Researchers from Princeton University have discovered a way to bypass encryption of hard drives, using the property of RAM modules to store information for a short period of time even after a power outage.
Foreword
Since you need to have a key to access an encrypted hard disk, and it is, of course, stored in RAM - all you need is to get physical access to your PC for a few minutes. After rebooting from an external hard drive or USB Flash, a complete memory dump is made and the access key is extracted from it within a few minutes.
In this way, it is possible to obtain the encryption keys (and full access to the hard drive) used by BitLocker, FileVault and dm-crypt programs in Windows Vista, Mac OS X and Linux operating systems, as well as the popular free hard drive encryption system TrueCrypt.
The importance of this work lies in the fact that there is not a single simple method of protection against this method of hacking, except for turning off the power for a sufficient time to completely erase the data.
A clear demonstration of the process is presented in video.
annotation
Contrary to popular belief, DRAM, which is used in most modern computers, retains data even after a power outage for a few seconds or minutes, and this happens at room temperature and even if the microcircuit is removed from the motherboard. This time is quite enough to take a complete dump of the main memory. We will show that this phenomenon allows an attacker with physical access to the system to bypass the OS functions to protect data about cryptographic keys. We will show how a reboot can be used to launch successful attacks against known hard drive encryption systems without using any specialized devices or materials. We will experimentally determine the degree and probability of retention of residual magnetization and show that the time it takes to take data can be significantly increased using simple techniques. Also, new methods will be proposed for searching for cryptographic keys in memory dumps and correcting errors associated with loss of bits. We will also talk about several ways to reduce these risks, but we do not know of a simple solution.
Introduction
Most experts assume that data from a computer's RAM is erased almost instantly after a power outage, or believe that residual data is extremely difficult to extract without the use of special equipment. We will show that these assumptions are incorrect. Conventional DRAM memory loses data gradually over a few seconds, even at normal temperatures, and even if the memory chip is removed from the motherboard, the data will remain in it for minutes or even hours, provided this chip is stored at low temperatures. Residual data can be recovered using simple methods that require short-term physical access to the computer.
We will show a number of attacks that, using DRAM's remanent magnetization effects, will allow us to recover encryption keys stored in memory. This poses a real threat to laptop users who rely on hard drive encryption systems. Indeed, if an attacker steals a laptop, at the moment when the encrypted drive is connected, he will be able to carry out one of our attacks to access the contents, even if the laptop itself is locked or is in sleep mode. We will demonstrate this by successfully attacking several popular encryption systems such as BitLocker, TrueCrypt, and FileVault. These attacks should be successful against other encryption systems as well.
Although we focused our efforts on encryption systems for hard drives, in the event of physical access to a computer by an attacker, any important information stored in RAM can become an object for attack. Many other security systems are likely to be vulnerable. For example, we found that Mac OS X leaves account passwords in memory from where we can retrieve them, and we also carried out attacks on obtaining the private RSA keys of the Apache web server.
Some members of the information security and semiconductor physics communities were already aware of the DRAM's remanent magnetization effect, and there was very little information about it. As a result, many who design, develop, or use security systems are simply unfamiliar with this phenomenon and how easily it can be exploited by an attacker. As far as we know, this is the first detailed work examining the implications of these phenomena for information security.
Attacks on encrypted disks
Encrypting hard drives is a well-known protection against data theft. Many people believe that encryption systems for hard drives will help protect their data, even if an attacker gained physical access to a computer (in fact, they are needed for this, editor's note). California law, passed in 2002, requires you to report possible disclosures of personal information only if the data has not been encrypted. data encryption is considered to be a sufficient security measure. Although the law does not describe any specific technical solutions, many experts recommend using encryption systems for hard drives or partitions, which will be considered sufficient measures for protection. Our research has shown that the belief in disk encryption is unfounded. An attacker who is far from being of the highest skill can bypass many widely used encryption systems if a laptop with data is stolen while it was turned on or was in sleep mode. And the data on a laptop can be read even when it is on an encrypted disk, so the use of hard disk encryption systems is not a sufficient measure.
We have used several types of attacks on well-known hard disk encryption systems. The most time consuming installation of encrypted disks and checking the correctness of the detected encryption keys. Capturing a RAM image and searching for keys took only a few minutes and was fully automated. There is reason to believe that most hard disk encryption systems are susceptible to such attacks.
BitLocker
BitLocker is a system included with some versions of Windows Vista. It functions as a driver between the file system and the hard disk driver, encrypting and decrypting selected sectors on demand. The keys used for encryption remain in RAM as long as the encrypted disk is dummy.
BitLocker uses the same AES-generated key pair to encrypt each sector of the hard drive: a sector encryption key and an encrypted block chaining (CBC) encryption key. These two keys, in turn, are encrypted with the master key. To encrypt a sector, a plaintext binary addition is performed with a session key generated by encrypting the sector offset byte with the sector encryption key. Then, the received data is processed by two mixing functions that use the Elephant algorithm developed by Microsoft. These keyless functions are used to increase the number of changes in all cipher bits and, accordingly, increase the uncertainty of the encrypted sector data. In the last step, the data is encrypted with the AES algorithm in CBC mode, using the appropriate encryption key. The initialization vector is determined by encrypting the sector offset byte with an encryption key used in CBC mode.
We have implemented a fully automated demo attack called BitUnlocker. It uses an external USB disk with Linux OS and a modified SYSLINUX-based bootloader and a FUSE driver that allows you to connect BitLocker-encrypted disks in Linux. On the test computer running Windows Vista, the power was turned off, the USB hard drive was plugged in and booted from it. After that, BitUnlocker automatically dumped the RAM to an external drive, using the keyfind program, it searched for possible keys, tested all suitable options (pairs of sector encryption key and CBC mode key), and, if successful, connected the encrypted drive. As soon as the disk was connected, it became possible to work with it as with any other disk. On a modern laptop with 2 gigabytes of RAM, the process took about 25 minutes.
It is noteworthy that this attack became possible to carry out without reverse engineering of any software. Microsoft documentation describes BitLocker enough to understand the role of the sector encryption key and the CBC mode key and to create a custom program that implements the entire process.
The main difference between BitLocker and other programs of this class is the way of storing keys when the encrypted drive is disconnected. By default, in basic mode, BitLocker protects the master key only with the TPM module, which exists on many modern PCs. This method, which is apparently widely used, is especially vulnerable to our attack, since it allows us to obtain encryption keys even if the computer has been turned off for a long time, since when the PC boots up, the keys are automatically loaded into RAM (before login windows) without entering any credentials.
Apparently, Microsoft experts are familiar with this problem and therefore recommend that you configure BitLocker in an improved mode, where keys are protected, not only using TPM, but also with a password or a key on an external USB drive. But, even in this mode, the system is vulnerable if an attacker gains physical access to the PC at the moment when it is running (it may even be locked or in hibernation mode, (states - just off or hibernate in this case are considered not affected by this attack).
FileVault
Apple's FileVault system has been partially researched and reverse-engineered. On Mac OS X 10.4, FileVault uses a 128-bit AES key in CBC mode. When the user password is entered, the header is decrypted containing the AES key and the second key K2, which is used to calculate the initialization vectors. The initialization vector for the I-th block of the disc is calculated as HMAC-SHA1 K2 (I).
We used our EFI program to capture RAM images to retrieve data from a Macintosh computer (based on an Intel processor) with a connected drive encrypted with FileVault. The keyfind program then flawlessly and automatically found the AES keys for the FileVault.
Without the initialization vector, but with the obtained AES key, it becomes possible to decrypt 4080 out of 4096 bytes of each disk block (everything except the first AES block). We made sure that the initialization vector is also in the dump. Assuming that the data did not have time to distort, the attacker can determine the vector by alternately trying all 160-bit lines in the dump and checking if they can form a possible plaintext when they are binary added with the decrypted first part of the block. Together, using programs like vilefault, AES keys and an initialization vector allow you to completely decrypt an encrypted disk.
While investigating FileVault, we found that Mac OS X 10.4 and 10.5 leave multiple copies of a user's password in memory, where they are vulnerable to this attack. Account passwords are often used to protect keys, which in turn can be used to protect passphrases on FileVault-encrypted drives.
TrueCrypt
TrueCrypt is a popular open source encryption system that runs on Windows, MacOS, and Linux. It supports many algorithms including AES, Serpent and Twofish. In the 4th version, all algorithms worked in LRW mode; in the current 5th version, they use XTS mode. TrueCrypt stores the encryption key and tweak key in the partition header on each disk, which is encrypted with a different key derived from the password entered by the user.
We tested TrueCrypt 4.3a and 5.0a running Linux. We plugged in a disk encrypted with a 256-bit AES key, then turned off the power and used our own memory dump software to load. In both cases, keyfind found a 256-bit intact encryption key. Also, in the case of TrueCrypt 5.0.a, keyfind was able to recover the tweak key of the XTS mode.
To decrypt disks created by TrueCrypt 4, you need an LRW tweak key. We found that the system stores it in four words before the key schedule of the AES key. In our dump, the LRW key was not corrupted. (In case of errors, we could still recover the key).
Dm-crypt
The Linux kernel since version 2.6 includes built-in support for dm-crypt, a disk encryption subsystem. Dm-crypt uses many algorithms and modes, but by default it uses 128-bit AES cipher in CBC mode with non-keyed initialization vectors.
We tested the created dm-crypt partition using the LUKS (Linux Unified Key Setup) branch of the cryptsetup utility and the 2.6.20 kernel. The disk was encrypted with AES in CBC mode. We briefly turned off the power and, using a modified PXE bootloader, made a memory dump. Keyfind found a valid 128-bit AES key, which was recovered without any errors. After restoring it, an attacker can decrypt and mount the encrypted dm-crypt partition by modifying the cryptsetup utility so that it accepts the keys in the required format.
Protection methods and their limitations
Implementation of protection against attacks on RAM is not trivial, since the used cryptographic keys must be stored somewhere. We suggest focusing efforts on destroying or hiding keys before an attacker can physically gain access to the PC, preventing RAM dump software from running, physically protecting the RAM chips, and minimizing the storage life of the data in RAM if possible.
Overwrite memory
First of all, you should avoid storing keys in RAM whenever possible. It is necessary to overwrite key information when it is no longer in use and to prevent data being copied to paging files. The memory must be cleared in advance by means of the OS or additional libraries. Naturally, these measures will not protect the keys currently in use, since they must be stored in memory, for example, keys such as those used for encrypted disks or on secure web servers.
Also, the RAM must be cleared during the boot process. Some PCs can be configured to flush RAM on boot using a Power-on Self-Test (POST) request before booting the OS. If the attacker cannot prevent the execution of this request, then on this PC he will not be able to dump the memory with important information. But, he still has the ability to pull out the RAM chips and insert them into another PC with the necessary BIOS settings.
Limiting downloads from the network or from removable media
Many of our attacks have been implemented using booting over the network or from removable media. The PC must be configured to require an administrator password to boot from these sources. But, it should be noted that even if the system is configured to boot only from the primary hard drive, an attacker can change the hard drive itself, or in many cases, reset the computer's NVRAM to roll back to the initial BIOS settings.
Safe sleep mode
The results of the study showed that simply blocking the PC desktop (i.e., the OS continues to work, but in order to start interacting with it, you need to enter a password) does not protect the contents of RAM. Hibernation is also ineffective if the PC locks up when it returns from hibernation, because an attacker could activate hibernation, then restart the laptop and take a memory dump. The hibernate mode (the contents of the RAM are copied to the hard disk) will also not help, except in cases of using key information on alienated media to restore normal operation.
In most hard drive encryption systems, users can protect themselves by shutting down their PC. (The Bitlocker system in the base mode of the TPM module remains vulnerable, since the disk will be connected automatically when the PC is turned on). The contents of the memory can persist for a short period after shutdown, so it is recommended to watch your workstation for another couple of minutes. Despite its effectiveness, this measure is extremely inconvenient due to the long loading of workstations.
The transition to sleep mode can be secured in the following ways: require a password or some other secret to "wake up" the workstation and encrypt the contents of the memory with a key derived from this password. The password must be strong, since an attacker can make a memory dump and then try to brute force the password. If encryption of the entire memory is not possible, then only those areas that contain key information need to be encrypted. Some systems can be configured to enter this type of protected hibernation, although this is usually not the default setting.
Refusal of preliminary calculations
Our research has shown that using pre-computation to speed up cryptographic operations makes key information more vulnerable. Preliminary calculations lead to the fact that there is redundant information about key data in memory, which allows an attacker to recover keys even in the event of errors. For example, as described in Section 5, information about the iterative keys of the AES and DES algorithms is extremely redundant and useful to an attacker.
Avoiding precalculations will reduce performance because potentially complex computations will have to be repeated. But, for example, you can cache pre-calculated values for a certain period of time and erase the received data if they are not used during this interval. This approach represents a trade-off between security and system performance.
Key expansion
Another way to prevent key recovery is to change key information stored in memory in such a way as to complicate key recovery due to various errors. This method was considered in theory, where it was shown a function that is resistant to disclosure, whose input data remains hidden even if almost all of the output data was detected, which is very similar to the work of one-way functions.
In practice, imagine that we have a 256-bit AES key K, which is not currently in use, but will be needed later. We cannot overwrite it, but we want to make it resistant to recovery attempts. One way to achieve this is to allocate a large B-bit data area, fill it with random data R, and then store the result of the next transformation K + H (R) in memory (binary summation, ed.), Where H is a hash function like SHA-256.
Now imagine that the electricity has been turned off, this will cause the d bits in this area to be changed. If the hash function is strong, when trying to recover the key K, the attacker can only rely on the fact that he will be able to guess which bits of area B were changed out of about half that might have changed. If d bits have been changed, the attacker will have to search for an area of size (B / 2 + d) / d to find the correct values of R and then recover the key K. If the area B is large, such a search can be very long, even if d is relatively small.
In theory, this way we can store all the keys, calculating each key only when we need it, and deleting it when we don't need it. Thus, using the above method, we can store keys in memory.
Physical protection
Some of our attacks relied on physical access to memory chips. Such attacks can be prevented by physical memory protection. For example, memory modules are housed in a closed PC case, or sealed with epoxy glue to prevent attempts to remove or access them. Also, memory wiping can be implemented as a response to low temperatures or attempts to open the case. This method will require the installation of sensors with an independent power supply system. Many of these methods involve tamper-proof hardware (such as the IBM 4758 coprocessor) and can greatly increase the cost of a workstation. On the other hand, using memory soldered to the motherboard is much cheaper.
Changing architecture
The architecture of the PC can be changed. Which is impossible for already used PCs, but it will allow you to secure new ones.
The first approach is to design DRAM modules in such a way that they erase all data faster. This can be tricky, as the goal of erasing data as quickly as possible contradicts another goal so that data does not disappear between memory refresh periods.
Another approach is to add hardware for storing key information, which would be guaranteed to erase all information from its storages at startup, restart and shutdown. Thus, we will get a reliable place to store several keys, although the vulnerability associated with their pre-computation will remain.
Other experts have proposed an architecture in which the contents of the memory will be permanently encrypted. If, in addition to this, we implement the erasure of keys upon reboot and power outage, then this method will provide sufficient protection against the attacks described by us.
Trusted Computing
Hardware conforming to the concept of "trusted computing", for example, in the form of TPM modules, is already used in some PCs. While useful in defending against some attacks, in its current form, such hardware does not help prevent the attacks we have described.
The TPMs used do not implement full encryption. Instead, they watch the boot process to decide whether it is safe to boot the key into RAM or not. If the software needs to use a key, then the following technology can be implemented: the key, in a usable form, will not be stored in RAM until the boot process follows the expected scenario. But, as soon as the key is in RAM, it immediately becomes a target for our attacks. TPMs can prevent the key from being loaded into memory, but they do not prevent it from being read from memory.
conclusions
Contrary to popular belief, DRAM modules store data for a relatively long time when disabled. Our experiments have shown that this phenomenon allows us to implement a whole class of attacks that allow us to obtain important data, such as encryption keys from RAM, despite the OS's attempts to protect its contents. The attacks we have described are realizable in practice, and our examples of attacks on popular encryption systems prove this.
But other types of software are also vulnerable. Digital rights management (DRM) systems often use symmetric keys stored in memory and can also be obtained using the methods described. As we have shown, SSL-enabled web servers are also vulnerable because they store in memory the private keys needed to create SSL sessions. Our search methods for key information are likely to be effective in finding passwords, account numbers, and any other sensitive information stored in RAM.
It seems that there is no easy way to fix the vulnerabilities found. Changing the software will most likely not be effective; hardware changes will help, but time and resource costs will be high; technology of "trusted computing" in its current form is just as ineffective because it cannot protect the keys in memory.
In our opinion, laptops, which are often located in public places and operate in modes vulnerable to these attacks, are most at risk for this risk. The presence of such risks shows that disk encryption protects important data to a lesser extent than is commonly believed.
As a result, you may have to consider DRAM memory as an untrusted component of a modern PC, and avoid processing important confidential information in it. But this is not practical at the moment, until the architecture of modern PCs changes to allow software to store keys in a safe place.
Many people use the Windows encryption feature, but not everyone thinks about the security of this method of protecting data. Today we will talk about Bitlocker encryption and try to figure out how well Windows disk protection is implemented.
By the way, you can read about how to set up Bitlocker in the article ““.
- Foreword
- How Bitlocker works
- Vulnerabilities
- Recovery keys
- Opening BitLocker
- BitLocker To Go
- Conclusion
This article was written for research purposes. All information in it is for informational purposes only. It is addressed to security professionals and those who want to become one.
How Bitlocker works
What is Bitlocker?
BitLocker is a native disk encryption feature in Windows 7, 8, 8.1, 10. This feature allows you to securely encrypt sensitive data on your computer, both on HDD and SSD, and on removable media.
How does BitLocker work?
BitLocker reliability should not be judged by the reputation of AES. A popular encryption standard may not have frankly weak points, but its implementations in specific cryptographic products often abound in them. Microsoft does not disclose the full code of BitLocker technology. It is only known that in different versions of Windows it was based on different schemes, and the changes were not commented on in any way. Moreover, in build 10586 of Windows 10, it simply disappeared, and after two builds it reappeared. However, first things first.
The first version of BitLocker used Ciphertext Block Chaining (CBC) mode. Even then, its shortcomings were obvious: the ease of attack using a well-known text, poor resistance to attacks such as spoofing, and so on. Therefore, Microsoft immediately decided to strengthen the protection. Already in Vista, the Elephant Diffuser algorithm was added to the AES-CBC scheme, making it difficult to directly compare ciphertext blocks. With it, the same contents of two sectors gave completely different results after encryption with one key, which complicated the calculation of the general pattern. However, the default key itself was short - 128 bits. It can be lengthened to 256 bits through administrative policies, but is it worth doing?
For users, after changing the key, outwardly nothing will change - neither the length of the entered passwords, nor the subjective speed of operations. Like most full disk encryption systems, BitLocker uses multiple keys ... and none of them can be seen by users. Here is a schematic diagram of BitLocker.
- When BitLocker is activated using a pseudo-random number generator, a master bit sequence is generated. This volume encryption key is FVEK (full volume encryption key). It is with them that the contents of each sector are encrypted from now on.
- In turn, FVEK is encrypted using another key - VMK (volume master key) - and stored encrypted among the volume metadata.
- The VMK itself is also encrypted, but in different ways at the user's choice.
- On newer motherboards, the VMK is encrypted by default using an SRK (storage root key), which is stored in a separate cryptoprocessor - a trusted platform module (TPM). The user does not have access to the TPM content and is unique to each computer.
- If there is no separate TPM chip on the board, then instead of SRK, to encrypt the VMK key, a user-entered PIN code or a USB-Flash drive connected upon request with key information pre-recorded on it is used.
- In addition to the TPM or USB stick, you can protect the VMK with a password.
This general pattern of BitLocker has continued in subsequent releases of Windows until today. However, BitLocker's key generation and encryption modes have changed. So, in October 2014, Microsoft quietly removed the additional Elephant Diffuser algorithm, leaving only the AES-CBC scheme with its known shortcomings. At first, no official statements were made about this. People were simply given a weakened encryption technology with the former name under the guise of an update. Vague explanations for this move came after independent researchers noticed BitLocker simplifications.
Formally, the abandonment of Elephant Diffuser was required to ensure Windows compliance with US Federal Information Processing Standards (FIPS), but one argument refutes this version: Vista and Windows 7, which used the Elephant Diffuser, were sold in America without problems.
Another apparent reason for abandoning the additional algorithm is the lack of hardware acceleration for the Elephant Diffuser and the loss in speed when using it. However, in earlier years, when the processors were slower, the encryption speed was ok for some reason. And the same AES was widely used even before there were separate instruction sets and specialized chips to accelerate it. Over time, it was possible to make hardware acceleration for the Elephant Diffuser, or at least give customers a choice between speed and safety.
Another, unofficial version looks more realistic. "Elephant" interfered with employees who wanted to spend less effort decrypting the next disk, and Microsoft willingly interacts with the authorities even in cases where their requests are not entirely legal. Indirectly confirms the conspiracy theory and the fact that before Windows 8, BitLocker used the Windows built-in pseudo-random number generator to generate encryption keys. In many (if not all) editions of Windows, this was Dual_EC_DRBG, a "cryptographically strong PRNG" developed by the US National Security Agency and containing a number of inherent vulnerabilities.
Of course, the secret weakening of the built-in encryption drew a strong wave of criticism. Under her pressure, Microsoft rewrote BitLocker again, replacing the PRNG in new releases of Windows with CTR_DRBG. Additionally, in Windows 10 (starting with build 1511), the default encryption scheme is AES-XTS, which is immune to manipulation of ciphertext blocks. The latest builds of the Top 10 have addressed other known BitLocker bugs, but the main problem still remains. It is so absurd that it makes other innovations meaningless. It is about the principles of key management.
The task of decrypting BitLocker drives is also simplified by the fact that Microsoft is actively promoting an alternative method of restoring access to data through the Data Recovery Agent. The meaning of the "Agent" is that it encrypts the encryption keys of all drives within the enterprise network with a single access key. Having obtained it, you can decrypt any key, and therefore any disk used by the same company. Comfortable? Yes, especially for hacking.
The idea of using one key for all locks has already compromised itself many times, but they continue to return to it in one form or another for the sake of convenience. Here is how Ralph Leighton wrote down the memoirs of Richard Feynman about one characteristic episode of his work on the Manhattan Project at the Los Alamos Laboratory: “… I opened three safes - and all three in one combination. I finished all of them: I opened the safes with all the secrets of the atomic bomb - the technology for obtaining plutonium, a description of the purification process, information about how much material is needed, how the bomb works, how neutrons are obtained, how the bomb works, what its dimensions are, in a word, everything. what they knew in Los Alamos, the whole kitchen! "
BitLocker is somewhat similar to the safe device described in another excerpt from the book "You, of course, are kidding, Mr. Feynman!" The most imposing safe in the top-secret laboratory had the same vulnerability as a simple filing cabinet. “… It was the colonel, and he had a much more cunning, two-door safe with large handles that pulled four three-quarter-inch-thick steel rods out of the frame. I examined the back of one of the imposing bronze doors and found that the digital dial was connected to a small padlock that looked exactly like the lock on my Los Alamos closet. It was obvious that the leverage system depended on the same little rod that locked the filing cabinets. In depicting some activity, I began to twist the dial at random. Two minutes later - click! - the safe has opened. When the safe door or the top filing cabinet drawer is open, it is very easy to find the combination. This is what I did when you read my report, just to show you the danger. "
BitLocker crypto containers are quite reliable in and of themselves. If they bring you a BitLocker To Go-encrypted flash drive that came from nowhere, then you are unlikely to decrypt it in a reasonable time. However, in a real-world scenario using encrypted drives and removable media, there are many vulnerabilities that can be easily exploited to bypass BitLocker.
BitLocker vulnerabilities
You've probably noticed that when you first activate Bitlocker, you have to wait a long time. This is not surprising - the sector-by-sector encryption process can take several hours, because even all blocks of terabyte HDDs cannot be read faster. However, disabling BitLocker is almost instantaneous - how come?
The fact is that when disabled, Bitlocker does not decrypt the data. All sectors will remain encrypted with the FVEK key. It's just that access to this key will no longer be restricted in any way. All checks will be disabled, and the VMK will remain recorded among the metadata in cleartext. Each time the computer is turned on, the OS loader will read the VMK (already without TPM checking, requesting a key on a USB flash drive or a password), automatically decrypting FVEK by it, and then all files as they are accessed. For the user, everything will look like a complete lack of encryption, but the most attentive may notice a slight decrease in the performance of the disk subsystem. More precisely - no increase in speed after disabling encryption.
Interesting in this scheme and more. Despite the name (full disk encryption technology), some data is still unencrypted when using BitLocker. MBR and BS (unless the disk was initialized in GPT), bad sectors and metadata remain in the clear. The open bootloader gives you a lot of imagination. It is convenient to hide other malware in pseudo-bad sectors, and the metadata contains a lot of interesting things, including copies of keys. If Bitlocker is active, then they will be encrypted (but weaker than FVEK encrypts the contents of the sectors), and if it is deactivated, then they will simply be in cleartext. These are all potential attack vectors. They are potential because, in addition to them, there are much simpler and more universal ones.
Bitlocker recovery key
In addition to the FVEK, VMK, and SRK, BitLocker uses another type of key that is generated "just in case." These are recovery keys associated with another popular attack vector. Users are afraid to forget their password and lose access to the system, and Windows itself recommends them to make an emergency login. To do this, the BitLocker Encryption Wizard at the last stage suggests creating a recovery key. No refusal to create it is provided. You can only choose one of the key export options, each of which is very vulnerable.
In the default settings, the key is exported as a simple text file with a recognizable name: "BitLocker recovery key #", where the computer identifier is written instead of # (yes, right in the file name!). The key itself looks like this.
 If you've forgotten (or never knew) your BitLocker password, just look for the recovery key file. Surely it will be saved among the documents of the current user or on his USB flash drive. Maybe it's even printed on a piece of paper, as Microsoft recommends.

To quickly locate the recovery key, it is convenient to limit the search by extension (txt), creation date (if you know when you could have turned on BitLocker approximately) and file size (1388 bytes if the file was not edited). Once you find your recovery key, copy it. With it, you can bypass the standard authorization in BitLocker at any time. To do this, just press Esc and enter the recovery key. You will log in without any problems and can even change the password in BitLocker to an arbitrary one without specifying the old one!
Opening BitLocker
Real cryptographic the system is a compromise between convenience, speed and reliability. It should provide procedures for transparent encryption with decryption on the fly, methods for recovering forgotten passwords and convenient work with keys. All this weakens any system, no matter how robust algorithms it is based on. Therefore, it is not necessary to look for vulnerabilities directly in the Rijndael algorithm or in different schemes of the AES standard. It is much easier to find them precisely in the specifics of a particular implementation.
In the case of Microsoft, such "specifics" are enough. For example, copies of BitLocker keys are by default sent to SkyDrive and deposited in Active Directory.
Well, what if you lose them ... or Agent Smith asks. It is inconvenient to keep the client waiting, let alone the agent. For this reason, the comparison cryptographic strength AES-XTS and AES-CBC with Elephant Diffuser fades into the background, as well as recommendations to increase the key length. No matter how long it is, the attacker will easily get it in unencrypted form.
Retrieving escrowed keys from a Microsoft or AD account is the primary way to attack BitLocker. If the user has not registered an account in the Microsoft cloud, and his computer is not in the domain, then there are still ways to extract the encryption keys. During normal operation, their open copies are always stored in RAM (otherwise there would be no "transparent encryption"). This means that they are available in its dump and hibernation file.
Why are they even stored there?
Funny as it may seem - for convenience. BitLocker was designed to protect against offline attacks only. They are always accompanied by a reboot and connection of the disk in another OS, which leads to the cleaning of RAM. However, in the default settings, the OS performs a dump of the RAM when a failure occurs (which can be provoked) and writes all its contents to the hibernation file every time the computer goes into deep sleep. Therefore, if you recently logged on to Windows with BitLocker activated, there is a good chance to get a decrypted copy of the VMK, and with its help decrypt the FVEK and then the data itself along the chain.
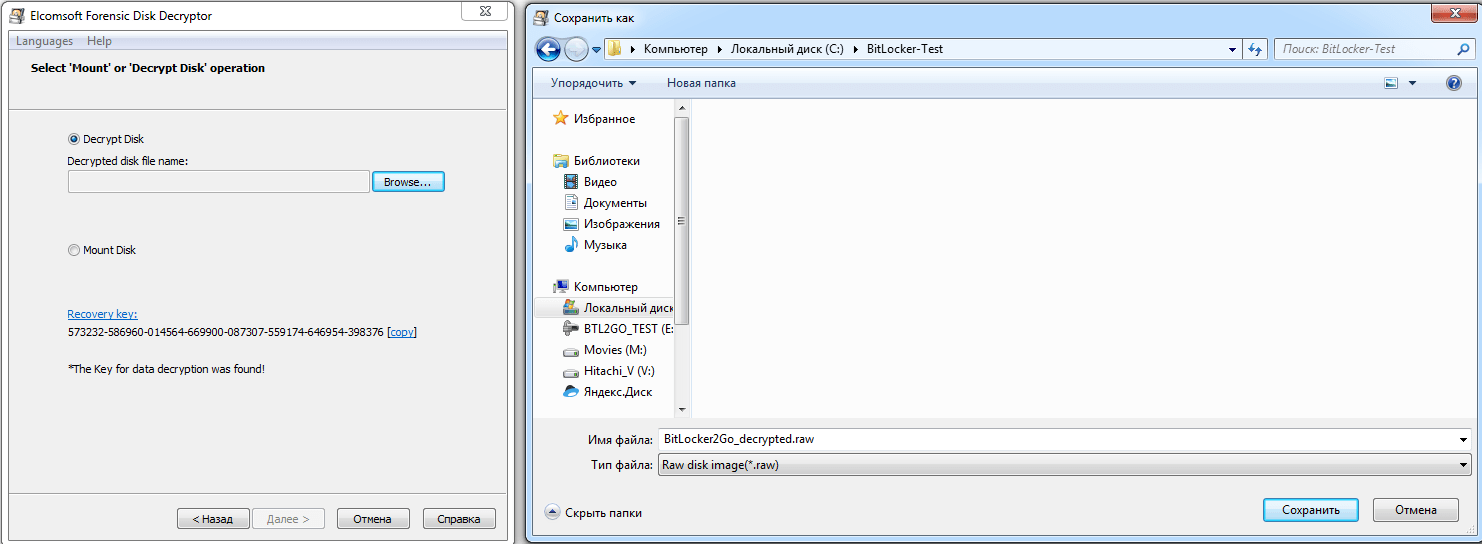
Check it out? All of the above methods of hacking BitLocker are collected in one program - Forensic Disk Decryptor, developed by the domestic company Elcomsoft. It can automatically extract encryption keys and mount encrypted volumes as virtual disks, decrypting them on the fly.
Additionally, EFDD implements another non-trivial method of obtaining keys - an attack through the FireWire port, which is advisable to use when there is no way to run your software on the attacked computer. We always install the EFDD program itself on our computer, and on the hacked one we try to do with the minimum necessary actions.
As an example, we will simply run a test system with BitLocker active and silently dump the memory. So we will simulate a situation in which a colleague went out to lunch and did not lock his computer. We launch RAM Capture and in less than a minute we get a full dump in a file with the .mem extension and a size corresponding to the amount of RAM installed on the victim's computer.
How to make a dump - by and large it makes no difference. Regardless of the extension, this will result in a binary file, which will be further automatically analyzed by EFDD in search of keys.
We write a dump to a USB flash drive or transfer it over the network, after which we sit down at our computer and launch EFDD.
 Select the "Extract keys" option and enter the path to the file with the memory dump as the key source.
 BitLocker is a typical crypto container like PGP Disk or TrueCrypt. These containers turned out to be quite reliable on their own, but client applications for working with them under Windows are littered with encryption keys in RAM. Therefore, EFDD implements a generic attack scenario. The program instantly finds encryption keys from all three types of popular crypto-containers. Therefore, you can leave all the boxes checked - what if the victim is secretly using or PGP!
After a few seconds, Elcomsoft Forensic Disk Decryptor shows all found keys in its window. For convenience, you can save them to a file - this will come in handy in the future.
 BitLocker is no longer a hindrance! You can carry out a classic offline attack - for example, pull out a hard drive and copy its contents. To do this, simply connect it to your computer and run EFDD in "decrypt or mount disk" mode.
After specifying the path to the files with the saved keys, EFDD of your choice will perform a complete decryption of the volume or immediately open it as a virtual disk. In the latter case, the files are decrypted as they are accessed. In any case, no changes are made to the original volume, so the next day you can return it as if nothing had happened. Working with EFDD happens without a trace and only with copies of data, and therefore remains invisible.
BitLocker To Go
Starting with the "seven" in Windows, it became possible to encrypt flash drives, USB-HDD and other external media. A technology called BitLocker To Go encrypts removable drives just like local drives. Encryption is enabled by the corresponding item in the Explorer context menu.
 For new drives, you can use encryption of only the occupied area - anyway, the free space of the partition is filled with zeros and there is nothing to hide there. If the drive has already been used, then it is recommended to enable full encryption on it. Otherwise, the space marked as free will remain unencrypted. It may contain recently deleted files in clear text that have not yet been overwritten.
 Even fast encryption of only a busy area takes from a few minutes to several hours. This time depends on the amount of data, the bandwidth of the interface, the characteristics of the drive, and the speed of the processor's cryptographic computations. Since encryption is accompanied by compression, the free space on the encrypted disk usually increases slightly.
The next time you connect the encrypted flash drive to any Windows 7 or higher computer, the BitLocker wizard will automatically invoke to unlock the drive. In the "Explorer", before unlocking, it will be displayed as a locked disk.
Here you can use both the already discussed BitLocker bypass options (for example, looking for VMK in a memory dump or hibernation file), and new ones related to recovery keys.
If you do not know the password, but you managed to find one of the keys (manually or using EFDD), then there are two main options for accessing the encrypted flash drive:
- use the built-in BitLocker wizard to work directly with the flash drive;
- use EFDD to fully decrypt a flash drive and create a sector-by-sector image of it.
 The first option allows you to immediately access the files recorded on the USB flash drive, copy or change them, as well as write your own. The second option takes much longer (from half an hour), but it has its own advantages. The decrypted sector-by-sector image allows for more sophisticated analysis of the file system at the forensic laboratory level. In this case, the flash drive itself is no longer needed and can be returned unchanged.
 The resulting image can be opened immediately in any program that supports the IMA format, or first converted to another format (for example, using UltraISO).
 Of course, in addition to discovering the recovery key for BitLocker2Go, all other BitLocker bypass methods are supported in EFDD. Just iterate through all the available options in a row until you find a key of any type. The rest (up to FVEK) will themselves be decrypted along the chain, and you will get full access to the disk.
Conclusion
BitLocker full disk encryption technology differs from version to version of Windows. After adequate configuration, it allows you to create encrypted containers, theoretically comparable in strength to TrueCrypt or PGP. However, the built-in key mechanism in Windows negates all algorithmic tricks. Specifically, the VMK used to decrypt the master key in BitLocker is recovered using EFDD in a few seconds from an escrowed duplicate, memory dump, hibernation file, or FireWire port attack.
Having received the key, you can perform a classic offline attack, discreetly copy and automatically decrypt all data on the "secure" disk. Therefore, BitLocker should only be used in conjunction with other protections: Encrypting File System (EFS), Rights Management Service (RMS), program launch control, device installation and connection control, and more stringent local policies and general security measures.
The article uses materials from the site:
Elcomsoft's Advanced EFS Data Recovery software can be used to crack the Encrypted File System (EFS). A demo version of this software can be obtained from http://www.elcomsoft.com/aefsdr.html
Start window of the program
Fig 3. Advanced EFS Data Recovery window
The program can decrypt protected files only if the encryption keys (not all, but at least some of them) still exist in the system and have not been changed.
For files encrypted in the Windows 2000 operating system, if the Account Database Key (SYSKEY) is stored on a floppy disk, or if the "Password Startup" option has been set, you must know one of the following passwords to be able to decrypt the files:
startup password or startup floppy
the password of the user who encrypted the files
Recovery Agent password (if possible)
If the computer was part of a domain when the files were encrypted, you may not be able to decrypt the files in some cases. If the password of the user (who encrypted the files) was changed after encryption, you may need to enter the old password into the program.
Cracking Windows 9x passwords
However, keep in mind that there is a much easier way to crack network passwords. Since in most organizations today the OS of the client machine is Windows 95/98, it is, accordingly, much easier to organize hacking of the password protection of this OS, because the password in such a file is stored only in uppercase (in capital letters), knowing this is much more convenient and easier to pick up required network password.
There are a large number of programs for cracking Windows 95/98 passwords, but let's dwell on the most popular of them PwlTool 6.0, which was used as an example for research.
Figure 3 shows the main working window of this program designed to work on computers with OS Windows 95/98, Windows NT / 2000.
PwlTool is a set of password recovery tools. The main program is RePwl. This program allows you to recover your sometimes forgotten or lost login password for Windows 95 (original version and OSR2) and Windows 98. It also allows you to view the passwords stored in the PWL file.
What is a pwl file?
Windows 95/98 stores the password in a PWL file. PWL files can be found in the Windows directory. Their names are usually saved as USERNAME.PWL. The PWL file is encrypted and it is not easy to extract passwords from it. The first encryption algorithm in Windows 95 was created in such a way that it was possible to create programs to decrypt PWL files. However, in OSR2, this flaw was eliminated.
Evaluating the reliability of pwl files.
The password protection system in OSR2 is professional and reliable in terms of cryptography. However, despite this, it contains several serious disadvantages, namely:
all passwords are converted to upper case, this significantly reduces the number of possible passwords;
The MD5 and RC4 algorithms used for encryption allow faster password encryption, but a valid Windows password must be at least nine characters long.
The password caching system is inherently insecure. The password can only be saved if no unauthorized personnel can access your computer.
How to hack wifi? Many of us have heard that when installing a Wi-Fi access point, in no case should you choose WEP encryption, since it is very easy to break. Probably, only a few have tried to do it on their own, and about the same number know how it all really looks. Below is described a variant of hacking a point with such an encryption protocol, so that you can more clearly understand how real the situation is when someone connects to your super secret point, and what such a hack is. Naturally, in no case should it be used on someone else's router. This material is for informational purposes only and calls for the abandonment of easily hacked encryption protocols.
To hack, an attacker will need:
- suitable Wi-Fi adapter with packet injection capability (for example, Alfa AWUS036H)
- BackTrack Live CD
- actually, your Wi-Fi access point with WEP encryption, on which the experiment will be performed
- patience
After launching the BackTrack command line called Konsole, enter the following command:
You will see your network interface named "ra0" or something like this. Remember this name. In the future, it will be referred to as (interface), and you replace it with your name. Then we enter 4 lines in sequence:
airmon-ng stop (interface)
ifconfig (interface) down
macchanger --mac 00: 11: 22: 33: 44: 55 (interface)
airmon-ng start (interface)

Now we have a fake MAC address. We introduce:
airodump-ng (interface)

A list of available wireless networks will appear. As soon as the desired network appears in the list, you can press Ctrl + C to stop the search. You need to copy the BSSID of the network and remember the channel (column CH). Also make sure WEP is listed in the ENC column.
Now we start collecting information from this grid:
airodump-ng -c (channel) -w (file name) --bssid (bssid) (interface)
channel is the channel from the CH column, file name is the name of the file to which everything will be written, and bssid is the network identifier.

You will see something similar to what is shown in the screenshot. Leave this window as it is. Open a new Konsole window and type:
aireplay-ng -1 0 -a (bssid) -h 00: 11: 22: 33: 44: 55 -e (essid) (interface)
essid - SSID name of the victim network.
We are waiting for the message "Association successful" to appear.

aireplay-ng -3 -b (bssid) -h 00: 11: 22: 33: 44: 55 (interface)
Now you need to be patient and wait until the number in the #Data column crosses the 10,000 mark.

When the required amount of collected data is reached, open the third Konsole window and enter:
aircrack-ng -b (bssid) (file name-01.cap)
The name is entered as the name you previously selected for the file.
If successful, you will see the line "KEY FOUND", which contains the key to the network.