For many of us, whose work tasks have been closely related to information security for at least some time, Nmap has long been a familiar and useful tool. It is as indispensable as a warm blanket on a cold winter night. Except that Nmap is a damn efficient quilt.
Nmap is a popular and powerful command-line cross-platform network security scanner that lets you explore any network extremely efficiently. It can also help you get an overview of the systems that have connected to your network; you can use it to find out the IP addresses of all live hosts, scan open ports and services running on those hosts, and much, much more.
Nmap is without a doubt the most versatile port scanner in existence. Yes, you can find faster scanners, but there is none that is so useful and simply indispensable for solving many, many of your tasks. And the vast majority of information security professionals would categorically agree with this statement.
However, far fewer people know that one of the most interesting features of Nmap is the ability to use NSE scripts, which will give your favorite network security tool even more flexibility and efficiency. With their help, you will be able to do what you would never expect from even a very advanced port scanner like Nmap.
Let's take a closer look at NSE scripts, and perhaps their potential can pleasantly surprise you.

In other words, in addition to the standard Nmap scan for open ports, you, using NSE, can also get extended information about the services running on it. So, for example, using NSE scripts, you can take a deeper analysis of your network services and see how well they are configured, what information is available, whether weak credentials are used, etc. In fact, NSE scripts make Nmap a flexible platform for interaction with network services.
Nmap Scripting Engine Scripting Features
The Nmap port scanner development team conceived and created a scripting engine primarily for solving problems such as:
1. Network research
This is the main practical area of Nmap. Several scripts are designed to facilitate, optimize and speed up your favorite port scanner. Some examples of their use include performing tasks such as:
- searching for WHOIS data (an application-level network protocol based on the TCP protocol; its main application is obtaining in text form registration data about the owners of domain names, IP addresses and autonomous systems) in the corresponding domains;
- Sending queries to major regional WHOIS servers ARIN (North America), RIPE (Europe and the Middle East) or APNIC (Asia and Pacific) to determine the owner of a specific IP address;
- identd search on open ports (allows you to identify users connected to them);
- execution of requests using the SNMP protocol (Internet protocol for managing devices in IP networks based on TCP / UDP architectures);
- compilation of lists of available resources and services via network protocols for remote access NFS, SMB or RPC.
2. A more sophisticated version of the definition of versions
Nmap's service and application versioning system is capable of recognizing thousands of different services using probes and regular expression signature matching, but it is not omnipotent either. For example, the identification of the Skype v2 service requires two independently operating probes, whose version detection capabilities are not very flexible. Nmap is also able to recognize some SNMP services if it tries to brute force several hundred community names. The standard Nmap versioning methods are not very convenient for both of the above tasks, but both are easily accomplished with NSE. For this reason, the versioning system now calls the NSE by default to handle the versioning problem when handling some complex services.
3. Search for vulnerabilities
When a new vulnerability is discovered, it becomes common knowledge, and network security professionals urgently need to scan their networks to quickly identify vulnerable systems, before the bad guys do it for them. While Nmap is not a full-fledged vulnerability scanner, NSE's powerful capabilities allow it to perform vulnerability checks even with very stringent requirements. For example, when a Heartbleed bug in the OpenSSL cryptographic software compromised hundreds of thousands of systems around the world, the Nmap developers responded by writing an ssl-heartbleed detection script within two days.
4. Backdoor detection
Many cyber intruders, as well as some automated worms, leave behind backdoors in order to provide themselves with a loophole for easier penetration into your system in the future. Some of these backdoors can be detected using standard Nmap versioning based on regex signature matching, but many more complex worms and backdoors require advanced NSE capabilities to reliably detect many more complex worms and backdoors. In particular, NSE is used to detect the DoublePulsar backdoor that exploits a vulnerability in the implementation of the SMB protocol, backdoor versions for the UnrealIRCd IRC server, and the vsftpd and ProFTPd FTP servers.
5. Vulnerability detection
Based on a general-purpose scripting language, NSE can even be used to create exploits that can help you discover vulnerabilities even before their existence becomes publicly available. This ability to add custom scripted exploits can be extremely useful for some people (primarily penetration testers). However, the NSE is not a full-fledged platform for creating signatures and exploits, like Metasploit.
What categories of NSE scripts are there?
There are currently 598 NSE scripts that you can find in the scripts folder, a subdirectory of the main Nmap directory. For better performance, all scripts are indexed in the "scripts / script.db" database, which indicates which category or categories each script belongs to.
Depending on the intended use, as well as to simplify their use, NSE scripts are grouped into different categories. The following categories of NSE scripts are currently defined: auth, broadcast, brute, default. discovery, dos, exploit, external, fuzzer, intrusive, malware, safe, version and vuln (category names are not case sensitive). Below is a more detailed view of each category:
- auth- This category of scripts deals with (or bypasses) authentication credentials on the target system. Examples of such scripts are "x11-access", "ftp-anon" and "oracle-enum-users". Note that scripts that use a brute force attack to attempt to determine credentials are categorized as brute.
- broadcast- scripts in this category are usually used to discover hosts not specified on the command line through broadband interaction with the local network. When using the "newtargets" script argument, they will automatically add the hosts they find to the scan queue.
- brute- This category of scripts is used to carry out brute force attacks to obtain the authentication credentials of the remote server. Nmap offers brute force attack scripts for dozens of protocols. These include the following scripts: "http-brute", "oracle-brute", "snmp-brute", etc.
- default- This category of scripts defines those scripts that are selected by the Nmap developers as useful for extending the functionality of the scanner or optimizing its operation, and are assigned to the base set "by default". They are run by using the "-sC" or "-A" options, and not by specifying a specific list of scripts using the "--script" option. It is possible to explicitly specify this category of scripts, like the others, using "--script = default". The Nmap team, when determining whether to categorize a particular script as default, tries to rely on the following requirements:
- speed- Scanning by default should complete quickly, which excludes the inclusion of brute force authentication crackers, web spiders, and any other scripts in this category, which scan time for one service is calculated in minutes or even hours.
- utility- Carrying out a scan in a default category requires valuable and relevant information. In other words, the scan result of such a script should be understandable and useful to the average network security professional. Otherwise, it doesn't make sense to run it by default.
- brevity- the output of the received information by the Nmap scanner is used for a variety of purposes and needs, so this information should be readable and concise. Scripts, which often create many pages with full output of all the information received, also do not belong in the default script category. In other words, NSE scripts that are categorized as default do not show anything in the report when they do not find any important information. This also applies to the default scripts that look for hidden vulnerabilities - they output the result only when these vulnerabilities are found.
- reliability- many scripts in their work can rely on the data of heuristic analysis and fuzzy signature match in order to draw certain conclusions about the target host or service. Examples of such scripts are "sniffer-detect" and "sql-injection". Such scripts will not be categorized by default, since the results of their work are often erroneous and can mislead the user who does not clearly understand all the specifics of their work.
- unobtrusiveness- some scripts are unnecessarily intrusive when they use significant resources of a remote system, which can lead to the failure of this system or service, or their actions can be regarded by remote administrators as an attack. Such scripts are also not included in the category by default. However, some "moderately aggressive" scripts have been categorized as default by the Nmap team based on their usefulness and how well they can behave, considering other factors.
- confidentiality- many scripts can disclose confidential information to third parties, based on the very specifics of their work. For example, scripts to search for WHOIS data must report the target IP address to regional registrars. In other words, in the default NSE scripts category, the Nmap command tries not to add scripts that might compromise privacy.
- discovery- this category of scripts actively tries to learn more about the network by sending public requests to the registrar, SNMP-enabled devices, directory service, etc. Examples of such scripts are "html-title" (gets the title of the root path of websites), "smb-enum-shares" (lists Windows shares), and "snmp-sysdescr" (fetches detailed information about the system via standard Internet protocol for SNMP device management).
- dos- scripts in this category should be used with extreme caution, as they can lead to denial of service. They are sometimes used by security testers to test a system's vulnerability to denial of service attacks, but such testing can lead to unwanted side effects, such as causing some vulnerable services to fail.
- exploit- these scripts are aimed at actively exploiting a specific vulnerability. Examples of this category of scripts are "jdwp-exec" and "http-shellshock".
- external- scripts in this category can send data to third parties controlling databases or other network resources. An example of such a script is "whois-ip", which connects to WHOIS servers to obtain information about the target's IP address. There is always the possibility that the third party database operators will record everything you send them, which in many cases will include information about your IP address and the IP address of your target. Most scripts that deal exclusively with traffic between the scanning computer and the client do not fall into this category.
- fuzzer- This category of scripts is designed to send unexpected or randomized fields to the server software in every batch. While this method can be useful for finding unknown bugs and vulnerabilities in software, it is a slow process that is also bandwidth intensive. An example of scripts in this category is "dns-fuzz", which bombards the DNS server with partially altered domain queries until the server goes down or a user-set time limit expires.
- intrusive- this category of scripts includes those that cannot be classified as safe (safe), since the risks are too high that the target system will collapse under their pressure, will require significant resources on the target host (for example, bandwidth or processor time), or some otherwise, their execution will be perceived by the administrators of the target system as malicious activity. Examples of such scripts are "http-open-proxy" (which tries to use the target server as an HTTP proxy) and "snmp-brute" (which tries to guess the so-called "community string" of SNMP devices by sending popular values such as public, private, and cisco). If a script does not belong to the special version category, it must be classified as safe or intrusive.
- malware- These scripts check if the target platform is infected with malware or backdoors. Examples of scripts in this script category are "smtp-strangeport", which monitors SMTP servers running on unusual port numbers, and "auth-spoof", which detects spoofed identd daemons (which implement user authentication protocol support) that provide a fake response yet. before receiving the request. For the first and for the second example, such behavior, if detected, is usually a sign of a system infection with malicious software.
- safe- all scripts that were not created to cause service failure, use large amounts of network bandwidth or other resources, or were not aimed at exploiting security holes, are categorized as safe. They are much less likely to attract the attention of remote administrators, although (as with any other Nmap functionality) they cannot be 100% guaranteed that they will never attract collateral attention. Most of these scripts perform general network exploration tasks. Examples of scripts in this category are "ssh-hostkey" (gets the host's SSH key) and "html-title" (grabs the title from the web page). Scripts in the version category are not categorized as safe, but other scripts that are not safe must be defined as intrusive.
- version- scripts from this special category are extensions of version detection functionality and cannot be selected explicitly. They are only selected to run when asked to determine the Nmap version ("-sV"). Their output cannot be separated from the output of the versioning function, and they do not act like host or service scripts. Examples of such scripts are "skypev2-version", "pptp-version" and "iax2-version".
- vuln- scripts in this category perform checks for a specific known vulnerability and usually return only those results that confirm that such a vulnerability has been found. Examples of such scripts are "realvnc-auth-bypass" and "afp-path-vuln".

Scripts, depending on their functional focus, as well as the scanning phase during which they are executed, are divided into four types (some scripts can support several types of operations at once):
- Prerule scripts - this type of scripts are run even before any Nmap operations are performed, respectively, they are executed before the scanning stage, when Nmap has not yet collected any information about the target. These scripts can be useful for performing tasks that are independent of specific scan targets, such as making broadcast requests to poll DHCP and DNS SD servers. Some of these scripts can create new targets for Nmap scans (only if you specify the "newtargets" NSE argument). So, for example, the dns-zone-transfer script can get a list of IP addresses in a domain using a zone transfer request, and then automatically add them to the list of targets for Nmap scans. Prerule scripts are identified using the prerule function.
- Host scripts - These scripts are run during the normal Nmap scan process, after the Nmap scanner has performed normal operations such as host discovery, port scanning, version detection, and OS discovery on the target host. This type of script is called once for each target host that matches its hostrule function. Examples include the "whois-ip" scripts, which looks for owner information for the target IP address, and "path-mtu", which tries to determine the maximum IP packet size that can reach the target without requiring fragmentation.
- Service scripts - This type of script is run when certain services are found on the target host. For example, Nmap includes more than 15 http service scripts that run to work with web servers. If the host has web servers running on multiple ports, these scripts can be executed multiple times (one for each port). These are the most common type of scripts in Nmap, and they differ in that they contain a portrule function to determine which of the detected services the script should run against.
- Postrule scripts - This type of script is run once, after Nmap has scanned all of the intended targets. They can be useful for formatting and presenting the output from the Nmap scanner. For example, the "ssh-hostkey" script is more commonly known as a service script (with the portrule function specified) that connects to SSH servers, discovers their public keys, and prints them. But it also includes the postrule functionality, which checks for duplicate keys among all verified hosts, and then prints all found ones. Another potentially possible use of this type of script is to reverse-print the output of an Nmap scanner — for example, listing all hosts running a particular service, rather than simply listing all hosts running services on them. Postrule scripts are identified using the postrule function.
Note: many scripts can run as a prerule script or as a postrule script. In these cases, it is recommended to use the prerule functionality to avoid inconsistencies.

The eternal paranoid, Anton Kochukov.
See also:
Below you will find 20 basic examples of using the Nmap command.
You will learn how to use Nmap from command line in Linux to find active hosts on the network and scan open ports.
You will see how remotely identify the operating system using TCP / IP stack fingerprints and how find out the software version running on a remote server.
I will also show you how to use Nmap to implement covert scanning, how define a firewall And How spoof MAC address.
1. Scan One Host or IP Address
Scan Separate IP Address:
$ nmap 192.168.1.1
Scan server by Host Name:
$ nmap server.site
Increase Level of detail scan results:
$ nmap -v server..site
2. Scanning Multiple IP Addresses
Scan Multiple IP Addresses:
$ nmap 192.168.1.1 192.168.1.2 192.168.1.3 $ namp 192.168.1.1,2,3
Scan Subnet:
$ nmap 192.168.1.0/24 $ nmap 192.168.1. *
Scan IP Address Range (192.168.1.0 — 192.168.1.200):
$ nmap 192.168.1.0-200
3. Searching for Active Computers on the Net
Useful advice: Scan the network with just one ping command! Calculate all active computers!
Scan network in search Active Hosts:
$ nmap -sn 192.168.1.0/24
4. Scanning the Host List from File
Scanning a list of hosts / networks from File:
$ nmap -iL input.txt
File format:
# Entries can be in any of the formats that Nmap can handle from the command line (IP addresses, hostnames, CIDR, IPv6, or octet # ranges). Entries must be separated by one or more spaces, # tabs, or newlines. $ cat input.txt server.site 192.168.1.0/24 192.168.2.1,2,3 192.168.3.0-200
5. Excluding IP / Hosts / Networks from Scanning
Exclude Targets from Nmap scan:
$ nmap 192.168.1.0/24 --exclude 192.168.1.1 $ nmap 192.168.1.0/24 --exclude 192.168.1.1 192.168.1.5 $ nmap 192.168.1.0/24 --exclude 192.168.1.1,2,3
Exclude List hosts taken from file:
$ nmap 192.168.1.0/24 --excludefile exclude.txt
The excluded hosts file format is the same as above.
6. Scanning Specific Ports
Scan One Port:
$ nmap -p 80 192.168.1.1
Scan Multiple Ports:
$ nmap -p 80,443 192.168.1.1
Scan Port Range:
$ nmap -p 80-1000 192.168.1.1
Scan All Ports:
$ nmap -p "*" 192.168.1.1
Scan some of the most Common Ports:
$ nmap --top-ports 5 192.168.1.1 $ nmap --top-ports 10 192.168.1.1
7. Determine Supported IP Protocols
Determine which IP Protocols(TCP, UDP, ICMP, etc.) supports scanned host:
$ nmap -sO 192.168.1.1
8. Scanning TCP / UDP Ports
Scan all TCP Ports:
$ nmap -sT 192.168.1.1
Scan specific TCP Ports:
$ nmap -p T: 80 192.168.1.1
Scan all UDP Ports:
$ nmap -sU 192.168.1.1
Scan specific UDP Ports:
$ nmap -p U: 53 192.168.1.1
Combining different port scans:
$ nmap -p U: 53,79,113, T: 21-25,80,443,8080 192.168.1.1
9. Fast Scan
Activate Fast Mode scan:
$ nmap -F 192.168.1.1
* Scans fewer ports than a normal scan.
10. Show Port Status Reason
Show The reason, according to which Nmap considers the port to be in a certain state:
$ nmap --reason 192.168.1.1
11. Show Only Open Ports
Show Open Ports Only(or possibly open):
$ nmap --open 192.168.1.1
12. Definition of OS
One of the most well-known features of Nmap is remote OS detection based on analysis of the TCP / IP stack.Nmap sends a series of TCP and UDP packets to the remote host and examines the responses.
After performing many tests, Nmap compares the results with its database and, when a match is found, displays information about the OS.
Turn on Definition of OS:
$ nmap -O 192.168.1.1
13. Determining the Version of the Services
Turn on Determining the Version of the Services:
$ nmap -sV 192.168.1.1
* Determines the versions of programs running on the remote server.
14. Firewall detection
Find out if your computer is protected by any Batch Filters or Firewall:
$ nmap -sA 192.168.1.1
15. Spoofing MAC Address
Substitute MAC Addresses:
$ nmap --spoof-mac 00: 11: 22: 33: 44: 55 192.168.1.1
Spoof MAC Address Random MAC:
$ nmap --spoof-mac 0 192.168.1.1
16. Scanning the Firewall for Vulnerabilities
These three types of scans exploit an invisible loophole in the TCP RFC to distinguish between open and closed ports.When an RFC-compliant system is scanned, any packet that does not have the SYN, RST, or ACK bit set will cause an RST to be sent in response if the port is closed, or no response if the port is open.
Because none of these bits are set, then any combination of the three remaining bits (FIN, PSH, and URG) will be correct.
TCP Null scanning:
$ nmap -sN 192.168.1.1
* No bits are set (Flags in TCP header 0).
TCP Fin scanning:
$ nmap -sF 192.168.1.1
* Only the TCP FIN bit is set.
TCP Xmas scanning:
$ nmap -sX 192.168.1.1
* FIN, PSH and URG flags are set (the package glows like a Christmas tree).
17. Covert Scan
Useful advice: Remain anonymous during port scans! Use Nmap + Tor + ProxyChains! Safe and Easy Penetration Testing!
TCP SYN scanning:
$ nmap -sS 192.168.0.1
* Known as half-open scan because it does not open full TCP connections.
18. Disable Host Discovery (No Ping)
Do not ping hosts before scanning:
$ nmap -Pn 192.168.1.1
19. Disable DNS Usage
Useful advice: Need to harden Linux security? Encrypt DNS traffic to prevent spoofing!
Never perform reverse DNS resolution for every active IP address found.
Nmap is a cult scanner that almost no hacker can do without, so the topic of expanding its capabilities, I think, is of interest to many. It is common practice to use other tools with Nmap. This article will discuss how to easily automate Nmap with your favorite tools. It is more convenient to "press one button" and get the result than to constantly do the same sequence of actions. Using scripts in Nmap can help hackers to more automatically break into systems, and sysadmins can check systems for default holes and fix them in a timely manner.
A few words about Nmap
I am sure that most of the readers of Hacker magazine know what Nmap is, and have probably used it more than once to explore the network and collect information. For those who have forgotten or do not know, just in case, let me remind you:
- Nmap is a cross-platform tool for scanning a network, checking its security, detecting OS versions and various services, and much more. It is a very flexible and easily extensible utility, and makes it such an NSE scripting engine;
- NSE (Nmap Scripting Engine) is an Nmap component with powerful capabilities that allows users to write scripts to automate a wide range of network tasks: more flexible interaction with the existing capabilities of Nmap, detection and exploitation of vulnerabilities, and more. NSE is based on the Lua language interpreter;
- Lua is a scripting language similar to JavaScript.
Formulation of the problem
As already mentioned, today we will be working on extending the functionality of Nmap by writing our own scripts. Any hack / penetration test usually starts with intelligence and data collection. One of the first to check is the presence of open ports on the host under investigation and the identification of running services. There is perhaps no better tool for collecting such information than Nmap. The next step after scanning is usually either a search for an exploit for a vulnerable service found, or a brute force method for selecting a login: password pair.
Let's say you are actively using the THC-Hydra brute-force to brute-force passwords for several services (for example, HTTP-Basic, SSH, MySQL). In this case, you have to set the hydra on each service separately, you need to remember the features of the services and the flags necessary to launch the hydra. And if there is a need to brute force much more than five services? .. Why not automate this?
Therefore, let's write a simple script that will automate the process of launching Hydra to brute force logins / passwords for one service (for example, PostgreSQL). For this we need the following tools:
- Nmap;
- THC-Hydra;
- any text editor.
If you don't already have Nmap and / or Hydra installed, fix it immediately:
$ sudo apt-get install nmap hydra
Okay, let's start. Nmap scripts are plain text files with the * .nse extension. So open your favorite text editor and create a new file. I will be using Vim:
$ vim hydra.nse
NSE script structure
Before proceeding to writing, it must be said that all scripts have a certain structure. In addition to the code itself, which automates certain actions, it contains a description of the script (what it is intended for and how to use it), information about the author, license, dependence on other scripts, categories to which the script belongs, and so on. Let's take a closer look at each of these parts.
Description of the script (description)
This section contains a description of the script, the author's comments, an example of displaying the script execution result on the screen, additional features.
For our script, which picks logins / passwords for PostgeSQL, the description will look like this:
Description = [[Brute force all services running on a target host. The results are returned in a table with each path, detected method, login and / or password. ]] --- - @usage - nmap --script hydra [--script-args "lpath =
A comment; - - multi-line comment; @usage, @output, @args - an example of calling a script, displaying the result on the screen, the required arguments when calling.
Above in @usage, we see the script launch format. In this case, only the name of the script (hydra) is specified. This becomes possible if the script is placed in the /
Categories in which the script is located (categories)
When writing an NSE script, you can specify its category (or several categories). This is useful when the Nmap user wants to use not a specific script, but a set of scripts that are in the same category. Examples of some categories:
- auth is the category in which scripts define the authentication data of the target host;
- brute - a category whose scripts help to define logins and passwords for various services;
- default is a category that contains main scripts. There are some criteria that determine whether a script belongs to this category: scanning speed, usefulness, reliability, confidentiality, visual output;
- malware is a category that helps identify malware.
For example, if you need to run all scripts from the auth category, the command will look like this:
$ nmap --script = auth example.com
In this case, scripts of this category will be launched in turn for the specified host. Our script belongs to the brute category. Let's add the following line to the file:
Categories = ("brute")
Information about the author (author)
Each script contains information about its author. In my case:
Author = "Olga Barinova"
Information about the used license (license)
Nmap welcomes all user development and encourages sharing, including NSE scripts. By specifying the license, you confirm the right to share the script with the community. A standard Nmap license looks like this:
License = "Same as Nmap - See http://nmap.org/book/man-legal.html"
Let's add this line to our script as well.
Dependencies from other scripts (dependencies)
This area contains the names of NSE scripts that must be executed before starting this script to obtain the necessary information. For example,
Dependencies = ("smb-brute").
In our case, this feature will not be needed, so we will not add dependencies.
Host and port
Nmap needs to know for which services and on which ports to run the script. There are special rules for this:
- prerule () - the script is executed once before scanning any host; it is used for some network operations;
- hostrule (host) - the script is executed for each host from the table that it takes as an argument;
- portrule (host, port) - the script is executed for each host and for each port from the tables that it takes as arguments;
- postrule () - the script is executed once after scanning any host. It is mainly used to process the results obtained, summarize statistics and the like.
There are libraries for the formation of such rules. In our script, you only need to specify the port number (5432) and the name of the service (postgresql), and then it will work only for this port and service. There is a fairly popular shortport library built into the NSE that includes various methods. We will use the method
Port_or_service (ports, services, protos, states)
where ports are port numbers, services are service names, protos are protocol names (for example, udp), states are states.
This method returns true if a service is currently being analyzed that is located on one of the ports from the ports list or corresponds to some service from the services list, in addition, the protocol and state are checked for compliance, otherwise false is returned.
For our script to work with PostgreSQL, we need to add the port number and service name:
Portrule = shortport.port_or_service ((5432), ("postgresql"))
Connecting libraries
Let's digress for a second from the structure of the script and consider how external libraries are connected, the functionality of which we need to access.
Continuation is available only to participants
Option 1. Join the "site" community to read all the materials on the site
Membership in the community during the specified period will open you access to ALL Hacker materials, increase your personal cumulative discount and allow you to accumulate a professional Xakep Score!
Nmap is a very popular open source network scanner that can be used on both Windows and Linux. Nmap, or Network Mapper, was developed by Gordon Luon and is currently used by security professionals and system administrators around the world.
This program helps system administrators very quickly understand which computers are connected to the network, find out their names, as well as see what software is installed on them, what operating system and what types of filters are applied. The functionality of the program can be extended with its own scripting language, which allows administrators to automate many actions.
For example, scripts can automatically detect new security vulnerabilities in your network. Namp can be used with good or bad intentions, be careful not to use nmap against the law. In this tutorial, we will look at how to use namp to scan ports on Linux. But first you need to try to understand how this utility works.
In computer networks, all connected devices have their own ip address. Each computer supports the ping protocol, which can be used to determine if it is connected to the network. We just send a ping request to the computer, and if it responds, then we consider that it is connected. Nmap takes a slightly different approach. Computers also react in a certain way to certain network packets, the utility simply sends the necessary packets and looks at which hosts have sent a response.
But you probably already know about this. More interesting is how Nmap knows which services are running on a machine. The essence of all network programs is based on ports. To receive a message from the network, the program must open a port on your computer and wait for incoming connections. And to send a message over the network, you need to connect to another program (addressee) port. Then the program will need to open a port on which it will wait for a response.
The nmap utility, while scanning the network, enumerates the available port range and tries to connect to each of them. If the connection is successful, in most cases, by transmitting several packets, the program can even find out the version of the software that is waiting for connections to this port. Now that we've covered the basics, let's look at how to use nmap for port and network scanning.
Nmap syntax
The command to start Nmap is very simple for this, you just need to pass it the target IP address or network in the parameters, and also specify options if necessary:
$ nmap options address
Now let's take a look at the basic options that we will need in this article.
- -sL- just create a list of running hosts, but do not scan nmap ports;
- -sP- only check if the host is available using ping;
- -PN- consider all hosts available, even if they do not respond to ping;
- -sS / sT / sA / sW / sM- TCP scan;
- -sU- UDP scan nmap;
- -sN / sF / sX- TCP NULL and FIN scanning;
- -sC- run the script by default;
- -sI- lazy Indle scan;
- -p- specify a range of ports to check;
- -sV- a detailed study of ports to determine the versions of services;
- -O- determine the operating system;
- -T- scanning speed, the more, the faster;
- -D- mask scanning using bogus IP;
- -S- change your IP address to the specified one;
- -e- use a specific interface;
- --spoof-mac- set your MAC address;
- -A- determination of the operating system using scripts.
Now that we've covered all the basic options, let's talk about how nmap port scanning is performed.
How to use nmap for port scanning on Linux
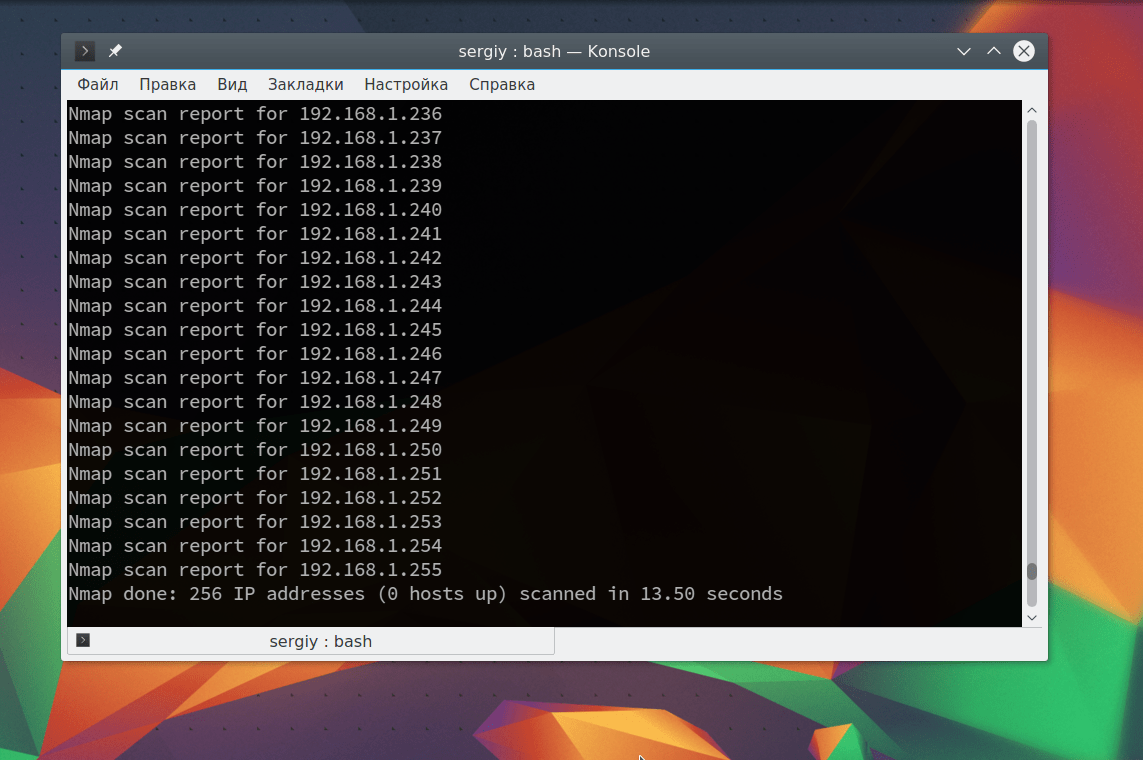
Next, let's look at examples of nmap. First, let's look at how to find all devices connected to the network, for this it is enough to use the -sL option and specify the mask of our network. in my case it is 192.168.1.1/24. You can find the mask of your local network by running the command:
From the output for the interface being used, take the number after the slash, and before the slash, specify the ip of your router. The command to scan the network nmap will look like this:
nmap -sL 192.168.1.1/24
Sometimes this scan may not produce any results because some operating systems have port scan protection. But this can be bypassed by simply using ping to scan all ip addresses on the network, for this there is the -sn option:
nmap -sn 192.168.1.1/24

As you can see, the program has now detected active devices on the network. Next, we can scan nmap ports for the desired node by running the utility without options:
sudo nmap 192.168.1.1

Now we can see that we have several ports open, all of them are used by some service on the target machine. Each of them can be potentially vulnerable, so it is not safe to have many open ports on a machine. But this is not all that you can do, further you will learn how to use nmap.
To find out more detailed information about the machine and the services running on it, you can use the -sV option. The utility will connect to each port and determine all available information:
sudo nmap -sV 192.168.1.1

We have ftp running on our machine, so we can try to look at this service in more detail using standard nmap scripts. Scripts allow you to check the port in more detail, find possible vulnerabilities. To do this, use the -sC option and -p to set the port:
sudo nmap -sC 192.168.56.102 -p 21
We executed the script by default, but there are also other scripts, for example, you can find all the scripts for ftp with the command:
sudo find / usr / share / nmap / scripts / -name "* .nse" | grep ftp
Then we will try to use one of them, for this it is enough to specify it using the --script option. But first, you can see the information about the script:
sudo nmap --script-help ftp-brute.nse

This script will try to determine the FTP login and password on the remote host. Then execute the script:
sudo nmap --script ftp-brute.nse 192.168.1.1 -p 21
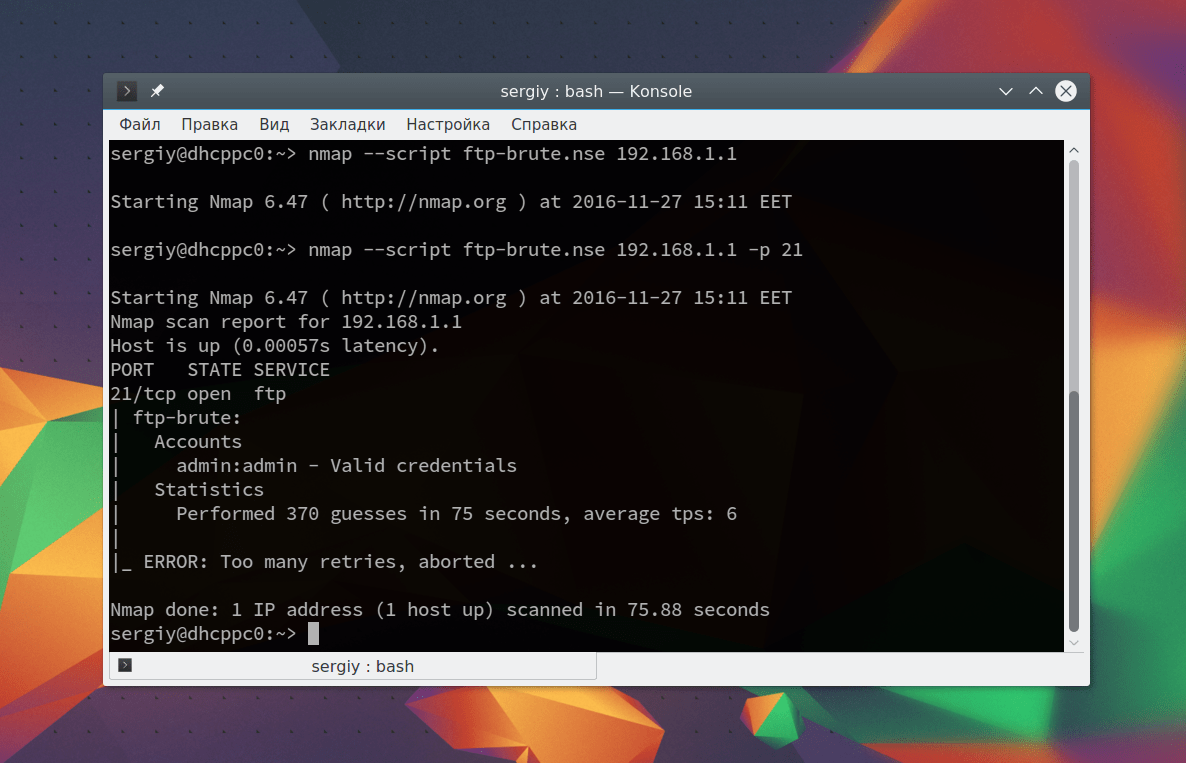
As a result, the script picked up the login and password, admin / admin. This is why you don't need to use the default login options.
You can also run the utility with the -A option, it activates the more aggressive mode of the utility, with which you will get most of the information with one command:
sudo nmap -A 192.168.1.1

Please note that there is almost all the information that we have seen before. It can be used to increase the protection of this machine.
conclusions
In this article, we looked at how nmap port scanning is performed, as well as some simple examples of using this utility. These nmap commands can be useful to many sysadmins to improve the security of their systems. But this is not all the utility's capabilities. Continue experimenting with the utility to find out more just not in other people's networks!
about the author
Founder and site administrator, I am fond of open source software and the Linux operating system. I am currently using Ubuntu as my main OS. In addition to Linux, I am interested in everything related to information technology and modern science.
nmap [ <Тип сканирования> ...] [ <Опции> ] { <цель сканирования> }
Description
Nmap (" Network Mapper ") is an open source utility for network exploration and security auditing. It was designed to quickly scan large networks, although it does fine for single targets. Nmap uses raw IP packets in an ingenious way to determine which hosts are available on the network, what services (application name and version) they offer, what operating systems (and OS versions) they use, what types of packet filters / firewalls are in use, and many more. other characteristics. While Nmap is commonly used for security checks, many system administrators find it useful for common tasks such as monitoring network structure, managing service startup schedules, and keeping track of host or service uptime.
The output of Nmap is a list of targets scanned with additional information on each of them depending on the options given. Key information is « important ports table» ... This table contains the port number, protocol, service name, and status. The state can be open, filtered, closed, or unfiltered. Open means that the application on the target machine is ready to connect / accept packets on this port. Filtered means that a firewall, network filter, or some other obstruction on the network is blocking the port, and Nmap cannot determine whether that port is open or closed. Closed ports are not associated with any application, but can be opened at any time. Ports are considered unfiltered when they respond to Nmap requests, but Nmap cannot tell if they are open or closed. Nmap will print open | filtered and closed | filtered when it cannot determine which of the two states describes a port. This table can also provide details of the software version, if requested. When scanning over IP protocol (-sO), Nmap provides information about the supported protocols, not the open ports.
In addition to the table of important ports, Nmap can provide further information about targets: resolved DNS names, guesses about the operating system being used, device types, and MAC addresses.
A typical scan using Nmap is shown in Example 1. The only arguments used in this example are -A, for OS version detection, scripting, and tracing; -T4 for faster execution; then two target hosts.
Example 1: Typical Nmap Scanning Example
# nmap -A -T4 scanme..org) Interesting ports on scanme.site (64.13.134.52): (The 1663 ports scanned but not shown below are in state: filtered) PORT STATE SERVICE VERSION 22 / tcp open ssh OpenSSH 3.9p1 (protocol 1.99) 53 / tcp open domain 70 / tcp closed gopher 80 / tcp open http Apache httpd 2.0.52 ((Fedora)) 113 / tcp closed auth Device type: general purpose Running: Linux 2.4.X | 2.5.X | 2.6.X OS details: Linux 2.4.7 - 2.6.11, Linux 2.6.0 - 2.6.11 Interesting ports on playground..168.0.40): (The 1659 ports scanned but not shown below are in state: closed) PORT STATE SERVICE VERSION 135 / tcp open msrpc Microsoft Windows RPC 139 / tcp open netbios-ssn 389 / tcp open ldap? 445 / tcp open microsoft-ds Microsoft Windows XP microsoft-ds 1002 / tcp open windows-icfw? 1025 / tcp open msrpc Microsoft Windows RPC 1720 / tcp open H.323 / Q.931 CompTek AquaGateKeeper 5800 / tcp open vnc-http RealVNC 4.0 (Resolution 400x250; VNC port: 5900) 5900 / tcp open vnc VNC (protocol 3.8) MAC Address: 00: A0: CC: 63: 85: 4B (Lite-on Communications) Device type: general purpose Running: Microsoft Windows NT / 2K / XP OS details: Microsoft Windows XP Pro RC1 + through final release Service Info: OSs: Windows , Windows XP Nmap finished: 2 IP addresses (2 hosts up) scanned in 88.392 seconds
The latest version of Nmap can be downloaded from