Despite your best efforts, are you unable to format your memory card? Do not rush to send it to the trash can.
Our advice is guaranteed to help you accomplish your plan with a minimum investment of time and effort. Go.
Important!
Formatting external media is designed to change the existing format, or quickly remove all information from it. Before formatting, make sure that there is no important data left on the micro-SD, and only then proceed with cleaning.
Formatting with Windows Tools
Formatting external media is designed to change the existing format, or quickly remove all information from it.
Before formatting, make sure that there is no important data left on the micro SD, and only then proceed with cleaning.
First, let's look at the methods that provide us.
For them, you do not need to download or install anything, in a couple of clicks you will achieve the desired result.
So, we follow the following algorithm of actions:
Go to the Start menu and select "Control Panel".

From the control panel, select the view mode "Small Icons" as shown in the screenshot:

In the list that appears, select


You will see a list of connected drives.
In it, find the memory card and right-click on it:

Important! In the line "Status", located opposite the name of your card, there must be a status "Healthy" .
In the appeared me, click on the item "Formatting" as shown in the screenshot above.
If everything goes well, then the formatting of the card is completed.
If the inscription is displayed in the card status "Unallocated", choose an action "Create New Volume".
You completed all the steps without errors, but Windows stubbornly refuses to format the card, which means that your OS uses this drive and blocks access to the file system.
In this case, you will need to use additional utilities, which we describe below.
Formatting using the command line
Before you start, you need to restart your computer in safe mode.
To do this, we call the command line by simultaneously pressing the keys Win + R.
In it we write the command
Msconfig and then click OK.

The system configuration menu will open in front of us.
and check the box next to "Safe mode".After that, you can safely restart your computer.

After that, we call again and enter the command into it
format n Where « n » the letter responsible for the name of the memory card.
If everything is done correctly, the formatting will be successful.
If not, move on to the next paragraphs.
Formatting with D-Soft Flash Doctor
Microsd not formatted using system tools? So you need to use additional utilities.
Using the search engine, download and install the program D-Soft Flash Doctor.
With its help, you can mount a disk image, check the status of the disk and restore the functions of the media.
We open the program and select the desired disk (which is responsible for our media) and select the function "Restore Media":

Depending on the size of the memory card, the restore operation may take up to 15 minutes.
Wait patiently for completion and click Finish

This completes the formatting process.
DownloadFormatting with the HP USB Disk Storage Format Tool
This utility is able to forcibly format the media, create a new one (with bootable functionality) and check the status of the disk.
Download and install HP USB Disk Storage Format Tool.
After the installation process, open the program.
In the top line, select the disk we need:

In line « file System» select the type of file system we need from the allowed ones: "FAT", "FAT32", "exFAT" or "NTFS".

Note: a quick cleaning will save you time, but does not guarantee a complete result.

Line « Volume label» allows you to change the media name to any other.

After filling in all the fields, click the button « Format disk», to start the cleaning process.
DownloadEzRecover Program
The peculiarity of this utility is that it is absolutely not necessary to specify the path and name of the drive, because it itself recognizes it.
The scheme is still the same - download and install the program. You launch it.
The first thing we will see is an error message, but there is nothing to worry about, just reconnect the MicroSD, leaving the program enabled.

Good day to all! I propose to discuss what to do if the computer does not see the memory card.
Once the son of a friend took his father's flash drive, connected it to a PC, but it was not readable. The teenager did not come up with a better solution than formatting the media. The accessory contained important documents. Well, that's just a copy. In order not to be in such a situation, read what to do when the computer does not see the sd card in this article.
The memory card is connected to a stationary computer through a card reader. The lack of contact between the PC and the flash drive is sometimes due to a damaged USB or socket.
Checking this assumption is simple: try connecting the media using another cable (if any) or to any device: tablet / laptop.
Also test the socket by inserting another accessory into it. If both the hole and the adapter are OK, move on.
Problem and solution: the same letters
It happens that the name of the memory card and the hard drive are indicated by the same Latin letter, for example, F. This is a common reason why the computer does not see removable media.
You can do two things:
- To see the flash drive, go not to "My Computer", but to the "Disk Control Panel". In Windows version 7/8, for this you need to press Win + R, and then enter diskmgmt.msc in the drop-down line. For the "eight" just press Win + X and select "disk management". After that, a window will appear on the monitor, where all connected devices will be displayed.
- Now you need to change the name of the memory card, permanently solving the problem of recognizing the accessory. Right-click on it and select "Change drive name or path".
These tips are relevant for a new PC or flash drive. If a computer that has been in use for a long time suddenly stops seeing a familiar drive, most likely it is a cunning virus and you need to contact a professional.
Problem: standards incompatibility
There are many types of memory cards: micro sd, mini sd, SD, xD, MMC, etc. They differ not only in form factor, but also in the way of reading. Externally, a flash drive may fit perfectly into the card reader connector, but this does not mean that it will see its contents.
You can understand why the PC does not read the memory card by carefully studying the instructions for the adapter. If only the SD standard is indicated in its specifications, this means that it will not accept SDHC, although they are the same in size and have the same contacts. The obstacle lies in the addressing mechanism: for SD it is byte-by-byte, and for SDHC it is sector-by-sector.
Most consumers prefer 2-in-1 accessories using an SD/MMC adapter. I agree, cheap, although not always convenient. Often, when connecting a flash drive of a larger form factor, the contacts break and can be significantly damaged. My friend forcibly shoved the card from the camera into an unsuitable conductor, which is absolutely impossible to do. Do not repeat such mistakes and use compatible card readers.
It's about drivers
Often, if the computer does not read the microSd card correctly, the user does not know what to do and simply formats the media. Do not rush - very important information can be stored on a flash drive (I recommend using media for backup, not the main storage). Plus, it doesn't always help.
For example, the computer does not see the tablet's memory card (and the iPad itself recognizes it perfectly) - this may indicate outdated drivers or the absence of them. You need to install the drivers from the disk that came with the PC.
If you have reinstalled Windows and the drive is formatted, just search Google for a program for your operating system - better on the official website, which has detailed step-by-step installation instructions.
Issue: BIOS settings
When using this program, there are constant snags when reading removable media. But if you like the BIOS and don't want to give it up, just adjust the settings.
- Check if the latest version is installed. If it is outdated, update the BIOS.
- Make sure the usb controller is ok. Its ports must be enabled and, most importantly, work in version 2.0. The main differences between the USB versions are in the level of power supply, in 1.0 it is much lower, which interferes with reading modern SDHC cards.
If everything is in order with the cable and software, but the memory card is still not readable, try inserting it into a laptop (there is usually a built-in card reader) of a compatible standard.
Problem: PC does not see smartphone
It often happens that when you connect your phone to a computer, the latter only performs the function of a charger, but does not see the memory card.
There may be several reasons:
- Outdated Windows (XP is not suitable for new Androids, try installing "seven").
- A pattern has been installed to protect files on the phone - just enter it when opening the section.
- The smartphone is connected as another device: for example, as a wifi router or usb modem. Disable this option and you will see the memory card.
- When connecting an android phone as a camera, the computer may not see the memory card if the file transfer mode is not enabled.
Armed with knowledge, you can be sure that you will reduce the problems with reading a USB flash drive on a PC to a minimum. See you in the vastness of my blog!
The topic is what to do if the tablet does not see the memory card.
If you want to be in the know, I'm in instagram, where I post new articles that appear on the site.
Thank you for your attention! Sincerely, Rostislav Kuzmin.
If your SD card doesn't show up in Windows Explorer when you plug it into your PC's Card Reader, don't despair. This is a common problem with Windows, and while very frustrating, it's usually very easy to fix.
Below is a list of fixes that have worked for other Windows users. Start at the top of the list and work your way down until you find a fix that works for you.
Method 1: Update your drivers
In 80%, this problem is solved by installing drivers.
The driver can be downloaded from the official website of the laptop manufacturer.
For lenovo laptops
For HP Notebooks

For Asus laptops

For Aser laptops

For other brands of laptops, installing the driver for the card reader is similar.
Here are the websites of other manufacturers:
- Dell - https://www.dell.com/support/home/ru/ru/rubsdc?app=drivers
- Prestigio - http://www.prestigio.com/MultiBoard_Drivers
- Toshiba - https://support.toshiba.com/drivers
Method 2: Run Windows Installer
- Click Windows+R.
- Enter " services.msc» without quotes in the launch box and click Enter key .
- Find windows installer.
- Then right click on it and click " Start".
- You can then run the Hardware and Devices troubleshooter again.
Try checking if the Card Reader is recognized in Explorer.
Method 3: Reinstalling the controller
- Press the keys Windows + R on keyboard.
- Enter devmgmt.msc in the "Open" text box.
- Expand universal serial bus controllers from the window.
- Right click drivers and select " Delete" .
- Click " OK" in "Confirm request to remove device".
- Restart your computer, the drivers will be automatically installed on your Windows 10.
Method 4: Check your SD card on another PC
If your SD card is bad, your computer won't recognize it. To test, you need to find another computer with a card reader and test your SD card on that computer to make sure it works.
If your SD card doesn't work on another PC, it's probably bad and you need to replace it.
If he really works in another computer, then this is not a faulty card, but it may be that your card reader is faulty.
Method 5: Disable then enable the card reader
Navigate to device manager as above - when I do this, there are no SD host adapters, but there are memory technology devices that have a RealteK PCIE Card Reader. Select that, then click Driver, then Disable, confirm the pop-up, then back to the driver screen, click Enable and its pop-up - the SD card now appears as before and is accessible.
Don't know why it works, but it was for me."
If you don't know how to do this, follow these steps:
1) On the keyboard, press the key Win+R(key Windows and key R) at the same time to bring up the launch window.
2) Enter devmgmt.msc in the launch box and click " OK" .
4) Click the tab Driver. Click " Disable device" .
5) When prompted to turn off the device, click " Yes" .
6) Double-click the card reader to open the Properties windows. Click " Turn on the device", to turn the device back on.
We hope these tips will help you troubleshoot your SD card issue. Please comment below if you have any questions or suggestions. We are always happy to hear about new solutions!
Method 6: Clean the SD card and reader
Another very common reason for an unrecognized SD card is a very simple one: a dirty SD card or a dusty card reader. Or will lead to bad contacts between the card and the reader.
So, the second thing you need to do is give your card a clean and dust-free reader, and then try the card again.
- To clean the card, dip a cotton cloth in some alcohol or water and lightly wipe the dirty area, paying special attention to the metal contacts.
- To clean your reader, use a compressed air device to blow dust out of the reader. Alternatively, you can buy a contact cleaner on Amazon that you can use to clean the reader.
How to restore an SD card or USB flash drive if the computer does not see them, does not read or write data? Problems with flash drives are rarely caused by normal wear and tear. More often, the causes of problems with them are ignoring the rules of safe removal of the device by users, experimenting with various software in which these flash drives are involved, as well as their initially lousy quality. Below we consider a list of possible actions carried out in the Windows environment that can solve the problem, unless, of course, the cause lies in a mechanical failure. And we, friends, will go from simple to complex.
Recovery of SD cards and USB flash drives in Windows environment
- Note: below we will only talk about restoring the performance of flash drives, but not about saving the data stored on them. This is a separate topic, and on this account the site has, you can still use this program for. Most of the methods for recovering SD cards and flash drives suggested below will result in the loss of their data.
1. Hardware lock
SD cards, MicroSD adapters and flash drives can be hardware-protected from writing data or completely blocked even for reading. These devices have a lock switch, which must be set to the "Unlocked" position accordingly.

2. Problems not related to the drives themselves
The cause of problems with SD cards and flash drives can be the Windows security policy. You need to find out if access to removable drives (in full or in part of writing data to them) is blocked by the computer administrator. You also need to check the card reader or USB ports of the computer. If everything is in order with the latter - the card reader reads other SD cards, but there are still problems with the flash drive, no matter how you connect it to other USB ports, let's move on.
3. Windows Explorer
Standard formatting using Windows Explorer can help in simple cases such as unsuccessful data writing to a USB flash drive. Or when for some reason a smartphone, tablet, camera or other device cannot handle this operation with respect to SD cards. In any of the current versions of Windows, in the Explorer window on the drive, we call the context menu, click "Format".

We leave the original file system and first try a quick format.

If it fails, we repeat the operation, but with full formatting (uncheck the quick one).

4. Windows Disk Management
You can try to format the format in disk management. To launch this tool, in the system search field, enter:
diskmgmt.msc
In the disk management window, focusing on the size of the drive, we are looking for it among the drives connected to the computer. And in the context menu called on it, we start formatting.

You can immediately choose full formatting.

If your flash drive has a partition structure like a hard drive, you need to delete each of those partitions. This is done using the option in the context menu "Delete volume".

And then, in place of the resulting unallocated space, you need to create a single partition. To do this, in the context menu on this very unallocated space, we launch the “Create a new volume” operation and follow the instructions of the step-by-step wizard.

5. Programs for low-level formatting
Regular formatting tools may not help in difficult cases, for example, when flash drives are displayed (in the same Explorer or disk management) as unrecognized devices with the RAW file system. The latter means that either the Windows environment does not understand the file system of the drive, or there is no file system as such in principle. Actually, this is what causes problems with a flash drive or SD card when it works on other devices, with other operating systems. In such cases, third-party Windows programs designed for the so-called low-level formatting will help restore the USB flash drive.
In fact, low-level formatting is a procedure that is carried out either in the production environment of flash device manufacturers, or in serious narrow-profile services. Various Windows software that claims this kind of operation actually performs the usual full formatting, but by mechanisms different from those used by the operating system. Such programs are good at dealing with flash drive problems if these problems occur at the file system level. Let's look at two of these programs.
HDD Low Level Format Tool
http://hddguru.com/software/HDD-LLF-Low-Level-Format-Tool/
The shareware portable program HDD Low Level Format Tool can format various types of storage media, in particular, SD cards and USB flash drives. After unpacking the archive with the program, run it, agree to the license terms.

Choose free use.

Directly in the program window, specify the problematic drive and click "Continue".


We confirm the decision.

We are waiting for the operation to complete and check the operation of the media.

SDFormatter
http://flashboot.ru/files/file/355
The completely free little program SDFormatter is another tool for so-called low-level formatting. Works with both SD cards and USB sticks. We install SDFormatter into the system, launch it, in the "Drive" column we indicate the problematic flash drive. Click "Format".

The program wants to make sure the seriousness of our intentions, click "OK.

Asks not to touch the drive while the operation is being carried out.

Upon completion, we test a USB flash drive or SD card. If it doesn’t help, repeat the operation with the settings for a complete rewriting of sectors (nothing more than a full format). Press "Option", select "Full (OverWrite)". And also click on "Format" at the bottom.

If using the above methods it was not possible to reanimate the flash drive, and it is still under warranty, you need to stop at this stage. And take no further action, except to contact the seller with a request to replace the device. All the actions that are described below should be resorted to only when, in fact, there is nothing to lose. The instructions below apply to USB sticks, SD cards, and MicroSD cards. However, in the case of the latter, the probability of recovery is extremely small.
6. D-Soft Flash Doctor
D-Soft Flash Doctor performs the so-called low-level formatting, and along the way it also detects bad sectors (cells). Well, and, accordingly, knows how to block them and replace them with backup ones. The program can help when flash drives or SD cards have difficulty reading individual files that have fallen on bad sectors. The program is free and portable. I did not find the official site, but it can be freely downloaded on the Internet.
In the D-Soft Flash Doctor window, the first thing to do is run a scan for errors.

In my case, there were no damaged (broken) sectors.

But if in your case, friends, the scan results are different, and bad sectors are found, we start the recovery process.

The window for this operation promises that the process will not last longer than 10 minutes, but in fact, remapping bad sectors on a drive with a capacity of more than 4 GB can take quite a long time. So it is better to run the recovery operation at night.

7. Flashing the memory controller
Programs for the so-called low-level formatting or their analogues, in any other form declaring the function of resuscitation of all types of SD cards and / or USB flash drives, turn out to be powerless in the event of a software failure of the controller when it needs to be flashed. This problem may have different symptoms, but more often it is either the computer does not completely see the drive, or it sees, it can even read data, but cannot format it by any means. In particular, due to write protection, despite the fact that the drive is not blocked by hardware.
Do you want to use the MicroSD card as a real storage expansion and install apps on it? To do this, you need to format it as internal memory. This is fairly easy to do on most phones, but unfortunately some manufacturers like Sony, LG or Samsung don't have this feature by default. But if your smartphone is equipped with Android Marshmallow or newer, then you can use the command line. True after that, avoid Android updates. How to combine memory correctly, we will tell in this article.
Jump:
The easy way
If you're lucky, your smartphone will allow you to do this without connecting it to a PC. This method will most likely be your only hope if you are using a newer version of Android (7.0 Nougat or 8.0 Oreo). Here's how to check:
- Install SD card in Android phone and wait for it to be recognized
- open Settings > Storage
- Touch the name of your SD card.
- Touch the three vertical dots in the upper right corner of the screen.
- Click "Settings" .
- Select Format as internal memory.
- Click "Clean and Format"
- Android will then prompt to transfer the data
If your smartphone does not allow you to do this, the process becomes more difficult. We will move on to it below.
What to do if your phone won't let you format microSD as internal storage
Some smartphone manufacturers disable the common Android feature to format a microSD as internal storage, hiding the ability to do so from your phone. But it is still possible to activate this process using a PC without requiring any root privileges.
The exact steps vary depending on the Android version of your phone. This method worked well with Android 6.0 Marshmallow and Android 8.0 Oreo, however we ran into trouble on Android Nougat.
For phones using Android 6.0 Marshmallow
When the MicroSD card is formatted as internal memory, applications can be fully stored on it. This means that if you download an app with a total size of 2 GB, then there should be 2 GB of space on the SD card. If, however, the MicroSD card is formatted only as a backup, there will not be enough memory, as it says PLATYPUS_DIARRHEA on reddit.
Just because a menu option is invisible doesn't mean it doesn't work. A few days after posting on Reddit, it was revealed that it was also possible to format the MicroSD card as internal storage in the Galaxy S7 using the command line. We have successfully tested the instructions with Samsung Galaxy S7, Sony Xperia Z5 and LG G4 running Android 6.0 Marshmallow.
All three smartphones work from the factory or have been updated with Android 6.0 Marshmallow and have a microSD card slot. Also, there is no menu option to format the microSD card as internal storage. The feature is only available on HTC One A9 and Motorola on all Moto smartphones.
Why did Samsung, LG and Sony hide this item? I connected each of the three smartphones to the computer, and each of them had one microSD card.
I then entered in the commands described in my blog. Once you open a command prompt window and connect your smartphone, you can enter the first command:
- adb shell
Now the command line is ready to run system commands on your smartphone. In this case, we want to format the SD card or part of it as internal storage. Even if Sony, Samsung and LG deny us this option in the graphical user interface, we can still execute this command through the console. First, however, we need the ID of the SD card. You can find it out with the following command:
- sm list disks
In my case the disk is called 179.64 . Perhaps yours is different. Note the exact ID. In the following command, we will format and partition the MicroSD card. Your content will be removed. If there are important files on the card, copy them to another drive or computer. If you want to keep a MicroSD card in your smartphone all the time, you can now partition all your memory. To do this, enter:
- sm partition disk:179,64 private
The operation takes a few seconds or minutes, depending on the capacity of the memory card. If you want to use only a certain percentage so that other devices can read it, you must exclude it from the personal section. The 50:50 split command looks like this:
- sm partition disk:179.64 mixed 50
This is the end of Paul O'Brien's guide, but not the end of the job. If you now want to use the reallocated memory, you must migrate applications and data as well. This can be done through the "Storage" section in the Android settings menu. Select the MicroSD card, then go to the top right side of the menu and click "Move data". You cannot select this menu item before splitting.
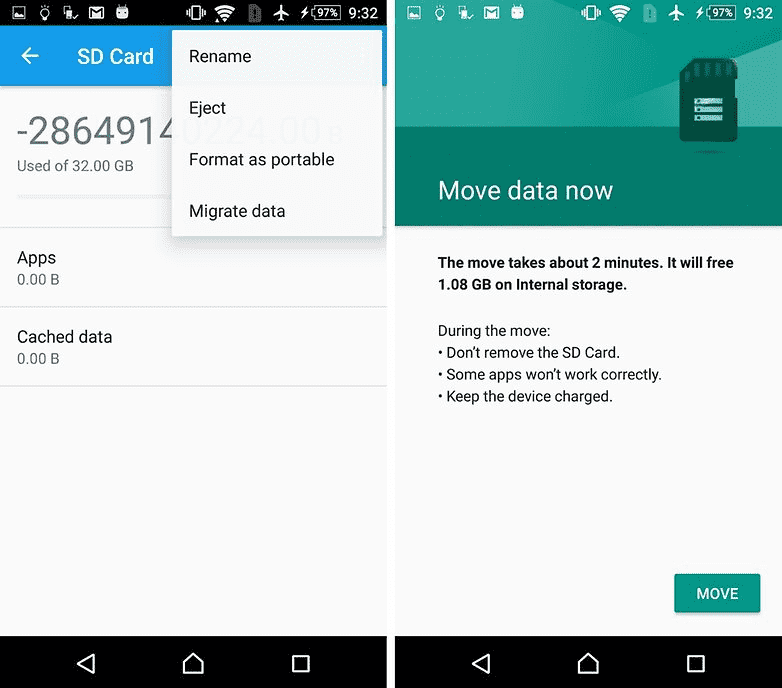
Now all downloaded applications will be completely written to the MicroSD card. Only system apps and updates use internal memory. This means that you will never get an error due to lack of space.

Smartphones with Android Oreo
Recent Android updates have changed the rules a bit, but it's still possible to use this method with ADB. Just start working with ADB by the method above, but after entering shell adb you will be prompted to set certain values.
Enter the following lines to unlock the ability to format microSD cards as internal storage on your phone:
G8141:/ $ sm set-force-adoptable true
G8141:/ $ sm list-disks
disk:179.0
G8141:/ $ sm partition disk:179.0 private
G8141:/ $ sm set-force-adoptable false
G8141:/ $ exit
We tested this method on a Sony Xperia XZ Premium running Android 8.0 Oreo and it worked. In the screenshots below, you can see a 16 GB microSD card installed as internal storage:

Problems with system updates and Nougat
Some readers have reported difficulties installing system updates in Android 6.0 after using the above methods. Upgrading to Android 7.0 Nougat is not possible after installing MicroSD as internal storage. Our test devices with Android 7.0 Nougat don't even respond to the console commands shown above.
Due to the lack of documentation on the web, we can only recommend that you perform a number of operations before updating the system. Back up your photos or music to your computer or the cloud and free up as much space on your SD card and smartphone as you can.
Delete unnecessary applications and return the data to the internal memory. Then format the MicroSD card as removable media. Only then can you safely install the Android update.
What's the catch?
MicroSD cards do not work as fast as the built-in memory of a smartphone. So don't waste your money on cheaper ones, and instead buy yourself memory cards with reasonable read bandwidth. Extreme Pro and MicroSD from Sandisk were, in our opinion, the best in terms of price / quality ratio. With a write throughput of 74 MB/s, you shouldn't experience lag. Such cards are best suited for installation as internal memory.
Interestingly, only the LG G4 was able to read the extended memory correctly. Samsung showed an unnaturally large amount of occupied memory, and Sony's memory was even negative. However, we didn't have any complications, and even when we were connected to a computer, we were able to access all of our data properly, although we could only see the general and not the specific part of the memory. Difficulties arose only in the case of a system update (see above).
Memory Boost: Complete Success
We subjected all the smartphones described above to a single endurance test. We have installed Final Fantasy IX on all devices. The game size is 1.8 GB. After installation, it is easy to see which of the two types of memory, internal or SD card, was used. In all cases, after installing on the SD card, there is 1.8 GB less space. This degree of success cannot be achieved with SD cards formatted as external memory, as full data migration is not possible.
Compare the values of internal memory and SD card memory in the screenshot to confirm.

What happens if you remove the microSD card?
Of course, the question is what happens if the MicroSD card disappears from the system. In fact, this creates a serious problem for your applications. Eventually, they can no longer access their data. Since your operating system partitions and factory reset information are still stored in the internal memory, a removed or broken SD card cannot do much harm. When we removed the microSD card, the app icons simply disappeared, and when we reinstalled them, they returned back.
If you lose or break your SD card, your data will be lost. Since they are encrypted as internal memory, you may not hope for data recovery. Instead, use regular backups. So feel free to enjoy the cheap memory expansion of your Marshmallow smartphone.
Safe removal of an internal broken SD card
To safely remove the SD card from your smartphone, you must reverse the process above. Since you probably don't have enough internal storage space, you'll first need to move your photos and other data to some other storage, such as your PC's hard drive.
Then go back to settings "Storage and USB drives" and press "Move data to internal memory" on the menu. Then format the SD card as an external memory. Perform both steps (backup and format) so that your data cannot be lost and you can use the SD card with other devices.