It would seem that quite recently, only twenty years ago, photography was considered a matter of the elite. Not every inhabitant of the USSR could afford to have a FED, not to mention a Zenith mirror or a cool foreign camera, for example, the German Practice. Nowadays, photography has become accessible to almost everyone and therefore a very popular activity. There are cameras in almost every family. And if there is no camera as such, then almost every one of us has it built into the mobile phone.
For about four years now, manufacturers of photographic equipment, releasing more and more new models of professional cameras, began to actively develop and produce SLR cameras aimed specifically at beginner amateur photographers. With such cameras, even an amateur can take decent quality photos. And this, of course, inspires beginners, gives them an incentive for creative search, and, of course, the growth of their skills. Thus, they “sit down” on branded photographic equipment.
What separates beginner cameras from professional cameras? First of all, it is the simplicity of their design and high functionality. Beginner cameras usually have several modes that allow the photographer to easily shoot, for example, a child in motion or a portrait, photograph sports, or simply shoot in a city at night, etc. All of these modes usually work automatically. Each of them is set up for some kind of shooting and programmed.
The current cameras are very perfect, they are simply crammed with all sorts of technological innovations. But the functions of digital cameras of the previous generation, manufacturers and designers, nevertheless, retained them. Almost all digital SLR cameras operate in four modes:
- P - automatic program mode
- A - aperture priority mode
- S - shutter priority mode
- M - manual mode
Let's look at each of these modes separately.
Auto mode P (programmed)

If you set your camera to automatic program mode, denoted by the P symbol, you won't have to adjust anything else when shooting. Your camera will set the shutter speed and aperture automatically. It is good to use the M mode when the photographer does not have the opportunity to set all the parameters on the camera separately and turn on the built-in flash on his own during work (when shooting a photo essay, for example). Very handy here is that the automatic program mode allows the photographer to adjust the ratio of shutter speed and aperture manually, while still getting the same exposure.
If, when shooting, there are conflicts with the existing exposure parameters and the preset ones (underexposure or overexposure), the camera's automation fixes these problems and informs you about them with an inscription in the viewfinder or display field of view. By the way, this function is provided for all operating modes of a modern camera.
A - aperture priority

When switching to work in this mode, which is indicated by the symbol A on the camera, you will have to adjust the aperture manually, on your own. And in order for the exposure of the frame to be optimal, the shutter speed for obtaining it will be selected by the camera's automatics independently.
In order to increase or decrease the depth of field, you need to decrease or increase the aperture of the lens. The narrower this hole (that is, the number indicating the aperture is larger), the greater the depth of field will be, and vice versa - the larger aperture (wider), the smaller the depth of field.
This mode, aperture priority mode, is perhaps the most popular and common among photographers. The point here is that the depth of the sharply depicted space is most often the most important, relevant moment in the work. Professionals set the aperture in the first place when shooting. No matter how important other parameters are, they are already adjusted depending on the aperture. So why should we puzzle over this? Let's entrust this matter to the automation of the camera.
Accurate and correct aperture setting is perhaps the most important component when working in various photographic genres. But it is especially important when shooting portraits and macro photography. Aperture is given a lot of attention in these genres of photography.

Those who have been taking pictures for a long time should be well aware that the aperture of each lens has its own parameters. With some of its values, the photo turns out worse, with others - better. But, usually, in order to get a good picture, photographers work at an aperture of f 11 or f 16. If you set the aperture between f 5 - f 22, you can also get a good quality photo.
S - shutter priority

If you set your camera to shutter-priority mode, which is indicated by the S icon, when shooting, you yourself will have to set the shutter speed, that is, the shutter speed of your camera. All other parameters will be set automatically by your camera. In shutter priority mode, people usually take pictures when they have to shoot dynamic shots, objects in motion, when the photographer needs to emphasize this movement in some way. As you know, when shooting moving objects at a slow shutter speed, they are blurry in the picture. A short shutter speed, as it were, "freezes" such objects, makes the action taking place in the frame instantaneous. So, for example, it is good to shoot an athlete in a high jump. You have a chance to capture in the frame exactly the moment when he touches the bar with his foot and it starts to fall down. And the athlete has a grimace of failure on his face ...
In shutter priority mode, as a rule, they are removed if there is active movement in the frame. For example, sports competitions, some kind of stage performance, festive fireworks, moving vehicles and much more.

When shooting in shutter priority mode, the photographer may experience some problems and difficulties, since working in it has its own specific characteristics. The main difficulty, the main “pitfall” here is the shutter speed and aperture value. In some cases, there may be a conflict between their values due to the fact that they will not match. Simply put, if you set a certain shutter speed on the camera, in order for the exposure to be ideal, the camera's automatics will not be able to select the exact appropriate aperture value. Sometimes this conflict can be resolved by selecting a different shutter speed value, which is located nearby. Set the shutter speed a little faster or a little slower. But then the frame may turn out to be underexposed or overexposed.
If you need to get a sharp frame when shooting handheld, then the shutter speed is calculated using a simple formula: 1/X, where X is the focal length of your lens. Simply put, the shutter speed should be no longer than 1/X. Provided you shoot at a slower shutter speed, you will need to use a tripod to shoot. It is much more difficult to shoot handheld with long lenses, there is a chance to get a blurry image.
M - manual mode

When shooting in this mode, which is marked with the M symbol on the camera, the photographer himself sets the value of both shutter speed and aperture. In M mode, these parameters are adjusted according to your own vision, while controlling underexposure and overexposure indicators (it is good to track them on the metering sensor built into the camera). Simply put, you can adjust all the necessary shooting parameters even before you start photographing. The main thing - do not forget to follow the exposure meter sensor.
The manual mode of the camera gives the photographer an excellent opportunity to open the camera shutter for almost any desired length of time. To do this, you can use the bulb mode. But it is needed quite rarely, when the shutter speed should be more than 30 seconds. For example, if you shoot a meteorite falling in the sky, or lightning.

And in manual mode, they usually shoot in the studio. After the desired light is set, the exposure on the camera is not set at random, but according to the results of its measurement with a special device called a light meter, and then this value is entered into the camera manually.
How to make exposure compensation

Exposure compensation should be done in cases where the exposure needs to be quickly, in the course of work, changed in one direction or the other, without changing all the other camera settings. Exposure compensation gives the photographer the opportunity to independently adjust the shooting parameters suggested by the camera's automation. In each of the modes described earlier in this article, exposure compensation will change certain values. The most important thing here is that in this case, the value that is not the priority in the mode you have chosen will change. Well, for example, if you shoot in aperture priority mode, then in order to achieve the exposure you need in the picture, the camera's automatic will change the shutter speed. When shooting in aperture priority mode, the camera will automatically change the shutter speed value. If you make exposure compensation in fully automatic mode, P mode, then your camera will change the ISO value, that is, the value of the ISO number.
Exposure bracketing

When creating HDR photos, you need to set the camera to different exposure values. In this case, the settings can go both in the direction of increasing the exposure, and in the direction of its decrease. For such shooting, it is good to use exposure bracketing. Bracketing mode gives the photographer the opportunity to simultaneously take several pictures that differ from each other only in exposure parameters. The parameters and the number of shots must be set individually and done in such a way that the spread in exposure was convenient for you.
Auto exposure lock
If you have to photograph a subject that is outside the center-weighted or spot metering area, you may end up with a poor quality shot due to the fact that it is not properly exposed. In this case, we recommend that you turn off automatic exposure by first exposing the frame to its main subject.
Results
If you take into account our tips and recommendations set out in this article and take them into account in your work, you can quickly learn how to take pictures with a modern SLR camera, not trusting the automation, but taking control of all the settings for shooting parameters into your own hands. . We assure you, there is nothing particularly difficult in this. You just need to practice for a while. As the old masters of photography say, the one who takes a lot of pictures takes good pictures.
We wish you good luck in your work and creative success!
Usually, after getting bored with all the 'Auto' modes of the camera, a lot of people start using special semi-automatic modes. M, A, S, P. These modes can be found on the camera control wheel, as shown in the picture below. Normal mode M, A, S, P stand out in a separate set, for example, in the photo below, these modes are highlighted with a special arc that unites them. Can be found instead of naming ‘M, A, S, P’ another name - ‘P, A, S, M’ or 'M, AV, TV, P'- they are all the same. I will try to talk about these modes in this article.
All modes of operation of the camera are aimed at creating the optimal. Either mode selects the shooting parameters in such a way as to get the most correct picture in terms of the amount of light needed to convey the exposed scene.
Important: modes P, A, S, M give additional access to many menu items, which are not available in automatic modes. In these modes, you can customize any function to your liking, such as controlling ISO, choosing a picture format, etc.
To understand how these P, A, S, M modes work, I strongly recommend that you familiarize yourself with such basic concepts in photography as:
- Diaphragm
P
The simplest special mode is the mode ‘P’ (Programmed) – flexible program mode.
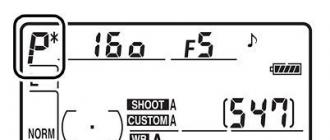
It is very similar to the automatic mode of the camera 'Auto', but in this mode you can change shutter speed within certain limits. varies within the range allowed by the extreme aperture values of the lens. The shutter speed can be changed using the camera's control wheels. If changed by the photographer, “*” is added to the mode name. The shortest in the mode 'P' is available at the smallest F-number, and the longest is available at the largest F-number. There is a golden rule, the interchangeability of aperture values and, just on this rule, the operation of this mode is built. For example, if you increase the shutter speed, for example, by 2 times, then the aperture will close by one step.
Example: if you increase the shutter speed from 1/200 second to 1/100 second, then this will allow the matrix to absorb more light and get overexposure, so the camera must reduce the amount of light by covering the aperture, and the aperture will close by one step. For example, if at 1/200s it was F4.0, then at 1/100s it will become F5.6. I do not like this mode because it constantly tries to set the value and aperture, which are convenient for the camera itself. With each new scene with a different exposure, camera reselects shutter speed/aperture values and the shutter speed has to be changed again and again to suit your tasks.
What 'P' mode is used for: convenient to use when moving from the green zone (fully automatic camera mode) to class modes M, A, S, P. You can be sure that the camera will help you set the normal settings. In this mode, you can photograph almost everything without worrying about the correct settings. It is very easy to achieve the fastest shutter speeds available, which allows you to get the lens and the current ISO value, while you can be completely sure that the frame is correctly exposed. This can be used for ' '. If you turn on the auto-ISO mode, then the program mode works a little differently.

A(or Av)
A very useful mode is the 'A' (Aperture Priority) mode, or 'Av' (Aperture value) mode - aperture priority
This is one of my favorite camera modes. It is quite convenient, as it allows you to control the aperture, and with it the depth of field. In this mode, you can simply set the desired aperture value, and the camera itself recalculates and selects the shutter speed. The larger the aperture, the slower the shutter speed. Conversely, the smaller the aperture, the longer the shutter speed. The shutter speed maneuver is much wider than the aperture maneuver. Usually the shutter speed changes from 30 seconds to 1/8000 second, that is, the shutter speed limits are very large and the camera is almost can always choose the desired shutter speed for almost any aperture value on the camera.
For example: for a lens with aperture limits from F3.5 to F36, the camera will almost always select the desired shutter speed for any value of the F-number. So, for F3.5, a relatively short shutter speed will be selected, and for F / 36, a slow shutter speed will be selected.
If at a certain value of the number F the camera cannot select the desired shutter speed, then on the camera, in the field that is responsible for the shutter speed, the HiGH or LOW value will be displayed.
What is 'A' mode used for: In this mode, it is very convenient to control. With aperture priority mode, you can easily. Generally, aperture control (aperture control) can greatly improve image quality, since most lenses only give maximum image quality in a certain F-number range. For example, aperture greatly affects vignetting and . With this mode, you can easily control the intensity of bokeh, which is sometimes important for photographing portraits. And with the help of a closed aperture in the mode 'A' you can achieve photos with a long exposure, for example, . You can also get various interesting effects, for example. This mode works very effectively when enabled.

S (or TV)
'S' mode - (Shutter Priority), or 'Tv' (Time value) - shutter priority
It's the opposite here - this mode allows you to control the shutter speed, unlike the program mode, the shutter priority mode allows you to set any shutter speed that the camera can use. If you set a certain shutter speed on the camera, the camera itself will select the desired aperture value. The mode works similarly to the aperture priority mode, but instead of the aperture value, you need to set the shutter speed here. Aperture travel is quite limited, and often you will find that the camera cannot set the desired aperture for a certain shutter speed.
If at a certain shutter speed the camera cannot find the desired aperture value, then the camera will display the HiGH or LOW value in the field that is responsible for the aperture.
What is 'S' mode used for: using this mode is very easy to achieve. This is very useful when shooting sports and fast moving subjects. In order to freeze something in a photo, it is enough to take a picture at a fast shutter speed, for example, at 1/2000 second, while the camera itself will select the desired aperture value for a shutter speed of 1/2000 second. Also, in this mode it is convenient without blurring the picture. This mode works very well with the auto ISO function turned on.

M
'M' (Manual) - manual mode.
In this mode, the camera will have to set both shutter speed and aperture. manually, in fact, because the mode is called ‘ manual camera control here.
Conclusions:
Creative semi-automatic camera control modes are very useful in a number of cases and can very easily get the camera to do what the photographer wants. I recommend doing your own experiments.
↓↓↓ Like :) ↓↓↓ Thank you for your attention. Arkady Shapoval.
95% of my friends, when buying a SLR camera, use only automatic shooting mode with preset scenes: portrait, landscape, macro, etc. At most, some of them, once in a lifetime, turn on the manual mode, and without understanding anything in it, they turn it off forever.
But is this auto mode so good - let's figure it out? The more you use the camera, the more you realize that the scope of auto shooting is not enough for you. Not always, for example, auto mode can clearly cope with shooting in places with poor lighting. Let's figure it out.
As a rule, in all SLR cameras, in addition to the automatic mode with scene programs, there are 4 more modes that involve the direct participation of the photographer in setting the frame. Let's consider them in more detail.
- “P” programmed auto mode.
By and large, this is the same automatic shooting mode. The only thing is that you can adjust some parameters: white balance, matrix sensitivity, jpeg settings, etc.
Application: Used when there is no time for manual settings to take a quick shot. This mode is useful for beginner amateur photographers. This is a smooth transition from auto to more manual modes.
- “S” is shutter priority mode.
The photographer sets the shutter speed and the camera sets the aperture (f).
Application: This mode is used when you need to emphasize the movement in the frame. The effect of "motion blur" at slow shutter speeds, or the subject is clearly fixed at short exposures. This mode is great for shooting sports and domestic events, fountains, water, cars, etc.
In this mode, as a rule, the clarity of the background suffers.

- "A" aperture priority mode.
Unlike “ S" mode, here you already set the aperture value, and the camera selects the shutter speed. According to many photographers, this is the most convenient shooting mode. Aperture values are smaller than shutter speed values. Aperture control is much easier.
Application: Suitable for portraits (1.2-2.8 min aperture), landscapes (16-22) and static macro.

- "M" manual shooting mode.
The photographer manually sets all parameters. If you want to become a real pro, you need to work and experiment with this mode. In this mode, you can take absolutely any pictures. The only drawback of the manual mode is time. While you are adjusting the camera, you may miss a shot.
Application: Ideal for night photography and studio photography. In manual mode, you can experiment, for example, deliberately overexposing the frame, etc.

In recent years, professional and semi-professional cameras have become much more accessible to the general public. But to figure out what this or that letter on the camera means is not always and not everyone succeeds. Especially for novice photographers, and not only, I post a description of the letters and symbols on the screen and camera body.
A, Av - aperture priority mode
ACR is an abbreviation for Adobe Camera RAW. Built-in converter in Photoshop.
A/D - analog-to-digital converter
AE-L - exposure lock
AF - autofocus lens and autofocus system
AF-L - autofocus lock
AF-S - Nikon's single-frame autofocus system, as well as other lenses that support this technology and have autofocus
AF-C - continuous autofocus system (after focusing, the camera continues to focus while the shutter button is pressed halfway or fully), Nikon
APS - sensor size equivalent to a 35 mm film frame (on Sony and Canon cameras)
APS-C - matrix, 1.6 times smaller than APS (Canon camera)
ASPH - lens using aspherical lenses
B - exposure "by hand". In this case, the beginning of the exposure will coincide with the moment the shutter button is pressed, and the end will coincide with its release.
BG - background (from the English "BackGround")
BW - black and white (from the English. "Black / White")
CA - chromatic aberration
C1 - Converter for RAW files PhaseOne CaptureOne Pro
CCD - CCD matrix. It is used in compact cameras, as it is less noisy at small sizes.
CF - Compact flash memory card
CMOS - CMOS matrix. This is used in SLR cameras as it is less noisy at large sizes.
CNX - Nikon Capture NX RAW File Editor and Converter
CPL is a round polarizing filter. It is mounted on the lens, rotates around the optical axis and filters polarizing light.
CRW - Canon RAW file
D - "digital". Lens with manual iris ring
DNG is a unified RAW format from Adobe.
DOF - depth of field, depth of field
DPP - Digital Photo Professional Software (Canon native RAW converter)
DR - DD, dynamic range
DSLR - digital reflex camera
DX - a lens for cameras with a matrix reduced by 1.5 times in size, not intended for film (Nikon); system for automatic transmission of film speed data to the camera
ED - lens with an element of low dispersion glass, Nikon
EF-S - a lens for cameras with a matrix reduced by 1.6 times, not intended for film (Canon)
EXIF is a format for storing image metadata: date, exposure settings, focal length, etc.
EV - exposure change step, can be used both for exposure compensation relative to the set one, and for measuring the dynamic range
EVF - electronic viewfinder
F - maximum aperture of the lens (in the name), relative aperture
FF - full frame, which corresponds to a 35mm film frame 24x36mm
F-number - aperture value
FL - FR, focal length
F-stop - aperture change step
FOV - angle of view
FP-Sync is a camera and flash mode that provides high-speed synchronization, that is, less than the shutter speed of a full frame opening
fps - shooting speed, measured in frames per second
FX - sensor size equivalent to a 35 mm film frame on a Nikon camera
G - lens without aperture ring, on Nikon lens; lens with ED glass element on camera Sony
GB - Gb, gigabyte
GND is a gradient filter that is used to equalize the illumination of a light sky and a dark sea
HDR - high dynamic range (greater than 9 EV), generally applied to images with extended DD
HSL - Color Hue, Saturation and Lightness settings
IF - lens with internal focusing, that is, without rotation of the front lens
IR - infrared shooting
IS - image stabilizer on camera Canon
ISO - standardized speed of film and photosensitive matrices
JPEG, JPG is an image file format that supports 8-bit color channels, progressive compression and color profiles, and is generally accepted as a standard by all manufacturers of photographic equipment.
L - lens with an element of low dispersion glass on a Canon camera
LCD - Liquid Crystal Display
LD - lens with ED glass element, Tamron lenses
LR - Adobe Photoshop Lightroom Converter and Editor
LV - real-time LCD viewing system (live view)
M - manual shooting mode
MB - Mb, megabyte
MF - medium format camera; manual focus lens and manual focus system in cameras
Mp - MP, megapixels
N - a lens with an element or coating of an optical element made using nanotechnology
NEF - Nikon RAW file
NI - Neat Image noise reduction system, plugin for Photoshop
NSFW - image not intended for viewing at work
ND - neutral density filter used to darken the frame and then increase the exposure
NN - Noise Ninja noise reduction system, plugin for Photoshop
NR - noise reduction system in the camera
Oly - Olik, Olympus
P - program shooting mode
P&S - a compact camera without a mirror, the so-called "mirrorless"
PC - lenses with tilt-shift perspective control
POL is a linear polarizing filter. It does not spin and is put through a special adapter.
PS - Adobe Photoshop, professional image editor
PSP - Paint Shop Pro, professional image editor
RAW is an intermediate data file format for storing and transmitting an encoded and compressed signal from a camera matrix. The so-called "raw source".
S, Tv - shutter priority mode
SLD - lens with an element of low dispersion glass, Tamron lenses
SSS - Sony Optical Image Stabilizer
SLR - reflex camera
T - shutter speed set manually. Its beginning coincides with the first pressing of the shutter button, and the end coincides with the second.
TC - optical teleconverter that increases the focal length of the lens by 1.4 or 2 times
TIFF, TIF is an image file format that supports 16-bit color channels, no compression or zip compression, and color profiles.
TTL - exposure metering system through the lens, in the form that the camera itself sees when shooting
ULD - lens with an element of low dispersion glass, Tamron lenses
USM is a "soft mask" filter used to sharpen photos in Photoshop
USM - built-in autofocus motor on a Canon camera
VR - optical image stabilizer on a Nikon camera
WB - white balance (from the English "White Balance")
Manual and semi-automatic modes of the camera, in contrast to the scenery modes of the green zone, allow the photographer to use the resources of the camera as efficiently as possible. On the technical side, in all programs of work, the camera is always guided by the principle of reciprocity of exposure parameters.
Automatic operating modes
In the "green zone" modes, most of the camera parameters are not available for editing, and the camera works according to the program embedded in it, with the lowest possible settings available to the user. The well-known phrase “In the green zone, the camera works at 30 percent of its capabilities” appeared for a reason - despite the availability of the CZK menu in scene modes, often the image quality in them does not cause any admiration, since the camera program, in itself, without the possibility of adjustment, far from ideal.
Switching modes is done by turning the main control dial of the camera. Icons corresponding to the mode are marked on the disk.
There are several green zone modes on Canon SLR cameras:
- Portrait. In this mode, the camera tries to set the lens aperture to the maximum open value, as this allows you to perfectly separate the subject from the background.
- Scenery. Landscape photography uses a large depth of field (aperture values from f/5.6) at a shutter speed of at least 1/focal length of the lens.
- Sport. As a rule, the sports mode involves shooting moving objects. With manual control of the parameters, the shortest shutter speed is selected, and the aperture that allows you to separate the background from the object in these conditions. The camera in automatic mode, in addition, connects the object tracking mode.
- No flash. Shooting in automatic mode, with the flash turned off (recommended for use in museums, zoos).
- Night portrait. Long exposure at an open aperture and high ISO. Due to possible shaking, it is better to use stabilization (tripod, etc.)
- Auto. Fully automatic shooting mode. The camera according to the program, depending on the current lighting conditions, will decide for itself which exposure pair to choose. A very dubious mode in terms of output quality, especially if shooting is in JPEG.
- Macro. In macro mode, the camera tries to increase the depth of field, shooting is carried out at the minimum possible distance from the lens (not less than the minimum focusing distance).
- Custom Creative Mode (CA). In this mode, the camera allows you to further change the shooting atmosphere (tint the image). Otherwise, the same machine.
You can use these modes at the very beginning of your photographic journey, they are well described in the names of the modes themselves, or you can try to figure out the camera settings and start taking technically more advanced pictures.
Manual and semi-automatic modes
Manual and semi-automatic modes of operation of the camera are also programs embedded in the camera. Unlike scenario modes, they have b O more controllable parameters, and are used, thanks to this, in a variety of photography conditions. There are few such modes:
- Aperture Priority (Aperture Value - A, Av)
- Shutter Priority, Time Value - S, Tv
- Program machine (Program AE - P)
- Manual Mode (M)
- Freehand shooting mode
A number of modern cameras also have camera modes in which all user-set parameters (Custom, C1, C2, C3) are saved.
Aperture priority (A, Av)
In this mode, the photographer can change the diameter of the aperture aperture of the lens. The camera adjusts the required shutter speed based on the current aperture value. This mode is usually used to control the depth of field in the resulting image. For example, when shooting portraits.
On most Canon DSLRs, aperture priority mode is convenient for manual lens use.
Shutter priority (S, Tv)
In this mode, the camera selects the aperture value based on the shutter speed set by the photographer. You can use it, for example, when shooting fast moving objects (birds, cars, and so on), or vice versa, if you need to open the shutter for a long time (shooting the starry sky from a tripod). Also, shutter priority is used in dynamic lighting conditions, and when there is no need (or opportunity) to think about depth of field.
Photo taken in shutter priority. Canon 1Ds and Jupiter-37A
Program machine (P)
In the programmable machine, the camera works almost like in automatic mode. The difference is that it is possible to change the combination of the exposure pair, set the metering parameters, and the sensitivity to light. Exposure compensation is also available.
The program machine can be inconvenient because the camera position often differs from the user’s position: when shooting, for example, moving objects, the automation often sets the exposure one to three stops lower than necessary, since the calculation is based on lighting data, and not happening around 🙂
The software machine, in principle, allows you to take good shots.
Manual mode (M)
In the manual mode of the camera, the photographer can play with the settings as he needs - it is possible to change the shutter speed, aperture, metering mode, sensor light sensitivity, exposure compensation, and others. The camera displays only the exposure meter readings.
Manual mode is typically used in difficult electronics environments. For example, when all possible methods of exposure metering do not bring the proper result, or it is necessary to take a picture of a moving object with a very shallow depth of field. Well, or in night shooting.
The picture was taken in manual mode.
Freehand shooting mode
Bulb shooting mode (BULB) is a mode for controlling the camera shutter manually. Used, for example, when taking pictures of the starry sky, or in other situations where manual shutter control is necessary. In this mode, the shutter opens when the shutter button is pressed and closes when it is released. Previously, in film cameras, this mode was used to work with non-synchronized flash lamps, hence the name - BULB (lamp).
Also found
A-DEP- Depth of field control mode. The user uses the button on the body of the camera (usually the DOF button) to indicate the “from” and “to” points for setting the depth of field, and the camera already “adjusts” the exposure parameters. The mode is found in digital SLR cameras Canon EOS Digital. Exposure compensation is also available in this mode.
Sv— light sensitivity priority mode. It works like a software machine, only the camera also sets the sensitivity of the matrix.
TAv- exposure priority mode. In it, the camera selects the necessary matrix light sensitivity based on the exposure / exposure parameters set by the user.
Sv and TAv modes are found in Pentax cameras. They are not used in Canon and Nikon, since it is possible to auto-adjust the ISO (Auto ISO) in any of the semi-automatic modes.
What camera modes to use
As you may have understood, there are no universal modes. The most versatile mode is Photographer Experience. And experience, as you know, comes through the study of theory and practice. However, with an accuracy of 146 percent, I can assure you that when you leave the “green zone” and after a little practice, you will later want to re-shoot everything that you “shot” on the machine.
Ask questions in the comments.