Application examples
08.12.2014To synchronize time, NetPing devices use the NTP protocol. Using this protocol, all devices on the network adjust their time according to the specified server. NetPing devices connected to the Internet can use a public NTP server, as recommended in article. If there is no access to the Internet, then you can set up a local NTP server. Such a server can be any Windows computer with a configured service W32Time (« Windows Time Service "). This service does not have a graphical interface and is configured either through the command line or by editing registry keys.
Instructions for setting up an NTP server on Windows 7/8/2008/2012
Consider setting up a time service through editing the registry. The setup is the same for versions of Windows 7/8, Windows Server 2008, Windows Server 2012.
For this setting, you must have Windows administrator rights.
Open the registry editor either through the dialog box " Run” triggered by the key combination “ Win» + « R", or through the search form, where we type " regedit».

In the editor that opens, in the left tree menu, open the "branch" " HKEY_LOCAL_MACHINE\SYSTEM\CurrentControlSet\services\W32Time\TimeProviders\NtpServer", where we are looking for a key with the name " enable". Right-click and select "Edit". Change key value from 0 on 1 .

By changing this parameter, we indicated that this computer acts as an NTP server. The computer simultaneously remains a client and can synchronize its time with other servers on the Internet or a local network. If you want the internal hardware clock to act as a data source, then change the value of the key parameterAnnounce Flags on 5 in the thread " HKEY_LOCAL_MACHINE\SYSTEM\CurrentControlSet\Services\W32Time\Config».

For the changes to take effect, we need to restart the service. Services are accessed via Control Panel» from the menu « Start» -> « Control Panel» -> « Administration» -> « Services". It is also in the search form when you enter " services.msc". In the list of services that appears, we find the one we are interested in " Windows Time Service"and through the menu called by the right mouse button, select the item" Restart».
MSK-IX NTP Server is a public time server supported by MSK-IX. The exact time server is designed to synchronize with the reference source of internal clocks of computers and network equipment (servers, routers, smartphones, etc.) using the NTP protocol.
MSK-IX NTP server belongs to the highest level of accuracy (Stratum One Time Servers) in the hierarchical system of clock levels. The signal of global satellite navigation systems GLONASS (priority) and GPS is used as a reference time signal.
MSK-IX NTP Server is implemented as a grouping of servers located in Moscow, St. Petersburg, Yekaterinburg and Novosibirsk. The use of anycast network technology ensures high reliability and fast response of the system throughout the country.
MSK-IX servers are also included in the international pool of NTP servers POOL.NTP.ORG, which is widely used in operating system settings.
How to start using the NTP Server service?
Use the following options when configuring hardware:
| Server name | ntp.msk-ix.ru |
| IPv4 address | 194.190.168.1 |
| IPv6 address | 2001:6d0:ffd4::1 |
How to establish peering with MSK-IX NTP server network?
To shorten the network route to the MSK-IX NTP server, use the Route Server service or establish direct peering with the MSK-IX DNS Cloud network. Peer-to-peer interaction is established upon an additional application within the framework of the contract for connection to MSK-IX at no additional charge.
Good afternoon, dear readers and guests of the blog site, how many people talk about time, that it runs fast or slowly, and everyone understands that it is priceless and important. So in the infrastructure of Active Directory, it is one of the most important factors for the proper functioning of the domain. In the domain, everyone trusts each other, and once logged in and received all the tickets from Kerberos, the user goes anywhere, limited only by his available rights. So, if you do not have the exact time on your workstations to the domain controller, then you can assume that you are starting to have serious problems, which we will discuss below and consider how to fix them using Windows NTP server settings.
Time Synchronization in Active Directory
The following time synchronization scheme works among computers participating in Active Directory.
- The root domain controller in the AD forest that owns the PDC emulator FSMO role (let's call it root PDC) is the time source for all other domain controllers in that domain.
- Child domain controllers synchronize time with domain controllers upstream in the AD topology.
- Ordinary domain members (servers and workstations) synchronize their time with the nearest available domain controller to them, respecting the AD topology.
The root PDC can synchronize its time both with an external source and with itself, the latter is set by default and is absurd, as errors in the system log periodically hint at.
Synchronization of clients of the root PDC can be performed both from its internal clock and from an external source. In the first case, the root PDC's time server advertises itself as "reliable".
Next, I will give the optimal configuration of the root PDC time server from my point of view, in which the root PDC itself periodically synchronizes its time from a reliable source on the Internet, and the time of clients accessing it synchronizes with its internal clock.
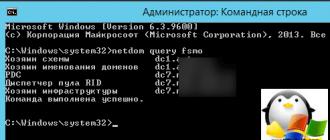
Enter netdom query fsmo. In my example, the role of the PDC and NTP server belongs to the dc7 controller

NTP Server Configuration on the Root PDC
Configuring the Windows time server (NTP server) can be done using the command line utility w32tm, and through the registry. Where possible, I will provide both options. But at the beginning, look at your complete settings on the computer, this is done with the command:
w32tm /query /configuration
EventLogFlags: 2 (Local)
AnnounceFlags: 10 (Local)
TimeJumpAuditOffset: 28800 (Local)
MinPollInterval: 6 (Local)
MaxPollInterval: 10 (Local)
MaxNegPhaseCorrection: 172800 (Local)
MaxPosPhaseCorrection: 172800 (Local)
MaxAllowedPhaseOffset: 300 (Local)FrequencyCorrectRate: 4 (Local)
PollAdjustFactor: 5 (Local)
LargePhaseOffset: 50000000 (Local)
SpikeWatchPeriod: 900 (Local)
LocalClockDispersion: 10 (Local)
HoldPeriod: 5 (Local)
PhaseCorrectRate: 7 (Local)
UpdateInterval: 100 (Local)NtpClient (Local)
Enabled: 1 (Local)
InputProvider: 1 (Local)
CrossSiteSyncFlags: 2 (Local)
ResolvePeerBackoffMinutes: 15 (Local)
ResolvePeerBackoffMaxTimes: 7 (Local)
CompatibilityFlags: 2147483648 (Local)
EventLogFlags: 1 (Local)
LargeSampleSkew: 3 (Local)
SpecialPollInterval: 3600 (Local)
Type: NT5DS (Local)NtpServer (Local)
DllName: C:\Windows\system32\w32time.dll (Local)
Enabled: 1 (Local)
InputProvider: 0 (Local)
AllowNonstandardModeCombinations: 1 (Local)VMICTimeProvider (Local)
DllName: C:\Windows\System32\vmictimeprovider.dll (Local)
Enabled: 1 (Local)
InputProvider: 1 (Local)

Enabling synchronization of the internal clock with an external source

Enable NTP Server
The NTP server is enabled by default on all domain controllers, but it can also be enabled on member servers.

Setting the list of external sources for synchronization

The 0x8 flag at the end means that synchronization should occur in NTP client mode, at intervals suggested by this server. In order to set your own synchronization interval, you must use the 0x1 flag.
Setting the synchronization interval with an external source
Time in seconds between synchronization source polls, default 900s = 15min. Works only for sources marked with the 0x1 flag.
"SpecialPollInterval"=dword:00000384
Setting the minimum positive and negative correction
Maximum positive and negative time correction (difference between the internal clock and the synchronization source) in seconds, above which synchronization does not occur. I recommend the value 0xFFFFFFFF, at which the correction can always be made.
"MaxPosPhaseCorrection"=dword:FFFFFFFF
"MaxNegPhaseCorrection"=dword:FFFFFFFF
Everything you need in one line
w32tm.exe /config /manualpeerlist:"time.nist.gov,0x8 ntp1.imvp.ru,0x8 ntp2.imvp.ru,0x8 time.windows.com,0x8 pool.ntp.org,0x8" /syncfromflags:manual / reliable:yes /update
Useful Commands
- Apply changes made to the time service configuration
w32tm /config /update - Force sync from source
w32tm /resync /rediscover - Display the synchronization status of domain controllers in a domain
w32tm /monitor - Display of current synchronization sources and their status
w32tm /query /peers
Configuring NTP Server and Client by Group Policy
Since we have an Active Directory domain, it's stupid not to use group policies to mass configure servers and workstations, I'll show you how to configure your NTP server in windows and a client. Open the Group Policy Editor snap-in. Before setting up our NTP server on Windows, we need to create a WMI filter that will apply the policy only to the PDC master server.

Enter the query name, namespace, will be "root\CIMv2" and the query "Select * from Win32_ComputerSystem where DomainRole = 5". We save it.

You then create a policy on the Domain Controllers container.

At the very bottom of the policy, apply your created WMI filter.

Go to the branch: Computer Configuration > Policies > Administrative Templates > System > Windows Time Service > Time Providers.

Here we open the "Configure Windows NTP Client" policy. Set parameters
- NtpServer: 0.ru.pool.ntp.org.0x1, 1.ru.pool.ntp.org.0x1, 2.ru.pool.ntp.org.0x1, 3.ru.pool.ntp.org.0x1
- Type: NTP
- CrossSiteSyncFlags: 2. A two means that if this parameter is set to 2 (All), any sync member can be used. This value is ignored unless NT5DS is set. Default value: 2 (decimal) (0x02 (hexadecimal))
- ResolvePeerBackoffMinutes: 15. This value, expressed in minutes, determines how long the W32time service waits before trying to resolve a DNS name if it fails. Default value: 15 minutes
- Resolve Peer BAckoffMaxTimes: 7. This value determines the number of DNS name resolution attempts that the W32time service makes before restarting the discovery process. Each time DNS name resolution fails, the interval to wait before the next attempt is doubled. Default value: seven attempts.
- SpecilalPoolInterval: 3600 This NTP client setting value, expressed in seconds, specifies how often to poll a manually configured time source that uses a specific polling interval. If the SpecialInterval flag is set for the NTPServer parameter, the client uses the value specified as SpecialPollInterval instead of the MinPollInterval and MaxPollInterval values to determine how often the time source is polled. Default value: 3600 seconds (1 hour).
- EventLogFlags: 0

We make a separate group policy for client workstations, with the following settings.
- NtpServer: The address of your domain controller with the PDC role.
- Type: NT5DS
- CrossSiteSyncFlags: 2
- ResolvePeerBackoffMinutes: 15
- Resolve Peer BAckoffMaxTimes: 7
- SpecilalPoolInterval: 3600
- EventLogFlags: 0


There are many services in operating systems whose normal functioning depends on the accuracy of the system clock. If the exact time is not set on the server, this can cause various problems.
For example, on a local network, it is required that the clocks of machines sharing files be synchronized - otherwise it will not be possible to correctly set the modification time of files. This, in turn, can cause version conflicts or important data to be overwritten.
If the server does not have an exact time set, there will be problems with Cron jobs - it is not clear when they will run. It will be very difficult to analyze the system event logs to diagnose the causes of failures and malfunctions ...
You can go on for a long time...
To avoid all the described problems, you need to set up synchronization of the system clock. Linux uses NTP (Network Time Protocol) for this. In this article, we will talk in detail about how to install and configure NTP on the server. Let's start with a little theoretical introduction.
How does the NTP protocol work?
The NTP protocol is based on a hierarchical structure of exact time servers, in which different levels (English strata) are distinguished. Level 0 refers to the reference clock (atomic clock or GPS clock). At level zero, NTP servers don't work.
Tier 1 NTP servers, which are sources for Tier 2 servers, synchronize with the reference clock. Tier 2 servers synchronize with Tier 1 servers, but can also synchronize with each other. Tier 3 and below servers work the same way. In total, up to 256 levels are supported.
The hierarchical structure of the NTP protocol is characterized by fault tolerance and redundancy. In the event of connection failures with the upstream servers, the backup servers take over the synchronization process. Redundancy ensures that NTP servers are always available. By synchronizing with multiple servers, NTP uses data from all sources to calculate the most accurate time.
Installing and configuring an NTP server
The best known and most widely used time synchronization tool is the ntpd daemon. Depending on the settings specified in the configuration file (this will be discussed below), it can act both as a server and as a client (i.e. it can both receive time from remote hosts and distribute it to other hosts) . Below we will describe in detail how to install and configure this daemon in OC Ubuntu.
Installation
The NTP program is included in the distributions of most modern Linux systems and is installed using a standard package manager:
$ sudo apt-get install ntp
Setting
After the installation is complete, open the /etc/ntp.conf file in a text editor. It stores all program settings. Let's consider them in more detail.
Logging options
The first line of the config file looks like this:
Driftfile /var/lib/ntp/ntp.drift
It specifies a file for storing information about the frequency of the time offset. This file stores the value resulting from previous time adjustments. If external NTP servers become unavailable for one reason or another, the value will be taken from it.
Logfile /var/log/ntp.log
List of servers for synchronization
The configuration file specifies the list of NTP servers with which synchronization will be performed. By default it looks like this:
Server 0.ubuntu.pool.ntp.org server 1.ubuntu.pool.ntp.org server 2.ubuntu.pool.ntp.org server 3.ubuntu.pool.ntp.org
Each line means a group of servers that will report the correct time to our server. You can improve synchronization accuracy using the iburst option (it indicates that not one, but several packets should be sent to the server for synchronization):
Server 0.ubuntu.pool.ntp.org iburst server 1.ubuntu.pool.ntp.org iburst server 2.ubuntu.pool.ntp.org iburst server 3.ubuntu.pool.ntp.org iburst
You can also specify your preferred server with the prefer option:
Server 0.ubuntu.pool.ntp.org iburst prefer
NTP servers are scattered around the world (here, for example, is a list of available public NTP servers). To ensure a more accurate setting of the system clock, it is recommended to synchronize only with ntp servers of the region in which our server is geographically located. To do this, in the /etc/ntp.conf configuration file, specify the regional subdomain for pool.ntp.org in the server addresses:
- Asia - asia.pool.ntp.org;
- Europe - europe.pool.ntp org;
- Africa — africa.pool.ntp.org;
- North America - north-america.pool.ntp.org;
- South America - south-america.pool.ntp.org;
- Oceania - oceania.pool.ntp.org.
You can also specify subdomains for individual countries (for more details, see ). There is also a subdomain for Russia - ru.pool.ntp.org
Backup time server
An NTP server that is disconnected from the Internet for any reason may transmit its system clock data for synchronization. To do this, add the following line to the configuration file:
Server 127.127.1.0
Restrictions
Recently, cases of using NTP servers to amplify traffic in DDoS attacks have become more frequent (for more details, see, for example,). To prevent our server from becoming a victim of abuse, it would be useful to set access restrictions for external clients. By default, the following restrictions are set in the /etc/ntp.conf file:
Restrict −4 default kod notrap nomodify nopeer noquery restrict −6 default kod notrap nomodify nopeer noquery
The nomodify, notrap, nopeer, and noquery options prevent third-party clients from modifying anything on the server. The kod parameter (this abbreviation means kiss of death) provides additional protection: a client that sends too many requests will first receive a so-called kod packet (denial of service warning) and then be disconnected from the server.
In order for machines from the local network to synchronize with the NTP server, add the following line to the configuration file:
Restrict 192.168.1.0 mask 255.255.255.0 nomodify notrap
For the local host, you can set access to the NTP server without restrictions:
Restrict 127.127.1.0
Synchronization check
After all the necessary changes have been made to the configuration file and saved, restart the NTP server:
$ service restart ntp
Then run the following command:
$ ntpq -pn
Its output will be presented in the form of a table:
Remote refid st t when poll reach delay offset jitter ======================================= ===================================== *62.76.96.4 130.173.91.58 2 u 207 256 37 10.985 -215.79 256.992 +85.21.78.91 89.175.22.41 2 u 193 256 37 32.623 -207.70 259.121 +31.131.249.27 89.175.22.41 2 u 198 25 6 37 0.621 -216.90 257.037 +85.21.78.8 193.11.166.20 2 u 193 256 37 32.028 - 207.41 259.863 +91.189.94.4 193.79.237.14 2 u 192 256 37 50.573 -206.62 259.542
The table indicates the following parameters:
- remote — exact time server address (this column displays servers from the list in the configuration file);
- refid - upstream server (the one from which the server from the previous columns receives synchronization);
- st — level (stratum) of the server;
- t — peer type (u- unicast, m- multicast);
- when is the time of the last synchronization;
- poll is the time in seconds it takes for the NTP daemon to synchronize with the peer.
- reach — server availability status; after eight successful synchronization attempts, the value of this parameter becomes equal to 377;
- delay — response delay time from the server;
- offset is the time difference between our server and the synchronization server; a positive value of this parameter means that our clock is fast, a negative value means that it is behind;
- jitter is the time offset on the remote server.
The following characters can be specified to the left of the server address:
- * server selected for synchronization;
- + a server suitable for updating (with which you can synchronize);
- — it is not recommended to synchronize with the server;
- x server is unavailable.
You can check if a server from the list is suitable for synchronization using the command:
Ntpdate -q server хх.ххх.ххх.ххх, stratum 2, offset −0.127936, delay 0.02600 7 Jul 14:30:23 ntpdate: adjust time server хх.ххх.ххх.ххх offset −0.127936 sec
From the above output, it can be seen that the server is suitable for synchronization, its level is 2, the offset is 0.127936 ms, and the delay is 0.026 ms.
You can also find out how the synchronization went (successfully or with errors) from the logs:
7 Jul 15:17:17 ntpd: synchronized to 91.198.10.4, stratum=2 7 Jul 15:17:17 ntpd: kernel time sync disabled 0041 7 Jul 15:17:21 ntpd: kernel time sync enabled 0001
Setting the local date and time
The ntpdate command can be used to set the local date and time on the server by sending a request to the NTP server.
Setting up an NTP server in Windows
Starting with Windows 2000, all Windows operating systems include a time service W32Time. This service is designed to synchronize time within an organization. W32Time is responsible for the operation of both the client and server parts of the time service, and the same computer can be both an NTP (Network Time Protocol) client and server.
By default, the Windows time service is configured as follows:
When the operating system is installed, Windows starts an NTP client and synchronizes with an external time source;
When you add a computer to a domain, the synchronization type changes. All client computers and member servers in a domain use a domain controller that authenticates them for time synchronization;
When a member server is promoted to a domain controller, an NTP server is launched on it, which uses a controller with the PDC emulator role as a time source;
The PDC emulator, located in the forest root domain, is the primary time server for the entire organization. At the same time, it is also synchronized with an external time source.
This scheme works in most cases and does not require intervention. However, the Windows time service structure may not follow a domain hierarchy, and any computer can be designated as a reliable time source. As an example, I will describe setting up an NTP server in Windows Server 2008 R2, although the procedure has not changed much since Windows 2000.
Starting an NTP server
I note right away that the time service in Windows Server (from 2000 to 2012) does not have a graphical interface and is configured either from the command line or by directly editing the system registry. Personally, the second method is closer to me, so we go to the registry.
So, the first thing we need to do is start the NTP server. Open the registry branch
HKLM\System\CurrentControlSet\services\W32Time\TimeProviders\NtpServer.
Here to enable the NTP server parameter Enabled you need to set the value 1
.
Then we restart the time service with the command net stop w32time && net start w32time

After restarting the NTP service, the server is already active and can serve clients. You can verify this using the w32tm /query /configuration command. This command displays a complete list of service options. If section NtpServer contains the string Enabled:1, then everything is in order, the time server is working.

In order for the NTP server to serve clients, do not forget to open UDP port 123 on the firewall for incoming and outgoing traffic.
Basic NTP server settings
The NTP server has been enabled, now you need to configure it. Open the registry branch HKLM\System\CurrentControlSet\services\W32Time\Parameters. Here we are primarily interested in the parameter type A that specifies the type of sync. It can take the following values:
NoSync- The NTP server is not synchronized with any external time source. The clock built into the CMOS chip of the server itself is used;
NTP- The NTP server is synchronized with external time servers, which are specified in the registry setting NtpServer;
NT5DS- The NTP server synchronizes according to the domain hierarchy;
AllSync- The NTP server uses all available sources for synchronization.
The default value for a computer that is a member of a domain is NT5DS, for a stand-alone computer — NTP.
And parameter NtpServer, which specifies the NTP servers with which this server will synchronize time. By default, this parameter contains the Microsoft NTP server (time.windows.com, 0x1), if necessary, you can add several more NTP servers by entering their DNS names or IP addresses separated by a space. The list of available time servers can be viewed for example.
You can add a flag at the end of each name (ex. ,0x1) which specifies the mode to synchronize with the time server. The following values are allowed:
0x1– SpecialInterval, use of a special polling interval;
0x2– UseAsFallbackOnly mode;
0x4– SymmetricActive, symmetrical active mode;
0x8– Client, sending a request in client mode.
When using the SpecialInterval flag, the interval value set in the key is required SpecialPollInterval. If the UseAsFallbackOnly flag is set, the time service is told that this server will be used as a fallback server and that other servers in the list will be contacted before synchronizing with it. Symmetric active mode is used by default by NTP servers, and client mode can be used in case of synchronization problems. You can see more about synchronization modes, or don’t fool around and just put it everywhere ,0x1(as advised by Microsoft).

Another important parameter Announce Flags located in the registry key HKLM\System\CurrentControlSet\services\W32Time\Config. It is responsible for how the NTP server declares itself and can take the following values:
0x0( Not a time server) - the server does not advertise itself through NetLogon as a time source. It can respond to NTP requests, but neighbors will not be able to recognize it as a time source;
0x1(Always time server) - the server will always announce itself regardless of the status;
0x2(Automatic time server) - the server will only announce itself if it receives reliable time from another neighbor (NTP or NT5DS);
0x4(Always reliable time server) - the server will always declare itself as a reliable time source;
0x8(Automatic reliable time server) - a domain controller is automatically declared reliable if it is a forest root domain PDC emulator. This flag allows the forest master PDC to assert itself as the authorized time source for the entire forest, even if it is not connected to the upstream NTP servers. No other controller or member server (which has the default flag 0x2) cannot claim to be a reliable source of time if it cannot find a source of time for itself.
Meaning Announce Flags is the sum of its constituent flags, for example:
10=2+8 - NTP server declares itself as a reliable time source, provided that it receives time from a reliable source or is a PDC of the root domain. Flag 10 is set by default for both domain members and standalone servers.
5=1+4 - The NTP server always claims to be a reliable time source. For example, to declare a member server (not a domain controller) as a reliable time source, flag 5 is needed.

Well, let's set the interval between updates. The key already mentioned above is responsible for it. SpecialPollInterval, located in the registry key HKLM\System\CurrentControlSet\services\W32Time\TimeProviders\NtpClient. It is in seconds and defaults to 604800, which is 1 week. This is a lot, so it's worth reducing the value of SpecialPollInterval to a reasonable value, say 1 hour (3600).

After configuration, you need to update the service configuration. You can do this with the w32tm /config /update command. And a few more commands for configuring, monitoring and diagnosing the time service:
w32tm /monitor - using this option, you can find out how much the system time of this computer differs from the time on the domain controller or other computers. For example: w32tm /monitor /computers:time.nist.gov
w32tm /resync - With this command, you can force the computer to synchronize with the time server it uses.
w32tm /stripchart - shows the time difference between the current and remote computer, and can display the result in a graphical form. For example, the command w32tm /stripchart /computer:time.nist.gov /samples:5 /dataonly will make 5 comparisons with the specified source and display the result in text form.
w32tm /config is the main command used to configure the NTP service. With its help, you can set the list of time servers used, the type of synchronization, and much more. For example, you can override the default values and set up time synchronization with an external source using the command w32tm /config /syncfromflags:manual /manualpeerlist:time.nist.gov /update
w32tm /query - Shows the current service settings. For example, w32tm /query /source will show the current time source, and w32tm /query /configuration will show all service parameters.
Well, as a last resort 🙁
w32tm /unregister - Removes the time service from the computer.
w32tm /register - Registers the time service on the computer. In this case, the entire parameter branch in the registry is recreated.