Good day!
If you have a new computer (relatively :)) with UEFI support, then when installing a new Windows you may be faced with the need to convert (convert) your MBR disk to GPT. For example, during installation, an error of the form may appear: "In EFI systems, Windows can only be installed on a GPT disk!".
In this case, there are two ways of solving: either switch UEFI to Leagcy Mode (not good, because UEFI shows higher performance. The same Windows loads faster); either convert the partition table from MBR to GPT (fortunately, there are programs that do this without losing data on the media).
Actually, in this article I will consider the second option. So, …
Convert MBR disk to GPT (without losing data on it)
For further work, you need one small program - AOMEI Partition Assistant.
Great program for working with disks! Firstly, it is free for home use, supports Russian and runs on all popular Windows 7, 8, 10 (32/64 bit) operating systems.
Secondly, it has several interesting wizards who will do the entire routine process of setting and setting parameters for you. For instance:
- disc copy wizard;
- partition copy wizard;
- partition recovery wizard;
- oS transfer wizard from HDD to SSD (relevant lately);
- bootable Media Builder.
Naturally, the program can format hard drives, change the structure of MBR to GPT (and vice versa), and so on.
So, after starting the program, select your drive you want to convert (you need to choose the name "Disc 1" for example), and then right-click on it and select the function " Convert to GPT"(As in Fig. 1).

Figure: 1. Convert disk MBR to GPT.

Figure: 2. Agree with the transformation!
Then you need to click the "Apply" button (in the upper left corner of the screen. For some reason, many are lost at this step, expecting that the program has already started working - this is not so!).
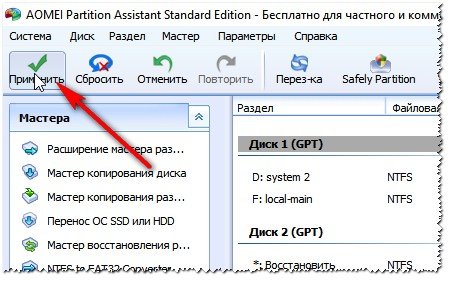
Figure: 3. Apply changes to disk.
Then AOMEI Partition Assistant she will show you a list of actions that she will take if you give consent. If the disk is chosen correctly, then just agree.

Figure: 4. Start conversion.
Generally, the conversion process from MBR to GPT is fast. For example, a 500GB drive was converted in a couple of minutes! At this time, it is better not to touch the PC and not interfere with the program to do the work. At the end, you will see a message indicating that the conversion is complete (as in Figure 5).

Figure: 5. The disk was converted to GPT successfully!
Pros:
- fast conversion, literally a few minutes;
- conversion occurs without loss of data - all files and folders on the disk are intact;
- it is unnecessary to have any specials. knowledge, no need to enter any codes, etc. The whole operation is reduced to a few mouse clicks!
Minuses:
- you cannot convert the disk from which the program was launched (i.e. from which Windows is also loaded). But you can get out - see. below:);
- if you have only one disk, then in order to convert it you need to connect it to another computer, or create a bootable USB flash drive (disk) and convert it from it. By the way, in AOMEI Partition Assistant there is a special wizard for creating such a flash drive.
Conclusion: Generally speaking, the program copes with this task perfectly! (The above disadvantages - you can lead to any other similar program, because you cannot convert the system disk from which the boot was performed).
Converting from MBR to GPT during Windows Setup
This method, unfortunately, will erase all data on your media! Use it only when there is no valuable data on the disk.
If you are installing Windows and you see an error that the OS can only be installed on a GPT disk, then you can convert the disk right during the installation process (Attention! The data on it will be deleted, if the method does not work, use the first recommendation from this article).
An example of an error is shown in the figure below.

Figure: 6. Error with MBR when installing Windows.
So, when you see a similar error, you can do this:
1) Press the Shift + F10 buttons (if you have a laptop, then perhaps you should try Fn + Shift + F10). After pressing the buttons, the command line should appear!
2) Enter the command Diskpart and press ENTER (Fig. 7).

3) Next, enter the List disk command (this is to view all the disks that are in the system). Note that each disk will be labeled with an identifier: for example, “Disk 0” (as in Figure 8).
Often when installing windows, when you select the target disk, you may stumble upon a message like “The selected disk has an MBR partition table. On EFI systems, Windows can only be installed on a GPT disk "
Example of MBR error when installing Windows
The Internet is full of advice, ranging from strange "you need to press esc very often at a certain stage of the installation", and ending with quite bearable, but not always applicable.
Let's try to figure out what can be done in this situation, how best to proceed and, in general, the reasons for this error.
Reasons for the error
A long time ago, when hard drives were small (less than a terabyte) and used BIOS, they used what was called the Master Boot Record (MBR). Any operating system of the Windows family has firmly settled in this entry in order to boot successfully. This record was located in a certain area of \u200b\u200bthe hard disk, and was accordingly limited in size. Over time, the BIOS was replaced by the UEFI system. And the screws got bigger. And the bright minds realized that the MBR is very outdated, and that its volume is small. What if a cunning user wants to put ten operating systems on his multi-terabyte screw? That's how they came up with a replacement for MBR - GPT. And new versions of Windows (starting with the eight for sure) require that the hard disk, if the computer is not BIOS a UEFI, be formatted in GPT - just in case.
what to do?
Option one is to enable a special boot mode - Legacy. This mode will make it clear to the Windows installer that this computer has compatibility with old systems, and you can use the MBR. Unfortunately, it is impossible to say how to enable this mode in a specific BIOS - every developer hides it as soon as possible. Here's one example:
 Example of switching boot mode to Legacy
 The disadvantage of this method is that if at some point the installer stops responding to the Legacy mode, then the method will stop working.
What if the previous method cannot be used? The obvious answer is to convert the disk to GPT format. Windows Installer provides such an option, but - all data on the disk will be destroyed.There is also a third method - but more on that later.
So you are ready to convert the disk to GPT, deleting all data. Here are the steps to do this:
- In the Windows installer, we reach the stage of partitioning the disk
- Push Shift + f10... The console will open (black window with white letters).
- We enter the following commands sequentially (after each line, press Enter and wait for a new command prompt):
- diskpart list disk select disk
clean convert gpt exit
- diskpart list disk select disk
- At the select disk stage, you need to enter the number of your disk, which is just shown by the list disk command. Most likely the disk number is 0. But in the case of booting from a USB flash drive, the number may differ.
- Everything, the disk is formatted
This is all great, but not everyone wants to destroy all data on their disk. In this case, a wonderful utility will help us. Naturally, it needs a downloadable working copy of windows to work. You can put old XP for such a thing, you can use some kind of assembly that allows you to run programs. In general, the sequence of actions is as follows:
- Download the utility and unpack it to a place accessible for windows (for working Windows - anywhere, for an installer with launching programs - most likely on a USB flash drive with an installer)
- We get in any way to any Windows console. In a working copy, this can be done with the cmd command in the Run window.
- Go to the folder with the unpacked gptgen (for those who do not know how to use the console - google the CD command).
- Run the following command gptgen.exe -w \\\\. \\\\ physicaldrive0
Naturally, instead of zero at the end, you need to substitute the number of the disk that you want to overtake. How to find out the disk number - described above. Most likely, you will still need to confirm the conversion, but the program will kindly ask you this. Everything! Drive converted, data in place. The only thing is that the windows loader will most likely fly off. But you can either restore it, if necessary, or install a new windows, for which, in fact, all this was started.
Even if you belong to the category of those users who prefer not to interfere in any processes, life itself can force you to join the study of some technical issues. The fact is that manufacturers of computer equipment and components are directing their actions towards continuous improvement, so it is not surprising to find hard drives, the total volume of which reaches completely unprecedented values.
How to convert a GPT disk to MBR and vice versa
In addition, the style of the hard drive partitions is also surprising. If earlier it was possible to encounter only MBR, nowadays many people acquire hard drives with the GPT style. Everything would be fine, it would be completely possible not to recognize what each of these styles represents, if they did not interfere with the performance of certain tasks.
In particular, hard drives with the MBR style are not welcomed by owners of huge hard drives, since it cannot provide optimal use of the entire disk space. This style assumes that disks are partitioned into no more than four partitions, each of which must not exceed 2 TB.

You've probably already sensed that an MBR-style hard drive can use about 8 TB, but if you just bought a PC with a lot of disk space, then the rest won't just be used. This is definitely wrong, so the manufacturer has developed this new style. By the way, GPT allows you to partition your hard drive into hundreds of partitions, which impresses many users.

However, it is also difficult for many to agree to this style, because trying to install the desired operating system, a system error will occur. And also the BIOS version that is installed on your PC can prevent the introduction of a new style on the hard drive. Given this, it is not at all surprising that many users are eagerly eager to find information on how to convert GPT to MBR, so as not to prejudice their interests when installing their preferred "seven".
Conversion methods
There are several options that can be used to successfully convert a hard disk from GPT to MBR. We recommend that you familiarize yourself with all the options in order to figure out for yourself which of the methods will be preferable. And also, before choosing the appropriate option, we recommend that you prioritize, determine how tragic the consequences of losing content stored on your PC will be for you. We offer you two options, one of which allows you to save everything that was previously placed on your hard disk, and the second, on the contrary, is accompanied by their irrevocable destruction.
Without erasing files
If you have determined for yourself a goal that involves changing the style of the hard disk, and also be sure to ensure the complete preservation of all existing documents, videos, audio materials on the hard disk, you will have to use additional software. Excellent options for such programs are:
- Paragon Hard Disk Manager 15 Professional;
- AOMEI Partition Assistant.
The program, which is the first in this small list, is not a free product, so if it inspires confidence in you, you will have to fork out to become its owner. For training or practical evaluation of the capabilities of the Paragon Hard Disk program, you can download a demo version.

We invite you to familiarize yourself with the principles of this program. Open the Disk Management option on your computer. In this window, you can observe how many partitions you have, as well as estimate their size.
If not one hard drive is installed, but two at once, you will also immediately notice this from the open program window. By clicking on each right mouse button and clicking on the "Properties" line, you can easily verify once again what style your hard disk supports.

Now run the Paragon Hard Disk program, in the window that opens, you can again find all the disks that your computer is equipped with. Each will show a supported style. Place the mouse cursor on the disk with the GPT style, right-click, bringing up an additional menu with the necessary options. In it, you can easily find such an option as "Convert basic GPT to basic MBR disk", feel free to opt for it. After that, a new window will appear on the screen, in which you will need to click the "Convert" button again, confirming your desire.

This is not the end of your conciliatory moments, now in the main window of the program you need to click on the "Apply" button, and then once again confirm your consent to make such changes. Further, the program will perform all the actions by itself, you just have to wait a little. After a record appears on the screen confirming the completion of the process, you can check your disk, make sure that you managed to make it a different, now accompanied by the MBR style.
ADVICE. If you really want to do the opposite, a GPT-style disc, this program can again act as an ideal helper. To achieve what you want, you will have to convert your disk in the same way, but this time you will have to select the "Convert to GPT disk" option.
With file deletions
If you want to use the command line, which also allows you to make your disk in whatever style you prefer, you must take into account that all content stored on the hard drive will be irrevocably deleted. Of course, with this in mind, you need to analyze how valuable the stored files are to you, if you need to transfer them to new drives first.
In the command line, we initially write diskpart, then we recommend that you write the list disc command, which will display all available disks.

At the end of a line followed by a disk, you can find an asterisk or mark its absence. It is this asterisk that is the guideline that a particular disk is accompanied by the GPT style. Opposite each disk there is a numerical indicator, find out which specific disk you would like to convert now. Only then enter the following command sel dis 1 with the correct numeric value.
Then, to clean up this disk space, you just need to enter the clean command. This completes the preparatory part, you can start converting by entering the convert mbr command. Finally, it remains to enter the traditional exit command.

Now you will be able to make sure that everything worked out great for you, but only then your disk will sparkle with its "cleanliness", since during the process all information was deleted from it.
So, the process of converting disk space from one style to another is quite doable, everyone can handle it. To eliminate any worries, read the instructions, theoretically master the basics, and then proceed to their practical implementation.
Correct operation of the software depends directly on the hardware installed on the PC. If the HDD partition tables do not meet the developer's requirements, the OS installation will fail. Here knowledge of methods of converting hard drives from GPT to MBR style and vice versa will come to the rescue.
GPT is a new format for the hard drive, it is used in conjunction with UEFI - BIOS.
MBR is a familiar standard HDD format.
Convert GPT to MBR
It is not uncommon for a regular reinstallation of the system to fail. When determining the HDD for "filling" Windows, the information appears - "Installation on this disk is not possible. The selected disk has a GPT partition style ", after which the process is stalled. The reason is there is no possibility or there is a UEFI BIOS.
There are several solutions to change the HDD image from GPT to MBR. Let's take a look at the three most common options for converting GPT to MBR.
Through the command line
If installed, there is no risk of losing information. Therefore, we cope with the task involving the command line:
Advice! Thanks to the considered application, sections are created on the screw. Indication create partition primary size \u003d n will allocate n MB to the system partition. Indication format fs \u003d ntfs label \u003d "System" quick reformats the device to NTFS, active - activates the device.
Using Windows Disk Management
This method is used exclusively for physical non-system hard drives and converts GPT to MBR without losing data on other HDDs:

Advice! The operation "Delete volume" must be done with each section of the non-system HDD.
No data loss
There are several programs to solve the problem of converting GPT to MBR without data loss:
- Paragon Hard Disk Manager and others.
Let's dwell, for example, on the last one with the version "Paragon HDM 2010 Pro":
- After starting the application, in the dialog box, select the edited GPT disk with one click, at the top of the window, click "Hard disk". In the context menu - "Convert to basic MBR disk", confirm the performed actions by clicking on the green checkmark.
- In the window that appears, click "Convert".
- At the end of the transition process from GPT to MBR, Paragon will show the window "All operations completed". After that we close the program.
By default, Windows almost always uses the MBR hard disk data structure.
If you have new hardware with UEFI support, it may be necessary to convert (convert) the MBR structure of the disk to GPT.
How to do it? If you want to install Windows on a UEFI based computer, your disk must be GPT based.
Otherwise, the installation will display a message that the system cannot be installed.
You may also need to convert a disk from MBR to GPT for other solutions - you can do this without losing data.
For example, if your system is installed on GPT, but has additional MBR disks.
Then, when booting from UEFI with devices, an error may occur.
Method # 1 - Convert MBR disk to GPT without data loss
Conversion between structures can be done using built-in Windows utilities, but then you will lose all your data.
However, there is a simple, free management tool that can perform this operation without compromising your data - Aomei Partition Assistant Home Edition.
Launch the program - right-click on the main title (eg Disk 1), and then select "Convert GPT disk ..." from the drop-down list.
After that, the conversion task will appear and will be added to the list on the left.
Click on the "Apply" button to start the process. Now the program will convert partitions from MBR to GPT without data loss.
Advantages of this transformation: all partitions remain intact and do not lose data.
Cons: You can only convert additional discs that your computer has.
If you only have one and want to convert it, you must pull it out and mount it as a second drive on another computer.
Method number 2 - converting from MBR to GPT during the installation of the Windows system
If, when trying to install Windows, the system displays a message that it can only be installed on a GPT disk, you can convert it directly in the installer.
Only then will you lose all data, although you need to format at least one partition in all cases.
When you reach the message that installation is not possible, press Shift + F10 - a command prompt window will appear.
Start the partitioning utility by typing "Diskpart" and confirm by pressing "Enter".

In the next step, enter the "List Disk" command, and then confirm with Enter. After that, a list of disks installed on the computer will be displayed - each of which is identified on the left side (0, 1, 2, 3 ...).
You have to choose the one you want to convert. Enter the command "Select Disk #", where # is the disk number. Press the Enter key.

Now that the drive is selected, you must clear it. Enter the command "Clean" and confirm your selection by pressing Enter.
Then enter the last command "Convert GPT" and then press Enter.

The drive will be formatted and converted to GPT. Now you can close the window and refresh the list. The error message will no longer be displayed and everything will go well.
Pros: You can do from Windows Installer even if no system is installed on the computer.
Cons: loss of all data. Converting with this method removes all data and sections. Good luck.
Categories: Uncategorized


