Linux is a very useful and convenient operating system for solving, first of all, various engineering tasks. Connected to the Internet, Linux expands the possibilities and simplifies the work with it. It is very convenient to download and install the necessary applications in the Ubuntu shell, you just need to select the ones you need from the list, and Linux will do everything by itself, provided that there is a network connection, it is also convenient that the OS itself finds updates for drivers, packages, localizations and other important things for the normal functioning of the system. If you are interested in how to set up the Internet in Linux, this article will give you all the answers. Let's figure it out.
In the modern world, an OS without the Internet becomes irrelevant
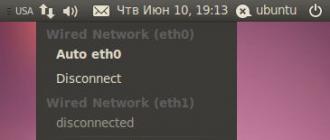
To manage all network settings in Ubuntu there is a Network Manager. You can view the available connections in it by clicking on the icon on the right at the top of the screen.

In this list, each of the connections can be made active or inactive by selecting the desired connection or clicking "Disconnect" below it. To set up a new connection, right-click on Network Manager. In the list that appears, click on "Edit connections". This will open the connection settings window. There you can choose from wired connections, wireless (via Wi-Fi), modem, encrypted VPN connections, and DSL connections.

To configure a wired connection type, go to the "Wired" tab and select one of the network adapters in the list, then click "Edit". On Ubuntu Linux, the default settings are "Obtain an IP address automatically" as this is the most popular option. If you are going to use this type of connection, then you do not need to configure anything. In the case when manual entry is required, then you just need to enter the IP address by clicking "Add" in the "IPv4 Settings" tab, DNS is also entered below. Previously, in "Method" select "Manual" instead of "Automatic". After all the values are entered, do not forget to click "Apply" so that all settings are successfully applied.


If you need to set up the Internet in Linux through a DSL modem, then first you should go to the "DSL" tab and click "Add". Next, you need to enter your username, password and click "Apply". In the event that such a connection refuses to work, do the following:
- go to the IPv6 Settings tab;
- in the "Method" item, set "Ignore";
- click "Save" to save your settings.
Please note that this must be done for the network card to which the DSL modem cable is connected.
Then re-add the connections as described in the previous step. There is another way to configure - through the console. Launch the "Terminal" and enter the command with the syntax "sudo pppoeconf", then you will be asked for the password from the system. After that, you will need to register the username and password that the provider provided to you. If errors occur, then this may also be the fault of the provider. A scenario is possible in which an Ethernet connection will be established, but a connection via the PPPoE protocol is not established because the MAC address of your network card is blocked by the provider. In this case, you should contact the provider directly.
To set up a VPN connection, go to the "VPN" tab, click the "Add" button, and then "Create". After that, to go to the connection settings, go to "Advanced", there you will need to enter your authorization data (login and password).

If you need to set up the Internet on “pure” Linux, then the method for such a case is given below.
First you need to go to the configuration file. This is done through the nano editor, you can enter it through the Linux terminal. Enter:

In place of the addresses indicated in the example should be yours. You can find them out from your provider.
- The first line indicates that the settings are set statically.
- address specifies an IP address.
- netmask - subnet mask.
- Gateway - gateway address.
- eth0 is the name of the interface we are connecting. You need to specify the name of the interface you want to connect to. To see a list of them, type ifconfig.
To set up dynamic IP settings, enter

After you have specified all the necessary parameters, save and close the editor. To do this, use the keyboard shortcut Ctrl+X, then press Y (yes) to confirm your choice.
As you can see for yourself, the process of setting up an Internet connection in Ubuntu is quite simple. The setup on other Linux shells is similar. Leave comments with feedback on how useful this article was and write about your experience with setting up the Internet in Linux.
This is done for a minute. But first, a little theory.
What is PPPoE
This abbreviation stands for: Point-to-point protocol over Ethernet. It is a tunneling protocol that runs on top of the Ethernet protocol used in local area networks. The fact is that the Ethernet protocol does not provide for the possibility of user authorization. That is, via Ethernet, access cannot be allowed or denied at the logical level.
This problem is solved by the PPPoE protocol. It is used to control access to certain network resources through a network connection. In practice, PPPoE is most often used to provide high-speed Internet access. Today, the most common high-speed Internet access is implemented using DSL (xDSL) technology. To an apartment or office, communication goes through a telephone wire, a DSL modem is installed in the apartment (office), and this modem is connected to a computer via a network cable.
But now another technology is being actively introduced - FTTx. FTTB (Fiber to the Building) or FTTH (Fiber to the Home). A fiber optic cable is laid to the building or even to the apartment, and a regular network cable is connected to it inside the building or apartment. Using this technology, such telecom operators as Rostelecom (Home Internet service), MTS (Home Internet and TV service), Beeline (Home Internet service) now provide Internet.
Regardless of which channel is used, DSL or FTTx, the connection setting on the client computer will be the same - this is the pppoe connection setting. With the exception of Beeline, they connect using the VPN protocol (Configuring Beeline (Corbina) VPN on Ubuntu Linux). Later in this article it will be shown how to set up Home Internet from MTS. Although the Internet is configured in the same way for any provider that uses the PPPoE protocol.
Ubuntu PPPoE
Open the Network applet:In the window with the list of connections, select the one through which this computer is connected to the local network, select it and click the "Change" button:

Then open the "IPv6 Settings" tab and there switch the option to "Ignore" and click the "Save" button:

Attention! This must be done for the network card to which the network cable is connected (from a DSL modem or from FTTx).
After that, again in the "Network Connections" window, open the "DSL" tab and there click the "Add" button. In the window that opens, enter your username and password and click the "Save" button:

All. Close the "Network Connections" window and through the "Network" icon in the tray, enable this "DSL connection".
If the connection is successful, a message should appear:

You can also check if a pppoe connection is established through the console by typing the command ifconfig -a- there must be an adapter in its output ppp.
Some possible errors
Since the pppoe connection works on top of the network connection, in case of problems, you first need to check if there is an Ethernet connection on the network card.
Another problem is possible - the Ethernet connection on the network card is established, but the pppoe connection is not established due to the fault of the telecom operator. You can check this if you run the command in the console sudo pppoeconf. When it starts, this program checks all available network cards - it tries to connect to a pppoe server or hub through each one. If it throws an error when looking for a hub, then for some reason the start packets of the pppoe session are not getting through. This may be, for example, because the operator is blocking the MAC address of the network card.
More information about the problem can be found in the dmesg and syslog logs.
Setting up pppoe via console
On Linux, you can set up a pppoe connection not only through the graphical interface, but also through the console. Most distributions include the pppoeconf command line program which, step by step, allows you to set up a pppoe connection. Further, such a connection can be used not only in the usual way, but also in scripts. That is, connect to the Internet and disconnect in some script that automates, for example, downloading. In Ubuntu, the program is run via sudo - sudo pppoeconf.
If you found this article useful or just liked it, then don't be shy - support the author financially. This is easy to do by throwing money on Yandex Wallet № 410011416229354. Or on the phone +7 918-16-26-331 .
Even a small amount can help writing new articles :)
Usually Linux community sites are full of different topics, but not like this one. The reason is that if you at least once installed Linux on your own, then by default it is assumed that setting up e-net is not a problem for you.
But! This in no way applies to a beginner who just installed Linux Mint half an hour ago and is now on the wave of the wow effect, still not quite understanding where he got in and what will happen to him.
The problem is that setting up the Internet in Linux is not the most trivial task, but it is also vital. So, let's get started - SETTING UP WIRED INTERNET.
1. Setting up a wired network is carried out in 2 ways, in which lies the "universal disharmony".
You can set up the Internet through the GUI - network manager, but if you have a stable connection to the network, then, as a rule, there are no problems - plug the wire and it works. Connection fun begins when it comes to the initial connection of the provider's services. This is where the fun begins. You can forget about justice.
Setting up a wired Internet connection begins with the sudo pppoe command, run in the terminal as root "s. In the process of establishing a connection in this way, you should know a few key points.
1. You will be asked which network device (adapter) to select. The answer is etho. This is necessary to download firewood to the network card of your device.
2. After selecting the device, a search for pppoe will follow - authentication through the network interface of your choice (eth0).
3.Next, you will be asked if you want to use noauth - do not require authentication from the PPPoE server or use defaultroute - add a default network route. We also remove the nodetach parameter and select the check of the configuration file (pppoe.conf). Choose the last option and click yes.
4.After that, pppoeconf will notify you that the dsl-provider configuration file (/etc/ppp/peers/dsl-provider) has changed. We agree, click “Yes” - continue with the new configuration.
5. Next, you must enter your authentication data (log & pass), which you received from the provider - login and password - specified in the contract.
6. After that, you will have to select the option “automatically add DNS server addresses when connecting. We answer in the affirmative - yes - without this option, your network, like the Internet, will not work. They will be added to the /etc/resolv.conf file.
7. In the next window, there is a problem with the MMS restriction - click Yes.
8. Next - done and establish an Internet connection. We press "Yes".
Setup - completed.
Then the quirks begin already with the WIRELESS NETWORK.
1. Having bought a package of Internet services from a provider, we start, and sometimes we think in advance about which device will distribute all this stuff.
There are several options - Asus dsl -n12u, n10u, Dlink-dir-300, TP-Link or buy a router from a provider (if you, like me, are hostage to the Internet services of Rostelecom OJSC, Dom.ru or some other office in the same vein , you will understand me).
2. The principle of setting up the router is the same almost everywhere - through the web interface. After buying your device, unpack it, turn it over and look at what is written on the bottom - on the other hand, the ip-address of its interface is usually (http://192.168.1.1;http://192.168.0.1) and login with password (most often admin - both, but it may differ - it will be written at the bottom of the device).
3. Installation and configuration are carried out using an rj-45 cable connecting the router and laptop / computer, since at this moment the Wi-Fi is not working yet. During the setup process, you have to go through several steps.
3.1. Log in with your username and password to the router interface.
3.2. Set up your native localization
3.3. Configure the WAN by specifying the necessary ip, dns for you, or specifying the dhcp server - depends on your agreement with the provider. Connect via pppoe connection in the router settings, since the wire goes to your router from the distributor.
3.4. The most important thing among all this action is to register the login and password specified in the agreement with the provider - without this, the grid will not rise unambiguously.
3.5. Specify the network name (ssid), AES/TKI/WPA/WPA2 encryption type and Wi-Fi password.
After all of the above - you must save the settings, apply them and exit the interface. All is ready.
Ubuntu's NetworkManager software aims to make your network connections "just work". However, sometimes not everything is so smooth. Sometimes you need to tweak or change your connection settings, especially when using a laptop.
The problem of a weak mobile network signal can be solved with a 3G 4G Internet kit, which can strengthen the mobile signal.
Thankfully, you won't have to pull out a terminal and type in any arcane commands to get your internet connection working.
Check the basics first
Before you scold Ubuntu, try connecting to the Internet on other devices. If they are experiencing the same problem, then it is not with Ubuntu but something else. For example, you may need to restart your router. It is always worth checking these basics before delving into further problems.
Some laptops have hardware switches that you can toggle to quickly turn Wi-Fi on or off. If your Wi-Fi isn't working at all, check your laptop's Wi-Fi switch.
If you're using a wired connection, make sure the Ethernet cable is securely connected to both the computer's local port and the router's Ethernet port. Sure, it might seem a little obvious, but it's easy to miss the cable you need.
To troubleshoot Wi-Fi signal strength issues, position your router, computer, and other objects around your home to maximize Wi-Fi signal strength .
Configure connection settings in NetworkManager
NetworkManager connects to Wi-Fi networks and automatically configures wired network connections when an Ethernet cable is connected.
If something doesn't work properly, you still have to tweak NetworkManager. Click on the network connection or Wi-Fi icon in the bar at the top right of the Ubuntu screen to open the NetworkManager menu, and then select what you need. If you need to view information about your connection for troubleshooting - your computer's IP address, for example: click "Connection Details".

If the LAN connection is not working, make sure the "Network Management" option is enabled in the menu. In this menu, options allow you to quickly disable and enable connections, which is useful for putting your laptop into airplane mode. If you have also accidentally disabled this feature, you will not be able to connect to the Internet until you enable them again.

Customize your connections by clicking the Edit Connections button. You will see a window with one or more connections, depending on how many network adapters you have on your computer. Select a connection and click Edit to change its settings.

Make sure "Automatically connect to this network when available" is enabled on the General tab. If it is disabled, NetworkManager will not automatically connect to a wired or wireless network when the computer boots.
NetworkManager uses Dynamic Host Configuration Protocol (DHCP) by default, so your computer will automatically try to get the connection settings - IP address, DNS servers, and default gateway - from your router or ISP.
For networks that require a static IP configuration, you need to visit either the "IPv4 Settings" or the "IPv6 Settings" panel and the "Manual" configuration method. (If you're not sure what you're using, you're probably still using IPv4.) Enter the details your connection requires: Your ISP or network administrator can tell you what to enter if you don't know.

If for some reason your network only allows devices with a specific MAC address to connect, click on the ethernet tab and enter that information in the Cloned MAC address field.

From the very beginning, after installing the Ubuntu distribution, we really need the Internet, which we cannot do without. During installation, for example from a Live CD, the system needs to download from the Canonical servers the appropriate localization that you selected during the start of the installation.
You will also need to download audio and video codecs and much more. The Internet is very important and after installing the system, you will definitely need to configure it.
- multimedia and audio codecs ubuntu-restricted-extras
Let's start setting up DSL cable Internet. What is DSL?
Let me explain with an example, most users in the world use the PPPoE Internet, that is, a cable connection capable of transmitting data over a network at a speed of 10-20-40-80-150mb, all that is higher is already optics.
To start setting up a PPPoE connection, let's go to the top panel on which we will find an icon similar to network stripes with an exclamation mark, which, as it were, tells us that our network is not configured. Click on this icon:
Or, as in my distribution of Ubuntu 14.04.1 LTS with a third-party theme, it looks something like this:
- As I have already marked with an arrow, let's go to the item - Edit Connections (Edit Connections). After we see the following, click on the button - Add (Add).
- We select the connection type, the default item is Ethernet, but we click on the arrow and select DSL and again click on the Create button.
- After the final stage of setting up a PPPoE connection, we are looking for our contract that we have concluded with the cable Internet provider and looking for data - User (User) and Password (Password). Next, we enter these data into the fields that we see after clicking on the create button from the stage described above.
The field "Service (Service)" does not need to be filled in, leave this field empty, when entering a password next to this field there is a checkbox item, show password (Show password), check this field and enter the password, this will save us from entering an extra character and further errors when trying to connect to the network. Next, the finish line in creating a connection, if you have already entered all the data and filled in the fields (user and password), click on the button below - Save (Apply)
We created the connection, after we look for it on the top panel where we previously saw the network icon with an exclamation mark, if you did everything right when creating the connection, then you will see it in the list. With one click on it, we will connect to the network and then we can safely (surf the network, download applications or watch movies online, etc.).
In some cases, users complain that the connection is not created by the method described above and you will not find it in the list, in this case we have a way to create a network connection using the console (terminal).
Don't worry, I won't bother you with entering a large list of commands or something else, just one command and then in the same way as in the method above, we just have to enter the username and password that the provider provided us with.
To launch the terminal, go to (menu Applications→Accesories→Terminal or Applications→Accessories→Terminal) in Russian localization, or go to the Dash menu and type in the Terminal search, launch the application, then enter the command:
The command above will ask us to enter a password, please note that the password is not displayed when entering, neither with asterisks, nor with dashes, in any way. This is normal and the way it should be. Entered press Enter.
Next, your Ethernet ports will be scanned, after detection, you will be asked in several short steps how to go through a small survey and, in turn, enter the login and password that the provider provided you, then press the TAB - OK key and you're done. After the manipulations above, you will have a connection immediately after logging in, immediately after turning on the computer without pressing additional confirmation keys. It is very comfortable.