Management is carried out using the command line. For these purposes, it is most convenient to use a free program. PuTTy. It does not require installation: after downloading and running the utility, you can immediately connect to the VDS via SSH by entering an IP address (the default port number is 22) and clicking on the “Open” button. After that, a console window will appear on the screen with an invitation to authorize “login as:”. Enter root, press “Enter”, then specify the password received when ordering the service and confirm the action again with the enter key. Now you can start work.
The very procedure for configuring VDS is entering text commands into the console, with which you can perform almost any operation on the server. Below is a sequence of basic actions that must be performed immediately after starting a virtual machine, as well as step by step software bundle installation needed to host websites. The examples are adapted for the two most common Linux families: Debian (it includes, for example, the popular Ubuntu) and Centos (it includes Centos itself, Fedora, and a number of others).
Attention! For OS version Bitrix 6 installed on VDS, LEMP installation is not required!
Initial VDS setup
Software update
You need to start configuring VDS with a global update. You can run the update on Debian-like operating systems as follows:
apt-get update && apt-get upgrade
for Centos the command is different:
During the upgrade process, you will be asked if you want to install new packages. Answer yes using the Y key and confirm your choice by pressing “Enter”.
Adding a new user
Working with the server under the root account is strongly discouraged - it is best to create a new user and give him the necessary rights. On Debian-like systems, this is done with the command:
adduser username
where username should be replaced with the desired username. After completing it, you will be asked to set a password, and then you will be prompted to fill in additional fields (this is optional - you can leave them blank).
When working with Centos, the command is also used:
adduser username
However, the password is set separately:
passwd username
Transferring root privileges
After creating a new user, he needs to transfer super administrator rights, otherwise you will not be able to fully configure VDS. This is done by adding the newly created account to the appropriate group. For Debian-like:
Gpasswd -a username sudo
for Centos-like:
Gpasswd -a username wheel
SSH Management
For security purposes, you need to do a series of manipulations with the sshd_config configuration file, which, as you might guess, is responsible for setting up a remote connection to the server via SSH. Different Linux distributions use different utilities for editing, respectively, and the commands for them will vary slightly. Debian-like uses nano:
Nano /etc/ssh/sshd_config
To save the changes, you must press the key combination Ctrl + X, then Y and “Enter”. Centos includes vi editor:
Vi /etc/ssh/sshd_config
Saving information is carried out by the command: x, after which you must press “Enter”.
In sshd_config, you should disable root login by replacing
PermitRootLogin yes
PermitRootLogin no
and also change the default SSH port by replacing
for example, on
It is better to choose a port number from the range 49152-65535 - this will avoid possible conflicts with various Linux services and services. After the described manipulations, you need to restart SSH. In Debian, this is done like this:
service ssh restart
Systemctl reload sshd
Now you need to reconnect to the server through the assigned port under a new account, after which you can continue configuring VDS.
Installing and configuring LEMP
Most modern CMS are written in the PHP programming language. This means that to host almost any site, regardless of type and functionality, we need LEMP. This abbreviation stands for a bunch of modern and very fast Nginx web server, php-fpm interpreter and MySQL database management system. The installation procedure is quite simple and will not take much time.
Installing Nginx
Let's start by installing Nginx. On Debian-like distributions, this is done in one line:
sudo apt-get install nginx
after which the server will be automatically started.
On Centos, you first need to add the EPEL repository:
sudo yum install epel-release
and only after that to install:
sudo yum install nginx
The final stage is the launch of Nginx:
sudo systemctl start nginx
Installing MySQL
On Debian-like operating systems, the database service is installed with the command:
sudo apt-get install mysql-server mysql-client
During the process, you will be asked to set a MySQL administrator password.
Centos-like distributions use a fork of MariaDB instead of MySQL, which has the same functionality. After installing it:
sudo yum install mariadb-server mariadb
the database server must be started and added to the startup list:
sudo systemctl start mariadb sudo systemctl enable mariadb
MySQL setup
The initial configuration of the database server is carried out using a special script that comes with the main software:
sudo mysql_secure_installation
After starting, you will be asked to enter the MySQL administrator password that we set in the previous step, and then you will be asked a series of questions, which must be answered with the Y (yes) and N (no) buttons, confirming the choice with the “Enter” key:
- Do you want to change your password? (Change the root password?) - No (N)
- Remove anonymous users? (Remove anonymous users?) - Yes (Y)
- Disable remote authorization with superuser rights? (Disallow root login remotely?) - Yes (Y)
- Delete test database? (Remove test database and access to it?) - Yes (Y)
- Reload privilege table? (Reload privilege tables now?) - Yes (Y)
Adding a new database
Databases are managed through the MySQL console. To enter it, you must enter the command:
To host a dynamic site, you need to create a database that the engine will work with. Usually, for each project, a separate database is created and a separate user who can manage it. Let's create the sitedb database, the user site_user, and then give the latter the rights to manage sitedb (you can replace the proposed names with any other).
This is done as follows:
We create a database:
CRE ATE DATABASE sitedb;
Create a user (replace password with a unique password)
CREATE USER [email protected] IDENTIFIED BY "password";
We transfer sitedb control rights to the site_user user:
GRANT ALL PRIVILEGES ON sitedb.* TO [email protected] IDENTIFIED BY "password";
Update privilege data:
FLUSH PRIVILEGES;
When all operations are completed, exit the MySQL console:
Installing PHP
An important step in setting up VDS is installing and configuring the PHP interpreter. The commands for different Linux distributions are different. Installation on Debian goes like this:
sudo apt-get install php5-fpm php5-mysql
In Centos it's a little different:
sudo yum install php php-mysql php-fpm
PHP Configuration
The first step is editing the php.ini file. On Debian and Ubuntu it is located here:
sudo nano /etc/php5/fpm/php.ini
On Centos-like distributions, directly in the etc directory:
Sudo vi /etc/php.ini
In both systems, you first need to uncomment and change the value in the following line:
;cgi.fix_pathinfo=1
cgi.fix_pathinfo=0
Thus, we have closed an important vulnerability that could have been used by attackers to gain unauthorized access to the site. This completes the Debian interpreter setup, it remains to restart the PHP processor:
sudo service php5-fpm restart
On Centos, you also need to edit the www.conf file:
Sudo vi /etc/php-fpm.d/www.conf
Here you need to find the line
Listen = 127.0.0.1:9000
and replace with
Listen = /var/run/php-fpm/php-fpm.sock
We also change
listen.owner = nobody listen.group = nobody
sudo systemctl start php-fpm sudo systemctl enable php-fpm
Directory creation
Now you need to create a directory in which your resource files will be located. On any Linux operating system, this is done with the following command:
sudo mkdir /var/www/sitename.ru/public_html
In this example, sitename.ru must be replaced with the domain name of the site. As for the CMS files, they should be uploaded to the public_html folder. When the download is complete, you must transfer control rights to the web server. There are differences in the names used to refer to Nginx. For Debian-like distributions, the command will look like this:
sudo chown -R www-data:www-data /var/www/html/*
On Centos it's different:
sudo chown -R nginx:nginx /var/www/html/*
Adding a New Nginx Host
The final step in configuring the VDS to host the site is adding the Nginx virtual host. We just need to edit the default. In the Debian family this is done like this:
Sudo nano /etc/nginx/sites-available/default
Sudo vi /etc/nginx/conf.d/default.conf
After opening the file, remove all information from it, replacing it with the code below (substitute the actual site name instead of sitename.ru), and save the result:
Server ( listen 80; server_name sitename.ru; server_name_in_redirect off; access_log /var/log/nginx/sitename.access_log; error_log /var/log/nginx/sitename.error_log; root /var/www/sitename.ru/public_html; index index.php index.html index.htm default.html default.htm; location / ( try_files $uri $uri/ /index.php?$args; ) error_page 404 /404.html; error_page 500 502 503 504 /50x.html ; location = /50x.html ( root /usr/share/nginx/html; ) location ~ \.php$ ( try_files $uri =404; fastcgi_pass unix:/var/run/php-fpm/php-fpm.sock; fastcgi_index index.php; fastcgi_param SCRIPT_FILENAME $document_root$fastcgi_script_name; include fastcgi_params; ) )
It remains to restart Nginx. Command for Debian distributions:
Sudo service nginx restart
sudo systemctl restart nginx
Now the virtual server is completely ready for operation, and you can start working directly with the web resource. The next steps depend on the chosen CMS.
The server must select the following option:
You will receive access data by email. If you reinstall, then all current data from the server will be deleted.
Those wishing to install VestaCP through the console, they can independently use the instructions below.
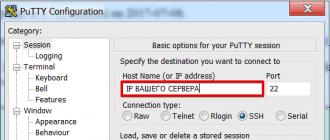
1. If you use Windows on your PC, then download the popular SSH client PuTTY .
If used on a local Linux or MacOS PC, you can use the console built into the SSH operating system.
2. After installation PuTTY run the program and enter the IP of your server: 
We enter the root login and password to the server, you received this data when activating the VDS to the contact email of the account, a request with this data is also available in the section "Tickets". Please note that the password is entered and should not be visible. Once entered, press the button. Enter.
3. Run the commands one by one:
Curl -O http://vestacp.com/pub/vst-install.sh
bash vst-install.sh
4. We will see an offer to continue the installation, we type "y"
Next, the system will ask you to enter your email and hostname of the server, do this and wait up to 15 minutes until the control panel is installed along with the necessary set of software.
5. When the installation is completed, we will see the following message in the SSH console: 
Save the data highlighted in red.
7. After entering the login and password that we received in paragraph 5, we proceed to add our domain. This can be done in the section WEB using the green button in the form of a sign "+" , we create the MySQL database in the same way, but in the section D.B.. Detailed information on working with VestaCP You can visit the developer's site.


8. To download the files of the added domain, you need to use any convenient FTP client and username/password admin, we received this data in the 5th paragraph of this instruction. How FTP server specify the IP of our VDS, upload site files to the directory /web/YOURDOMAIN/public_html/
If necessary, you can add new users to VestaCP.
9. Information about which NSs to use for a domain can be found at .
This post will be completely devoted to the instructions for installing the Clash of Clans bot on a VPS. These are not so complicated manipulations and everyone will be able to install the bot on the VPS. We want to tell you how to do it, how to run a bot on your phone, that is, you don’t even need a computer, you can do everything from your device, be it Android or iPhone.
VPS is the same as VDS, only you will not find VDS from foreign hosters, this is a purely Runet term.
VPS/VDS- a service within the framework of which the so-called Virtual Dedicated Server is provided to the user.
We will need a dedicated server with the Windows operating system installed. We will not talk about free VPS now and how to get them, we will now install the bot on a permanent basis and we need a paid option. RUVDS is now considered the most adequate in terms of pricing policy, with a suitable server configuration, you can get a VPS for 760 rubles per month, which is only 25 rubles per day.
Then we create a server with this configuration:
- CPU: 4×2.6GHz
- RAM: 3GB
- Disk: 20GB (HHD)
- IP: 1
- OS: Windows Server 2012

We click to order, if you make out for the first time, you will have a trial mode for 3 days, if you have experienced it, you will need to pay 760 rubles, which is considered not so much for this server configuration.

After a successful payment, you will be notified that all the necessary data will be sent to the mail, and you can also get them in your personal account.

If you immediately go to your personal account after registration, you will see how the VPS server is created, after which you can successfully use it.

To connect to this server, we need an IP address and user with pass.

To connect to the server, you do not need software, it is available both on a computer and on mobile devices. Install and move on to the next step.
- For Windows, this is a standard solution, look in standard applications.

After successfully installing Microsoft Remote Desktop on the system you need, add the server IP address by clicking on the plus button at the top right of the application.

In the next menu, click on the "Desktop" button

In the next menu, click on the "PC Name" button, enter the IP address of our server, click ready and add a new server account.

Adding our server account

We enter the account information, usually the username is set automatically by Administrator. This data is available in your personal account and is also duplicated to the specified mail.

Save and connect to the server.

As soon as the server starts, if you are connected via a mobile device, activate the mouse pointer in the menu to make it easier to work with the system.

After that, in the window that appears, disable the security feature in Explorer so that you can download all the necessary software to run the bot without any problems.

In the window that opens, disable this functionality.

Next, in order for the server to be constantly online and not go into hibernation, we need to create a second user and give him administrator rights. To do this, go to the control panel and click on User Accounts


We change the user account control according to the example.


In the window that opens, click on "Add a user account", after which we will open a window with the ability to enter this new user

We enter data that is easy to remember and indicate a simple password, after which we click on the Next and Finish button

Select your account to assign Administrator rights

In the profile section, select "Change the account type"

In the window that opens, select that this user has administrator rights, save and close the control panel.

After successfully creating and assigning an administrator to the second user, we will need to connect to it via Remote Desktop Connection, this will allow the VPS / VDS server to be constantly in working order and the bot will work around the clock.
In 99% of cases, the Remote Desktop Connection utility is already installed in Windows, as it is a standard application. Therefore, we will need to find it in the application list through the start, or through the search in the right corner.

In the opened Remote Desktop Connection utility, you will not need to enter the IP address of the server

And in the next window, enter the Username and password of the second user, which we created with you earlier

As soon as you connect to the second user, open Explorer and follow this link - we will need to download everything you need to run the bot for Clash of Clans.

We also download the bot you need, you will find everything you need on this page, we will show an example on MyBot. We launch the bot and see what it will need to work comfortably on your VPS/VDS.
On this system, we need Visual Studio, it is in the package that we previously downloaded with you.

Install Visual Studio and BlueStack from the downloaded package of the necessary software

After successfully installing the BlueStacks emulator, on the main window we see the All App button in the upper right corner, click on it and open the BlueStacks settings

Next, we will need to add a Google account to which the village is linked, if you do not have a village linked to a Google account, then you will need to create a new account and transfer it from the iOS device.


After successfully installing Clash of Clans, we open the game and we will be prompted to load your account, if you link, you will need to go to the settings and link the account from the iOS device. Next, configure the bot according to your requirements and press start. The bot will work around the clock.
Virtual Dedicated Servers (VDS) are designed to host Internet projects with a high level of visits, which are characterized by a very large load on regular hosting. Such a solution allows you to expand the possibilities of administration, increase resistance to overloads and provide the required security. The use of VDS opens up great opportunities for the introduction of modern technologies for managing the content of sites.
A virtual server is an emulated computer with an installed operating system. Accordingly, when working with it, the administration tools and VDS settings are no different from those of a dedicated physical server. VDS works under Microsoft Windows, Mac OS or Linux depending on the choice of the tariff plan. Like a physical server, its virtual counterpart provides root access, assignment of IP, ports, security policies, etc.
To start using VDS, the first step is to order the appropriate services from a hosting provider. You can connect to the virtual server using the Remote Desktop utility. A similar application is developed for all popular operating systems - Microsoft Windows, MacOS, Linux and even Android. In the case of Linux, rdesktop, FreeRDP or Remmina are suitable, and in Microsoft Windows, mstsc.exe is used.
Connecting to the server may also require certain knowledge - these are console commands and parameters, without which it is impossible to manage a remote system. There are three ways to clarify how to use VDS after connection:
- in relevant reference materials;
- independently - for this, it is enough to download and install the nginx or Apache web server, PHP and MySQL packages and other software necessary for the full operation of the server;
- contact your hosting provider who will give you the necessary step-by-step instructions.
To make it convenient to manage the system, special programs are used - VDS control panels. These include, for example, ISP Manager, a commercial application actively used by Russian Internet agencies.
If you do not want to waste your time searching for information on setting up and managing a virtual server, it is better to immediately order the necessary technical support. In particular, in the 3data data center network, you can always count on this service. Thanks to it, you can focus on the site and its promotion, and not on the intricacies of configuration and administration.