When the document is structured and has a good overall presentation, it is easy for the reader to navigate the text, which makes it easier to read. When a document is pleasant to read, it means that the text is well-formatted. There are quite a lot of formatting elements in the "Word", but this article will touch on the only one - a paragraph. It is also called the red line, which will be done periodically in this text.
Unfortunately, few people know how paragraphs are made in the "Word", or they know, but they do it all the same wrong. The article will cover all three methods: using the ruler, tabulation and the "Paragraph" menu. They perform the same role, but the approach to each of them is different. Therefore, read the article to the end to find a way for yourself.
A paragraph using a ruler
As mentioned above, paragraphs in the Word can be done in three ways. Now the first of them will be considered - with the help of a ruler. This method is quite simple to use, but it is still not popular enough. Most likely, this is due to its inaccuracy - the length of the paragraph is determined by eye, but if this does not matter to you, then you can safely use it.
So, first you need to figure out where the very ruler is. The fact is that sometimes it is disabled by default and must be enabled. To do this, follow three simple steps:
- Go to the "View" tab in the program.
- Find the area called "Show".
- Check the box next to Ruler.
If you are using the "Word" 2003 version, then you need to click "View" and select "Ruler" from the list.
Defining sliders on the ruler
So, how to turn on the ruler is now clear, but few people know how to use it. In order to correctly make paragraphs in the "Word", you should define in detail each slider on it.
As you might guess, you need to use the ruler, which is located on top. There are only 4 sliders on it - 1 on the left, 3 on the right. We are interested in those sliders that are located on the right side. They can be seen in the picture below.

Let's start at the bottom. The small rectangle slider affects the indentation of all text from the left edge. It is recommended to check it yourself right now by moving left or right. Just do not forget to select all the text or the necessary part of the text.
The middle slider is responsible for the protrusion. This means that if you shift it to the right, all lines except the first in the paragraph will be offset. You can also check this yourself.
Making a paragraph with a ruler
And now we come to the top slider. This is what we need. By moving it, you indent the first line of the paragraph - determine the size of the red line. You can move a paragraph to the right or to the left, depending on your preference.
As mentioned above, this method does not accurately identify the red line. Using the ruler, you can only roughly set the indent. But for clarity, it has divisions. Each digit is equal to one centimeter.
Paragraph using tabs
We have already considered the first way, how paragraphs are made in the "Word", now we move on to the next - to tabulation.
This method, like the previous one, does not give one hundred percent accuracy and loses in many respects to the ruler, but it is impossible not to mention it. With it, you can instantly indent from the left edge, thereby marking the red line. Now let's get down to business.

Tabulation is carried out by pressing the corresponding key - TAB. You can click it and see for yourself. Roughly speaking, when pressed, one large space is put. But if you put such a space before the first line of the paragraph, then visually it will look like a red line.
As for the cons this method, then it is the only one, but quite defining. If the text you typed is quite voluminous, then you won't be able to make a red line in every paragraph at once. We'll have to methodically do it in each of them. Therefore, it is easier to use the ruler or the "Paragraph" menu, which we will now talk about.
Paragraph using the Paragraph menu
Now we will do the 2007 release, but this does not mean that this method will not work for other versions, there may only be some differences.
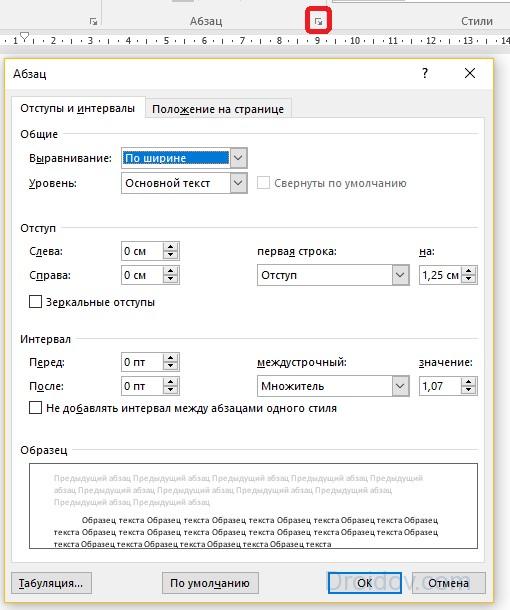
So, first we need to get into the "Paragraph" menu itself. This can be done in several ways by clicking the corresponding icon, the location of which you can see in the picture below.

Or by right-clicking on the text and choosing the "Paragraph" item from the menu.

In the "Paragraph" menu, on the first tab, there is a field called "Indent", which is exactly what you need. Pay attention to the drop-down list, above which is written "first line:". Clicking on it displays the options: "(none)", "indent" and "ledge". When selected, no - nothing will happen, the ledge will shift all lines except the first in the paragraph, but the indentation will shift the first line, which is what we need. Select it and enter your value in the field on the right. Thus, the parameters of the red line can be precisely set.
Change the spacing between paragraphs

The spacing between paragraphs in the "Word" is done in the same "Paragraph" menu, so do not rush to leave it. Pay attention to the "Interval" field, more precisely - to its left side. There are two counters there: "Before" and "After". By specifying values, you determine the amount of space between paragraphs.
By the way, all the above methods 100% make a paragraph in Word 2010. The spacing between paragraphs is set in the same way.
One of the main questions when formatting text word document for many users is associated with paragraph or paragraph indentation. When the text has already been typed, it is necessary to put paragraphs so that it is well structured and formatted, for easy readability. This is not difficult at all, you just need to know how. And in this article we decided to tell you how to put paragraphs in word.
The first and easiest way to set a paragraph indent is with the Word ruler of the document. If you have not set it by default, go to the View menu item - "Show or hide" and tick the Ruler tab.
In the case of placing paragraphs in word, we are interested in the ruler at the top. On it, as you have already noticed, there are four sliders. Three on the right and one on the left. Unfortunately, few people know which one is responsible for what.

For setting paragraphs, we are interested in the left sliders. And now we will tell you why each of them is needed.
The lowest one is needed for indentation. By moving it to the right, you can easily see this. Medium will help you make a ledge if necessary. But the top one is just responsible for the paragraphs in document word... If you move it to the right, an indent appears at the beginning of the paragraph. And each paragraph will have such indents as you type the text.

There is another way to add paragraphs
To do this, select the text, right-click and select the Paragraph tab. Set the indent length in it and click OK. That's all.
Lesson "Indentation and Spacing"
§ 2.1. Basic concepts
Basic structural unit word processor is a paragraph.
Paragraph (from a literary point of view) - this is a part of the text that represents a segment of a work, complete in meaning, the end of which serves as a natural pause for the transition to a new thought.
AT computer programs paragraph any text ending with a paragraph marker, i.e. by pressing the (Enter). In Nonprinting Included mode, the paragraph marker is displayed with a ¶ symbol. A paragraph marker is an important character that contains information about the formatting of a paragraph, so it is more convenient to display special characters when working with texts. In this case, an electronic paragraph can consist of any set of characters, a picture, an object created by other applications, and even contain nothing.
A paragraph can consist of either one word (for example, in the case of a blank to, or of an arbitrary number of lines.
If the right margin of the page is reached while typing, the text automatically wraps to the next line.
In the editor Word there is no need to keep track of the end of lines within a paragraph. It is enough to define the beginning of a new paragraph.
To start a new paragraph, make sure the cursor is positioned where you want to start a new paragraph, and then press[ Enter].
§ 2.2. Formatting a paragraph (setting options)
Text editor Word allows you to set attributes for a paragraph.
§ 2.3. Paragraph alignment (justification)
Alignment reflects the position of the text relative to the vertical boundaries of the typesetting bar.
There are four commonly used methods for aligning paragraphs:
Below are examples of paragraph alignment:
Some editors provide full justification, when even the last line of a paragraph "stretches" to the right margin.
To align selected paragraphs select the corresponding item from the Align drop-down list of the dialog box<Абзац> or toolbar buttons. If there are no selected paragraphs, the alignment setting will be applied to the paragraph in which the cursor is located.
First line indent (red line). Most often, a paragraph begins with a first line indent. This indentation can be:
- positive when the first line starts to the right of all other lines in the paragraph, is applied in normal text;
- negative (ledge), when the first line goes to the left of the rest of the lines, it is used in dictionaries, definitions;
- zero , used for center-aligned paragraphs and for normal text.
For instance:
To set the indentation of the first line of a paragraph, enter the appropriate value in the input field "First line: On ...". By setting the indent to the left (right), they type or select the desired indent value for the paragraph from the left (right) margin. If you want the text to appear in the left (or right) margin, specify a negative value.
If the red line visually separates the paragraphs from each other, then in the case of zero indentation of the first line, intervals (padding) are set before each paragraph.
In addition to the first line indentation, the entire paragraph can have left and right indents, which are measured from the margin. So the epigraph to the work of art or the addressee's details in the application have an indent on the left, and when making a corner stamp, you can use the indent on the right. Without paragraph formatting, not only is it impossible to prepare well-formed text, but also to format a table, organize a list, or place a picture on a page.
By setting the spacing before (after) the paragraph, they type or select the desired amount of distance before the first line for each selected paragraph. This value must be a positive decimal value.
In the process of typing the numerical values \u200b\u200bof spacing, indentation and mouthintroducing some other options, Word allows you to use differentunits of measurement:
| Centimeter (cm) | 2.54 centimeters \u003d 1 inch |
| Inch (") |
1 inch \u003d 12 points \u003d 6 peaks |
|
String (st) |
1 line \u003d 12 points \u003d 0.667 inches |
|
Pica (pc) |
1 spade \u003d 12 points \u003d 0.667 inches |
|
Item (Fri) |
1 point \u003d 1 line \u003d 0.667 inches |
They allow you to draw up documents according to all the rules - be it a term paper, a report or a book manuscript. Let's figure out how to make a paragraph in Word in different ways.
Ruler
You can quickly make paragraph indentation using the ruler, which is located right below the menu icons. If you do not see a measuring tape there, go to the "View" tab of Word 2007, 2010 or higher, in the "Show" section, check the box next to the "Ruler" item. If you are using the 2003 version, the function is located in the menu section of the same name.
On the left side of the ribbon, there are two arrows pointing at each other, on the right there is another arrow. To indent the first line, you need the top left arrow. Hold it with the mouse pointer and drag it to the right - the first line of the paragraph on which the editing cursor stood will begin to recede after it. If you drag the arrow to the left, the first line will begin to protrude outside the paragraph.
To set the indentation in the Word for the entire document at once, first select all the text, then move the arrow on the ruler. If you want to nudge the entire paragraph, use the down arrows to move its left and right borders, respectively. The lower left arrow has two parts - a triangular and a rectangular one. Moving the triangular portion will only move the left border of the paragraph. If you take a rectangular one, along with the border, the indent of 1 line will move.
Menu
You can also adjust the indentation of the first line using the menu. Select the text that needs to be formatted or place the cursor on the desired fragment if you want to change the position of only one of it. You can also set the settings in a blank document, before writing the text - then it will be automatically formatted at the time of input in accordance with the specified parameters.
On the main tab in the "Paragraph" section, open extra options by the button in the right corner. Or go to the function of the same name through the submenu that appears when you click on right button mouse anywhere in the text. Here you can set the values \u200b\u200bof indents to the left and right - to move the text relative to the page borders. The Mirror Margins option generates different spacing, just like in a book.
For the first line, select an action - indent or protrusion - and enter the value in centimeters. The Spacing section sets additional spacing before and after paragraphs, as well as line spacing.
Conclusion
We figured out how to make the correct indentation in Word. Create structured documents using all the power of Word.
You can change indentation - the space between paragraphs - to the left or right, as well as the spacing in the document. You can also increase or decrease the indentation of a single paragraph or group of paragraphs within margins.
|
Interval |
|
|
Specifies the spacing before the paragraph. |
|
|
Determines the spacing after the paragraph. |
|
|
Interlinear |
Please select single for a single spacing. To quickly select one spacing for an entire document, see Single spacing in a document. |
|
To set line spacing for text one and a half times more than single spacing, select 1.5 lines. |
|
|
To set text to double line spacing, select Double... For information on how to quickly double-space an entire document, see Double-spaced in a document. |
|
|
To set the minimum line spacing required to fit the largest character on a line, or graphic objects, select item Minimum and enter a value in the field value. |
|
|
To set a fixed line spacing, expressed in points, select exactly... For example, if the text has a font size of 10 points, you can specify 12 points for line spacing. |
|
|
To set the line spacing as a multiplier expressed as a number greater than one, select Factor and enter a value in the field value... For example, setting the line spacing to 1.15 increases the spacing by 15 percent, and setting 3 to 300 percent (triple spacing). |
|
|
Do not add |
If you don't want extra space between paragraphs, check the box Don't add spacing between paragraphs. |
In this article
Indent the first line of a paragraph

Indent all lines of a paragraph except the first
You can create a ledge, that is, add indentation not to the first line of a paragraph, but to subsequent lines.


