In minecraft, a solar panel is one of the main sources of energy that makes electric current out of solar energy. If you have a relatively small number of such batteries in minecraft, then they are suitable for use as auxiliary energy supply systems. If you make a lot of such modules, then solar panels will help you switch to this type of energy generation. When excess electricity appears in minecraft, it can be accumulated in special energy storages and batteries. In addition, the improved solar panel has a slot that can be used to charge batteries and tools.
Terms of use.
This mod, unlike traditional windmills and watermills, must be used in a 1x1 work area. That is, it will take only one block. This unit cannot be operated at night or in the rain. Therefore, you need to install it in minecraft only where direct sunlight enters. There should not be any blocks, glass, cables or pipes above the batteries that the BuildCraft mod has. Snow is the only exception. During one light day in minecraft, one solar panel generates up to 13 thousand EU, giving out a voltage of 1 EU / f. After installing such a system in the desert, you will not be afraid of rain, since it does not happen here. The only problem for the batteries will be at night.
Like many other sources of electricity in minecraft, this panel will become available only after you install the industrial craft 2 mod. Although it is perceived by many as an additional source of current, if you craft a lot of such systems, you can completely replenish all your energy reserves. It is best to collect energy in minecraft in special batteries, which will allow you to use it on cloudy days and even at night.
Manufacturing
In order to make one solar battery in minecraft, you need to have specific elements, as the table informs:
Installation.

From these elements, an efficient solar battery can be crafted. In minecraft, it must be installed where direct sunlight falls. A conventional or hybrid system can only work during daylight hours. When night falls, you can use the energy stored in the batteries. If you read the crafting wiki, then here it is advised to place the device in the desert, since there is no rain and cloudiness.
In addition, after reading the crafting wiki, you will find out that a solar-powered helmet can be made from such a device. It is very convenient to use when traveling long distances. All this will provide the crafter with the necessary level of mobility.
Advanced Alternative Sources.
By installing the Advanced Solar Panels mod, you will have the opportunity to use advanced energy generators in minecraft. Such an improved panel will not only provide more energy, but also generate it on cloudy days and at night. In addition, such equipment will have an increased output voltage and increased internal capacitance. In addition to the improved battery, there are other alternative power generators such as the hybrid panel and the super panel. They allow the use of uranium as additional energy. You can learn the recipes for making them by reading the crafting wiki. The only drawback of such systems is their higher price.
Compact Solars.
If you don't like any of the improved minecraft batteries, then you should install the optional CompactSolars mod. With it, you will receive several new items at once. Their advantage is that the improved panel will take up much less space than conventional batteries. This add-on was created in order to deal with lags that occurred due to overloading the server with large fields of energy sources.
Hello community! This kit was purchased solely for educational purposes of self-development. Under the cut, the assembly process and elementary measurements based on the results of balcony tests.
The parcel came with a track and was tracked at every stage without any problems. Delivery time is quite standard - 1 month. Packed firmly and conscientiously - not a single part of the kit was damaged. Actually, that's all I got. 
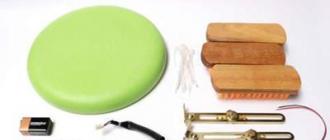
1) Flux pencil. I haven’t used this before, but I didn’t experience much enthusiasm, although I won’t say a bad word. Basically convenient. The algorithm is simple: greased-soldered. When you shake, you can hear a liquid of unknown origin flopping inside, the composition is not indicated! From useful information from the body of the pencil, you can only get a link to the vendor's website and e-mail support: and [email protected], respectively. Out of curiosity, I took a walk, it seems I didn’t sell too cheap. 
2) Tire (small 2 mm) for soldering photocells together. I did not measure the length, but it is very, very much. After the complete assembly of the kit, visually, how much was left. Since the battery in my pocket spectral device has run out :_), the metal from which it is made could not be established. But the tape is tinned and soldered very easily. 
3) Tire (large 5 mm.) for soldering assemblies of photocells and / or solar panels. Although I know for sure what ohmic losses are, I didn’t use it, I made the “+” and “-” conclusions from a small bus. And even if because of this I did not count 0.000018 W, but honestly it was just laziness) 
4) Well, actually, the photocells themselves (as many as 42! pcs.) Lovingly rewound by a Chinese in a packaging film. 
The geometric dimensions correspond to the declared ones. 
But there were a few elements with minor chips. It's a shame, of course, but the loss of area (read power) is less than 1%, I think. Since when the element is destroyed, the voltage generated by it remains the same as that of the whole, it can be mounted in a circuit with (slightly less) success. 
Since the seller stated that at the equator at noon on a cloudless day, each such socket is capable of delivering 0.5 V, it was decided to sequentially collect 36 elements to generate ≈ 18 V.
“They write on the Internet” that the most convenient platform for assembling such a solar panel is an A4 (photo) frame. Which was purchased in an offline store at a reasonable price. But back to installation.
The "+" contacts of the photocells are on the back and have different lengths. 
Therefore, I took a piece of a small tire (cut by eye ≈ 1.5 module width). I tinned it with ordinary rosin (with a flux pencil it was somehow inconvenient, it was unusual. I put it aside ...) 
Then I applied it in place along the length of the contact and ironed it with a soldering iron. 
The work is quite painstaking, and the material does not like haste at all; I did not even expect that these panels are so fragile - almost like an eggshell. Therefore, stock up on beer, kvass and patience. 
To prevent a short circuit, soldering the “negative” contacts did the opposite - he serviced the path of the photocell and ironed the tire to it. 
Of course, by the end of the work, I had already acquired a certain skill, but neither this nor the head start of six (42-36) elements saved me from collapse - I broke more solar panels than was available. That's the kind of handyman I am. The rivets of the photo frame latches also played a cruel joke, which passed through the working surface of the textolite and, although they were sealed by me with electrical tape, they still protruded quite strongly, so much so that they probably damaged a couple of elements; not less. 

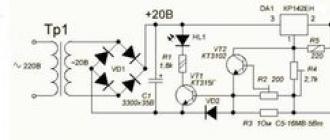
However, I was pleasantly surprised by the result. Because even in the absence of direct sunlight
the entire visible sky was covered with a veil, haze


my solar panel consistently gave out 19.7 V

For the use of which, a converter was purchased. Which at idle without hesitation gave 5 kopecks of volts.

But when connected as a load, the voltage, although it dipped to 3.9 V

But still, a current of 0.14 A went to charge the phone.

Conclusion: this kit is ideal (all inclusive) for educational and educational purposes, and the device assembled on its basis is quite capable of feeding undemanding consumers.
P.s. Then I solder the Schottky diode when I fill it with sealant.
p.p.s. there are really a lot of consumables (tires and flux)
The p.p.p.s test took place on July 6, 2015 at 17:15 in the northern hemisphere, at a latitude of approx. 60 degrees N (Leningrad region)
All good and light)
I plan to buy +52 Add to favourites Liked the review +71 +135
Solar cells are quite thin, typically between 0.2 mm and 0.4 mm thick, so they are quite fragile and break easily. Therefore, situations are not uncommon when, when working with solar cells, a certain number of broken, broken elements appear, and it also happens that when you receive the package, you notice that many elements are damaged. However, even a broken element continues to work, which means that they can be used to create a solar panel.
Materials needed to create a solar panel from broken solar cells:
1) fragments of solar cells
2) a soldering iron with a power of 15-25 W, as well as the necessary consumables for it
3) multimeter
4) eraser
5) foil tape
Consider the main features of working with broken solar cells and the stages of creating a working panel from them.
Naturally, when assembling a panel from broken solar cells, you need to know and take into account several features.
For example, a broken solar cell will produce the same voltage that is stated for whole cells, but the current strength from a broken cell will directly depend on the size of the fragment.
It is also important to know that with a series connection, the voltage will be summed up, and the current value will remain unchanged. That is, to obtain the necessary voltage of 12 V to charge the battery, you need to connect 24 solar cells in series, the voltage of each of which is 0.5 V.
And the magnitude of the current will depend on the smallest fragment in the series circuit of elements. Thus, if you connect in series 23 elements with an area of 10 cm² and one with an area of \u200b\u200b2 cm², then the current strength will be set by an element with an area of \u200b\u200b2 cm². That is why, before starting the assembly of the panel, it is necessary to sort all the fragments of solar cells by size.

If, after sorting, you notice that you do not have enough large fragments of elements to assemble one circuit line, then you can connect two small fragments in parallel, since with a parallel connection, the current strength is summed up, and the voltage remains unchanged.
Below is a diagram of such a connection, where two small fragments are used connected in parallel in a series circuit of solar cells:

Having decided on the scheme and arrangement of the elements, the author proceeded to prepare the elements for soldering.
Basically, mono and polycrystalline elements have a negative pole on the front side, and a positive pole on the back.
Before soldering the bus bar to the solar cells, it is necessary to clean their contacts. For these purposes, a regular eraser is suitable. It is necessary to thoroughly clean the contacts so that the solder is distributed evenly over the entire contact. At the same time, cleaning must be done carefully so as not to break the already fragile fragments of elements into even smaller pieces.


After the contacts were cleaned, the author proceeded to tinning the contacts of the front and back sides. When working with a soldering iron, it is also necessary to avoid excessive stress on the solar cells.

After that, you can start soldering the bus to the back of the element. When soldering a foil bar, leave a spare bar on one side for connection to the next chain element. If the bus has already been soldered on the front side, then the stock is left shorter, that is, try to calculate the bus length correctly.


After the bus has been soldered to each element, it remains only to connect all the elements into one serial circuit. The author took the remaining tire stock from the back of the element and soldered it to the front side of the next element. In this way, several series circuits were assembled, which were then connected in parallel to increase the output current.


It is clear that a solar panel from the remaining fragments of broken elements will have a lower performance than the same panel from whole elements. But basically it will be due to the area occupied by the elements, if you arrange the fragments as densely as possible, then the efficiency of such a panel will tend to the efficiency of a panel of the same area from whole elements.
Now you will learn something that sellers of solar panels will never tell you.
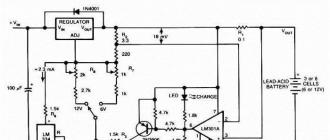
Exactly one year ago, in October 2015, as an experiment, I decided to join the ranks of the "green" ones, saving our planet from premature death, and purchased solar panels with a maximum power of 200 watts and a grid inverter designed for a maximum of 300 (500) watts of generated power . In the photo you can see the structure of the polycrystalline 200 watt panel, but after a couple of days of purchase, it became clear that in a single configuration it had too low voltage, not enough for my grid inverter to work properly.
Therefore, I had to change it to two 100-watt monocrystalline panels. Theoretically, they should be a bit more efficient, in fact they are just more expensive. These are high quality panels, Russian brand Sunways. I paid 14,800 rubles for two panels.

The second expense item is a Chinese-made grid inverter. The manufacturer did not identify himself in any way, but the device was made with high quality, and an autopsy showed that the internal components are designed for power up to 500 watts (instead of 300, written on the case). Such a grid costs only 5,000 rubles. Grid is an ingenious device. On the one hand, + and - from solar panels are connected to it, and on the other hand, using a conventional electrical plug, it is connected to absolutely any electrical outlet in your home. During operation, the grid adjusts to the frequency in the network and begins to "pump out" alternating current (converted from direct current) into your home 220 volt network.
The grid operates only when there is mains voltage and cannot be considered as a backup power source. This is his only downside. And a huge plus of the grid inverter is that you basically do not need batteries. After all, batteries are the weakest link in alternative energy. If the same solar panel is guaranteed to work for more than 25 years (that is, after 25 years it will lose about 20% of its performance), then the service life of an ordinary lead battery under similar conditions will be 3-4 years. Gel and AGM batteries last longer, up to 10 years, but they cost 5 times more than conventional batteries.
Since I have mains electricity, I don't need any batteries. If you make the system autonomous, then you need to add another 15-20 thousand rubles to the budget for the battery and the controller for it.

Now, regarding the generation of electricity. All the energy generated by solar panels in real time enters the grid. If there are consumers of this energy in the house, then it will all be used up, and the meter at the input to the house will not “spin”. If the instantaneous generation of electricity exceeds the current consumption, then all the energy will be transferred back to the grid. That is, the counter will "spin" in the opposite direction. But there are nuances here.
Firstly, many modern electronic meters consider the current passing through them without taking into account its direction (that is, you will pay for the electricity returned to the network). And secondly, Russian law does not allow individuals to sell electricity. This is allowed in Europe, and that is why every second house there is hung with solar panels, which, combined with high network tariffs, allows you to really save.
What to do in Russia? Do not install solar panels that can generate more energy than the current daily energy consumption in the house. It is for this reason that I have only two panels with a total power of 200 watts, which, taking into account the losses of the inverter, can give approximately 160-170 watts to the network. And my house consistently consumes around 130-150 watts per hour around the clock. That is, all the energy generated by solar panels will be guaranteed to be consumed inside the house.

To control the energy produced and consumed, I use Smappee. I already wrote about him last year. It has two current transformers, which allow you to keep records of both the network and the electricity generated by solar panels.

Let's start with theory and move on to practice.
There are many solar power calculators on the Internet. From my initial data, according to the calculator, it follows that the average annual electricity generation of my solar panels will be 0.66 kWh / day, and the total output for the year will be 239.9 kWh.
This data is for ideal weather conditions and does not take into account the losses for converting direct current to alternating current (you are not going to convert your household electrical supply to direct voltage?). In reality, the resulting figure can be safely divided by two.
Compare with real data on production for the year:
2015 - 5.84 kWh
October - 2.96 kWh (from October 10)
November - 1.5 kWh
December - 1.38 kWh
2016 - 111.7 kWh
January - 0.75 kWh
February - 5.28 kWh
March - 8.61 kWh
April - 14 kWh
May - 19.74 kWh
June - 19.4 kWh
July - 17.1 kWh
August - 17.53 kWh
September - 7.52 kWh
October - 1.81 kWh (until October 10)
Total: 117.5 kWh
Here is a graph of electricity generation and consumption in a country house for the last 6 months (April-October 2016). It was during April-August that the lion's share (more than 70%) of electrical energy was generated by solar panels. In the rest of the year, production was not possible, for the most part due to cloudiness and snow. Well, do not forget that the efficiency of the grid for converting DC to AC is approximately 60-65%.

The solar panels are installed in almost ideal conditions. The direction is strictly to the south, there are no high houses nearby that cast a shadow, the installation angle relative to the horizon is exactly 45 degrees. This angle will give the maximum average annual power generation. Of course, it was possible to buy a rotary mechanism with an electric drive and a sun tracking function, but this would increase the budget of the entire installation by almost 2 times, thereby pushing its payback period to infinity.

I have no questions about solar energy production on sunny days. It fully corresponds to the calculated ones. And even a decrease in production in winter, when the sun does not rise high above the horizon, would not be so critical if it were not for ... cloudiness. Cloudiness is the main enemy of photovoltaics. Here is the hourly output for two days: October 5 and 6, 2016. On the fifth of October the sun shone, and on October 6 the sky was filled with leaden clouds. Sun, wow! Where are you hiding?

In winter, there is another small problem - snow. There is only one way to solve it, to install the panels almost vertically. Or every day manually clear them of snow. But snow is nonsense, the main thing is that the sun shines. Even if it's low on the horizon.

So, let's calculate the costs:
Grid inverter (300-500 watts) - 5,000 rubles
Monocrystalline solar panel (Grade A - top quality) 2 pcs of 100 watts - 14,800 rubles
Wires for connecting solar panels (section 6 mm2) - 700 rubles
Total: 20,500 rubles.
Over the past reporting period, 117.5 kWh were generated, at the current daily rate (5.53 rubles / kWh) this will amount to 650 rubles.
If we assume that the cost of network tariffs will not change (in fact, they change upwards 2 times a year), then I can return my investments in alternative energy only after 32 years!

And if you add batteries, then this whole system will never pay for itself. Therefore, solar energy in the presence of network electricity can be profitable only in one case - when we have electricity will cost like in Europe. It will cost more than 25 rubles for 1 kWh of mains electricity, and then solar panels will be very profitable.
In the meantime, using solar panels is beneficial only where there is no mains electricity, and its implementation is too expensive. Suppose you have his country house, located 3-5 km from the nearest electric line. Moreover, it is high-voltage (that is, it will require the installation of a transformer), and you have no neighbors (no one to share the costs with). That is, you will have to pay conditionally 500,000 rubles for connecting to the network, and after that you will also have to pay network tariffs. In this case, it will be more profitable for you to buy solar panels, a controller and batteries for this amount - after all, after putting the system into operation, you will no longer need to pay.
In the meantime, it is worth considering photovoltaics solely as a hobby.
The very question of repairing or restoring a solar module or a solar cell deserves special attention. Helium panels, industrially manufactured and correctly installed, usually fail very rarely. And, if something has happened to them, then it is likely that this breakdown is so serious that repairing the solar battery will cost more than buying a new one. However, with proper use of the necessary materials and tools, you can repair such modules. As for the panels made in handicraft workshops or in general with their own hands, here the widest possibilities open up for the master.
Possible types of damage to solar modules
As a rule, branded solar panels are quite reliably protected from external influences. However, situations may arise in which they may fail. For example, glass can be damaged by a large hail, an unreliably fastened or unhidden power cable can be torn off by a strong wind, which, by the way, can also be damaged by a marten or weasel. If the glass does not crumble when hit by hailstones, then microcracks can form in it, through which water will penetrate into the body. This moisture can fog the glass, resulting in loss of performance; moisture will cause corrosion, which will destroy the solder contacts of live parts.
Helium panel after hail
If the glass was broken during bad weather, then silicon wafers may also be damaged. If the damage to the plates is fatal, then such a module must definitely be replaced, and in case of minor damage, you can try to repair the panel by restoring the damaged cells and replacing the glass. Small manufacturers can sell substandard products at a low price, but the module components will be of poor quality. Glass can be chipped, some solar cells can also be damaged, and individual elements are soldered poorly. But in good hands, even such modules can turn into reliable sources of electricity.

Glass edge damage
And finally, another category of consumers of solar electricity is garden lamps. Various manufacturers update their product range almost every week. The number of fixtures is indefinable, and competition has led to the fact that their prices have become almost junk. And when a lamp breaks down, the owners simply throw it away without thinking that it can be repaired. But the master will never throw it into a landfill, but first he will try to repair it. And, as practice shows, a faulty device in the vast majority of cases can be repaired and serve for a long time.
Glass coating repair
Damage to the glass covering of solar modules may not be fatal, and therefore, you should not rush to replace the entire module. Cracks, small holes, chips can be successfully repaired with special liquid adhesives. At the same time, the performance of helium panels practically does not decrease. Small cracks, small holes in the glass are easy to notice even with a cursory examination. And the module should be repaired as soon as possible, since water that has got inside, when frozen, can also break the glass and damage the solar cells themselves.

Typical glass damage
To repair the glass of helium modules, it is recommended to use the so-called ultraviolet liquid glass. This liquid glass, being applied to damaged areas, hardens, does not change the optical properties of the glass coating at all. To apply this agent to cracks, a special tool is used, which, in addition to everything, has an ultraviolet emitter, which helps to accelerate the hardening process. In this case, it is not at all necessary to remove the helium panel. All work can be carried out without dismantling the batteries on the roof.
FoxFix´s UV Kleber ultraviolet glue (liquid glass) has been developed specifically for repairing the glass coating of solar modules.

UV liquid glass
This acrylate adhesive also cures under natural light, but special ultraviolet emitters are used to speed up the curing process. The hardening process lasts from 10 to 15 seconds. During this time, the glued areas are firmly fixed, but the final hardening and diffusion processes continue for several hours. After hardening, the compounds are colorless, transparent, waterproof, heat-resistant (temperature range from -50°C to +120°C).
Before applying the adhesive, the surfaces to be glued must be cleaned of grease and dirt. This can be done with any cleaning agent such as BerFix®, acetone, alcohol or industrial glass cleaner. After the surfaces to be glued dry from the cleaning agent, liquid glass is applied. For the treatment of hairline cracks, depending on the width of the gap, dilute the adhesive with water in a ratio of 1:3. If a sufficiently large piece of glass (up to ten square millimeters) is knocked out or chipped, then the glue is applied without dilution with water. It is recommended to process the damaged glass surface gradually, allowing the already glued areas to seize.
After applying the adhesive, treat the joint with an ultraviolet lamp for about a minute.

UV emitter
After completion of the repair work, the surface should be cleaned of adhesive residues. This can be done with a blade or a special cutter. An ultraviolet emitter is usually included in the gluing toolkit. One such tool is Few Second UV Light Liquid Quick Fix Glass.

It consists of a replaceable tank into which liquid glass is poured from an ultraviolet emitter. Liquid glass from the tank through the capillary is fed to the surfaces to be glued.

After applying the adhesive, turn on the ultraviolet emitter and treat the areas to be glued. This tool comes with a spare tank of glue, two CR1620 3V batteries.
Helium cell repair
Failed various external lamps most often have one common cause of failure - corrosion of conductor connections. The metal coating of the positive electrode is often completely eaten away by corrosion. And the electrode itself with conductors may also be broken. Since a method has not yet been invented on how to solder the conductor to glass or ceramics, it is advisable to use conductive glue for repairs. Further, all operations are carried out very simply.

First you need to unsolder the existing conductors from the electrodes. The places where the conductors were connected to the electrodes must be carefully cleaned. The cleaning area is a few square millimeters.

Soldered conductors. Corrosion at solder joints
Then this place is degreased and a small layer of conductive glue is applied. This glue, as it were, restores an electrode that has been damaged by corrosion. After the glue dries, a stripped conductor is applied to it, and a drop of solder is applied to it with a hot soldering iron.

Refurbished solar cells
When the solder hardens, two or three drops of hot melt adhesive should be applied to it. Once this adhesive has cured, the solar cell is ready to go.
In fact, with the right tools, materials, and minimal skills, repairing solar panels is not such a difficult job. And anyone can cope with this task. There would be a desire.