Today everyone has a smartphone, tablet or laptop. These devices traditionally connect to the internet via WiFi. Wireless routers are designed to solve the problem of distributing access inside an apartment or office.
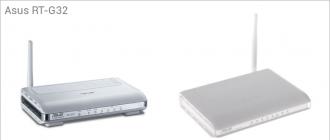
Router ASUS RT G32 popular model among users
Traditionally considered the most suitable for home or small office use. They provide a stable connection and work with any providers on the Russian market. provided a reasonable price combined with a reliable connection quality. Setting up ASUS RT G32 WiFi is easy, but novice users do not always cope with it. Let's consider how the ASUS RT G32 Beeline router is configured.
One of the largest providers, Beeline, uses L2TP for authorization in the network and this causes slight difficulties for users.
Here are the steps for installing the router:
- Preparatory, which includes downloading and installing new firmware and checking the configuration of the network connection.
- Direct connection of the router and firmware.
- Establishing a network connection.
- Setting up a Wi-Fi network.
WATCH THE VIDEO
Preparation
The first step is to download the latest firmware from the ASUS website. Go to the device model page through the "Products" menu and select the "Support" link at the top, and then click on the "Download" item. In the section with software, the new version is presented with the number 7.0.1.26. To download, select the "Global" link and save the resulting file.
- Run the command "ncpa.cpl" from the window.
- We select the used local network connection and call its properties.
- Let's move on to changing the parameters for TCP / IP 4.
- We set both switches to auto.
- router;
- power unit;
- documentation and PC connection cable.
Let's consider how to connect ASUS RT G32 WiFi router to a computer. On the back panel, the router has 5 ports. One of them is signed by the WAN, and a cable installed by the provider's specialists is connected to it. 4 LAN ports are designed to connect a PC and other devices, one of them is connected to a computer. Connect the network adapter for the ASUS router to the electrical network.
One of them is signed by the WAN, and a cable installed by the provider's specialists is connected to it.Important! An Internet connection on a PC should not be installed, either during setup or after. The connection will be established by the router.
In this step-by-step guide, we will talk about how to set up the Asus RT-G32 Wi-Fi router. This wireless router is one of the most purchased in our country, and this is quite easy to explain - a high-quality router at a low price will always find its buyer. Now about how to configure the Asus RT-G32.
Preparing for configuration and connecting the router

Before proceeding with the Asus RT-G32 setup process itself, I recommend checking the parameters of the local network connection on the computer from which you will configure it. To do this, go to:
- Control Panel - Network and Sharing Center - Change adapter settings (for Windows 8 and Windows 7)
- Control Panel - Network Connections (for Windows XP)
- Right-click on the local area connection icon and in the drop-down menu select "Properties"
- In the list of components used by this connection, select "Internet Protocol Version 4 TCP / IPv4" and click "Properties" again
- Make sure that automatic obtaining of the IP address and DNS server is selected in the protocol properties. If this is not the case, then set the automatic acquisition of parameters. (If you are using a connection with a static IP address, before changing the parameters, write down the data that was specified in the protocol properties somewhere, they will be needed when configuring the router).

This completes the preparation. The next step is to connect the router to your computer. The connection diagram is very simple: connect the cable of your Internet provider to the WAN port on the Asus RT-G32, and connect one of the LAN ports to the corresponding port on the computer. Connect power to the router. The next item is directly configuring the Asus RT-G32.

An important point to pay attention to: after connecting the router, you should not start a VPN or PPPoE connection on your computer - i.e. if earlier you launched the Beeline or Rostelecom icon to access the Internet, now you do not need to do this - the Internet will “appear by itself” after we finish setting up. This is a fairly common mistake and a common reason for the question that "the computer has the Internet, and the laptop is connected via Wi-Fi but without access to the network." Be careful.
Setting up connection on Asus RT-G32
The main point of configuring a router is to configure it for self-installation of the desired type of connection (determined by your provider). So, let's begin.

All actions for setting up a connection are performed on this page. In most cases, you just need to specify the "Connection Type", which can be obtained from the provider, the login and password to the Internet, as well as the address of the VPN server for PPTP and L2TP connections. After that, save the settings and after 10-30 seconds you will have access to the Internet.
Below is a list of connection types for popular Russian Internet providers:
- Beeline - L2TP, VPN server address: tp.internet.beeline.ru
- Rostelecom - PPPoE
- TTK - PPPoE
- Stork - PPTP, VPN server address: server.avtograd.ru
- Dom ru - PPPoE
- Interzet - Static IP
- Online - Dynamic IP
If you have coped with setting up the Asus RT-G32 connection, and you can already open Internet pages on separate browser tabs, then it's time to go to the wireless network settings.
Setting up a Wi-Fi access point on the Asus RT-G32
You can connect to the router via Wi-Fi right now. The only thing is that the name of the wireless network is impersonal (Asus RT-G32) and no password is set for it. The password is required in order to restrict access to your wireless network for unauthorized users: neighbors and even people sitting on a bench in the yard.
In order to configure the Wi-Fi parameters, on the router settings page in the menu on the left, select the "Wireless network" item and fill in all the required fields:

- SSID is the name of the access point, it is required so that you can identify your Wi-Fi network among all others. We use the Latin alphabet
- Authentication Method: WPA2-Personal is the best option here, this will ensure that your wireless network is secure.
- The WPA pre-shared key is the Wi-Fi password. The password must be at least 8 English letters and numbers.
Save the settings.
That's all, this completes the configuration of the Asus RT-G32 router and you can use the Internet from a laptop, tablet, smartphone and other Wi-Fi devices without wires. If you have any questions, write in the comments.
ASUS is a well-established manufacturer of electronics with good specifications, including modems for Internet access. But any device of this type needs to be configured according to the parameters of the provider with whom the contract for the provision of communication services has been concluded.
This instruction will give you an answer to the question of how to set up an asus rt g32 router, while it is worth remembering that the configuration algorithm and the interface of devices from one supplier are very similar, so the article will be useful to all buyers of ASUS modems with Wi-Fi support.
Preparing for setup
The technical preparation of the router for configuration is carried out in several stages:
- Connect the power supply to the Asus RT-G32 and turn it on to the power supply.
- Connect the Ethernet cable provided by your ISP to the modem connector labeled “WAN”.
- Connect the port of the router with the inscription "LAN1" to the network card of the computer using the Ethernet cable, which is included in the set of the Wi-Fi modem.
- Reset the Asus rt g32 settings to the factory settings by pressing and holding the "Reset" button recessed in the case for ten seconds.
Computer settings
Often the characteristics of a computer's network card are manually configured for other connections. To work with the asus rt g32 Wi-Fi router, you need to configure the card:
1. Open the OS network settings section. For example, for Windows 7, you need to open the settings window shown in the following figure (located in the control panel), where click on the highlighted link.

2. Go to the connection properties by right-clicking on its icon and selecting the corresponding item in the menu that appears.

3. Open "Properties" of the item indicated in the following figure:

4. Set the values of the protocol characteristics as shown in the figure:

We repeat the procedure for the rest of the connections, if any.
Configuring the router
To configure the asus rt-g32 for the settings of your provider, follow the steps of the following instruction:
1. Launch any browser, enter the address 192.168.1.1 and go to it.
2. In the uploaded authorization dialog in both fields, enter "admin" and click on "Submit"

3. Click on the "Home" button

4. The software shell of the wi-fi router asus rt g32 supports the Russian language, select it in the "Language" field.

5. To configure WAN access options, click on the “WAN” main menu item.
6. Check with your service provider for the type of connection.

7. If the provider provides the Internet using dynamic IP technology, then nothing needs to be changed on the “WAN” page. Click on the "Accept" button.
8. If the Internet is provided using static IP technology, then in the "Type of WAN connection" select the appropriate type and fill in all the fields of the form with the data received from the provider and click on "Accept".

9. When choosing the PPPoE connection type, specify the receipt of the IP address automatically, or fill in the address field if it was provided by your ISP. Z Fill in the fields of the "Account and connection settings" section with the data specified in the contract for the provision of communication services, and in the MTU field, enter the value 1472 and click on "Accept".


11. Apply the changes and configure the wifi module for wireless connection. If this option is not needed, restart the modem and use the Internet.
Wi-Fi setup
To configure the characteristics of wireless access to the global network, open the tab of the main menu "Wireless network". Where set the following parameters:
- In the "SSID" field, enter the name of the Wi-Fi network displayed on the subscriber devices. It can be arbitrary, but it must consist only of numbers, signs and letters of the Latin alphabet.
- Enable the "Hide SSID" option if you want to use this method to protect your wifi network from unauthorized access. When activated, the setting hides your network from subscribers, and you can only connect to it knowing its exact name.
- In the "Authentication Method" line, set "WPA-Personal". And in the line "WPA encryption" select "TKIP". These are the most well-established and widely used methods of protecting the network.
- The "Pre-Shared WPA Key" line contains the password that users must enter when logging into your wifi network. The length of the codeword must be at least eight characters; any characters are allowed.
- To fix the settings, click "Apply".

This completes the setup of the asus rt g32, it remains only to reboot it and use the Internet, both via a wired interface and via wi-fi.
Found a typo? Select the text and press Ctrl + Enter
Experts, as well as ordinary users, note the convenience of using ASUS routers when building a home wireless network. We will not argue with them, but rather we will clearly see how to configure the Asus RT-G32 router - one of the most popular routers.
Turn the back of the device towards you. Here you can see five ports: one WAN and four LANs.
In the WAN port, you need to insert the cable that your Internet provider has pulled into the apartment. Connect one of the LAN ports (preferably the first) using the supplied cable to the computer's network card. Then plug the router into the network and wait for the "Power" indicator on the case to light up.
Attention: if you have another working Internet connection on your computer, do not use it when setting up your router. Otherwise, after creating a wireless network, you will not be able to access the Internet via Wi-Fi.
Before configuring the router, you need to check the local network parameters on your computer so that you do not correct possible errors later.

Configuring the router
Now you need to configure the router for a specific type of connection, which is determined by your provider and specified in the contract for the connection of communication services. If you are familiar with the procedure for setting up a TP-LINK TL-WR842ND router or know how to set up a D-Link DIR-300 router, then this step of connecting the router will be easy to handle.
Open any browser and write 192.168.1.1 in the address bar. This is the address of the web interface of the ASUS RT-G32 router through which it is configured. 
The default login and password will be the word "admin". Enter it on both lines and click Submit.
You will be taken to the settings page, where in the field on the left you need to open the "WAN" section. Here you can configure the settings for connecting to the Internet.

Specific connection parameters must be specified in the contract that you have concluded with the provider. This is primarily about the type of connection. Let's say for Rostelecom, TTK, Dom.ru it will be PPPoE, and for Beeline - L2TP.
There may be other options, but the process of setting up the router itself does not change dramatically from this. Therefore, let's see how the router is configured if the provider uses PPPoE or L2TP connections. Let's stop our choice on these two types, as they are the most common.
PPPoE

L2TP

The rest of the parameters should not be changed. The only thing is, in the line "Hostname" write something in Latin: let's say, the model of the router.
Creating a wireless network
The process is identical to setting up Wi-Fi on ByFly. Only some names of menu items and sections are changed, there are no other differences.
Open the "Wireless" section in the settings menu. On the General tab, fill in the lines presented one after the other.
Do not use your personal information: first name, last name, date of birth, pet's nickname, etc. This will increase the security of your connection.
- In the "SSID" field, enter the name of the wireless network.
- Country Code select United States. This does not have any effect on the operation of the router, but when you try to connect the iPad there will be no problems.
- "Authentication Method" select "WPA-2 Personal". This is a fairly reliable method that provides a good level of protection against network hacking using special programs.
- "WPA Key" - the password for your network, which will be requested when you try to connect to it via Wi-Fi. Must be 8 characters long (Latin and numbers).

Click "Apply" to save the specified information in the settings of the router. Take a device with a Wi-Fi adapter that you want to connect to a wireless network, and start a search for available points on it. After detecting the access point you created, connect to it using the password specified in the router settings.
If you wondered how to connect an ASUS router to a computer, and how you can configure it, then this article is created for you. First, to make the connection, you need a special cable called a patch cord. Usually, this cable comes with a router, it serves to connect a computer and a modem, if the connection was made, in the network connection settings it is worth looking at whether there is access to the network.
The first step is Network Connection and its configuration.
You need to go to "Network and Sharing Management", for this we go to the Start menu, and there we select "Control Panel". It is there that the corresponding section will be, which we need, when you find yourself in it, you need to find the connection that is active, and by right-clicking on it, go to the "Status" tab.

When a new window appears, you need to select "Properties", and there find an item such as "Internet Protocol Version 4 (TCP / IPv4) 2" and go to its "Properties". Naturally, after that, you immediately need to go directly to the setting, there is no need to carry out a lot of manipulations, it is enough to automatically put a checkbox in front of each item with a value.

If this was the standard, then you do not need to make any adjustments, just leave everything in its place, close all windows, and go to the second point of configuring your router.
The second step is to connect the cable from the router to the computer.
Looking at the device from the back, you can see on it such connectors as LAN (yellow), WAN (blue), Power (black). A power supply must be connected to the Power connector, the patch cord that comes with the device is inserted into the LAN port (the other end of the wire is inserted into the computer), but the cable from your Internet provider must be connected to the WAN port.
The third stage is setting up the modem.
In order to continue configuring the modem, you need to launch the browser, and drive 192.168.1.1 into the address bar and press the ENTER key. After that, a page will open where you must enter your login and password. By default, they are set as "admin", "admin".
If this is the first time you enter this panel from your computer, then a similar dialog box will pop up in front of you.

If you click on the "Home" button, then you will automatically be taken to the main page, in which you will need to select the language of the control panel interface and configure the wired connection. If this is not done, then the wireless connection will not work. To get started, you need to go to the tab with the name WAN and select "Internet connection" there.

Now we proceed directly to setting up our Internet.
In the type of connection, you must select the item with the name - PPTP.
Opposite the item - DNS WAN settings ", you need to check the" no "box, because these settings will need to be filled in on your own, for this you will have to call the provider, inquiring about this data.
The account block should contain information about the Internet login and its password. This information should have been provided by your Internet provider when concluding the contract.
We apply all the actions, and we get a ready, efficient Internet connection.

The fourth point is setting up a wireless connection.
Due to the fact that working with an Internet connection via cable is not very convenient, a technology such as "Wi-Fi" was developed a long time ago, it allows you to access the Internet without a cable, for this reason, this is called "Wireless Internet Connection ". Now, we will do some small manipulations that allow setting up wireless data transmission on the router.
On the main page of the control panel, select the item with the name "Wireless networks". Then we go to the tab called "General", and there it will be necessary to fill in the data with pens. SSID field - requires the name of the network. You can choose absolutely any name, because it comes from your brain. Now you need to take care of protecting the created network. To do this, in the "Authentication Method" item, you must specify a setting named "WPA-2 Personal". The encryption type can be selected both combined and AES. Next, enter the password that will be requested when connecting to a wireless connection. It is necessary to set a password that will be reliable, but you must never forget it, otherwise you will not be able to connect to your own network, and you will have to reset the settings to the factory settings.

After completing these actions, the setting ends, you need to save the result, for this we click on the "Apply" button, it is located at the bottom of the page. After that, we reboot the modem, and make sure that everything works correctly. We advise you to check the performance not only on a computer, but, for example, on a phone, tablet, and so on. The setup process is not difficult, and even a beginner can do it.