Already dragged on for a blog? But what can you do if there are several simple and very convenient ways to do this at once. The reader must be given a choice.
And if we take into account the fact that laptops without disk drives are used quite often now, then this question cannot be avoided. Do you agree? Therefore, let's already finish off the section about creating a bootable USB flash drive Windows 7 in UltraISO. Not you know what kind of beast is this (UltraISO)? Yes, this is such a free program.
For the sake of a word of mouth, it is worth noting that the solution described in this article is perfect for creating bootable media not only for sevens, but also for Win 10. There is also UEFI support. Therefore, I personally like this alignment very much.
So let's get started. The first step is to download an application called UltraISO and install on your computer. The process is quite simple, there is not much to tell. We take and set. Then we run it and Windows 7. In our case, there will be a 64-bit version:
And then we smoothly move on to almost the last step. Namely, we follow the path "hard disk image":

And in the window that opens, set the following options:

- Disk Drive: specify the flash drive for copying files.
- Recording method: choose USB-HDD +.
- Do not forget to press the button "Save".
Naturally, you need to understand that formatting the drive will erase all the information on it. Well, in general, that's all, friends, the creation of a bootable USB flash drive for Windows 7 in UltraISO has come to an end.
Again, I repeat that this method can be used to record Windows without any problems. Everything is done by analogy. As they say, exactly v- exactly.
The only drawback of this approach is the impossibility of adding something to such a medium. Rather, you can do this, but you will need to manually edit the ISO image in the program and the files in the boot menu.
Therefore, write your thoughts and questions in the comments to the article, I always read them and answer whenever possible. I will also be happy with constructive criticism and business proposals. And now, bye, everyone, let's watch an entertaining video.
To boot from a USB flash drive on a PC or laptop with an active UEFI BIOS mode, you need a bootable UEFI flash drive, respectively. How do I create it? The installation processes of Windows 8.1, 10 and their corresponding server editions, some Live-disks support booting in the mode at the distribution level (ISO file downloaded from the Internet). Such distributions initially include an "EFI" folder with program codes that adapt the bootable media to work with UEFI. In this case, it will not matter which program the ISO file is written to the USB flash drive. If only the flash drive itself was formatted in the FAT32 file system before recording.
But what if the distribution kit is not adapted to work with the UEFI BIOS? With Live disks, things are simpler: even if the rescue media was not created in the format of a bootable UEFI flash drive, in order to boot from it in case of emergency - for example, in order to destroy viruses or determine the cause of problems with the computer's hardware, it is enough to first disable the UEFI mode in the BIOS and, accordingly, enable either Legacy mode or CSM (compatibility mode). Then, in the boot order, choose to start from not a UEFI flash drive, but from a regular one. But with a USB flash drive of the Windows 7 installation process, everything is more complicated. The distribution kit of this version of the system is not adapted for UEFI BIOS, and when you start the computer from a regular bootable USB flash drive in BIOS Legacy (or CSM) mode, the Seven will refuse to install on a GPT disk, which is one of the key advantages of UEFI BIOS. To install Windows 7 to a GPT disk, booting from a UEFI stick will be essential.
You can create a bootable UEFI USB flash drive with the Windows 7 installation process and Live disks, the creators of which did not bother adapting the distribution kit to the BIOS of the new format, using the free Rufus program. Rufus is a portable utility for burning ISO images to bootable removable media. The program's capabilities include adapting bootable media to the BIOS UEFI format.
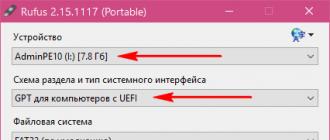
Having launched the program, in its first column, select the desired drive, if several of them are connected to the computer. In the second column, set the value "GPT for computers with UEFI". We check that the third column contains the value of the file system "FAT32". Leave all other values by default and in the "ISO-image" column specify the path to the image of the Windows 7 distribution kit or Live-disk. We press the "Start" button.
We confirm the start of the process.

UEFI will notify the progress indicator of the completion of the process of creating a bootable USB flash drive when it completely fills the scale with green color. Below the indicator you will see the “Ready” status.

That's it - you can close the Rufus program and test the UEFI flash drive.
Recall also that to boot software from a UEFI flash drive that does not have certified keys (and such software is Windows 7 distribution, some Linux distributions, many Live disks), UEFI (Secure Boot) is required in the BIOS.
Have a great day!
CD / DVD discs are outdated today. They were replaced by USB drives.
The need to boot from a USB flash drive can arise when solving many problems:
- installing a new operating system;
- running in Live Cd mode;
- to treat your computer from viruses and malware;
- to fix errors that occur when loading the operating system;
- pre-installation of additional drivers;
- scanning the hard disk for problem sectors;
- starting the operating system installed on the USB flash drive.
On many systems, booting from USB is disabled by default. Because of this, a user who wants to use a bootable USB flash drive may have problems changing the settings.
Features of booting from a USB flash drive
The order in which devices are selected to start is determined by the settings of Bios, a built-in firmware designed to provide the operating system with access to the device API.
To boot the system from a USB flash drive, you need to go to Bios and change the startup order, or use a special boot menu. However, this is not always easy to do, as the versions and types of firmware may differ on different motherboards.
If you need to boot from USB or any other storage device, you need to follow these steps:
- insert a disc or USB flash drive;
- turn on the computer or restart it;
- enter the Bios or Boot menu and select the USB device;
- if there are several connected devices, the system will automatically offer you a list to select the one you need.
Most modern motherboards work through a technology called UEFI. This is not just a more convenient graphical interface for the Bios firmware, but a new software with wider possibilities and flexible settings.
Uefi motherboards have a lot of new features, for example:
- monitor the temperature of various devices and, in this regard, increase or decrease the speed of the fans;
- adjust the frequency of overclocking of the central and graphic processor on those motherboards where it is provided by the developer;
- work with many Bios settings from special software under the Windows operating system.
Video: select boot device in BIOS
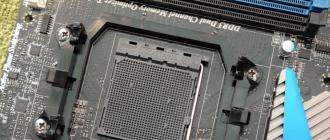
Asrock H77M-ITX motherboard
The easiest way to boot the system from a USB flash drive is to use the Boot Menu. For every modern motherboard there is such an opportunity. To find out which combination or key you can do this, most often it is enough to read the system messages. As a last resort, you need to refer to the documentation for the board.
Asrock H77M-ITX allows you to select the launch option using the "F11" button. On the first try, you may not be able to get into the menu, so you need to press the key several times. If unsuccessful, just restart your computer and try again.
As a result, you should see a blue-blue background that says Asrock UEFI setup utility. In the "Please select boot device" menu, you need to select the required device to boot.

To configure the startup order of devices in the BIOS of the Asrock H77M-ITX motherboard, you must perform the following steps:

After restarting the computer, you should see the start of the launch from the flash drive.
Motherboard ASUS P8H77-I
You can get into the BIOS on computers with the ASUS P8H77-I motherboard in exactly the same way as described in the previous section, using the keys "Del" or "F2"... The menu for selecting devices for loading can be accessed by pressing the "F8" button.
The firmware interface is very different from the previous version. But the names of the various settings menus are almost identical.
To simplify the actions, there is a primary configuration mode and an additional one. In the function of the initial setup, that is, in the main window that you enter when loading Bios, there is an option to select the startup priority. In the USB picture, it is indicated as with uefi.

If, after restarting the system, the boot from the USB flash drive does not start, you must go to the "Advanced mode". This can be done using the "Advanced" button or by pressing the "F7" key.

Photo: advanced UEFI Bios setup mode on ASUS P8H77-I
To set the priority, you need to do the following:

Photo: Enabling Full Initialization Support for USB Devices


Photo: menu "Boot order of hard drives"

Photo: rechecking priority after changes in hard drive boot lists
The computer will reboot, after which the startup from USB should start. If this does not happen, try changing the port and repeat the operation.
How to boot from a bootable USB stick into Award Bios
Newer motherboards that work with uefi are much easier to set up. However, the need to boot from a USB flash drive may also arise on older systems. The settings for using a bootable USB drive may be slightly different, although the principle of operation described earlier is the same.
One of the most famous versions of Bios is the Award. There is no way to call the menu to select the startup priority. Therefore, we immediately proceed to setting up the BIOS.
In order to boot the system from a USB stick on a computer with a motherboard running Award, you need to do the following:

If the launch from the required drive has not been performed, there is one more parameter to check: the USB controller must be enabled in the Integrated Peripherals menu.

Photo: checking the activation of the controller
AMI BIOS
This firmware management system is more modern, so there is already a menu for selecting the startup sequence. It is activated with the "F11" button. You can get into the BIOS setup using the "Del" or "F2" buttons.
To select a boot priority, you must:

Phoenix-Award Bios
Phoenix-Award Bios is quite rare, and its firmware is a bit unusual. There is support for displaying a menu for quick selection of a bootable drive, it is called by pressing the "F11" key.
Interestingly, you will not find a USB-HDD in the Phoenix-Award menu. But other gadgets connected in this way are provided for the choice, for example Zip, CDROM and Floppy. To start from a USB flash drive, you need to select Hard Disk, and then the required USB-HDD will appear in the list.

With regard to priority management through Bios, this is done almost identically to AMI.
The difference is that the following options must be selected in the Boot menu:
- using the "+" and "-" keys, change the order. The first should be the Removable Device;
- by activating the Removable Device and pressing the "Enter" button, select the flash drive from the drop-down list.

Photo: Removable Device first in the startup sequence list
The ability to boot the system from a USB flash drive is given by almost any Bios microsystem. Knowing the key combinations and the necessary menu items, you can quickly change the startup priorities.
More modern motherboards with uefi give you a lot more control over your system. If necessary, you can run different operating systems from different flash drives to manage any software.