How to install 1C Enterprise 8.3? This question torments many beginners, in fact it is much easier than you might think! You don't have to be at all for this. In this step-by-step instruction, I will tell you the process of installing the 1C 8.3 program and how to install the 1C configuration using the example of "1C Enterprise Accounting 8" with the Windows operating system. The procedure is absolutely similar for other applications, such as 1C Trade Management.
By the way, if you have not bought 1C yet, you can order any 1C program and customization services from. Delivery and installation of 1C PROF in Moscow and regions for free!
The installation can be conditionally divided into 2 small steps:
- First of all, the installation of the 1C 8 platform itself and
- Configuration installation: there are a lot of 1C configurations, and it is not possible to consider the installation of all. For example, I take the most popular configuration - 1C Enterprise Accounting.
Get 267 1C video lessons for free:
As a rule, configuration files are packed into an archive, in which the installation files. It looks something like this:

In the archive, you need to find and run the "setup.exe" file.
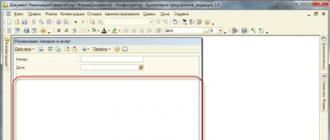
The following window will appear:

Here it is necessary for the first three items, as in the picture, to set the parameter "This component will be installed on the hard drive." Also, in the menu of interface languages, you can specify the one you need (the default is Russian / English).
With the advent of the new tenth version of the operating system, many are interested in how to install 1C on Windows 10. Although many users have already appreciated the functionality and convenience of the new system, users of 1C: Enterprise software have also noticed the fact that programs from 1C create many errors when working on the tenth Windows. Despite all the positive qualities, Windows 10 is frankly a raw and unfinished system. Specialized software, such as 1C: Accounting, works intermittently on this system.
Windows 10 can be installed in two ways:
- Upgrade from Windows 7 or 8;
- Install the system version from scratch.
Regardless of the implementation method, certain problems arise while working with 1C 7.7 and other versions. Therefore, if you decide that the cause of the problems is incorrect installation - this is the wrong conclusion.
Crashes when working with 1C on Windows 10
One of the most common errors that occur when working with programs from 1C version 8.3 and others on the tenth Windows is crashes to the point that the program writes "The program has stopped working." It is noted that after installing 1C: Enterprise on a completely empty Windows, the programs practically do not function, and when installed on version 7ku updated to version 10, it starts, but there are many minor errors that interfere with normal operation.
Some versions work better on Windows 10, some worse. Therefore, if you have the opportunity, it is better to test your version of the software for compatibility with the tenth Windows and only after that upgrade.
The most common errors that may occur when working with 1C on Windows 10:
- Indexing errors;
- Encoding problems;
- Lack of logical integrity check;
- DLL crashes;
- OpenConf errors, etc.
If you are unable to solve all the problems that have arisen on your own, then you should seek help from a specialized company. Experienced programmers, engineers and tuners will promptly correct all violations and failures in the system.
How to install version 8.3
If you still decide to install 1C on the tenth version of Windows, then the installation process itself will differ slightly from a similar installation on 8 x64. First of all, you need a package to install 1C software. It can be purchased as a software CD or downloaded from a dedicated website.
The resulting archive should be unpacked - it usually unpacks itself, but you can use any archiver programs. After that, in the folder where you placed the unpacked files, find the installation file and run it. After running the installer, you will need to click the "Next" button and start the installation process.
On a new page, the installer will prompt you to select a couple of suitable system elements that you want to install. You can choose all or just some of the following:
- 1C: Enterprise;
- File version, or thick client;
- Thin client;
- server;
- Expansion modules for the server;
- Translations of the program into different languages;
- Server administration;
- Server for storing all important configuring elements;
- Converter.
After selecting all the files to be embedded, click on the "Next" button again. On the next page, you will need to select the language in which the product will be launched. Again, click on the "Next" button.
Transferring 1C from Windows 7 to 10
If you selected Server in the installation components, you will be presented with an additional screen for selecting server settings. After all the settings are selected, you just have to click "Install".
Once the installation is complete, the program will give you the option to install a security driver. If you are going to get the keys to the program through the emulator, you do not need to install this driver. This completes the installation process, you can terminate the process and restart your computer.
The most rational way to get stable operation of 1C software on the tenth Windows is to transfer from Windows 7. This is not as complicated a process as it seems. The first thing to do is to copy all the databases to removable media, disk or flash card. Subsequently, they will need to be transferred to the computer after reinstallation. The location of the bases can be found when the program is started.
After that, take care of the transfer of the platform itself. Go to the hard drive where you have the program installed. Usually this is drive C. There, find the Program Files folder and copy it to removable media as well.
Now you can upgrade the system to Windows 10. When the process is completed and you get a computer with a new OS, you can start transferring 1C back to your computer.
How to implement 1C 7.7 during transfer?
First copy the databases to the PC. Remember to remember the exact path where you copied them. After that, go to drive C to the Program Files folder and copy the previously saved 1Cv77 folder there. In this folder, find a subfolder called BIN. Find the file 1cv7l.exe in it, create a shortcut on the desktop and run it.
When you open the program, it will be empty. To find the databases, click "Add" and navigate to where you placed the databases. When you find the desired folder, click on OK. After that, you need to run 1C 7.7 in the configurator mode. In "Administration" find the item "Code page of information security tables" and select "+ current system installation" there. Confirm the action and wait a bit. The program will start in normal mode and will work as efficiently as possible.
Working with a system as fresh as Windows 10 is fraught with problems. Installing 1C on it and using it is much more difficult than on Windows 2000. If you are not ready to face such problems, then do not rush to switch to Windows 10 and wait until all problems are fixed.
Installing 1C:Enterprise 7.7 on x64 bit Windows is fraught with some difficulties. The fact is that installing 1C through a regular installer will not work, even if you run the program in compatibility mode. But nothing is impossible in our life. Therefore, below is a step-by-step instruction for installing 1C: Enterprise on x64 bit Windows, in my case it is Windows 10.
Installation in Windows x32
First you need to install the required platform 1C:Enterprise in any other 32-x (x86) bit Windows system by changing the default installation path to " C:\Program Files (x86)\1Cv77\” (for all shortcuts to work). Then you need to copy the files to the 64-bit system:
Directory " 1Cv77' out of the way
« C:\Program Files (x86)\» 32-bit system in
« C:\Program Files (x86)\» 64-bit system.
Directory " 1C Enterprise 7.7' out of the way
« C:\Documents and Settings\All Users\Main Menu\Programs»
on a 32 bit system
« C:\ProgramData\Microsoft\Windows\Start Menu\Programs»
64-bit system
(the paths may vary depending on the version of Windows you are using).
Copy file from path
« C:\WINDOWS\system32\» 32-bit system in
« C:\Windows\SysWOW64\» 64-bit operating system.
ShutdownDEPfor 1cv7.exe process (for server OS)
Next, you need to exclude the 1cv7.exe process from the DEP check, for this we go to the system properties (“ Start» - « Control Panel» - « system and safety» - « System”) and choose “ Additional system settings» .

In the opened window " Properties of the system» go to the tab « Additionally" and go to " Options» performance. 
Next, go to the tab " Data Execution Prevention" , press the button " Add"and select the file" C:\Program Files (x86)\1Cv77\BIN\1cv7s.exe, which we copied in step 1. 
Installing security drivers
Now you need to install the protection drivers. 1C:Enterprise uses the HASP hardware and software protection system from Aladdin Knowledge Systems Ltd. To run all protection modules, you must:

Fixing the error "The sort order set for the database is different from the system sort order!" if such an error occurs when starting 1C:Enterprise.
Launch 1C:Enterprise
Everything, on this the installation of the 1C: Enterprise platform is completed. To launch, you can use the shortcut located along the path " Start» - « All programs» - « 1C Enterprise 7.7» - « 1C Enterprise» . You can also add a shortcut to launch 1C on the desktop for all users by copying it to " C:\Users\Public\Desktop” (paths may vary depending on the version of Windows you are using). Further work with the 1C system is similar to working in 32-bit Windows.