In detail Arduino programming language for beginners is presented in the table below. Arduino microcontroller is programmed in a special programming language based on C / C ++. Arduino programming language is a variety of C ++, in other words, there is no separate programming language for Arduino. Download the PDF book at the end of the page.
In Arduino IDE, all written sketches are compiled into the C / C ++ program with minimal changes. Arduino IDE compiler greatly simplifies writing programs for this platform and the creation of devices on Arduino becomes much more accessible to people who do not have large knowledge in C / C ++. Let us give further a small certificate with the description of the basic functions of the Arduino language with examples.
Detailed Handbook of Arduino Language
Language can be divided into four sections: operators, data, functions and libraries.
| ARDUINO | Example | Description |
Operators |
||
| setup () | void setup () { pinmode (3, Input); } |
The function is used to initialize variables, determining the operating modes of the conclusions on the board, etc. The function starts only once, after each power supply to the microcontroller. |
| loop () | void loop () { digitalWrite (3, High); Delay (1000); digitalWrite (3, Low); Delay (1000); } |
The Loop function is spinning in the cycle, allowing the program to make calculations and react to them. The Setup () and Loop () functions must be present in each Sketch, even if these operators are not used in the program. |
Managers operators |
||
| if | … if (x\u003e iF (X.< 100) digitalWrite (3, LOW ); … |
The IF statement is used in combination with comparison operators (\u003d\u003d ,! \u003d,<, >) And checks whether the truth is achieved. For example, if the value of the variable x is greater than 100, then the LED at the output 13, if less - LED is turned off. |
| if..else | … if (x\u003e 100) DigitalWrite (3, High); eLSE DIGITALWRITE (3, LOW); … |
The ELSE operator allows you to check the check other than that specified in IF to implement several mutually exclusive checks. If none of the checks received the result of the truth, the operator unit is running in ELSE. |
| switch ... Case. | … switch (x) { case 3: Break; } … |
Like if, the SWITCH operator manages the program, allowing you to set actions that will be performed under different conditions. Break is a command of the output from the operator, Default is executed if no alternative is selected. |
| for | void setup () { pinmode (3, Output); } void loop () { for (int i \u003d 0; i<= 255; i++){ analogWrite (3, I); Delay (10); } } |
The FOR design is used to repetitive operators enclosed in curly brackets. For example, smooth darkening of the LED. The FOR cycle header consists of three parts: for (initialization; Condition; Increment) - initialization is performed once, then the condition is checked, if the condition is correct, the increment is incremented. The cycle is repeated until it becomes a false condition of Condition. |
| while | void loop () { while (X.< 10) { x \u003d x + 1; Serial.println (x); delay (200); } } |
The WHILE operator is used as a cycle that will be performed until the condition in parentheses is truth. In the example, the WHILE cycle operator will repeat the code in brackets infinitely until X is less than 10. |
| do ... While | void loop () { do. { x \u003d x + 1; delay (100); Serial.println (x); } while (X.< 10); delay (900); } |
Cycle operator Do ... While works just like the While cycle. However, with the truth of the expression in parentheses, the cycle is continued, and not output from the cycle. In the example above, with x more than 10, the addition operation will continue, but with a pause of 1000 ms. |
| break continue. |
switch (x) { cASE 1: DIGITALWRITE (3, HIGH); cASE 2: DIGITALWRITE (3, LOW); case 3: Break; cASE 4: Continue; default: DigitalWrite (4, High); } |
Break is used to enforce output from Switch, Do, For and While cycles, without waiting for the cycle completion. CONTINUE operator skips the remaining operators in the current cycle step. |
Syntax |
||
| ; (semicolon) |
… digitalWrite (3, High); … |
Sein point is used to designate the end of the operator. Forgotten at the end of the string, a comma point leads to an error when compiling. |
| {} (braces) |
void setup () { pinmode (3, Input); } |
The opening bracket "(" must be accompanied by a closing bracket ")". Unpaired brackets can lead to hidden and incomprehensible errors when compiling Sketch. |
| // (comment) |
x \u003d 5; // comment | |
Hello! I am Alikin Alexander Sergeevich, the teacher of additional education, leads the "Robotics" and "Radio Engineering" mugs in Tsdutt G. Labinsk. I would like to tell a little about the simplified method of Arduino programming using the ArDublock program.
I introduced this program into the educational process and admired the result, in children it enjoys a special demand, especially when writing the simplest programs or to create some initial stage of complex programs. ARDUBLOCK is a graphic programming medium, i.e. all actions are performed with drawn pictures with signed actions in Russian, which simplifies the study of the Arduino platform. Children already from the 2nd grade easily mastering the work with Arduino thanks to this program.
Yes, someone can say that there is still scratch and it is also a very simple graphic environment for Arduino programming. But Scratch does not flash Arduino, but only controls them through the USB cable. Arduino dependent on the computer and cannot work autonomously. When creating your own projects, autonomy for Arduino is the main thing, especially when creating robotic devices.
Even with all the well-known LEGO robots, such as NXT or EV3, our students are no longer as interesting with the advent of Arduino programming programs. More ARDUINO is much cheaper than any LEGO designers and many components can be simply taken from the old household electronic technology. The ArDubLox Program will help in work not only beginners, but also to active users of the Arduino platform.
So what is ardublock? As I said, this is a graphic programming environment. Almost completely translated into Russian. But in the Ardublock, the raisher is not only that, but also the fact that the ArDublOCK program written by us converts into the Arduino IDE code. This program is embedded in Arduino IDE programming environment, i.e. it is a plugin.
Below is an example of a flashing LED and a converted program in Arduino IDE. All work with the program is very simple and any schoolboy will be able to figure it out.

As a result of work on the program, you can not only program Arduino, but also study the teams incomprehensible to us in the ARDUINO IDE text format, well, and if the "laziness" write standard commands - stands up with fast manipulations to skim a simple program in ArDublok, and in Arduino IDE to debug it .
To install Ardublok, you must first download and install Arduino IDE from the ARDUINO official website and deal with the settings when working with the Arduino Uno board. How to do this is described on the same site or on Ampere, or see on YouTube's expanses. Well, and when we deal with all this, you need to download Ardublok from the official site, that's. I do not recommend the last versions, I do not recommend downloading, they are very complex for beginners, but the version from 2013-07-12 is the most popular thing there is the most popular.
Then, the downloaded file is renamed in ArDublock-all and in the "Documents" folder. Create the following folders: Arduino\u003e Tools\u003e Ardublocktool\u003e Tool and in the last throw downloaded and renamed file. ArDublok works on all operating systems, even on Linux, checked himself personally on XP, Win7, Win8, all examples for Win7. Installing the program for all systems is the same.

Well, and if it's easier, I prepared a 7Z archive on the Mail disc, which is unpacked which will find 2 folders. In one already working program Arduino IDE, and in another folder the contents must be sent to the Documents folder.
In order to work in ArDublok, you need to run Arduino IDE. After that, we go to the tab tools and there they find the Ardublok point, click on it - and here it is, our goal.

Now let's deal with the program interface. As you already understood, there are no settings in it, but there are plenty of programming icons and each of them carries a command in the Arduino IDE text format. In the new versions of the icons even more, so to deal with the Ardublok of the latest version is difficult and some of the icons are not translated into Russian.

In the "Management" section, we will find a variety of cycles.

In the "Ports" section, we can control the values \u200b\u200bof ports, as well as the soundtakers connected to them, servo or ultrasonic approximation sensor.

In the "Numbers / Constants" section, we can choose digital values \u200b\u200bwith you or create a variable, but the fact that it is unlikely to use.

In the "Operators" section, we will find all the necessary comparison and calculation operators.

The "Utilities" section basically uses icons with time.

"Tinkerkit Bloks" is a section for purchased Tinkerkit set sensors. We have such a set, of course, no, but this does not mean that for other sets, the icons will not fit, even on the contrary - the guys are very convenient to use such icons as the turn on the LED or the button. These marks are used in almost all programs. But they have a feature - when they choose, there are wrong icons denoting ports, so they need to be deleted and substitute the icon from the "Number / Constant" section of the top one in the list.

"DF Robot" - this section is used in the presence of sensors specified in it, they are sometimes found. And our today's example is no exception, we have a "adjustable IR switch" and "line sensor". The "line sensor" is different from the fact that in the picture, as it is from Ampeka. Their actions are identical, but the sensor from the ampell is much better, since it has a sensitivity regulator.

"Seeedstudio grove" - \u200b\u200bthe sensors of this section are never used, although only the joysticks. In new versions, this section is expanded.

And the last section is "Linker Kit". The sensors presented in it did not come across.
I want to show an example of a program on a robot moving along the strip. The robot is very simple, both in the assembly and in the acquisition, but about everything in order. Let's start with its acquisition and assembly.
Here is the set of details all was purchased on the Ampeka website.

- Amp-B001 Motor Shield (2 channels, 2 A) 1 890 rub
- Amp-B017 Troyka Shield 1 690 rub
- Amp-X053 battery compartment 3 × 2 AA 1 60 rub
- Amp-B018 Digital Line Sensor 2 580 rub
- ROB0049 two-wheeled platform MINIQ 1 1890 rub
- Sen0019 Infrared Sensor Obstacles 1 390 rub
- Fit0032 Fastening for infrared sensor obstacles 1 90 rub
- A000066 ARDUINO UNO 1 1150 rub

To begin with, we collect the wheel platform and solder the wires of the wire.

Then install the racks, for fastening the Arduino Uno board, which were taken from the old motherboard well or other similar fasteners.

Then Krepim on these racks of Arduino Uno board, but one bolt does not work out - the connectors interfere. You can, of course, drop them, but it is already at your discretion.

The next secure infrared sensor obstacles to its special mounting. Please note that the sensitivity regulator is from above, it is for the convenience of adjustment.


Now install the digital line sensors, there will have to search for a couple of bolts and 4 nuts to them two nuts set between the platform itself and the line sensor, and the rest are fixing the sensors.

The next install Motor Shield or otherwise you can call the engine driver. In our case, pay attention to the jumper. We will not use separate diet for engines, so it is set in this position. The lower part is stuck with a tape, it is not random closures from the USB connector ARDUINO UNO, this is just in case.


Top Motor Shield Install Troyka Shield. It is necessary for convenience of connecting sensors. All Digital sensors used by us, so the line sensors are connected to 8 and 9 port, as they are also called pins, and the infrared obstacle sensor is connected to 12 port. Be sure to note that the ports 4, 5, 6, 7 cannot be used as Motor Shield is used to control the engines. I even specifically painted with a red marker to deal with the pupils.

If you have already noticed, I was added by a black sleeve, this is just in case the battery compartment installed by us did not fly out. Finally, we fix the whole design by conventional rubber band.
Battery compartment connections can be 2 types. The first wire connection to Troyka Shield. It is also possible to fall the power plug and connect to the Arduino Uno card itself.


Here is our robot ready. Before starting to program, it will be necessary to learn how everything works, namely:
- Motors:
Port 4 and 5 are used to control one motor, and 6 and 7 other;
The speed of rotation of the engines we adjusting the shim on ports 5 and 6;
Forward or backward, feeding signals to ports 4 and 7.
- Sensors:
We have all digital, therefore give logical signals in the form of 1 or 0;
And what to adjust them, they provide special regulators and with a suitable screwdriver they can be calibrated.
Details can be found on the ampere. Why? Because there is a lot of information on working with Arduino.
Well, we, perhaps, all viewed superficially, studied and of course gathered a robot. Now it must be programmed, so it is a long-awaited program!

And the program is converted in Arduino IDE:
Void setup () (Pinmode (8, Input); Pinmode (12, Input); Pinmode (9, Input); Pinmode (4, Output); Pinmode (7, Output); Pinmode (5, Output); Pinmode (6 , Output);) void loop () (if (DigitalRead (12)) (IF (DigitalRead (8)) (IF (DigitalLead (9)) (DigitalWrite (4, High); AnalogWrite (5, 255); AnalogWrite ( 6, 255); DigitalWrite (7, High);) ELSE (DigitalWrite (4, High); AnalogWrite (5, 255); AnalogWrite (6, 50); DigitalWrite (7, Low);)) ELSE (IF (Digitalread (9)) (DigitalWrite (4, Low); AnalogWrite (5, 50); AnalogWrite (6, 255); DigitalWrite (7, High);) ELSE (DigitalWrite (4, High); AnalogWrite (5, 255); AnalogWrite (6, 255); DigitalWrite (7, High);))) ELSE (DigitalWrite (4, High); AnalogWrite (5, 0); AnalogWrite (6, 0); DigitalWrite (7, High);))
In conclusion, I want to say, this program is just a find for education, even for self-study, it will help to explore the Arduino IDE commands. The most important raisin is that more than 50 installation icons, it begins to "bug". Yes, indeed, it is a raisin, since the permanent programming Only on Ardublok will not educate you programming in Arduino IDE. The so-called "glitch" makes it possible to think and try to memorize commands for accurate debugging programs.
I wish you success.
After familiarization with the main elements of Arduino, as well as writing the program "Hello World!" It's time for familiarizing the programming language.
The structure of the language is mainly based on C / C ++, so those who have previously programmed in this language will not have difficulty leaving Arduino programming. The rest should learn the basic information about management commands, data types and functions.
Most of the information contained herein will be compatible with any C / C ++ course, taking into account differences in data types, as well as several specific instructions for programming I / O ports.
Basics of the basics
Several formal things, that is, those that everyone knows, but sometimes forget ...
In Arduino IDE, as in C / C ++, you must remember the registers of characters. Keywords, such as if, for are always written in the lower case. Each instruction ends on ";". A semicolon reports a compiler, which part to interpret as an instruction.
Brackets (..) are used to designate software blocks. We use them to limit the body function (see below), cycles and conditional operators.
Good practice is to add comments to the contents of the program, it helps to easily understand the code. Single-line comments begin with // (Double sinking line). Multi-line comments begin with /* and end on */
If we want to connect any library into our program, we use the Include command. Here are examples of linking libraries:
#Include.
Functions in Arduino.
The function (subroutine) is a separate part of the program that performs some operations. Functions are used to simplify the main program and improve the readability of the code. Useful to use functions as we can easily use them in many of our projects.
The standard programming course contains information about the functions that give the following articles. In the case of Arduino, the functions will be discussed at the beginning, because even the simplest program should have two special functions. It has already been mentioned in previous articles, but here we systematize this information.
Defense ad
The declaration scheme features as follows:
Function_name type (parameter) (// Instructions for execution (body function) RETURN (/ * Return value * /);)
a type - This is the name of any available data type in this programming language. List of types available when programming Arduino Let's see in a separate article.
After execution, the function will return the value of the announced type. In case the function does not accept any return value, the data type will be "void".
function name Allows it to unambiguously identify. In order to call (run) function, we give her a name.
parameter - Function call parameter. Parameters are not required, but often they are useful. If we write a function that has no arguments, we leave round brackets empty.
Inside the brackets "(...)" contains the actual body of the function or the instructions that we want to perform. Description of specific instructions indicate in a separate article.
All functions that return to the value are completed by the Return operator, followed by the return value. Only functions declared by zero pointer ("void") do not contain the RETURN operator. It is necessary to know that the RETURN statement completes the performance of the function regardless of the location.
Below are some examples of declarations of functions.
Void F1 () (// body function) -------------- int minus () (// body function RETURN (0);) ----------- --- INT PLUS (INT A, INT B) (RETURN (A + B);)
As you can see on the examples, the declaration of functions can take various forms depending on your needs.
We strongly recommend that you explore and apply functions when writing your own programs. Over time, each programmer gains its own library of functions "for all occasions", which makes it easier and speed up the process of writing new programs.
Now that we know how you can write your own function, you need to learn to use it.
Call function
All functions we record in one file / program. There is of course a more elegant solution, but we will try to describe it next time.
Announces the function, we can use it in other functions with the corresponding name and any required parameters. Below are examples of calling the functions that we led to above:
F1 (); Plus (2.2); y \u003d plus (1.5);
As you can see in examples, the function call is performed by specifying its name and the required number of parameters. It is important to always call a function in accordance with its announcement.
If the function F1 () is declared without parameters, then no parameters cannot be specified when it is called, i.e. Calling the function F1 (0) will be incorrect.
The PLUS function (int a, int b) requires exactly two parameters, so the call with one or three parameters is impossible.
The call y \u003d plus (1.5) will be executed with the "Plus" function with the parameters "1" and "5" and save the return value to the "Y" variable.
SETUP () and LOOP () functions.
Having knowledge of declaring and calling functions, we can go to the ARDUINO system functions: setup () and loop (). Arduino IDE is required to declare these two functions.
setup () is a function that is called automatically when the power is turned on or pressing the RESET button.
In accordance with its name, it is used to set the initial values \u200b\u200bof variables, the inputs and system outputs, which are usually set in the initial parameters. Thanks to its specificity, this feature does not return values \u200b\u200band is not called with parameters. The correct setup () function declaration is presented below:
Void setup () (// body function - system initialization)
loop () is a function that is called in an infinite cycle. This feature also does not return values \u200b\u200band is not called with parameters. The correct declaration of the LOOP () function is shown below.
Void loop () (// body function - program code)
As you can see, declaring the LOOP () function is identical to the declaration of the setup () function. The difference is to perform these functions with a microcontroller.
Now we analyze the following pseudocode:
Void setup () (on_led1 (); // turn on the LED1 OFF_LED1 () LED; // turn off the LED1 LED1) void loop () (on_led2 (); // turn on the LED2 OFF_LED2 () LED; // Turn off the LED2 LED)
In the setup () function there are two instructions: the first turns on the LED1 LED connected to the board (for example, contact 13), and the second turns off the LED1 LED.
The LOOP () function has identical instructions for turning on and off the LED2 LED connected to the board (for example, contact 12).
As a result of the launch of the LED1 LED program, the LED will blink once, while LED2 will light up and go out until Arduino is turned on.
Pressing the RESET button will lead to the fact that LED1 will flash again once, and LED2 will again begin to flash.
Summarize:
- SETUP () and LOOP () functions are system functions that must be defined in each project. Even in a situation where in one of them we do not write any code, we still have to declare these two functions;
- The setup () function is executed once, LOOP () is performed continuously;
- We create our own functions in one file;
- We can call our functions from both setup () and loop () and from other functions;
- Our own functions can be called with parameters and return value;
- The function call must be performed in accordance with its declaration.
"Presents the Arduino training course for beginners. The series is represented by 10 lessons, as well as additional material. Lessons include text instructions, photos and training videos. In each lesson you will find a list of necessary components, listing programs and a connection scheme. After studying these 10 basic lessons, you can proceed to more interesting models and assembling robots based on Arduino. The course is focused on newcomers in order to proceed to it, no additional information from electrical engineering or robotics is not needed.
ARDUINO brief information
What is Arduino?
Arduino (Arduino) is a hardware computing platform, the main components of which are the I / O Board and Development Environment. Arduino can be used both to create autonomous interactive objects, and connect to the software performed on the computer. Arduino as refers to single-board computers.
How are Arduino and robots are connected?
The answer is very simple - Arduino is often used as brain robot.
The advantage of Arduino boards in front of similar platforms is a relatively low price and practically mass distribution among fans and professionals robotics and electrical engineering. ARDUINO, you will find support in any language and like-minded people who will answer questions and with whom you can discuss your developments.
Lesson 1. Flashing LED on Arduino
 In the first lesson, you will learn to connect the LED to Arduino and run it to flash. This is the simplest and basic model.
Light-emitting diode - semiconductor device that creates optical radiation when the electric current is passed through it directly.
Lesson 2. Connecting the button on Arduino

 In this lesson, you will learn to connect the button and the LED to Arduino.
When the button is pressed, the LED will burn, when pressed - do not burn. It is also a basic model.
Lesson 3. Connecting a potentiometer on Arduino
 In this lesson, you will learn to connect the potentiometer to Arduino.
Potentiometer- this is resistor with adjustable resistance.Potentiometers are used as regulators of various parameters - sound volume, power, voltage, etc.It is also one of the basic schemes. In our model from the turn of the potentiometer handlethe brightness of the LED will depend on.
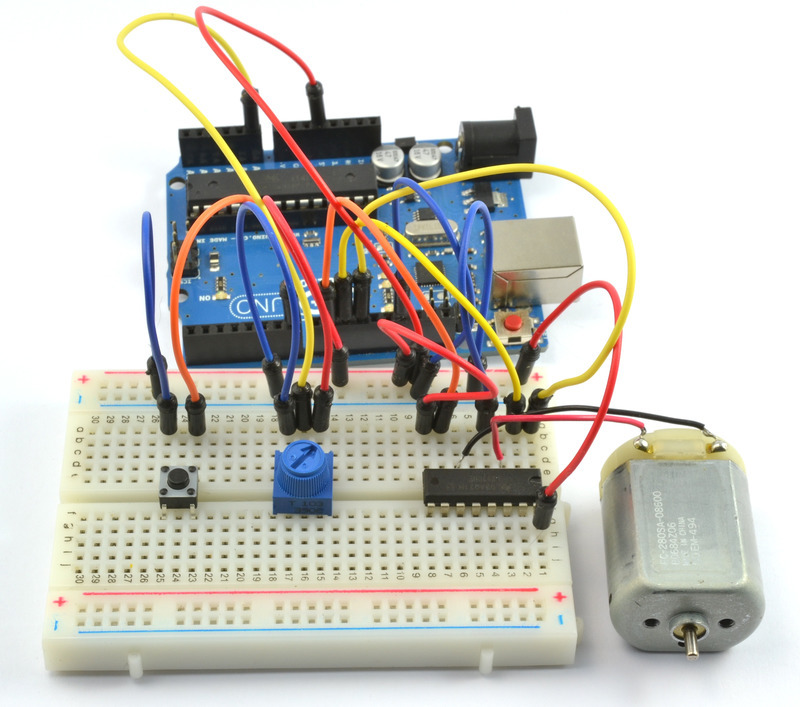
Lesson 4. Managing servo on Arduino
 In this lesson you will learn to connect the ARDUINO servo drive.
Servo- This is a motor, the set of the shaft of which can be controlled by setting the angle of rotation.
Servo drives are used to simulate various mechanical movements of robots.
Lesson 5. Three-color LED on Arduino
 In this lesson you will learn to connect a three-color LED to Arduino.
Three-color LED (RGB LED) - These are three LEDs of different colors in one case. They are like a small printed circuit board, on which resistors are located and without embedded resistors. In the lesson, both options are considered.
Lesson 6. Piezoelement on Arduino
 In this lesson, you will learn to connect a piezoelectric to Arduino.
Piezoelement- electromechanical transducer that translateselectrical tension In the oscillation of the membrane. These oscillations and create sound.
In our model, the frequency of sound can be adjusted by setting the corresponding parameters in the program.
Lesson 7. Photoresistor on Arduino
 In this lesson, our course you will learn to connect the photoresistor to Arduino.
Photoresistor. - resistor, the resistance of which depends on the brightness of the light falling on it.
In our model, the LED is on only if the brightness of light above the photoresistor is less than defined, this brightness can be adjusted in the program.
Lesson 8. Motion Sensor (PIR) on Arduino. Automatic sending e-mail
At this lesson of our course, you will learn to connect the motion sensor (PIR) to Arduino, as well as organize automatic sending e-mail. 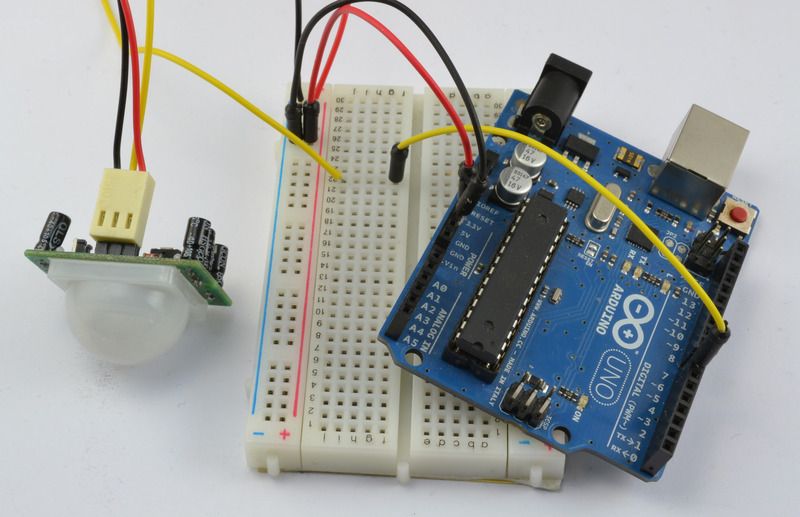
Motion Sensor (PIR) - Infrared sensor to detect motion or presence of people or animals.
In our model, upon receipt of the Arduino movement signal from the PIR sensor, send an e-mail command and send a letter automatically.
Lesson 9. Connecting the temperature sensor and humidity DHT11 or DHT22
In this lesson, you will learn to connect the temperature and humidity sensor DHT11 or DHT22 to Arduino, and also get acquainted with differences in their characteristics. 
Temperature and humidity sensor - This is a composite digital sensor consisting of a capacitive humidity sensor and a temperature measurement thermistor.
In our ARDUINO model reads the sensor readings and shows the testimony to the computer screen.
Lesson 10. Connecting a matrix keyboard
 In this lesson of our course, you will learn to connect the matrix keyboard to the Arduino board, and also get acquainted with various interesting schemes.
Matrix keyboard Invented to simplify the connection of a large number of buttons. Such devices are found everywhere - in the keyboards of computers, calculators, and so on.
Lesson 11. Connecting the real-time clock module DS3231
In the last lesson of our course, you will learn to connect real-time clock module from the family  DS to Arduino board, and also get acquainted with various interesting schemes.
Real-time clock module - This is an electronic circuit designed to account for chronometric data (current time, date, day of the week, etc.) is a system from an autonomous power source and taking into account.
Application. Ready Frames and Robots Arduino
 It is possible to start studying Arduino not only from the board itself, but also from buying a ready-made full-fledged robot based on this board - a spider robot, robot-machine, robot-turtle, etc. Suchmethod Suitable for those whom the electrical schemes are not particularly attracted.
By purchasing the working model of the robot, i.e. Actually ready high-tech toy, you can wake up interest in independent design and robotics. The openness of the Arduino platform allows you to make new toys from the same component parts.
Another option is to purchase a frame or a robot case: platforms on wheels or caterpillar, humanoid, spider, etc. In this case, the filling of the robot will have to do it yourself.
Application. Mobile directory
 - Assistant for the developers of algorithms for the Arduino platform, the purpose of which to give the end user the opportunity to have a mobile command set (directory).
The application consists of 3 main sections:
- Operators;
- Data;
- Functions.
Where to buy Arduino.
 ARDUINO sets
The course will be replenished with additional lessons. Subscribe to us
This introductory article for those who have already managed to unpack with their child dozen-other color boxes from the designers, built hundreds of various designs and filled with parts from Lego all available containers in Chulana. If you are ready to go to the next level: with electronics, microcontrollers, sensors and smart devices, it means that it's time for experiments with Arduino!
In this series of articles, we will collect the most important thing that you need to learn about Arduino to start studying with children on your own. Even if you have never taken into the hands of the soldering iron and the words "controller" and "controller" for you have about similar meaning, you can be confident - you still work out! The world of electronics and robotics today is full of simple and very convenient solutions that allow practically from scratch to create very interesting projects. Our tutorial will help you quickly navigate and make the first steps.
In the household language, Arduino is, in which you can block many different devices and make them work together with the program written in Arduino language in a special programming environment.
Most often the board looks like this:
The figure shows one of Arduino-ARDUINO UNO cards. We will study it more in the following lessons.
In the fee you can stick wires and connect many different elements. Most often, the connection is used for the connection charge for mounting without soldering. You can add LEDs, sensors, buttons, engines, communication modules, relays and create hundreds of options for interesting projects of smart devices. Arduino board is a smart socket that will turn on and off all affiliates depending on how it was programmed.


All work on the project is divided into the following steps:
- We come up with an idea and design.
- We collect the electrical circuit. Here we use a dead-end board that simplifies the installation of elements. Of course, the skills of working with electronic devices and skill will be needed.
- Connect to a computer via USB.
- And write it in a fee literally by pressing one button on the screen in.
- Disconnect from the computer. Now the device will work autonomously - when power is turned on, it will be controlled by the program that we recorded it.
The program and programming environment look like this:

The program shows the program (in Sleng Arduinshchikov, the text of the program is called "sketch"), which will flash the light bulb connected to 13 input on the Arduino Uno board. As you can see, the program is quite simple and consists of instructions understandable for knowledgeable English. The Arduino programming language uses its C ++ language dialect, but all C ++ features are supported.
There is another code writing option - a visual editor. It does not need to write anything - you can simply move the blocks and add the necessary algorithm from them. The program will boot into the connected fee with one click of the mouse button!

In general, everything looks pretty clear, isn't it? It remains to sort out the details.
Quick Start with Arduino
For starters, let's understand what and what we are going to do. What is Arduino and how to use it? If you are already familiar with the topic - you can safely jump further. If not - let's do a short immersion together.
Arduino is ...
Arduino is not a brand and not the name of the designer supplier. This is a common name for a whole family of various technologies and an open platform, which includes both hardware devices (controller cards and compatible equipment) and software designed to control hardware. In essence, Arduino is an infrastructure and an environment in which you can collect electronic and mechanical components to a single device, and then through a regular computer in two minutes to program the behavior of these most glands as we need.
Arduino is a bridge from the virtual computer world into the world of real things and devices. By writing a program on the usual computer, we manage with it not by virtual objects, but quite yourself real sensors, engines, screens. We change the world around ourselves - just programming on a computer using a free software and a lot of ready-made examples of libraries.
The technology has received its name, as it often happens, quite by chance. The source of inspiration served as a bar, in which the future creators of Arduino loved to drink on a tea circle. It was called the establishment of this way - Arduino, named by the main historical personality of the city of Ivrea, King Arduino. A king of some bright track in history did not leave and walked the loser, but thanks to the team of developers of the new platform, he found new popularity and is now known to millions of people around the globe.
Why Arduino?
All the charm of Arduino lies in the following simple benefits:
- Simplicity. Yes, yes - it is simplicity (although Lego and other toys, without a doubt, is more familiar, but we compare not with them). For young electronics developers Arduino "hides" a huge number of diverse technical issues. Many sufficiently complex projects can be created very quickly, without a long immersion in the details. And this is very important for a child - not to lose interest before the first result received by their own hands.
- Popularity. Arduino is extremely popular, you can easily find answers to any questions on numerous forums or sites. The Arduino community is extensively and friendly - there are relatively few lives of snobs-engineers and fully lovers and beginners, with pleasure to be divided by their joy from the found and recognized. This, of course, postpones the imprint on the quality of the Soviets, but as a rule, even the most difficult questions can be quickly resolved with the help of forums and sites.
- Availability. And the technology itself, and practically all the software are manufactured under open licenses and you can freely use other people's work, diagrams, and in many cases even for commercial use. It saves a lot of time and allows you to move big steps, based on the experience of previous researchers.
- Cheapness. The kit for the first election of electronics and programming can be bought in less than 500 rubles. Full-time robotics courses are possible at. No other technology will allow you to enter the world of real educational robotics so quickly and so effectively.
Where to begin?
If you want to engage in robotics using Arduino, then you will need such a gentleman set:
- With a USB cable for connecting to a computer.
- and wires.
- A set of basic electronic components and an adapter for a kroon type battery.
- Installed on the computer Wednesday
All equipment is sold in sets called start-up -
In the future, if classes really get involved and will be a desire to continue experiments, the list of equipment will expand:
- Screens and indicators.
- Engines and, relays and.
- Communication modules.
- A variety of additional modules and (shields)
If the first steps give the result, over time you will learn half of the people standing in the queue in the mail (if you still do not know them yet), and the postmen at the meeting will recognize you in the face and nervously run on the other side of the road.
How to buy Arduino?
Before you know something useful, you must first buy something useful. For experiments with electronics, you will need the electronics itself in the form of a designer or individual boards. It is recommended to buy a very expensive domestic set with the main components and then order sensors, engines, controllers and other treasures with aliexpress. You can find in Inenet (not only on our website). If you live in a big city, then buying everything you need will take a maximum of two days. Find the desired store is easy on the Internet.
 A few words about. Today, they can do them on completely legal conditions: both large, such as Intel, and small noname suppliers from China. The reliability and convenience of the "Chinese" and "official" fees Arduino in most cases are the same. Therefore, therefore, there is no need to overpay - for its training projects you can safely buy analogues that are easy to find on the Internet.
How to distinguish the "original" from a "compatible board":
- "Chinese" fees do not have the right to put Arduino logo.
- "Chinese" fees are much cheaper.
- "Chinese" often use another chip to maintain connection with the computer to which special drivers are needed. Drivers are installed in a second and almost never cause any problems.
We will emphasize once again, the use of non-original boards perfectly legally. Arduino - open architecture and developers make it possible to assemble their version of the fee to everyone.
No opportunity to buy?
If you live in Antarctica or you really do not have enough money even on the simplest sets, then do not despair - you can start learning Arduino on virtual simulators. The most powerful, simple and popular today is the online TinkerCAD service from the well-known Autodesk company. You can create electronic circuits by connecting a variety of components, and then "include" power and measure all electrical indicators. The device's library has both Arduino fees, and even a built-in editor for programming (including visual!). You can find a separate article on our website.