This article will talk about how to expand RAM due to the hard drive, since the answer to this question is of interest to many users of computer devices. It often happens that such a manipulation becomes a necessity and helps in cases where the computer starts to slow down and freeze, does not respond to commands or crashes completely.
System disk and RAM
RAM, or, as they say, RAM, is random access memory of a computer device. In fact, the RAM is a volatile component of the entire computer memory system, where for some period of time commands and various data are stored - those that the processor needs to be able to perform all kinds of operations.
It should be understood that system disk and RAM - these are different things. To increase the RAM you need to have enough free disk space, at least 10 or 15 GB. If there is not enough free space on the hard disk, the RAM, along with its commands and files, does not "fit" on the disk, and the processor stops working efficiently. To rectify the situation, it is required to provide the required space for the RAM by “clearing” the hard drive and thereby expanding the memory and increasing the speed of the computer.
How to expand RAM due to railway
To expand RAM by rail, the following steps are required:
- On the desktop, find the "My Computer" icon and right-click on it.
- A context menu will appear before you, from which select the “Properties” item and click on it.
- After clicking on “Properties”, a window with the name “System Properties” will open. Here you will see a lot of different tabs, but do not be afraid of their abundance, since you only need one - "Advanced". Click on it with the mouse once.
- You will see several additional points, from which you need to select the "Performance" option, and in it - the "Parameters" item.
- In the "Options" a new window will open with the name "Performance Options", in which you will be asked to choose your next actions. Here, too, you need to select "Advanced".
- Take a look at what the tab has suggested. You will see three items, from which select the line “Virtual memory” - and click on the “Change” button.
- After that, a new (third in a row) window with the name "Virtual Memory" will open before you again.
Disk expansion
Further, it is recommended to act with extreme care. You will see a list of computer device disks, due to which you will expand the RAM. You need to determine how much free space on each of the drives. Usually, rAM expansion carried out by C: or D: drives - let's say that you are interested in the latter option.
In the “Virtual memory” window, click on the D: drive, then select the “Special size” item and enter this same initial size: say 2000 (the maximum possible size is 4000). You can set the same values \u200b\u200bfor the minimum and maximum, and this value can be made about three times as much as the volume of your “physical” RAM.
Nothing more needs to be changed, just click on the OK affirmative button. Then, in the "Performance Settings" window, also click on "OK" and in the "System Properties" window - also click on "OK".
After you have completed all of the above steps, you only need to restart the computer device. That's all - the RAM has been successfully increased due to the disk you have chosen. You can enjoy the speed of your computer.
Disk cleaning
However, do not forget that a lot of different “garbage” gradually accumulates on the system disk. These are temporary programs, applications, files that need to be periodically deleted, since all this “junk” takes up space on the hard drive and slows down the system. In order to clean hard drive, you do not need to have any special knowledge. It is enough to take advantage of the capabilities of a special utility that will clean and defragment the disk quickly and efficiently. There are many such programs, and all of them are effective.
Install the program on your computer and launch it by clicking on the “Search” button. The utility will begin to analyze the system of your computer, and then offer to tick off files and programs to be deleted. You will be surprised, but there are a lot of them, and they can be deleted without any consequences for further work on the computer. A list of recommended items for removal can be found on the Internet. Mark these items and click on the “Clear” button. You will immediately be informed how much disk space is freed up after deletion.
During system analysis, debris removal and diffragmentation, you can continue to work on a computer device. If the computer at the same time will slow down, do not be alarmed: after cleaning, its speed will significantly accelerate.
Do not forget to clean the disk from time to time so that garbage does not accumulate, since its amount will sooner or later turn into “quality” - and you will need a lot of time to free the disk. Enjoy your work!
Instruction manual
In order to ensure a quick exchange of information between the central processing unit and the RAM, it is necessary to correctly configure the operation of these devices. To check the RAM status, install the MemTest program. It allows you not to restart the computer to perform a performance analysis of memory cards.
Turn on the PC and open the BIOS menu. To do this, you usually need to press the Delete key. Go to the menu responsible for configuring the operation of the central processor and RAM. Increase the bus frequency by 40-70 MHz. Save the changes by pressing F10. After the computer restarts, start the MemTest utility and check the memory performance.
Repeat this cycle until the program detects a malfunction in RAM. Undo the latest changes to eliminate the possibility of errors. Open the BIOS menu again and find the RAM timings. Decrease one of the indicators by one point. Usually there are only four of them. Save the settings and restart the computer.
Run the MemTest program again. Decrease RAM timings one at a time, each time performing stability checks on this device. Do not change only one indicator. This may result in equipment damage. Please note that even rare errors that occur during the operation of memory cards significantly reduce the performance of your computer and operating system.
Remember that RAM cards are fairly cheap elements of a personal computer. Sometimes it makes sense to purchase one or more new boards and connect them to the motherboard. This approach will significantly increase the performance of these devices and the entire computer as a whole.
Sources:
- how to increase the computer's RAM at home
RAM is a constantly updated computer memory, which, in contrast to the permanent memory (hard disk), stores the commands and data necessary for the processor to perform current operations. The RAM of a PC or laptop is called random access memory (RAM) and is a module or chip inserted into a special slot on the motherboard.
You will need
- To increase RAM in a virtual way, you will need the ability to work with a computer, physically - new RAM modules from a computer store.
Instruction manual
The physical way to increase the RAM is to install one or more modules of RAM, or to replace the module from weak to more powerful and voluminous. Opening the case of the system unit, you can see on the motherboard four slots for RAM. Typically, these are DDR, DDR II, DDR III, DDR 333, SDRAM, SRAM, PC3200 and others. Through the BIOS, you can find out the RAM and frequency (for example, 1066 MHz). To find out this data, you need to call the BIOS while holding down the DEL key. After you recognize the module, you can safely purchase a new module of the same size in the computer and insert it into a free slot, or a larger module, replacing it with the old RAM.
It will be more difficult for the owners - if you are not an expert, it is better to seek help in increasing the RAM in the service.
note
At the moment, the most powerful modules are RAM with 2 gigabytes of memory.
Useful advice
Before you buy additional RAM, make sure that the frequency and memory size of the new and old RAM module match.
Sources:
- increase operational memory
The blue "screen of death" in the Windows operating system, as well as critical mistakes BSOD often arise due to problems with the RAM of the computer - its operational memory. What indicates a RAM strip malfunction and how to test the RAM for errors?

You will need
- - Memtest program.
Instruction manual
Checking RAM for mistakes It is carried out by specialized startup programs, that is, these programs do not need Windows to start, so you can not worry - the next RAM failure during the test will not happen and the program will work until its final completion.
Memtest program can be downloaded from the official website - www.memtest86.com. The program is packaged in an ISO-image, which must be installed on a blank CD, after which, after rebooting the computer, you need to install the first bootable component in the BIOS drive. After that, the program will load, and you can begin to diagnose RAM. At the end of the diagnosis (and its time depends on the amount of RAM), the program will report on.
Also, in recent Microsoft operating systems, such as Windows Vista and Windows 7, there is a built-in and quite powerful tool for checking RAM for errors. It is called Windows Memory Diagnostic. At startup, press the “F8” key and you will see the so-called “Advanced Download Options” menu. Select “Windows Troubleshooting”, and on the new screen, in the “Tools” section, press the “Enter” key to select “Memory Diagnostics”.
No matter how fast your computer or laptop is, over time its power ceases to be enough and it can no longer cope with the tasks you need. Then the idea arises of overclocking its components. A relatively decent increase in performance can be achieved by overclocking the computer's RAM. Just remember that overclocking reduces the stability of the computer, so it must be done with caution and only if absolutely necessary.

You will need
- - Computer with Windows;
- - CPU Stability Test.
Instruction manual
So, in order to increase frequency operational of memory, go into the BIOS. After that, go to advanced settings (they may be called Advanced Chipset Settings or some other way, in a similar way). To change the timings, find the field responsible for this (Current Latency or the like) and set the minimum value. For example, if it costs 3, put 2.
Now try increasing frequency of memory. To do this, find the item responsible for the speed of the system bus here. It may be called FSB Speed \u200b\u200bor the like. Put frequency tires are 1 step larger than the one you have now. Better to change frequency at a minimum value of not more than 5 MHz.
After changing the bus frequency, save the settings in the BIOS, load the operating system and run the program to test the stability of the processor and of memory. In this regard, the CPU Stability Test program has proven itself well.
If the utility testing did not reveal any problems, you can safely return to the BIOS and increase frequency system bus (and with them the processor and operational of memory) one more step. After that, save the settings again, load the operating system and test stability. The cycle must be repeated until the utility shows the instability of the current configuration. In this case, it is recommended to return to the BIOS and roll back in frequency 2 steps back.
Useful advice
Typically, overclocking of RAM is reduced to increasing the frequency of the system bus or reducing timings to a minimum. Timings determine the response speed in measures of your RAM. Not all motherboards allow you to change the frequency of the system bus with a small step (1-5 MHz), if so, better refuse acceleration. By increasing the frequency of the system bus, the processor frequency also increases. If this happens abruptly without proper testing, then there is a high risk of disabling one or both of these computer components.
Changing the parameters of the central processor is a very important stage in accelerating the computer. It is important to understand that incorrect settings can lead not only to the malfunction of some devices, but also to their damage.

You will need
- - CPU-Z;
- - Clock Gen.
Instruction manual
Before setting up the central processor, install the CPU-Z program. Its main function is to provide information on the current state of the CPU. Run this application and make sure that the processor is stable.
Now restart your computer and enter the BIOS menu. Press F1 and Ctrl at the same time, open the Advanced Setup menu. Usually this is where the settings for the central processor and RAM are located. Find the item that is responsible for the frequency of the CPU bus. Increase this frequency by 10-20 Hertz. Now be sure to raise the voltage supplied to the central processor. It is recommended to increase no more than 0.1 volts at a time.
Press the F10 key. Wait for the operating system to complete loading. Check the stability of the central processor using the CPU-Z utility. If the program does not detect errors, then repeat the procedure for increasing the CPU bus frequency and voltage. After raising the frequency to the maximum bar, increase the processor multiplier. Naturally, increase the voltage at the same time.
If you couldn’t manage to change the CPU parameters through the BIOS menu, download the GlockGen utility. Please note that there are several versions of the program, each of which is designed for a specific version of the motherboard. Run the installed application.
Now increase the voltage and frequency of the bus by moving the corresponding sliders. Before applying the selected parameters, click the Test button. Verify that the CPU is running smoothly. Constantly monitor the temperature sensor. If the temperature exceeds the permissible norm even in passive operation, it is better to reduce the bus frequency and the multiplier. Otherwise, you risk spoiling the CPU.
Related videos
When configuring the parameters of the RAM, you need to consider a lot of parameters. Incorrect changes to certain items can lead to damage to some RAM bars.

You will need
- - MemTest.
Instruction manual
The stability of the RAM strips to make sure that the device is currently working without failures. Use MemTest or the standard Windows verification tool. Open the "Administration" menu. In Window Seven, it is located in the System and Security menu of the control panel.
Run the Windows Memory Checker program. In the window that opens, select the option "Restart now and perform verification." Wait a while until the computer restarts and the analysis of the status of the RAM strips is completed. Reboot the PC again and open the BIOS menu. Usually for this you need to hold the Delete key at the beginning of the computer boot.
Go to the Advanced Chipset Configuration menu. On some motherboard models, this menu may be called differently. Find items that display the values \u200b\u200bof the timings of RAM. Select the most recent item and decrease its value by one. Now find the RAM Voltage item. Increase the voltage supplied to the RAM strips. Initially, it is better to raise the voltage by 0.1-0.2 Volts.
Save your settings. Usually for this you need to press the F10 key or select Save & Exit. After the computer restarts, run the program for checking the state of RAM and evaluating its performance again. The MemTest utility allows you to avoid unnecessary reboots, as It works in a Windows environment.
Follow the described algorithm until you achieve the best RAM performance. Change the timings in turn. Do not get hung up on a single point. As practice shows, this will quickly lead to malfunctions in the RAM, practically without increasing its performance.
Related videos
The RAM of a modern computer is characterized by several parameters. The most famous are the volume and frequency, but also an important indicator is the latency of memory, otherwise called timing.

Computer random access memory (RAM) is a volatile memory that contains OS components and running programs. The amount of memory affects how much information it can contain at the same time, and, accordingly, the number of running applications. The frequency characterizes the speed of the memory, that is, the number of operations (cycles) per second.
The progenitor of computer memory was created in 1834 by Charles Babbage. This mechanical device, called the “store”, retained the intermediate results of the calculations of the “Analytical Machine”.
Latency, or timings, shows the number of clock cycles spent on internal operations, in other words, timings characterize simple memory.
Memory access principle
To understand these or other timings, it is worthwhile to dwell on access to memory. Simplistically, the memory chip can be represented in the form of a table, where each cell corresponds to a memory element that stores one bit.
When a specific cell is selected, the column and row number are transmitted through the address bus. The first is the gate access pulse for the row — RAS (Row Access Strobe), then the column access pulse — CAS (Column Access Strobe).
After selecting a cell, various control pulses are sent to it - checking access to the record, writing, reading or recharging. Moreover, between these operations there are delays, which are called timings.
Types of Timings
There are four different timings indicated by memory module manufacturers.
CL (CAS latensy) - CAS delay is the wait between the CAS pulse and the start of reading. In other words, the number of measures required to read the cell, if the desired line is already open.
T RCD (Row Address to Column Address Delay) - delay between RAS and CAS pulses. Timing shows the time between opening a row and opening a column.
T RP (Row Precharge Time). This timing is the delay between the pulse to close the active line and the RAS pulse to open the next.
Sometimes you can meet a record like 6-6-6-18-24. Here, the fifth number denotes timing Command rate - the delay between the pulse on the choice of microcircuit in the memory module and the activation of the line.
The sum of these timings characterizes the delay between reading a specific memory cell if another line is open. Manufacturers most often indicate precisely these three parameters, but sometimes you can see the fourth - T RAS.
T RAS (Row Active Time) - the number of ticks between the RAS pulse and the pulse that closes the line (Precharge), that is, the line update time. Typically, T RAS is equal to the three previous timings.
For convenience, timings are given without a hyphen, for example, 2-2-2 or 2-2-2-6.
Tip 8: How to increase the amount of RAM on your computer
An ordinary user will be able to increase the amount of RAM on a stationary computer, although if he remembers some of the subtleties.

Why might you need to increase the amount of RAM on your computer?
Unfortunately, many developers of operating systems and software (programs for work and games), do not think about optimization at all, do not remember that many users do not have the opportunity to constantly buy the most modern hardware, so their creations can “slow down” . To partially solve this problem, you may need to increase the amount of RAM on your computer.
How to buy a suitable RAM bar?
When purchasing a RAM strip, you need to remember that different types of RAM are not suitable for every motherboard. To select the correct memory bar, you need to look in the documentation for the exact model name of the installed motherboard. Look at the description of this model of the motherboard on the manufacturer’s website, which should indicate what type of memory is suitable for work, as well as the maximum possible amount of memory that this motherboard “sees”. Also from the description you can find out the number of connectors for installing RAM.
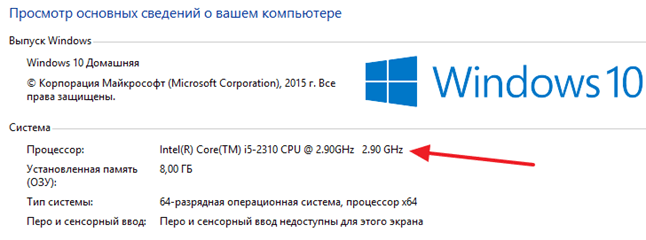
Determine the amount of RAM available on the computer. To do this, turn on the computer, right-click on the “My Computer” icon, then select “Properties” in the “General” tab and you can find the total amount of installed RAM.
From the obtained data, your task is to calculate the volume of the strip that you will purchase (if at least one slot for RAM on the motherboard is free, then you just need to subtract from the maximum possible amount of RAM the amount of installed RAM, otherwise you will need to remove one of the strips, smaller volume, and in its place set a new bar, the volume of which is also calculated).
After acquiring a new memory strip, remove the housing cover (depending on the housing model, it may be removed entirely or it is possible to remove only the cover from the side). Carefully look at how the existing memory strip (s) are installed. Along with them, place a new bar and insert it into an empty slot. The memory strip must enter the connector tightly so that the contacts are not visible, and the latch must necessarily work, which additionally holds the strip in the connector.
The diagram below shows an example of changing the DDR2 memory bar, but it is absolutely not necessary that you also have this type of memory, however, the appearance of the RAM slots and the memory bars themselves is similar and you also need to consider the location of the notches on the boards.
 If everything is done correctly, a larger amount of memory will be displayed in the aforementioned tab than before.
In order for a computer to perform its basic tasks, it must include, at a minimum, a central computing core - a processor; a certain amount of RAM for storing intermediate calculation results; device for data input; a solution that connects all components together - the motherboard and the power source.
This is a necessary minimum. Today we’ll talk about how to increase the computer’s RAM. This question is of interest to many users, since this component has a tangible effect on the performance of the entire system as a whole, while having a relatively low cost. The latter is especially true for DDR3 standard chips, the price of which is so low that even a school student who saves on dinners in the dining room can buy a “bar” for a couple of gigabytes. The second component that affects performance is the processor. Although replacing it with a more advanced model allows you to speed up the computer, the prices for these microcircuits are quite high (we don’t consider budget options that initially do not differ in high speed characteristics). Also, one cannot fail to mention the so-called overclocking of RAM. The meaning of this operation is to forcefully increase the frequency at which the microcircuits operate, which allows to achieve some performance improvement. However, with the advent of relatively inexpensive high-speed computing systems and the blocking of this feature in certain processors with built-in controllers, this operation has become the lot of enthusiasts seeking at all costs to achieve a greater number of "parrots" in the tests.
How to increase computer RAM

There are only three ways to increase the amount of RAM: application optimization, connecting additional modules and replacing the used strips with more capacious ones. Each of the methods has its own characteristics, which we will talk about. Let's start with the first one.
Programs
We have previously indicated that RAM is used by all running applications. Some require more of it, others less. Thus, a situation often arises when, with a large number of running programs, all subsequent ones simply do not have enough free available volume. Modern operating systems easily solve this problem by using the mechanisms of unloading unused sections of code into the swap file on the hard disk. Therefore, it may seem that there is no particular reason to study the question of how to increase the computer's RAM. However, it is not. The speed of the DDR3 chip cells significantly exceeds the fastest SSD drive, therefore, the more often swapping is used, the lower the system performance.

Thus, an increase in RAM can be achieved by optimizing the system. In Windows, you need to press Win + R, then, by typing msconfig, remove unnecessary programs from startup. You should also disable unnecessary services ("Control Panel" - "Administrative Tools" - "Services"). One should not expect special miracles from this method, although it may be interesting as an additional measure or with a lack of funds.
Volume increase
There is a more efficient way to increase the computer’s RAM. Its meaning is that the owner of the computer system acquires one or more memory modules, which are installed in the connectors on the motherboard. As a result, the available volume increases. However, before buying, you must make sure that the board has free connectors, as well as determine the supported standard (DDR2 or DDR3). If they are all busy, then the only option is to replace the existing slats with more spacious ones. You can use the AIDA64 program (System Board - SPD) to find out the characteristics of the brackets involved.
As the statistics of many computer users show, sooner or later the question begins to worry, how to increase computer RAM. It is important at the beginning to determine what kind of memory is installed in your computer, if it is an old computer or what kind of memory will fit a new motherboard if you are going to buy a new PC. This resource cannot bypass this problem and will do everything possible so that readers understand the choice of RAM
On the next page, click on the button. Download now!
After the installation file cpu-z_1.61-setup-en.exe downloaded, you need to install the utility.
In section General field Type shows us type of installed RAM. In this example - DDR3.
Field Size shows the size of installed RAM - 4 GB.
Field Channelsshows in what mode the memory works. In this case Single - one channel mode of operation. About operating modes a little later.
In section Timings we are interested in the field DRAM Frequency. Shows the frequency of the memory bus - 666 MHz. The effective frequency is 2 times higher - 1333 MHz. How to check RAM for errors can be found in the article Test RAM.
2. Decide on the number of free slots for RAM
Why is this necessary. Before answering a question about increase RAM computer we need to know if there are any free slots and how many memory modules can be purchased.
There are two options:
- Visually (open and view)
- Through the program
We will use the installed CPU-Z.
After that, we go to the motherboard manufacturer's website, find our model and look at its characteristics. We are interested in the field RAM .
It can be seen from the figure that the maximum pure memory slots is 4. The maximum amount of supported memory is 32 Gb. The type of memory supported is DDR3. Frequency 1333 and 1066 MHz. Dual channel memory mode is supported.
You can read more about choosing a motherboard in the article Selecting a motherboard.
3. Understand the concept of dual-channel RAM
The concept of an operating mode refers to a memory controller. Now there are one, two, three and four-channel memory controllers. AMD is the first company to start integrating memory controllers into its processors. Now it does Intel.
How to increase the computer's RAM.Currently, progress is leaps and bounds, and computers, laptops and other equipment tend to become obsolete faster. There are several factors that affect computer performance. Among them is the amount of RAM. But how to increase the computer's RAM on your own? This question often starts to worry PC users. In this article, we will consider all ways to increase RAM. Three of them will not require any cash investments from you!
How to increase RAM. Easiest option
There are several options for increasing the memory of your computer. The first is the easiest, buying a new RAM, the volume of which will significantly exceed the previous model. This method is not cheap, so if there is no extra money for the purchase of RAM, go to the next one.
Determine the desired type of RAM
Buying RAM just like that, indiscriminately is impossible, since there is a high chance of failure. Memory may not be compatible with other computer components. In addition, the motherboard is also able to support only a certain type of RAM. With the wrong selection, you simply disable it.
But in order to avoid such unpleasant consequences, it is necessary to find out the characteristics of the component that is installed on your computer now. You also need to calculate the number of additional places for RAM.
You can determine the characteristics and number of seats in several ways. The first of these is the installation of an additional program that will help you diagnose components. The second - removing the cover of the computer unit and self-counting slots for RAM.
Some wizards to repair and configure the equipment are advised to fill all the places for RAM, as this will help to achieve maximum performance from the device. At the time of purchase, it is worth looking at the memory at the highest speed, this will also help in increasing the speed of the PC.
You should also take into account the fact that the computer has a 32-bit or 64-bit operating system. Therefore, it makes no sense to increase memory to 4-6 GB in a 32-bit OS. Therefore, if you want to install a larger amount of RAM, then change the system.
Installing memory in a computer
After buying a new RAM, you need to figure out how to properly install it on your computer. Adding modules is easy enough. Each RAM location is equipped with clips on both sides. They need to be moved to the side, then the old module will pop up. Instead, you can install a new one. When fixing the memory, you will hear a click that will indicate that you have correctly fixed the RAM. It remains only to close the latches so that it does not fall out of the socket.
It is better not to immediately assemble a computer unit, because there is a high probability of difficulties when reading new RAM. After some time - about 10 minutes, you can collect the block. To check the correct recognition of the new RAM on the computer, click on the “my computer” icon and click on the “properties” section. In the category of "installed memory" will be the amount of memory that you installed. If the numbers match, then you did everything right.
Important! Before installing the RAM, it is necessary to disconnect the power supply and remove the static voltage. If this is not done, any part may burn out when removed or installed. To remove static voltage, you need to put your palm on the computer unit, and the second on the storage battery radiator. So you can neutralize static voltage and work with a disassembled computer safely.
So, we figured out the easiest way to increase RAM on your computer. However, if the financial situation does not currently allow this, then we will do it on our own. There are a few simple ways that do not require any cash resources.
The second way is to increase the virtual memory of the computer
Our PC is designed so that those files that cannot be stored in RAM remain on the hard drive in a specific place. Windows OS, as a rule, independently sets the amount of virtual memory, but if necessary, the user can change these settings. To do this, you do not have to be a programmer, everything is quite simple.
The instructions for expanding virtual memory on Windows XP and 7 are very similar, since the menu and device of the system are almost the same.
In the lower left corner of the screen there is a start button. We go there and select the line "computer". We click on it with the left mouse button and go to the "properties" menu.
computer propertiesWhen you open a new window on the left, you will see the line “advanced system settings”.
additional system parameters
additionallyYou will also be transferred to a new window, in which there will be an “additional” section. In the section "virtual memory, click on the" change "button.
performance parametersAgain, you will be presented with a new window with the parameters, which you will have to configure yourself. To get started, uncheck the box next to "automatically select the size of the swap file." After that, select any drive that has enough space and look at the optimal amount of RAM expansion. It is this number that can be entered in the column "indicate the size" - the initial and maximum. After the done actions, confirm all changes with the “ok” button.
virtual memoryFor Windows 8, the increase in virtual memory is different. In the main menu, find the “search” item. In the search bar, enter the following query “system properties performance”. Press Enter, then the "performance options" window will appear. In it, select the "advanced" tab. There is also a “virtual memory” column, where you can make an increase in virtual memory. This is done the same way as on Windows 7 / Xp.
Attention! Changing virtual memory does not provide the same benefits as when installing a new RAM. This will only speed up your PC.
The third way - we increase the RAM using external drives
This is a very effective method for creating space for RAM in your PC. This method appeared relatively recently, and it became available using Ready Boost technology, which Microsoft invented. However, not every user uses this method due to lack of awareness.
The Ready Boost program allows you to increase the amount of RAM using any external drive. The simplest and most common of these are flash drives or flash drives. Now almost any person has them, and sometimes several. So why not use one of them to increase RAM on your personal computer?
The main requirements for the flash drive will be - a read speed of at least 2.5 mb / s, free space from 256 MB and a write speed of 1.75 mb / s.
This method will not only change the amount of memory for the better, but also speed up the PC.
So, let's begin:
To get started, insert a USB flash drive and go to the menu. Select an external drive and right-click on it. In the new window we find the item "properties", wait until it opens. When the “properties” open, we find the Ready Boost item and tick it off. We move the slider of the reserved place to accelerate the work to the maximum. This will mean that you are using the full amount of flash drive. After completing the actions, click “ok” and wait until the system applies the new settings.
Now you know how to increase the computer’s RAM using a flash drive.
And the last, fourth way - we increase memory with the help of BIOS
Most BIOS versions allow you to change the RAM settings manually, so you can use this method. He also does not require financial investments from you. However, after such a setup, it is necessary to check the system to eliminate malfunctions.
How to change the amount of memory and not change the basic BIOS settings?
How to increase RAM through the BIOS. First, we enter the BIOS. To do this, turn off the computer. After, start it and during OS boot press the delete, f2 keys or the combination ctrl / alt / esc.
how to increase RAM via BIOSSecond, in the BIOS menu we are looking for the Performance section.
Memory sectionThird, here we find the Memory tab and reduce the numerical value of the timings in the CAS Latensy category. With a decrease in their number, an increase in cache performance occurs. The fewer the better. However, it should be taken into account that reducing the number of timings to the minimum value will affect the operation of the equipment. Do not be zealous!
Cas latencyAnd fourth, save all the changes and exit the BIOS. After all, you need to restart the computer and check its operation.
Attention! Changing RAM in BIOS can also change other system settings. Be careful!
All the methods described above will help you increase the computer's RAM. Three of them will not require financial investments from you at all. Improving the technical capabilities of your PC is not forbidden, however, follow your actions and follow the instructions. Then the whole process will be easy and you will use a faster version of your computer. Now you have the answer to the question - how to increase RAM.
Total:
It was about how to increase the RAM of your computer. All methods are described as detailed as possible, if possible with pictures.