Creating a bootable USB flash drive Windows 10, to install this system, many are now interested. Let's figure out the method using the Rufus program and the Windows USB / DVD Download Tool. The next article will be about how to make a clean install of Windows 10. So, let's go.
The first way. Bootable flash drive using Rufus
For this method, we need:
- Windows OS image You can download from here.
- Utility Rufus. Download.
- A flash drive with a capacity of 4 GB or more.
About creating such a flash drive using rufus, but it is not as detailed as this one.
Creating a bootable Windows 10 flash drive for UEFI-based systems
In this case, we can only install a 64-bit operating system, at the beginning of the installation it should be disabled Fast boot and in the UEFI BIOS. Once you install the operating system, you can enable these features again.
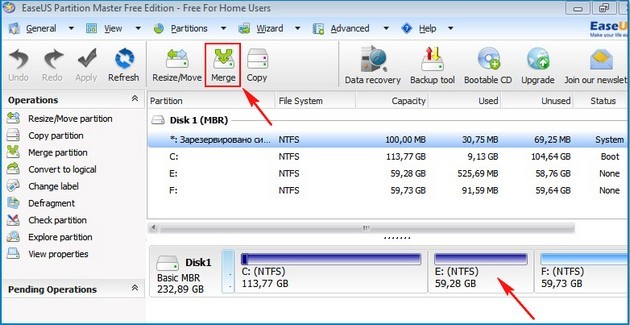
- Connect the USB flash drive to the computer and run the Rufus program
- In Rufus, make the following settings.
Device - Choose your flash drive, which will be subsequently formatted.
- for installation on UEFI, select "GPT for computers with UEFI."
Cluster size - The default is 4096 bytes.
New Volume Label - any name or set of letters and numbers.
In the formatting options, check the box next to "Quick formatting", then next to the option "Create bootable disk", select and click on the disk icon from the drop-down menu to select the Windows 10 image that we downloaded. Check the box next to "Standard Windows installation" just below. Also, check the box “Create advanced label and device icon”.
After setting the program parameters, click "Start" and wait a while until the process is complete.
How to create a bootable USB flash drive. We are reading, we are interested.
Creating a Windows 10 bootable flash drive for BIOS without UEFI
Run the RUFUS utility again, and insert the USB flash drive into the computer.
Now let's see how to configure Rufusa's parameters:
Device - choose a USB flash drive.
Partition layout and type of system interface - on a computer without UEFI, select "MBR for computers with BIOS or UEFI-CSM."
File system - preferably NTFS.
Cluster size - The default is 4096 bits.
New Volume Label - any name.
In the formatting options, we select the same items as in the previous method. See above.

Having configured all the parameters, press the button again "Start" and wait.
The second way. Create a Windows 10 bootable USB flash drive using the Windows USB / DVD Download Tool
So, in this method we will use a Microsoft utility called the Windows USB / DVD Download Tool. It creates flash drives for computers with and without UEFI BIOS.For this method we need:
- An image of a Windows 10 system that can be downloaded from here.
- Windows USB / DVD Download Tool. Download from here.
- USB flash drive with a capacity of 4 GB.
It is possible that when you install this program on a computer, a message appears stating that you need to install Microsoft .NET Framework 2.0. This is not a big deal, you just need to go to the Programs and components that are in the Control Panel and go to “Enable or disable components”, check the box “Microsoft .NET Framework 3.5” there.
Let's start the process of creating a bootable flash drive.
- Connect the USB stick to the computer and run the Windows USB / DVD Download Tool.
- In the program window, click on the “Browse” button and select the downloaded Windows 10 image, then click Next.

- Next, a drive selection window will appear, in our case, select “USB device”.

- After selecting the drive, click "Being copying".

- A window should appear where we need to select the formatting of the drive. To do this, click "Erase USB Device".

- We confirm the formatting of the drive.

- The flash drive will be formatted, then the image will start recording and that’s it, the bootable flash drive is ready.
These are the ways to create a USB flash drive for us, we have analyzed, of course they are suitable for Windows 8, and other versions of the OS. If something is not clear or there are problems, write in the comments and I will help as I can. Some may ask themselves a question, or not read it. Follow the link and read the article, maybe it will help you.
The installation procedure for the new Windows 10 has not changed. However, the question of how to create a bootable USB flash drive for Windows 10 remains open. The article will focus on the main ways to solve this problem: official and using external downloadable software.
Official way
Windows 10 developers took care of their audience and immediately after the release of the operating system on the official website they freely presented a special utility - Installation Media Creation Tool.
It is designed to easily create a bootable USB flash drive Windows 10, with which in the future the system will be installed on your computer. Naturally, this method is intended for owners of a license key or a Microsoft account for which the system has already been activated.
Having launched the program, it is necessary to choose the option with the creation of installation media.
Then you will need to set the parameters, as shown in the screenshot. In the current version of the utility, there is no item with the choice of the OS version, since the user will already select it when installing Windows.
At the last step, all that remains is to note the download point on the USB drive.
Without using third-party software
The following method works only on those devices where the motherboard has a pre-installed UEFI software. We are talking about most motherboards released in the last 2-3 years. They say that Windows is installed using EFI-boot technology.
In order to create a bootable Windows 10 flash drive in this way, the user must have downloaded a packaged system image in ISO format on the computer and must have a flash drive of the appropriate size (from 8 gigabytes for the full version or 4 gigabytes for the stripped down one). The USB drive must be formatted with the file system parameter - FAT32. Simply connect it to the “Computer” menu, by clicking on the connected PCM flash drive, select “Format” and then set the necessary parameters.
We must not forget about the consequences of installing the system: erasing personal files from the system drive, deleting files from a USB drive.
It is necessary to transfer all important files to a non-system drive or to another drive.
The further algorithm of actions is simple:

The flash drive is ready to work, but exclusively in UEFI-boot mode. To start the installation, it will be preferable to choose a USB flash drive in BootMenu yourself. You can open this menu by pressing a certain key at system startup. Typically, the keys are pressed at the very beginning of the device startup. About how to boot from the drive in more detail.
Rufus program
Another unofficial way involves using the Rufus program. In this case, a bootable Windows 10 flash drive is created from the ISO image.
The program is freely available: rufus.akeo.ie.
Before you begin, again you need to have an ISO image. By launching the application, you need to do everything as shown in the screenshot. The disk icon allows you to open Explorer and select the desired virtual disk image with the operating system. After clicking "Start", you will need to give permission to format the USB-drive, and then the program will automatically create a bootable USB flash drive.
Choosing a partition scheme, you must:
The article describes in detail how to make a bootable USB flash drive Windows 10. An extensive list of various software makes it possible to choose the most optimal software for this purpose. Any method is suitable, and the user will only have to find a suitable assembly of Windows 10.
Since the release of the latest build of Windows 10, Microsoft downloaded the Windows 10 Installation Media Creation Tool. Using it, you can create a boot image for a flash drive and install the system on a new device in the future. Bootable USB flash drive Windows 10 is an indispensable tool for diagnosing and restoring your PC.
It is also important to note that with this program the user will receive the original assembly of Windows 10 Pro (Professional), Home (Home) or Home for one language (starting from version 1709, the version of Windows 10 S is also included in the image). Such a flash drive will be relevant if the user has a Windows 10 key, or the user has previously updated the new version of the system, activated it, and wants to perform a new installation (in this case, the key entry phase is skipped during installation).
Download Windows 10 Installation Media Creation Tool on the official website.
The algorithm for creating a bootable flash drive:
- Run the downloaded utility and agree to the terms of the license;
- Select “Create installation media” (USB flash drive, DVD, or ISO file.
- Next, you need to specify the version of Windows 10 that will be recorded on the USB flash drive. In previous versions, an assembly choice was available - Professional or Home. As of 2018, the only available Windows 10 image is Professional Build. The choice of system capacity is available (32-bit or 64-bit).
ATTENTION! If a user accidentally or specifically unchecked the box “Use recommended settings for this computer” and chose a different bit or language, a notification will be displayed with the text: “Make sure that the release of the installation media matches the Windows assembly on the computer on which you will be use".
- Next, you need to specify “USB flash drive” if you want the Installation Media Creation Tool to automatically burn the image to a USB flash drive (or select the ISO file to load the Windows 10 image and then write it to the USB flash drive yourself).
- Select the drive to be used from the list.
REFERENCE! All data from a flash drive or removable hard drive (all partitions) will be destroyed. At the same time, if you create an installation drive on an external hard drive, the information in the “Additional Information” section at the end of this article will come in handy.
- The stage of downloading Windows 10 files and recording to a USB flash drive starts. Usually this procedure takes a long time.
- Upon completion, you will have a flash drive with the original Windows 10 of the latest build. It is useful not only for a new installation of the system, but also for its back-up in the event of a system failure.
- Alternative ways to create a flash drive with a Windows 10 x64 and x86 image for UEFI GPT systems and the MBR BIOS are described below.
Creating a bootable Windows 10 flash drive without programs
The way to create a bootable Windows 10 flash drive without any additional software at all requires that your motherboard (on the device where the flash drive will be used) has UEFI software (almost all modern motherboards have it), i.e. It had support for EFI-loading, and was performed on a GPT-type disk (or it was not critical to delete all partitions from it).
You will need an ISO image with the system and a large USB drive that was previously formatted in FAT32 (this is a prerequisite).
The steps for creating a bootable Windows 10 flash drive themselves consist of the following steps:
- Mounting the Windows 10 image on the system (Daemon Tools is great).
- Copy the entire contents of the image to USB.
- Done. If the device has UEFI boot mode, you can easily download and install Windows 10 from a USB flash drive (to do this, go to the Boot Menu of your motherboard).
Using Rufus to record USB installation
- If the machine does not have UEFI mode (instead of it the standard BIOS) or for some reason the above method did not work, Rufus is an excellent program (and in Russian) to quickly make a bootable USB flash drive for installing Windows 10.
- In the program you need to select a USB drive in the "Device" column, check the "Create boot disk" item and select "ISO-image" from the list. After that, by clicking on the button with the image of the CD drive, show the path to the Windows image.
You should also pay attention to the choice of the item in the "Partition scheme and type of system interface". In general, the choice should be based on the following:
- For computers with BIOS or to install Windows 10 on a device with UEFI, select “MBR for computers with BIOS or UEFI-CSM” on an MBR disk.
- For computers with UEFI - GPT for computers with UEFI.
After that, you need to click "Start" and wait for the transfer of files to the USB flash drive.
Windows 7 USB / DVD Download Tool
The official free Microsoft software, originally designed to burn Windows 7 images to disk or USB, has not lost its relevance with the release of new versions of the OS - it can still be used if you need a distribution kit for installation. After all the manipulations, you will have a working bootable flash drive.
Step-by-step instruction:
- Select an ISO image from Windows 10 on your computer and click “Next”.
- Specify a USB device - for a bootable USB flash drive or DVD - for "Create disk".
- Assign a USB drive from the list.
- Press the “Begin copying” button (a warning will be displayed indicating that the flash drive will be formatted).
Wait until the process is over and the flash drive is ready.
Windows 10 bootable flash drive with UltraISO
Utility UltraISO is used to work with ISO images. It is popular with users and can be used to create a bootable flash drive.
Step-by-step instruction:
- Open ISO image of Windows 10 in UltraISO
- In the "Self-loading" menu, select the option "Burn hard disk image", then write it to a USB drive.
WinSetupFromUSB
WinSetupFromUSB is the easiest program to record bootable and multiboot USB. It can also be used for Windows.
How to create a disk:
- Select a USB drive.
- Mark "Autoformat it with FBinst" (if the image is not attached to existing files on a flash drive).
- Specify the path to the ISO image of Windows 10 (in the line for Windows Vista, 7, 8, 10) and click the "Go" button.
- There is information that when using an external USB drive (HDD) to create a boot disk, it inherits the FAT32 file system and its volume may change: in this situation, after installation, when the installation files are no longer needed, you need to press Win + R, enter diskmgmt.msc and in the disk management menu delete all partitions from the drive, format, in accordance with the desired file system.
- Installing from a USB flash drive can be done not only by downloading to BIOS. You can simply run setup.exe from the drive. The main condition is compliance with the system capacity.
Output
The methods described in the article are far from all. For example, what works for Windows 8.1 will work for version 10. These methods are the safest and will not cause damage to the equipment or the system as a whole. They will allow any (even the most inexperienced) user to create a boot disk.
Necessity burn image of windows 10 or any other operating system (program) on a flash drive (in other words, USB stick) arises from the ordinary computer user infrequently. On the Internet you can find many different programs that cope well with this task. But how to choose one that is easy and download it from where it is guaranteed there will be no viruses and no other unpleasant surprises? Having tried many options, I settled on completely free Russified utilities for myself Rufus or Unetbootin. The latter is more sharpened for recording images of operating systems of the Linux family, but personally, I even managed to record Windows 10 with its help ( this had to be done with the technical versions of the “tens” before the official release of this OS on July 29, 2015 - now with clean install of Windows 10 everything is much simpler).
I never get tired of repeating that downloading programs and utilities is always necessary only from trusted sources, which are only official sites. By the way, on the official website and only there you are always guaranteed to find the latest version of the program. It is advisable to see if there is an article about the program you are interested in on Wikipedia. Having a story about the program on Wikipedia, of course, does not give a 100% guarantee of its complete safety, but it greatly reduces the chance of stumbling upon something frankly dangerous. In addition, it is precisely on Wikipedia that you can always find a link to the official website of the program. Anyone who has come across this will agree with me that it is sometimes impossible to figure out in a search engine which site is official and which is not. The Wikipedia article solves this problem perfectly.
Rufus utility for recording images to a USB drive
Most experts say that it is Rufus that is the optimal program for creating images on a USB flash drive in Windows 10. You can download the Rufus utility on it official website. You can read about this program in Wikipedia - True, only in English. Even if you do not know it (English) and do not use Google translator, then in any case, the presence of an article in this electronic encyclopedia always speaks in favor of one or another software. So, you can safely use the utility.
So, we go to the official website (link above), scroll down to the big heading " Downloads»And select either the topmost link (this is the last full stable version), or better the second (Portable version). Personally, I use the second (portable) version, since it launches, but does not install on the computer.
Download the utility and run it (for greater reliability with administrator rights).
Rufus has a lot of settings. We will not deal with them and leave everything as it is. If you do not know exactly what this or that parameter is responsible for, then it is better to leave them configured by default.
All we need to do is:
- Choose a flash drive on which we will record the image.
- Choose the image that we want to record.
- Start recording by clicking on the “Start” button.

If you downloaded the portable version of Rufus, then after the recording is complete, you do not need to delete it, since it was not installed on the computer. You can simply close and delete the downloaded file. And it’s better to save it in a folder for the future - you never need to write the image to the USB flash drive in your Windows 10 again.
Unetbootin utility for recording images to a USB flash drive
Now let's take a closer look at the Unetbootin utility. So, download it from the official site. To do this, select "Download (for Windows)" on the specified page.
Wikipedia about the Unetbootin program
Unetbootin official website

After that, we are transferred to the download page, where after a few seconds a window automatically appears offering to save the file to our computer (if this does not happen automatically, click on the “direct link” link).
Next, run the downloaded file. The great advantage of Unetbootin is that it is not a program, but a utility. That is, there is no need to install it on a computer. It starts immediately and is ready to go. And after that, you can delete the file and no trace of her stay on the computer will remain.
By the way, Unetbootin is a utility created specifically for recording images of the Linux operating system, but it copes well with other images as well. For example, I already said that I even wrote down image of Windows 10 on a USB flash drive with its help, and then successfully installed the "top ten on your computer next to the" seven "second system from a USB drive. I talked about this in detail in the article Install Windows 10 next to Windows 7 step by step .

By launching the Unetbootin utility, instead of the “Distribution” item, we select “Disk Image”. (If you select "Distribution", the program will automatically download and burn the image of the Linux OS).
Then we find through the browser (three points) on our computer the image of Windows 10, which we need to write to the USB flash drive (or some other image that we need to record).
After that, we can only choose the media - our USB drive (flash drive), on which we will write our image. In the case in the picture, this is disk “I”.
Well, having completed all the above steps, click OK. That's it, our image is being recorded.
In this article, we’ll look at two ways to create a bootable Windows 10 flash drive that is suitable for you to install, restore, or reinstall the operating system. I note that a bootable USB flash drive is currently the most popular and convenient medium for installing Windows 10, because Compared to a DVD, it provides a much faster process.
Method 1: Create a bootable Windows 10 flash drive using the official Microsoft Media Creation Tool
This is the official way to create a bootable USB stick. He is not the fastest, but the most correct. Using this method, you will create a bootable USB flash drive containing Windows 10 of the latest build with almost all of the latest updates.
Click on the button Download tool now. This starts the file download:
2. Run the downloaded file. Wait for the program to start (about a minute). Then click To accept.
3. Select Create installation media… and press Further:

4. Choose your preferred language, OS edition (home or professional), bit depth (in most cases, it makes sense to choose 64-bit) and click Further:

When choosing a release, remember that you must have an appropriate license to publish Home or Pro. For example, if you once upgraded Windows 8.1 to Windows 10 and received the Pro version, then select Pro. If you had the Home edition on the computer where you want to install (or reinstall) the OS, then Pro will not be activated.
5. Select USB flash driveplug the USB flash drive into the USB port and click Further:

Important notice! If you want to create several bootable flash drives with a "ten", then at this stage you better choose the ISO-file item. In this case, the program will save the Windows 10 image to your computer and you can then write it to different media in a different way, which I described in the next paragraph. This procedure will take much less time than if you would create each bootable USB drive in Microsoft's Media Creation Tool.
6. The flash drive should be defined in the section Removable media. Click on the button Further To start the process of creating an installation flash drive:

When the preparation of the bootable Windows 10 flash drive is completed, you will see a window like this:

Method 2: Create a bootable Windows 10 flash drive from an existing image. Iso
If you already have an downloaded iso image, you can also create a bootable USB flash drive 10. I note that using this method makes sense only if the downloaded image is fresh. Do not write the old ISO to the USB flash drive, because after installation, you will catch updates for a long time and, possibly, even restart your computer several times.
So, to write an existing Windows 10 ISO image to a USB flash drive, follow these steps:
1. Connect the USB flash drive.
2. Run the UltraISO program.
3. Open the disk image:


5. Click Write downand wait until the process ends:

Let me remind you again: the first official method is preferable, because using it, you will always have the latest version of Windows 10 with (almost) all updates at the time of creating the media.