How long does it take for Windows to boot? Sometimes it seems like it takes forever. There are several methods to speed up system boot, but the problem may be that your computer is performing the CHKDSK function on every boot.
Have you noticed a filling strip while waiting? Does she appear often? Ever wondered what it is, what is causing it, and whether Windows really needs to do it? Read this article and we will answer all these questions together.
If you are not sure which drive you have installed, check if it is solid state drive (SSD) or hard disk ( HDD). If your computer has an SSD, you can still use Check Disk, but it is not necessary to run the check with the flag / r... There are some differences between SSD and HDD, in particular, SSD has no moving parts.
SSD is not included physical diskso it doesn't need to be checked with chkdsk c: / r. However, Windows uses the same file system on both the SSD and HDD, so you can fix the errors file system at chkdsk help c: / f. Other than that, Check Disk is unnecessary.
On Windows 7 and earlier, the check may take some time. Maybe an hour, sometimes a whole day or more, so make sure you have some free time. Do not interrupt Check Disk after it has started.
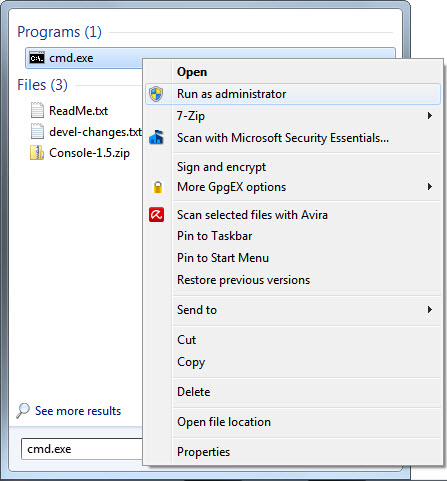
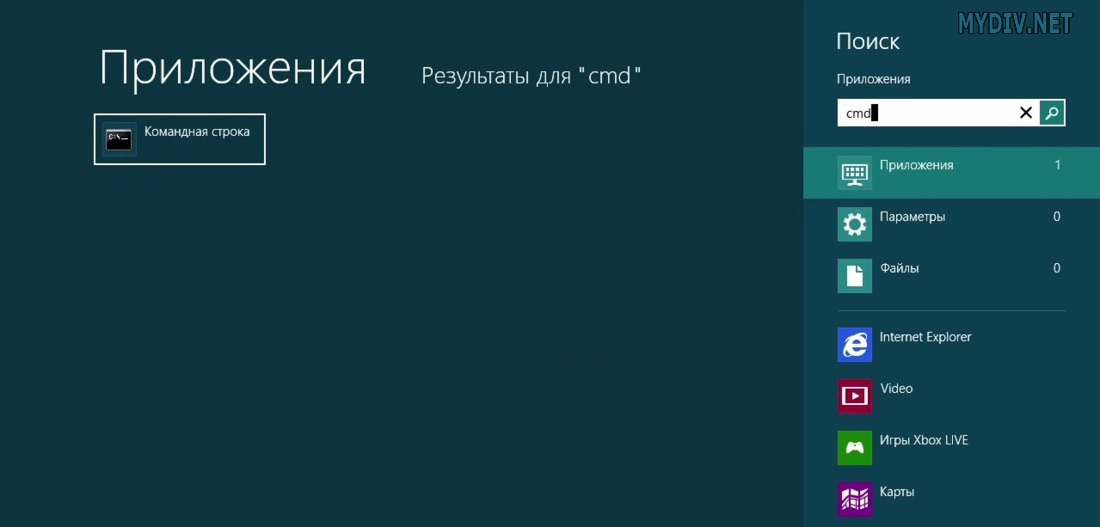
To run the utility, click the Start button. In the search bar enter “ command line". It should appear in search results. Right-click on the command line and select "".
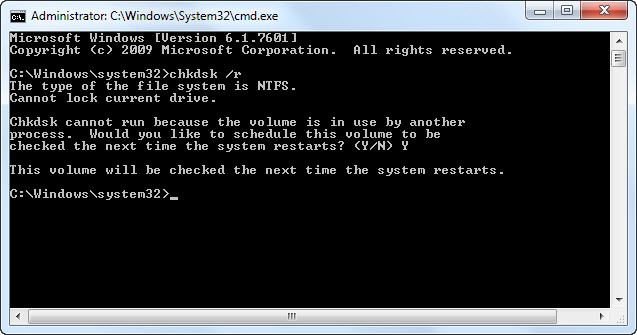
After the window appears on the screen command line, enter the command
and press the button Enter... Thanks to the / r flag, the program will try to recover information from bad sectors, as well as fix all errors on the disk, so you do not need the / f flag.
The command line will inform you that it cannot perform this action because the specified volume is currently in use. It then asks if you want to schedule a volume check for the next boot. Enter Y and press Enterto schedule Check Disk to run with the error fix option.
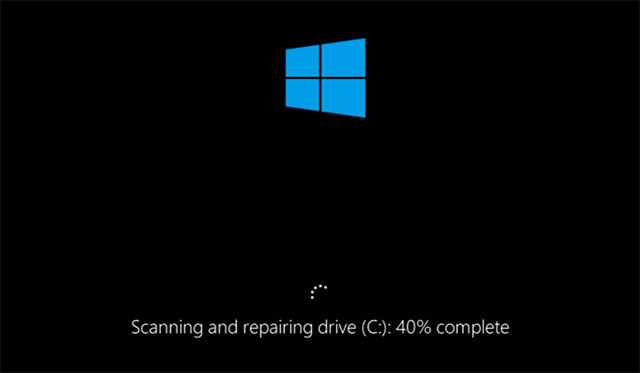
Restart your computer and wait for the utility to do its job. Once the check is complete, all errors should be fixed and Check Disk will no longer start at boot unless there are other problems, of course.
Windows 8 deals with these issues in a more efficient way. The file system constantly checks itself for errors. Errors that do not require unplugging the disk are fixed immediately. The fix for other errors, which can only be performed at boot time, is scheduled for the next system startup.
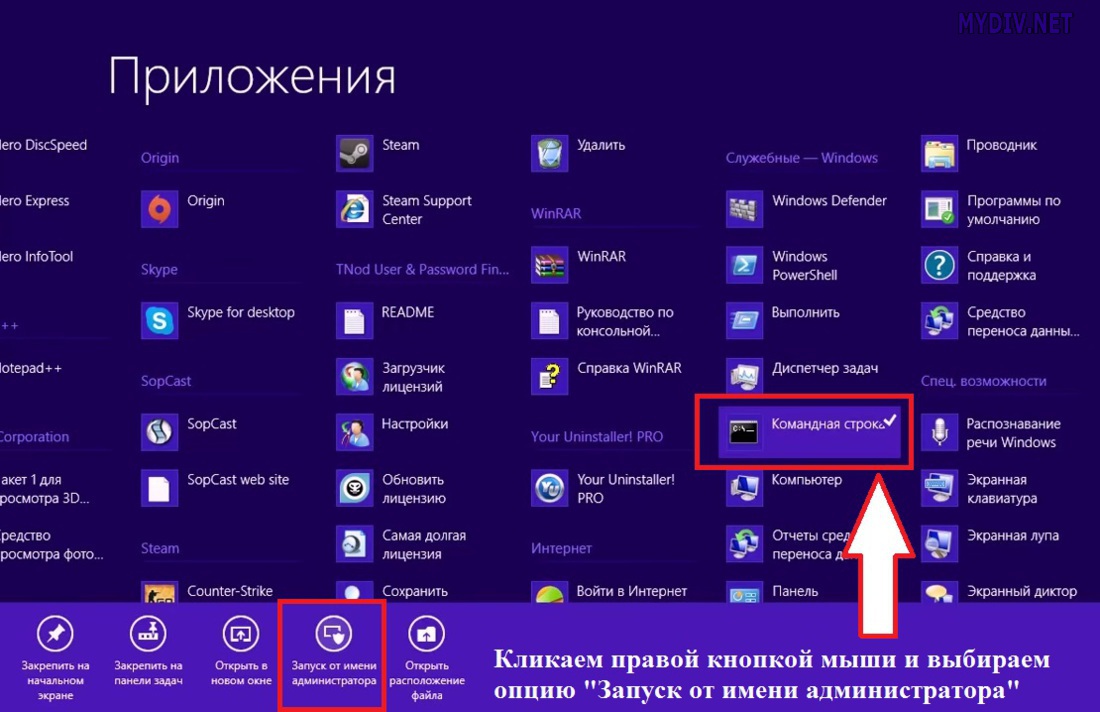
Since the system only needs to fix those errors that require unplugging the disk, Check Disk does its job in a few seconds or minutes. To do this, click the button Start... Enter " cmd"In the search bar for programs and files. The topmost search result will be cmd.exe... Right-click on the line and select " Run as administrator».
To make sure all other issues are found and resolved, first run a disk check by running the command
chkdsk C: / scan
and pressing the key Enter... During the scan, the utility will fix everything that does not require unplugging the disk. Once the verification is complete, enter
chkdsk C: / spotfix
and press Enter... You will see text informing you that this volume is occupied by another process. The command prompt will then ask if you want to schedule a disk check for the next system boot. Enter Y and press Enterto schedule Check Disk to run. Now restart your computer.
This time Check Disk will launch and fix any errors found during the scan. And since the utility only needs to fix errors that require disconnecting the disk, it will take only a few seconds or minutes.
Your filesystem should be fine now. Check Disk will no longer run when you turn on your computer unless there are other issues.
Check if it helped
After Check Disk finishes, there is only one way to check if the utility has completed its task - to restart the computer. Hopefully, the program will no longer start and you can continue your business. If Check Disk continues to run, you may have more serious problems with the file system, or errors related to the registry or the operating system itself. You should consider the option of a system restore or full reinstall Windows... Maybe it's time to change your hard drive. Of course, this is a last resort, but it definitely solved your problems.
Did this article help you fix your issues? Have you found other ways to stop Check Disk from running on every boot? Do you have any questions? Share them in the comments and we can help each other.
Almost every user at least once came across the fact that a message appeared on the computer with a request to run chkdsk. It is a utility program whose purpose is to check hard disk for file system errors and their subsequent correction. By default, this utility is installed in every windows OS, so you don't need to search and download it. Everything is much simpler - we will only consider how to start it.
Launch methods
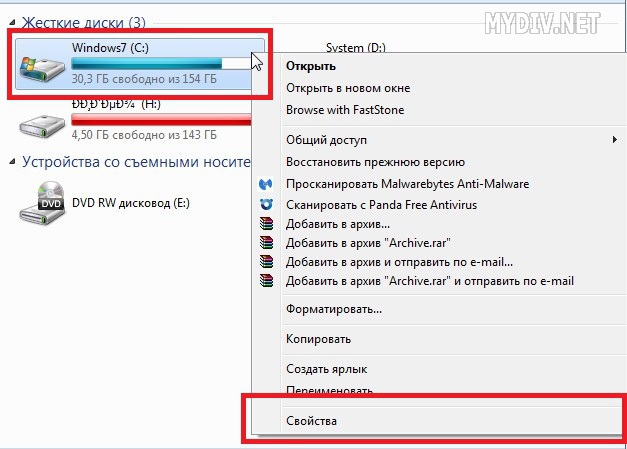
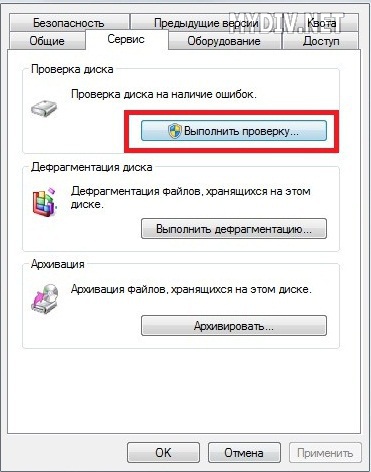
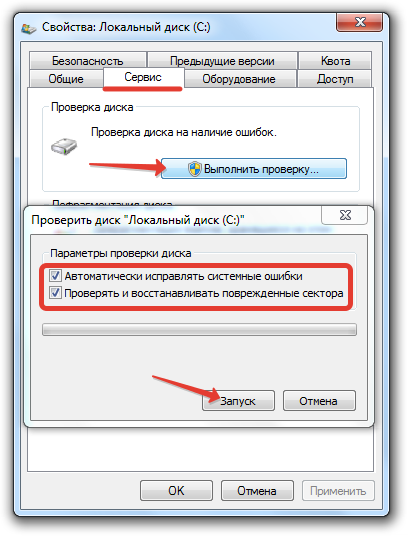
In order to open the program, you need to open the Computer. In it, we click the right side of the mouse, aiming at the disk that interests us. In the drop-down list, select Properties. Next, go to the Service tab and click Run Check. After that, the chkdsk utility window opens.


Before you start the windows 7 chkdsk utility, decide what you want to do with it. The interface has a choice of utility actions. You just need to mark or deselect. If you are going to check for errors the partition on which the operating system is located, then you may encounter a situation when the computer displays a message about the impossibility of this.

This situation does not indicate any serious problems. Just a check will be done when you restart your computer. This should not happen with partitions that do not have an OS.
In some windows versions the program starts automatically. This is possible in XP, NT, 2000. This usually happens when the computer is turned on, if the work was not shut down correctly. For example, a sudden power surge, etc. In version 7 of the chkdsk operating system, only the user can start the service.
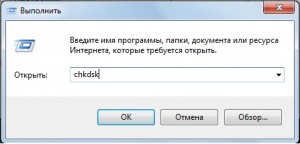
You can open the program using the command line. To do this, click Start and find Run. Enter the command chkdsk d: / f into the line, where d is the name of the disk that you want to check. Accordingly, if another section is needed, then we write its name.
Chkdsk allows you to check the disk for file errorsand then eliminate them. Its work can last from a few minutes to hours. Sometimes she can be a very good helper. Of course, there are other programs that can perform similar functions, and they are often distributed free of charge. However, such utilities are usually not needed if chkdsk is installed. And it comes bundled with all versions of the windows operating system.
Video to help:
If you are looking for information about what chkdsk is, how to use it, it does not work for you or does not work correctly, then you are here.
Introduction
If you are looking for how to download chkdsk for free, without waiting and sms, without entering a number, then I'm afraid to upset that the chkdsk program is present by default in every system of the Windows family.
What is ChkDsk in general and what is it for?
Let's figure it out (referring to Wikipedia).
CHKDSK (short for check disk) - standard application in operating systems DOS and Microsoft Windows ,
which checks the hard disk or floppy disk for file system errors (for example, the same sector is marked as belonging to two different files).
The CHKDSK utility can also fix found file system errors. Under Windows NT, Windows 2000 and
Windows XP, CHKDSK can also check the hard disk surface for bad sectors.
Sectors found are marked as bad and the system no longer tries to read or write to those sectors.
Previously, [SCANDISK] performed this task. On UNIX the equivalent command is called fsck.
By default, CHKDSK does not fix errors or check the disk surface for bad sectors.
But more on that later. The CHKDSK takes some time to complete - usually from several minutes to several hours (depending on the hard disk, its size, and how busy it is).
Method 1. How to run Chkdsk from under Windows (for example, Windows 7 and Windows XP).
To begin with, starting chkdsk programs on Windows 7 is almost no different from running on Windows XP. The easiest way for the user to start the program is to go to the properties of the required drive, for example "C:", and go to the "Service" tab. 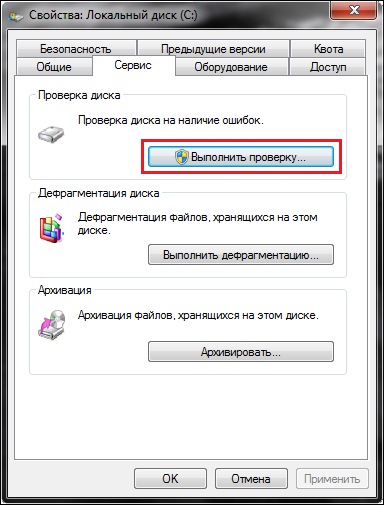
Then click "Check" and the Chkdsk window with a graphical interface will appear: 
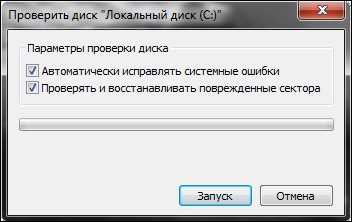
In the window, you can select scan options. One is responsible for correcting errors on the disk, and the other - detects bad sectors of the disk and repairs them, and specifies the correction of errors on the disk.
If you are checking a Windows partition (for example, the "C:" drive), you may receive a message about the impossibility of checking. (on win-xp there is a slightly different table, but with the same meaning):

![]()
This is normal and the check will be scheduled for the next launch, i.e. will be performed when the computer is restarted.
If you have selected a different drive, then the check will occur from under Windows. P.S - In Windows 7 Service Pack 1, instead of OK there may be an inscription "Schedule disk check". This is how they translated it. The essence of the button remains the same.
Method 2. From the command line using the example of Windows XP
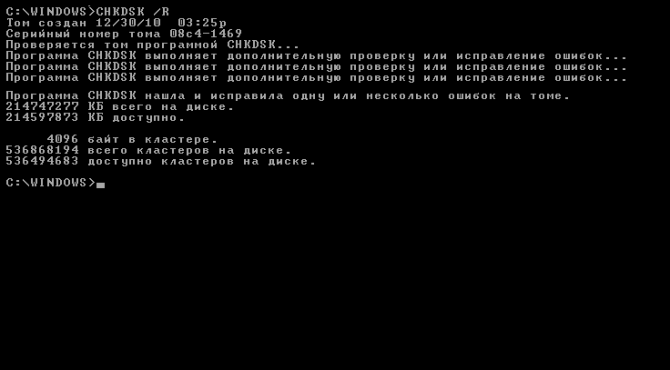
After crashes, unsuccessful shutdown of the computer, turning off the light, etc. we can observe the following picture during OS boot.
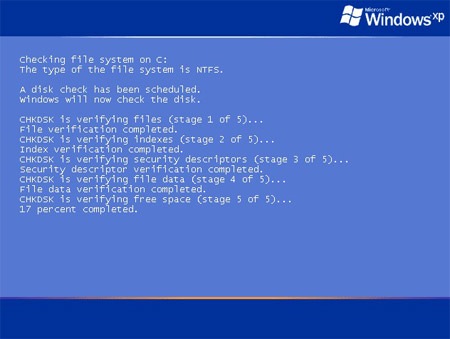
It means that it started special program - Chkdsk, to find and fix disk errors that might occur during a crash.
But there are also cases when there is an error on the disk, and Chkdsk did not start on its own. How do you run it to fix disk errors?
To do this, go to the "Start - Run" menu.

And we enter the command with the following parameters [volume:], where: [volume:] is the letter of the disk (partition); - the parameter that sets the correction of errors on the disk. The following command will be obtained: chkdsk with: / f
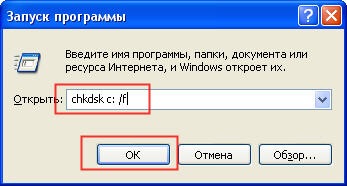
In my case, the drive "C:" is specified. Accordingly, if you need to check another disk, for example "D:", then we indicate: "chkdsk d: / f" To check the disk must be locked, therefore, after running the command by clicking OK, the following window may appear in which it is written:
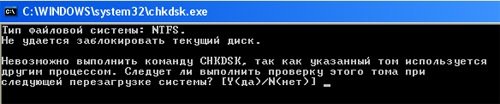
"The Chkdsk command cannot be executed because the specified volume is in use by another process. Should this volume be checked at the next system reboot?"
[Y (yes) / N (no)] "Press on the keyboard latin letter Y and Enter, and now the next time the computer boots, the chkds k command will check the specified disk for errors and fix them.
After rebooting, the following window will be shown:
It should also be added that the / f option is not the only option for the chkdsk command. There are others, but they are rarely used.
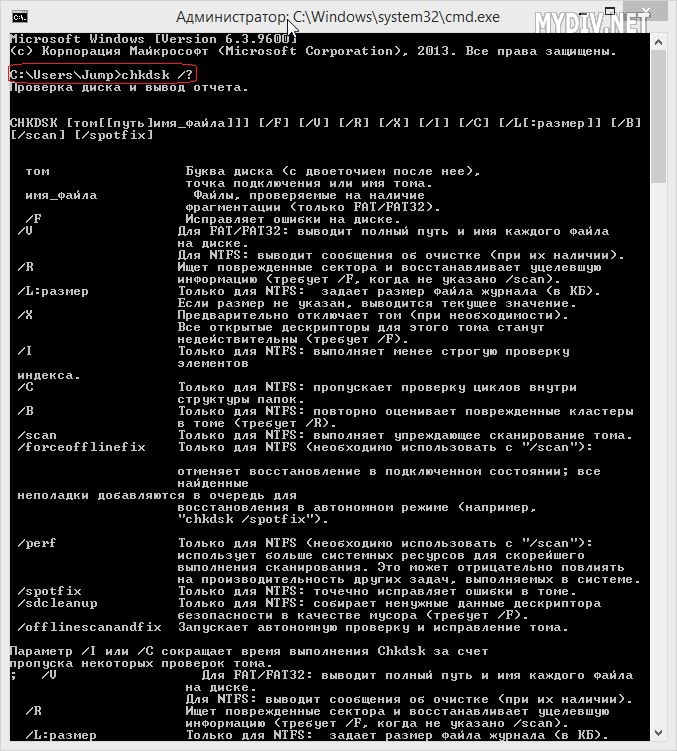
On the site you can also find all descriptions of the command keys (parameters).
Their description is also presented below. The only parameter that can come in handy is the / r parameter, which detects bad sectors on the disk and restores the part of the data that can still be read. The command with this parameter will look like this: chkdsk c: / r To achieve the effect, you need to have administrator rights (!).
Method 3: How do I run Chkdsk if Windows cannot boot?
Imagine, one fine day, you are sitting at the computer, when suddenly a power surge, small, but the plugs were knocked out. Your computer hiccupped and shut down abruptly. Having adjusted the light, you turn it on, but that's bad luck, Windows won't load! One of the options is that there was a failure on the main hard drive, which prevents the bootloader from working normally. How to fix it? "How do I start Chkdsk if Windows cannot boot?" - You ask. I will try to explain everything to you in this article.
First you need to insert your installation disk, front booting Windowsinto the drive. A message like this will appear:

* - On different computers BIOS settings "a are different, so your disk will boot automatically, or you will have to press a key to do this (the most common - f12 or Del). Which key to press should be written as soon as your computer turns on.
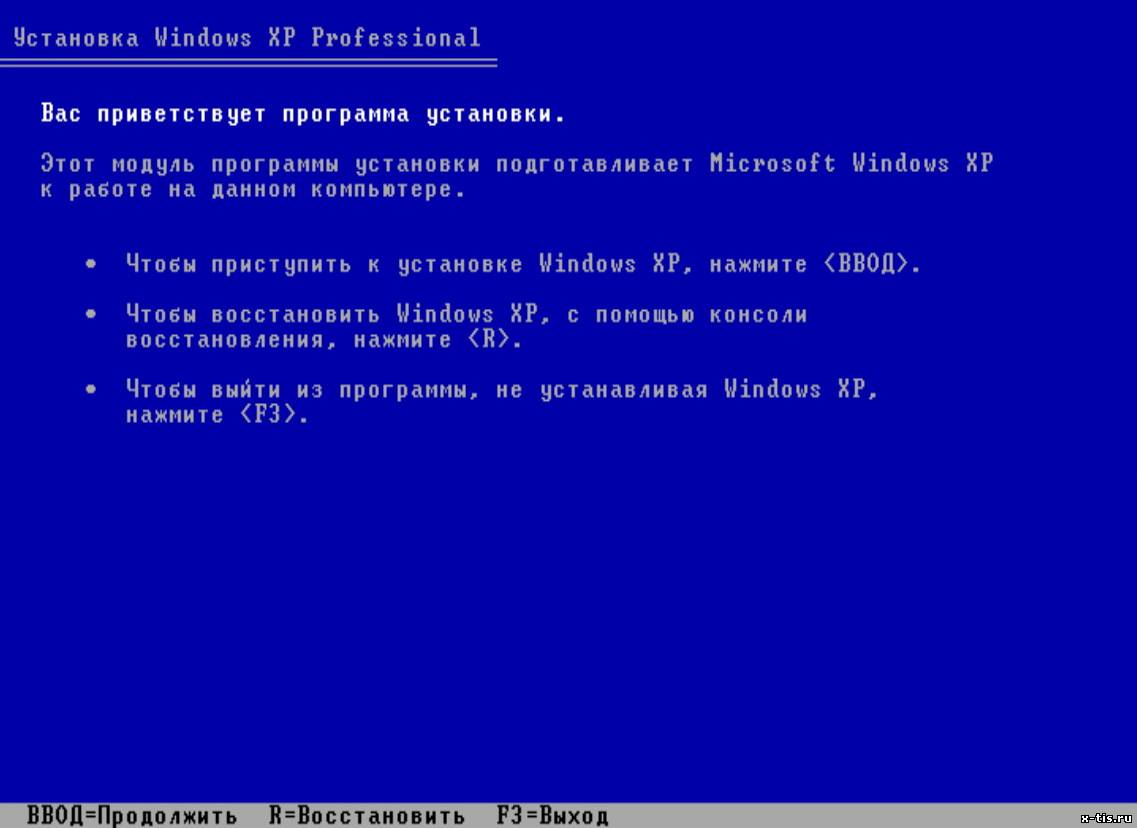
We press any key, the process of preparation for installation begins. After that, you will see the following:
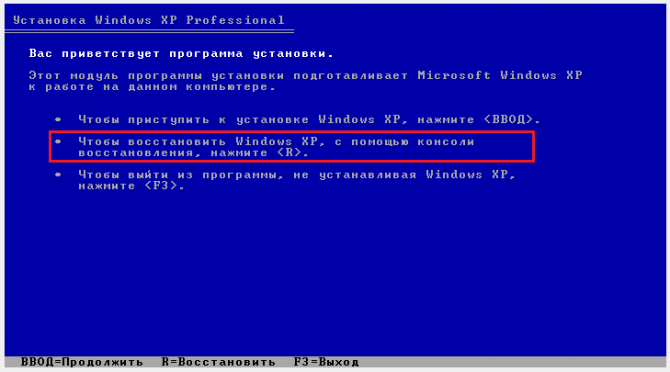
Press [R] and go to the recovery console. From the list, select the item with your copy of Windows (I have it the only one - No. 1.)
If the administrator has a password (the main hidden account in XP), you will be asked to enter it (In my case, it is there, and I entered it):

It becomes possible to enter commands. Hooray. Let's take our time and enter the word HELP. A whole list of commands will appear. For now, we only need the CHKDSK command.
Parameters are optional. If you need to make not the most effective check for a short time, then feel free to type "CHKDSK" and press Enter.
But if you need an effective check (albeit for a long time), then do not be too lazy to read to the end! So, let's take a look at all the parameters of this command before entering it.
To do this, we enter the command first "CHKDSK /?" Or "HELP CHKDSK".
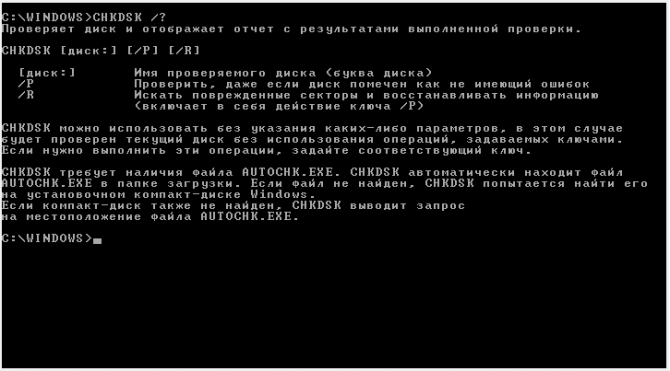
As you can see, in the picture, the / R parameter includes the duties of the / P parameter, so we will not consider / P.
Okay, let's not get too distracted and continue. After you have more or less figured out the command help, we can start practicing.
Enter the command CHKDSK [drive:]. For example - "CHKDSK C: / R". If you only have one hDD, then [disk:] can be omitted (undesirable).
Everything! The verification and recovery process has started! We wait, drink tea and rejoice.
Console commands:
Command: CHKDSK [volume:] checks the specified disk using the Check Disk program, when called without arguments, the current disk is checked.
Drive into the console without brackets. Example: C: / F / R
- volume - defines the volume label of the checked disk, mount point or disk name with a colon (for example, C :);
- path, file name - name of a file or group of files to check for fragmentation. Used only in the FAT / FAT32 file system;
- / F - perform error checking and error automatic fix;
- / V - display full paths and names of files stored on the disk during disk check. For discs containing nTFS partitions, also displays messages about cleaning;
- / R - search bad sectors and restore their contents. Requires the mandatory use of the / F key;
- / X - if necessary, unmount the volume before checking it. After disconnecting, all current descriptors for of this volume will be invalid. Requires the mandatory use of the / F key;
- / I - do not perform strict checking of index elements. Used only in the NTFS file system;
- / C - do not check for loops inside the folder structure. Used only in the NTFS file system.
- / L: size - during the scan, resize the log file to the specified size (in kilobytes). If not specified, the current file size is displayed. Used only in the NTFS file system;
Developer errors in CHKDSK (!):
- This wizard's interface can only be accessed on english languagehowever, the automatic fix can also be performed in other language versions of Windows.
- If you are downloading from a computer other than the one that has the problem, you can save the automatic fix to a flash drive or CD so that it can run on the target computer.

How to forcibly remove / restore CHKDSK from startup?
Foreword:
Let's dot the i's and try not only to solve the problem point by point, but also to understand its essence (so as not to step on the same rake in the future).
And the problem is the following: Every time the system boots, a disk check comes out. I can't say the exact reason, since this problem has several of them.
Most likely - your hard drive is slowly dying, or there is simply a system failure. The fact is that when the computer is turned on, its kernel is loaded first, and then the system itself.
So, at each boot, the Autochk.exe program is called by the kernel, which checks hard drives on the "Dirty bit" mark (see Wikipedia).
If such a mark is present, then Autochk.exe runs the chkdsk / f command, which is executed on the marked volume.
So is it possible to forcibly disable chkdsk from the so-called autorun at all? The answer is yes. You can do this as follows.
I want to warn you right away - disabling autostart CHKDSK deprives you of control over the integrity of your file system, which can lead to consequences!
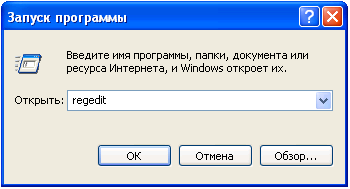
1. First you need to run the registry editor. Standard way:


3. Find “BootExecute” and erase its contents.
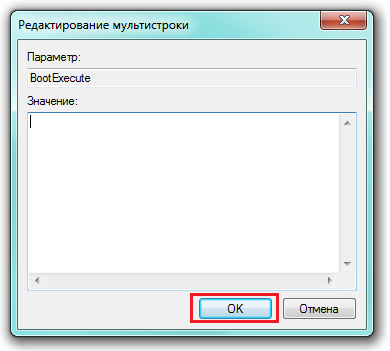
Autocheck autochk *
Method 2. Softer shutdown
1. Go to RegEdit
2. Go back to the section
HKEY_LOCAL_MACHINE \\ SYSTEM \\ CurrentControlSet \\ Control \\ Session Manager
3. Add “/ k: C” without quotes to your autocheck autochk * entry in the BootExecute parameter before the * sign. Where C: is the letter of your drive for which you want to disable checking. It should now look like this: autocheck autochk / k: C *.
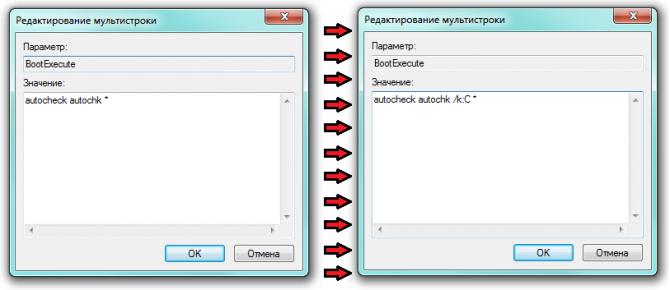
If you have multiple volumes, add the required number of entries “/ k: C”, separating them with spaces, where C is the required volume letter. For example: autocheck autochk / k: C / k: D / k: E *.

Ie I disabled automatic check CHKDSK for volumes C :, D :, and E :.
How to get everything back?
1. Go to RegEdit
2. Go back to the section
HKEY_LOCAL_MACHINE \\ SYSTEM \\ CurrentControlSet \\ Control \\ Session Manager
3. In the BootExecute parameter, erase everything that was and write:
Autocheck autochk *
or whatever was there originally. It is assumed that such a record was before you even got there. If you have a saved copy of the original recording, which I wrote about in the first method, then write it.
Chkdsk is a utility program designed to checking hard disk for errors and fixes. The program is used in cases when the system issues messages about various errors associated with hard disk, files, drivers, etc.
In order to run this utility in Windows 8, you need to do the following:
Step 1... If you work with the console from a user account, then when you enter the CHKDSK command, the following window will appear:
The easiest way out is to go to account administrator and run the console as administrator. Go to the "Start" menu and select a user with administrator rights:
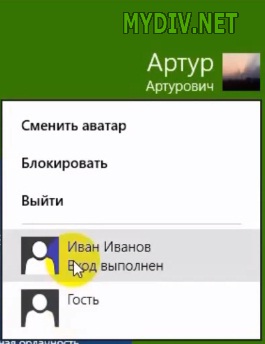
We click on this application with the right mouse button. The action panel will appear below: select "Run as administrator":
We'll launch the console as administrator:
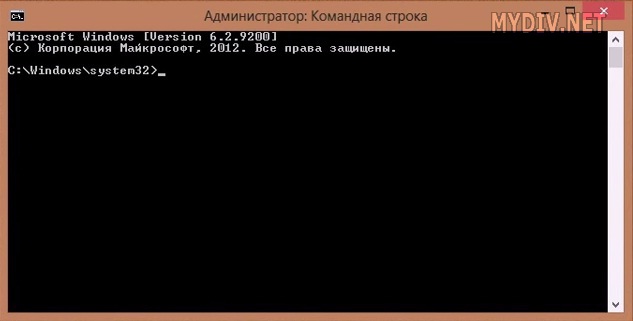
Here we need to enter the chkdsk command and press the Enter key, after which the disk check will start.
If you do not have the opportunity to do this, or you do not know passwords from other people's records, then you will have to check each logical drive separately. To do this, go to "My Computer" and select the required drive:
We put all the checkboxes and click "Start":

We will be asked to reboot the system, after which a check of this disk will be performed.
Step 2... If you know for sure that you are working under an administrator account, then just press the Win + R key combination on the keyboard. In the window that appears, enter the command “cmd” without quotes. 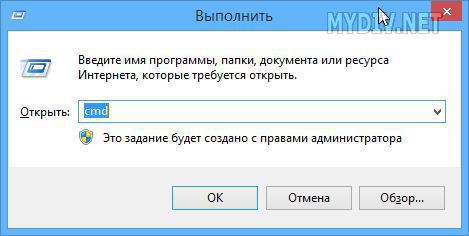
Step 2. Now write the command "chkdsk" without quotes as shown in the screenshot. The program will search for errors (without fixing them). How to fix the found bugs is described below. 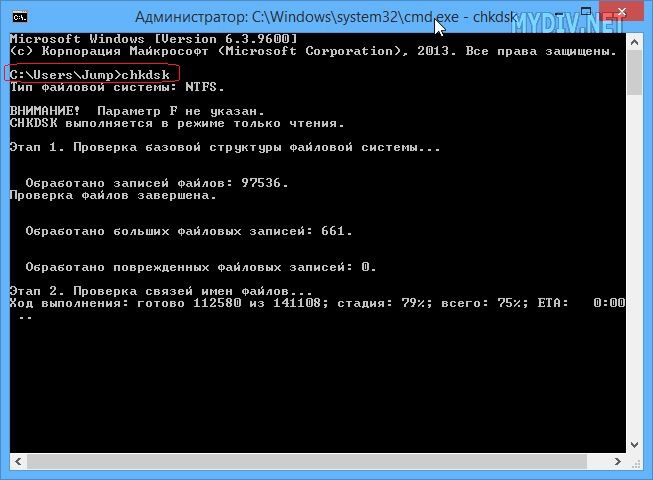
Step 3. Add the /? Flag to the command as shown in the screenshot. All parameters of the chkdsk utility will be displayed on the screen. Please select desired option... In particular, use the / F option to fix errors.
Restoring a hard drive or flash drive does not always require the use of special software; sometimes you can fix errors with the built-in windows utilitiescalled CHKDSK (check disk). This program will check the disk for errors and fix them if found. CHKDSK can be launched in several ways, but we will detail the command line option.
Command line recovery
To perform hard disk recovery using the CHKDSK utility, run the command line:
- Press Win + R and execute "cmd".
- Enter a command like "chkdsk E: / F / R".
If the disk is in use by the system, the computer will restart to perform the check. Correcting errors on a USB flash drive using the CHKDSK utility does not require a reboot.
Let's analyze the command syntax:
- "Chkdsk" - starts the verification utility.
- "E:" - letter partition hard disk or flash drive that needs to be checked using CHKDSK.
- "/ F" - error correction.
- "/ R" - recovery of bad sectors.
If you don't like working with the command line, run a disk check with windows interface:
Checking a partition of a hard drive or flash drive through the Windows interface is no different from this procedure in the command line. If the disk partition is in use, the system will reboot.
Windows won't boot
If the system due to mistakes hard the disk is constantly restarted or does not boot at all, then to restore the hard drive through the command line you will have to use the tools installation flash drive... If you have Windows XP, then start the recovery console:
If the verification utility is able to detect and eliminate errors and bad sectors, then after rebooting you will get a normally functioning system.
On Windows 7, after the first screen of the installer appears, you need to go to the "System Restore" section. On Windows 8.1 and Windows 10, the section is called "Diagnostics", it has a subsection " Extra options". Select Run Command Prompt from the list of available tools. 
At this point, many users make the mistake of typing chkdsk without considering the drive letter with installed Windows... The problem is that in the recovery environment, letters are assigned a little differently - "C" denotes a 100 (500) MB partition allocated for the needs of the system, and the volume with windows files becomes "D" and so on.
For the exact letter, type "notepad" in the command interpreter window and press Enter. Notepad will open: expand the File menu, click Open. In the Explorer window go to "Computer" and see what letter is assigned to the partition with Windows files. 
Having recognized the letter of the section, write it in the command syntax: for example, chkdsk D: / f. The disk check starts. If you need to scan your hard drive for bad sectors, then run chkdsk D: / f / r. When prompted for a failure to execute, type Y and press Enter. 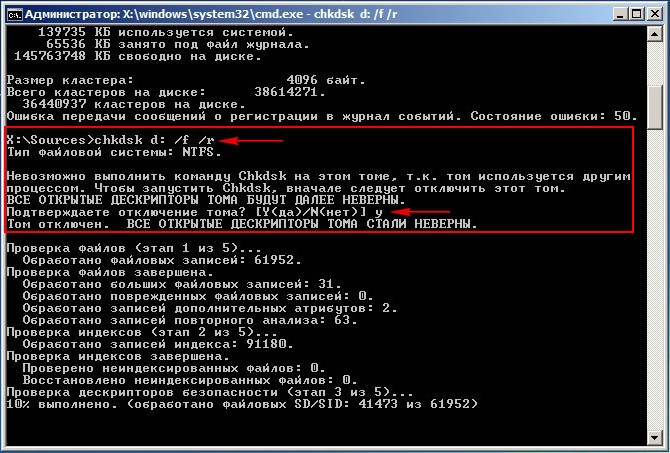
The disk check and repair will start. If everything was done correctly, then after completing the procedure, the system will work correctly. Do not forget to remove the boot from the flash drive if you set it up in the BIOS, otherwise Windows will not start.


