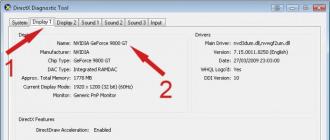
The health of the hard drive, like any other component of a computer or laptop, you need to ensure that it does not fail prematurely. In this article, we will introduce the built-in hard disk check utility in Windows. chkdsk. With its help, we will diagnose HDD and correct any errors.
A hard disk is an integral part of a computer and a careless attitude towards it can disable it, in which case everything that was on it all its working time will be lost and it is unlikely that it will help itself. And in order not to bring to such a case, you need to check the hard disk for errors at least occasionally. Today I will not talk about powerful utilities, such as Victoria or MHDD, about them another time. In today's article we will consider the built-in utility in the Windows operating system - chkdsk, it is designed to check the hard disk and fix problems on it.
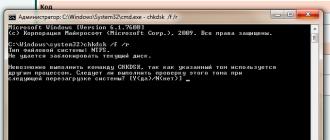
And so, you need to open the command line. It is possible through Start - in the search for cmd, or use "Win + R", the "Run" dialog box opens, in the line enter - cmd and click OK. A Windows command prompt opens.
There enter the command: chkdsk c: / f / r
Where chkdsk is the hard disk check command.
c: - letter of a hard disk, if there are several disks or partitions on a computer and you need to check another, just enter the letter you need, for example d: or e:
/ f - sets error correction on HDD.
/ r - corrects errors on the disk and restores part of the data that can be read.
There are other commands to get acquainted with them, you must enter the command: chkdsk /? Where will the full list of commands chkdsk.
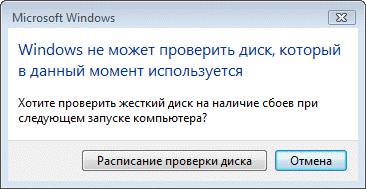
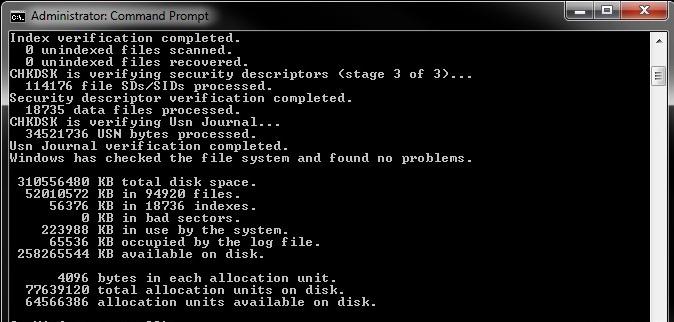
After entering the command, the utility should start scanning. As the scan ends, it will display its results. If you want to scan the system disk or partition (C), the following message will be displayed on the command line:

The program will not be able to scan the system disk during its operation; therefore, it is necessary to restart the computer. And for the scan to start right before the OS is loaded, you need to enter at the bottom of this message in the command line Y and click on Enter. The computer will restart and start scanning the disk.
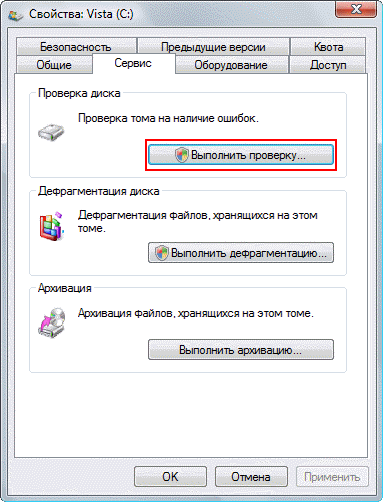
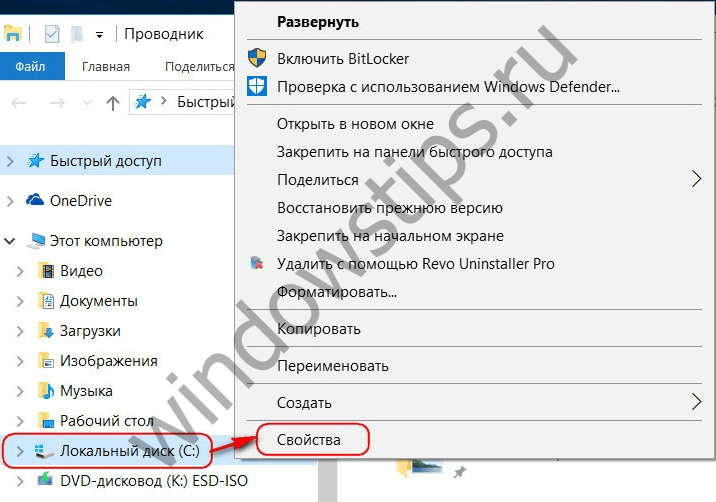
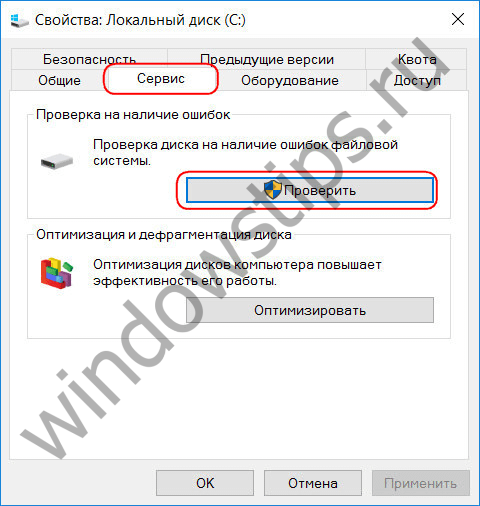
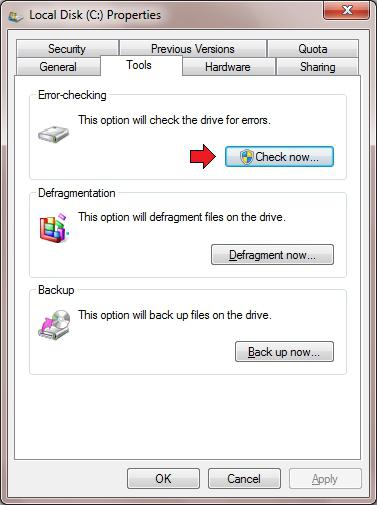
The built-in utility in Windows for checking HDD can be run without a command line, it has a graphical mode. In order to start the test in graphics mode, you need to go into My computer, select the desired drive, for example C: / right-click on it, select "Properties" in the drop-down list of the context menu. Next on the tab "Service" under the item "Check Disk" click on "Run a scan."
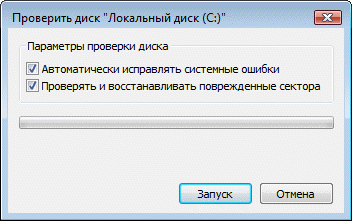
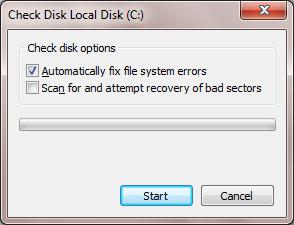
In the window that opens, click "Run."
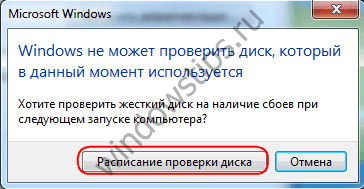
If you check the system disk (C), the computer will ask to restart (Check disk schedule) and only then start the scan before booting the OS, if you need to check any other disk or partition, the scan will start immediately.
How to disable chkdsk scanning at startup?
Sometimes users encounter such a problem when the chkdsk utility automatically starts scanning the HDD when the computer boots. This happens because errors are found on the hard disk and the system automatically tries to fix it. It is not recommended to disable automatic chkdsk scanning, it can damage the hard disk. If you still decided to disable it, you can do it like this: enter in the command line - chkntfs / x c: d: and press Enter.
Where "c" and "d" are the drive letters (partitions). And after that, the auto scan of chkdsk at startup will be disabled.
On this review, the built-in Windows CHKDSK program for checking and correcting errors on the hard disk comes to an end, if you have any questions about this topic, please contact us.
Windows crashes, emergency power off of the computer, experiments with software for managing disk space, the effects of virus infiltration - these and other problems can lead to the automatic launch of the regular Windows utility Chkdsk designed to fix hard disk file system errors. Incorrectly completed work of the operating system with files leads to file system errors, and sometimes to its damage at all. In an emergency, the Chkdsk utility turns itself on before starting Windows, scans the disk partitions and fixes errors. However, the fact that there are problems with the file system may not make itself felt during normal use of the computer and can be detected only when trying to manage disk space. So, for example, trying to reduce the disk partition with standard Windows tools, we can receive the following notification: “It is possible that the volume selected for compression is damaged. Use Chkdsk to troubleshoot, and then try to shrink the volume. ”
In this case, the disk check does not automatically start. How in Windows 7, 8.1 and 10 to run Chkdsk manually? How to fix disk errors with Chkdsk, if this problem caused the inability of the operating system to boot?
Inside Windows, you can run the Chkdsk utility in several ways.
1. Run Chkdsk using the Windows GUI
To run Chkdsk, in the system explorer on the C drive, right-click and open the "Properties".
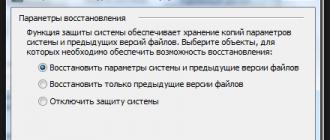
In the window of the opened properties of the disk partition, go to the “Service” tab, and in it click the “Check” button (or “Run check” for Windows 7).
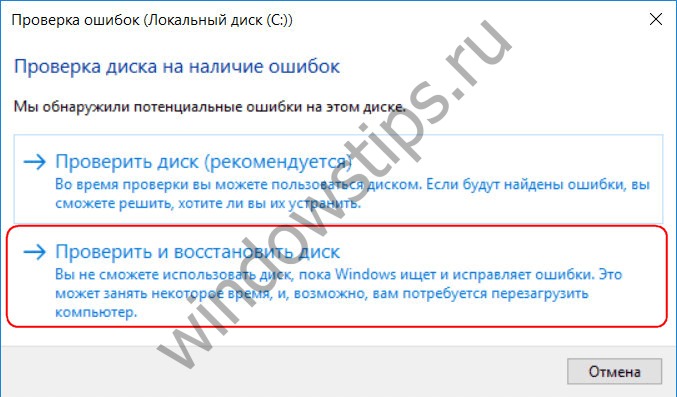
In versions of Windows 8.1 and 10, if everything is fine with the disk file system, in the next window that appears, we will see a notification that no verification is required. But if you wish, you can run the Chkdsk utility to check the disk by clicking "Check Disk".
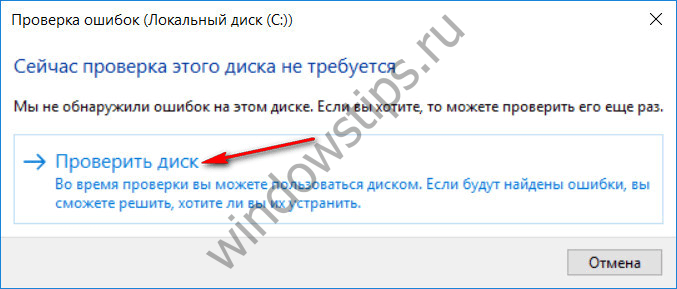
If the system suspects file system errors, this window will contain a button to start the scan and repair the disk.
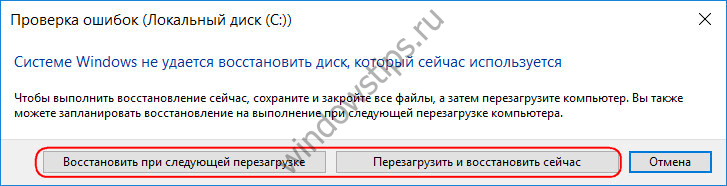
For Chkdsk to work with drive C, you must restart the computer. You can do this immediately or postpone the launch of the scan until the next reboot.
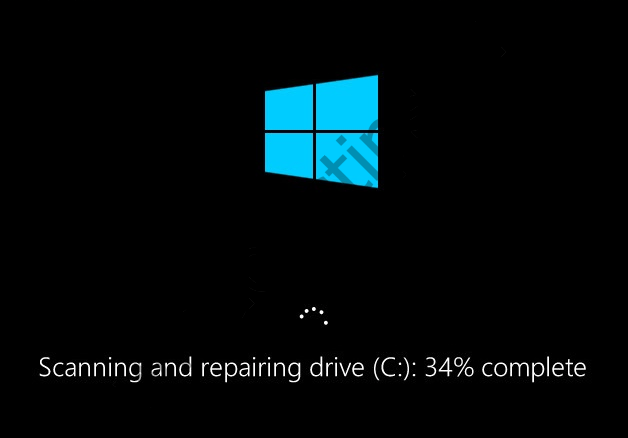
After the computer restarts, we can observe the operation of Chkdsk.
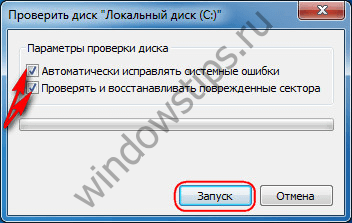
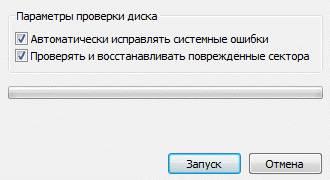
In Windows 7, running Chkdsk is a little different: you can add another possible option to the pre-installed automatic error correction option — check and repair bad sectors of the hard disk. When activating this option, it is worth considering that in this case the work of Chkdsk may take longer.
As in the case of Windows 8.1 and 10, in version 7, the system disk C cannot be verified within the operating system. To start the test, you must restart the computer. Click "Check Disk Schedule".
When checking a non-system disk partition, if it is used by some programs, the situation is simpler than with the system partition. In the window with the notification that the disk is currently in use, you just need to click the "Disconnect" button to, accordingly, disable this section during the scan.
2. Run Chkdsk using the command line
To run Chkdsk using the command line, first, respectively, run the latter.
In the command line enter the command by type:
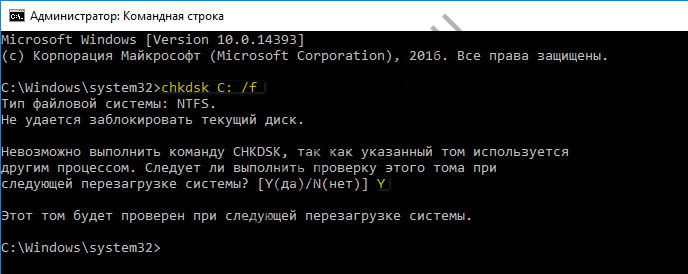
In this command, instead of drive C, each time we substitute the letter of the desired partition on which verification is required. If Chkdsk needs to check the system partition C, as with the GUI, you will need to restart the computer. After a message appears on the command line that the specified disk cannot be locked, enter “Y”, then restart the computer.
In addition to the / f parameter, which is responsible for correcting disk errors, Chkdsk can be run with the / r parameter, designed to search for bad sectors and recover data. As a result of Chkdsk with this parameter, hard disk clusters with unreadable sectors will be listed as damaged (bad blocks) with the transfer of their functions to the new cluster. Therefore, it is recommended to run Chkdsk with the / r parameter only when the usual error correction — launching the utility with the / f parameter — did not bring the required results. On the example of the same C drive, the command will look like this:
3. Running Chkdsk on a non-bootable Windows
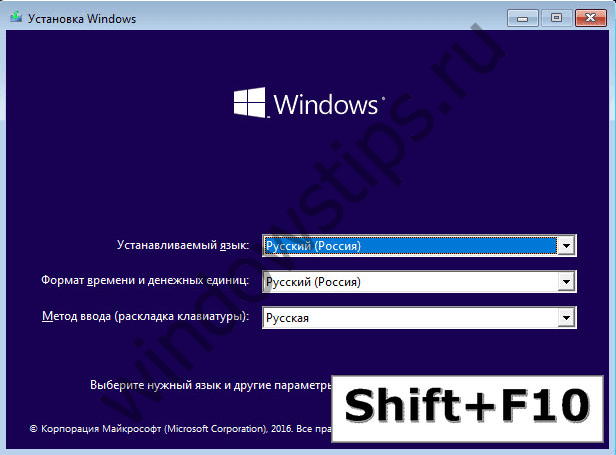
If Windows hangs at a certain stage of loading, one of the possible causes of this problem is file system errors. In this case, you must run Chkdsk by booting from the rescue media. As such, you can use the usual installation media with versions of Windows 7, 8.1 or 10. With its help, we will launch the Chkdsk utility from the command line. At the first stage of launching the system installation process, press the command line launch keys - Shift + F10.
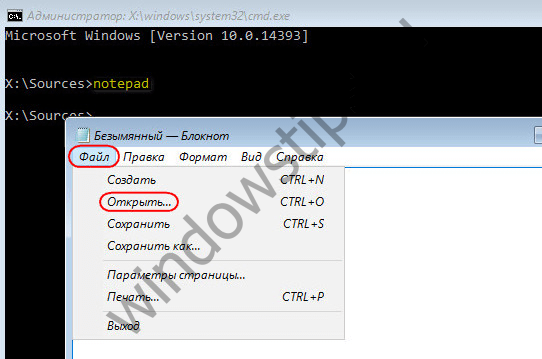
In the command line that opens, before running the Chkdsk command, you need to clarify with what letters the partitions of the disk are defined. This is easy to do with a notebook. Run it with the command:
We press the menu of the notebook "File", then - "Open".
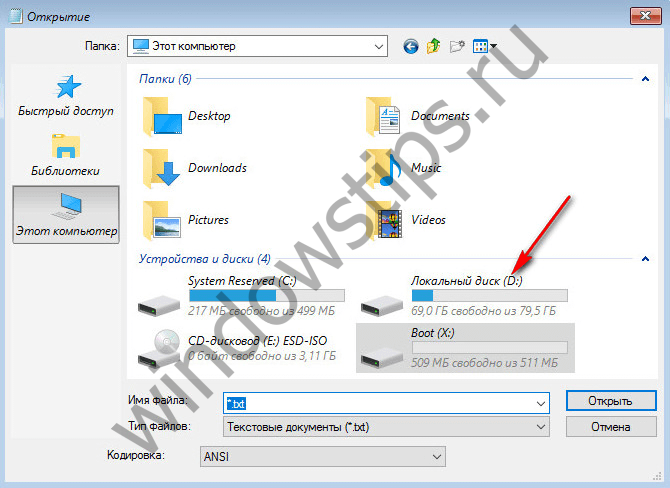
In the opened explorer we memorize new disk designations. As a rule, in Windows 8.1 and 10, the C drive partition (as it is inside a running operating system) appears as D, since the letter C is given to the first technical partition of the system. And all other sections are offset by one letter of the alphabet.
Having decided on the letters of the disk partitions, close the notebook, then returning to the command line, enter a command of this type:
![]()
As with Chkdsk inside Windows, you must first try to fix disk errors by running the utility with the / f option. And only if the problem is not solved, only then we run the command with the / r parameter, as indicated in the previous paragraph of the article.
For cases of inability to boot Windows, you can pre-record emergency Live-disc with a selection of various tools to restore the operating system. Among such, for example, AdminPE based on WinPE. His image for writing to a disk or USB flash drive can be downloaded from the official site of the Adminpe.Ru project. Using AdminPE, you can run a command prompt and enter the Chkdsk launch commands discussed above. But in this Live-disk, the Chkdsk utility has its own interface and is launched using a script. The utility launch label is placed directly on the desktop.
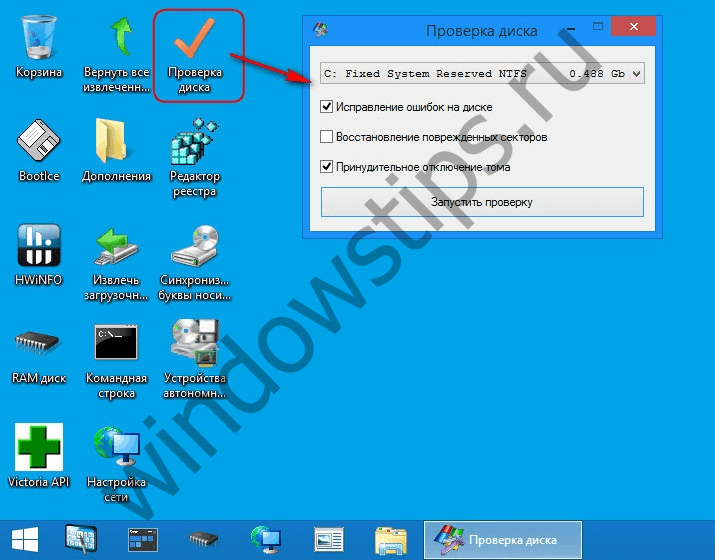
In the drop-down list to check the disk, select the desired disk partition. Next, activate the checkboxes to restore bad sectors and forcibly disconnect the partition (volume). Run the check.
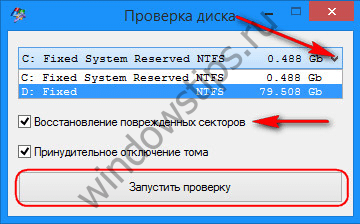
The AdminPE toolkit includes a number of other utilities for working with hard disks, as well as the well-known programs Hard Disk Sentinel and Victoria.
Have a great day!
I have already raised the topic of servicing hard drives, namely, wrote. Today we will discuss another tool to ensure the stable operation of your computer and the security of valuable data.
It will be a tool for fixing file system errors on disk and for. As many have already guessed from the title, it will be a question of the utility. Chkdsk.
General description of the program features
After failures, unsuccessful shutdown of the computer, problems with electricity, etc., before loading Windows, sometimes you can see the following picture:
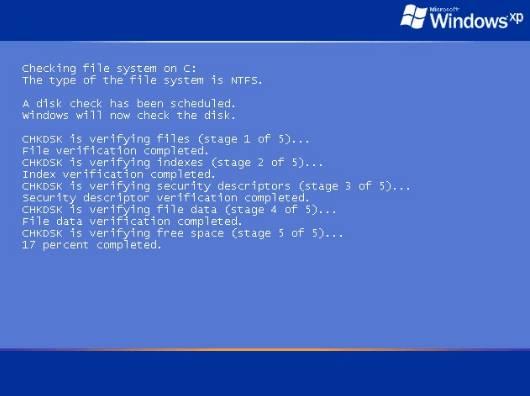
It happens that some users confuse this phenomenon with, but this is not it (even if the design here is also blue). This window means that the built-in Windows utility called Chkdsk (Check Disk is a disk check), which deals with what it is looking for (or a floppy disk) for file system errors that may have occurred during unforeseen malfunctions of the computer or the disk itself. Just about this small utility and will be discussed in this article.
In addition to the above properties, this joy (in the Windows NT, Windows 2000 and Windows XP operating systems) can also check the surface of the hard disk for the presence of physically damaged sectors (the so-called bad sectors). Found sectors are marked as damaged, and the system no longer tries to read from these sectors or write any information on them.
Actually, the presence of this program is infinitely useful because without it, after failures, the hard disk and file system would have been extremely difficult. As a rule, automatic launch of it can speak about failures not just in the file system, but also on the hard disk itself, which should give you an idea of valuable information and preparation for replacing the above-mentioned device.
How to run and use Chkdsk to test
It happens that you have a suspicion of unstable hard drive (just may well be a reasonable suspicion), and the utility Chkdsk did not start automatically. Then you can start the disk check yourself. This can be done in two ways.
First (graphic):
Open " My computer", right-click on the disk you want to check, then select" Properties" - "Service" - "Run check".
In the next window, check both the checkboxes and click the button " Launch".
And wait for the end of the test.
In case you check the section with Windows, you may receive a message about the impossibility of verification. This is normal and the check will be scheduled for the next run, i.e. will be made when the computer restarts.
Option Two (via console):
Choose " Start" - "Run" - "cmd" - "oK".
A console will appear in front of us where we enter the command:
chkdsk with: / f
Where chkdsk is the command itself, with: - this is the drive letter that we want to check, and / f is the parameter that specifies the correction of disk errors. Accordingly, if you need to check another disk, for example D, then we specify:
chkdsk d: / f.
As with the graphical solution, if you check the system partition, you may get the error: "Could not execute the Chkdsk command because the specified volume is being used by another process. Should I check this volume the next time I restart the system?". In this case, click on the Latin keyboard Y(do not forget to switch the language) and click on the button Enter and then, during the next boot, the utility chkdsk check the specified disk for errors and fix them.
Afterword
Chkdskin spite of the utility, you shouldn’t run too often, or rather it’s recommended to touch it in case of serious failures in order to restore the file system and restore the hard disk to normal operation to ensure information security. If you really really want to start just "for prevention" (c), then it is better not more than once every six months.
As usual, if you have questions, I am ready to answer them in the comments, or.
The hard disk of the computer is a very sensitive component. Appearing errors in its file system, bad sectors on the surface, mechanical problems sometimes cause a complete computer system failure.
The same problems are characteristic of flash drives, which in their essence are practically no different from the hard drive. How to determine the presence of errors and bad sectors and how to fix them if possible?
Just a bit of theory
Many simply confuse file system errors and bad sectors. Therefore, we will try to clarify the difference between these phenomena and the reason for their appearance. Also, we will determine what symptoms may be manifestations, errors that appear on the surface of the hard drive.
File system errors
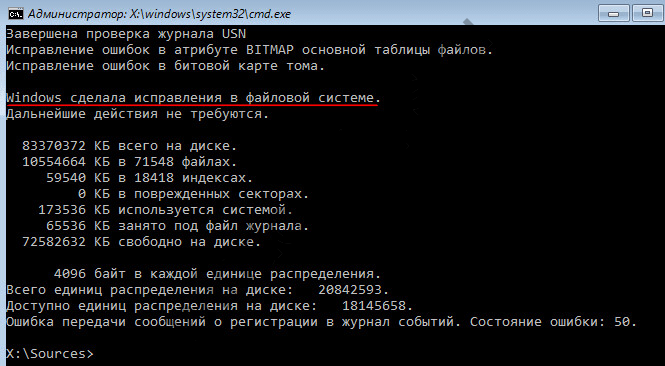
When people talk about hard disk errors and trying to fix them with the built-in Windows utility chkdsk, they most often mean file system errors. Such errors are associated with problems of metadata describing the file system itself: errors of the $ Bitmap, $ BadClus files, the main file table, various indexes.
For example, errors in the $ Bitmap file of the NTFS file system can cause the system to incorrectly recognize the amount of free space on the volume. And problems with the $ BadClus file can lead to incorrect definition of bad sectors and an attempt to write data to such sectors, which will cause a complete freeze of the computer.
Broken sectors
The nature of broken sectors is somewhat different. The hard drive is “sliced” into sectors still at the factory during production. It is then that its logical structure is created, then it receives magnetic properties for recording data. These structures become faulty as a result of the gradual degradation of hard surface areas, which become so due to careless handling of the hard drive, which inadvertently once fell to the floor or was hit on the case with an ordinary screwdriver.
Testing programs that fall on parts of the degrading surface reveal the so-called bad or bad sectors - the bad sector. Lost magnetic properties of the sector do not allow reading and writing data in them. Eliminate bad structures hard drive possible. To do this, manufacturers create special reserve areas of sectors. When a bad sector is diagnosed at a certain address, its address is reassigned to the sector from this reserve area.
Symptoms of errors and bad sectors
We have already told a little about the symptoms of the file system errors above. However, the symptoms are sometimes very diverse. Let us give some manifestations of errors and broken sectors encountered in the hard drive.
- A noticeable hanging of the operating system during read and write operations.
- Failure to boot the operating system. For example, the download only continues until the download notification and the Windows logo appear.
- Frequent occurrence of errors in the operating environment.
- Extremely slow and unproductive work of the operating system.
Here is a far from exhaustive list of errors caused by file system problems and the presence of degrading hard disk areas. What to do in such cases?
We check errors by means of Windows
Checking and fixing file system errors in Windows is done by a regular utility of this operating environment called chkdsk. It can also be useful in eliminating software-based bad sectors caused by viruses. It can be run both in a graphical environment and from the command line. Consider the most affordable version of its implementation in a graphical environment.
Verify inactive volume
Verifying an inactive volume is the easiest. You can run it completely in graphical mode. By an inactive volume, we mean a partition on which the current operating system is not installed. This may be another hard drive connected or, for example, drive D.
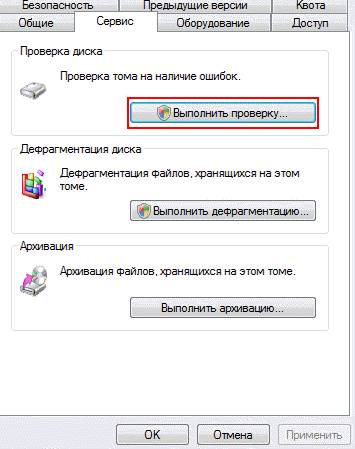
Click the "Run check" button.
The utility is launched from the “Tools” tab of the volume properties. In this tab there is a button "Run check". If you click it, the chkdsk utility window opens. To check for bad sectors that appeared as a result of program errors, you need to check the box next to the corresponding option. Next, just press the "Start" button - the utility will check and correct errors.
The chkdsk utility checks volume D, diagnosing also bad sectors.
System Volume Check
Checking and correcting errors of the system volume, where the operating environment is valid at the time of the check, is done a little differently. The utility defines such a volume as connected, and therefore warns that it cannot perform the check, but offers to perform it at a subsequent reboot.
The chkdsk utility reports that it cannot verify the disk.
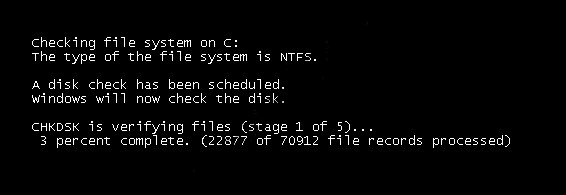
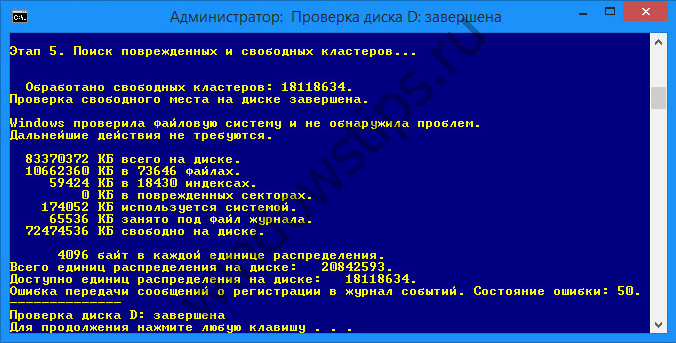
After restarting the computer, the user will find that during the bootup, after the appearance of the Windows emblem, a black screen appears. This black screen is gradually filled with lines of text. This is the chkdsk utility that checks the hard disk system volume. After checking and necessary corrections, it will show the result, and then the operating system will continue loading.
The chkdsk utility checks Volume C after a reboot.
Programs for checking the hard disk on the bad sector
There are a number of applications on the software market that can test the surface of a hard disk. In this case, not one of any volumes is tested, but the entire surface of the hard drive. Of course, the user can independently set the boundary sectors and test individual areas. To determine bad sectors, a test is usually carried out on reading sector data.
Important: test results for the presence of bad sectors should definitely be considered in conjunction with SMART indicators, such as Reallocation Sector Count, Reallocation Event Count.
Data Lifeguard Diagnostic
This utility was created by Western Digital. It is available for download on the official website of the company. Lifeguard Diagnostic works great with hard drives from virtually any manufacturer, not just hard WDs, as one might think. It offers a series of tests: Fast, Advanced, and the ability to fill the sectors of the hard drive with zeros.
The interface of the Data Lifeguard Diagnostic utility.
We are most interested in the advanced test. This test can detect bad sectors on the surface of disks. When the program finds a bad sector, it informs the user about it, prompting it to choose whether it wants to correct the detected error. If he agrees, the application writes to sector 0, so the sector data will be lost.
A selection of utility tests. We need an extended test.
The duration of this test is longer than the quick test. The testing time depends on the size of the drive, since the test is carried out to sweat the entire surface, starting from sector 0 and ending with the maximum LBA value.
Extended test utilities at work.
HDDScan
HDDScan application also seems to be an excellent tester of the hard drive surface. It can often be seen as part of entire software systems such as the LiveCD. This application has a graphical interface and offers a number of tests, among which in our case the most interesting “Surface Tests”.
Select the Surface Test from the drop-down list.
Important: when testing the surface from under Windows, it is necessary to close all running programs in order to avoid random results during the test, initiated by the action of these programs.
After selecting the test, an additional window will open, in which the test parameters are presented. Let's leave the “Read” option enabled, which will only allow reading data from sectors. So, we will define sectors from which it is impossible to consider information for the established time (bad sector), sectors of lag and normal cells. The fields of the initial and final sectors will be left unchanged if we want to check the entire surface.
Leave the Read test option enabled.
When testing this program revealed a number of sectors:
- bad sector
- sector freezes, which take more than 500 ms to read data,
- sectors with readout time from 150 to 500 ms,
- sectors with readout time from 50 to 150 ms,
- sectors with readout time from 10 to 20 ms,
- normal HDDScan considers such sectors whose data is read in 5 ms.
The result of the program test is available in the form of a line graph, a map of the distribution of sectors, as well as in the form of a plain text report.
Check the surface of the hard drive.
Ashampoo HDD Control
Unlike the above programs, HDD Control is not a free program. This application is a whole set of tools designed to restore the health of a hard disk. This program also offers the ability to test the surface of the hard drive.
Select the option "Surface Testing".
The test is very simple and accessible to the ordinary HDD Control user. To start it you just need to press the button "Testing the surface." He is deprived of additional options that would allow to customize the look of the test. When testing, only two types of sectors are identified: with an excellent reading result and a bad sector.
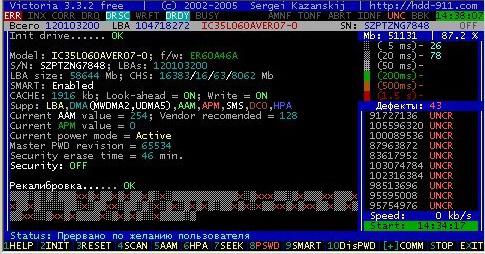
Victoria HDD
Victoria considers the health of the checked hard disk "GOOD".
This application is able to collect information about the SMART-health of the hard drive. Also, it allows you to test the disk surface, reassign the bad sectors with the Remap operation, reset the bad sector. It also divides the sectors into groups:
- bad sectors (Error),
- hangup sectors with a readout time of more than 600 ms,
- hangup sectors with readout time from 200 to 600 ms,
- sectors with readout time from 50 to 200 ms,
- sectors with readout time from 20 to 50 ms,
- victoria's normal sectors are diagnosed as part of reading data up to 5 ms.
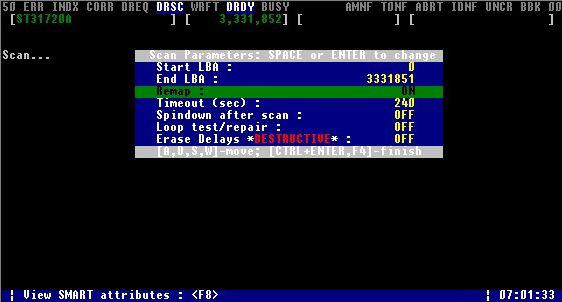
To test your hard drive, you can run this program in Windows graphics mode. Next, you need to select the tab "Tests". This is where the surface tests are located. There are four options for working with hard surfaces:
- Ignore,
- Remap,
- Erase,
- Restore.
First of all, Ignore test can be carried out to determine if there are bad sectors on the hard drive surface. If they are, then you need to proceed to the test Remap. This test will allow you to reassign addresses of bad sectors to the reserved area where normal sectors are located.
Types of available tests and categories of sectors. Victoria checks the surface.
If after the test Remap Victoria continues to diagnose bad sectors, you can still try to restore their performance by applying the Restore test. The Erase option should be used wisely from under Windows, since it writes zeros to sectors - erases sector data. It can be used only within a sample of sectors whose data is not related to the operating system.
Short summary
It should be noted that there is a difference between the errors eliminated by the chkdsk utility of the Windows operating system and the bad sectors that are fixed by programs like Victoria HDD. The former are caused by file system problems, and the latter are often the result of the loss of magnetic properties of the hard disk surface sectors and its gradual degradation. However, chkdsk is able to fix some problems of bad sectors.
To eliminate the bad sectors, you can use such applications as: Data Lifeguard Diagnostic, Ashampoo HDD Control, HDDScan, Victoria. Highlight the Victoria HDD application as the best for checking and eliminating bad sectors, as it offers a number of tests: Ignore, Remap, Erase and Restore. It allows you not only to detect bad structures of the hard surface, but also to heal the HDD.
Errors occur. Checking the drive for errors can be performed as built-in operating systems, and third-party. Often, errors on the HDD accumulate gradually and for the time being do not create any inconvenience. When their number becomes large, the OS can start to act up, and in the most neglected cases it is possible to lose all the information stored on the drive.
Causes of errors
In most cases, errors on HDD are caused by:
- incorrect software operation;
- improper power failure when the operating system is running;
- computer freezes while recording to HDD
So that the consequences of errors did not lead to the saddest result, the disk should be checked for errors from time to time.
Chkdsk utility
In any operating system of the Windows family includes its own tool - chkdsk. It can be launched both from the graphical shell and from the command line. The second case is very convenient if the OS does not boot, and all manipulations are performed from the recovery console.
Graphical interface
Open the explorer by double-clicking on the "Computer" icon on the desktop. (Here and below: RMB - right mouse button, LMB - left mouse button.)
- Right-click on any logical drive that you want to check.
- In the menu that opens, click on the line "Properties".
- At the top of the properties window, click on the "Service" tab.
- Click on the "Run check" button.
- Here put both checkboxes in the checkboxes and click on the inscription "Run".
If the selected partition is not a system partition, the disk check for errors will start immediately. If you wish to check the C: drive, the OS will display a notification that the operation cannot be performed at this time. Do not consider this behavior of the OS a failure. Since the partition contains all system data, it cannot be disabled while Windows is running.
Just click on the "check schedule" button and restart your computer. After turning on the PC, the disk check for errors will start before the operating system is loaded.
Command line
To run the chkdsk utility from the command line, do the following sequence of actions.
- Right-click on the desktop and select "Create Shortcut" in the context menu.
- In the window that appears, you will be prompted to select the executable file, but the easiest way is to simply enter "cmd" in the input line and click "OK".
- Now click RMB on the shortcut you just created and select the line "Run as Administrator". A command prompt opens.
- Enter: chkdsk [section letter]: / f / r.
As with the launch from the graphical shell, the disk check for errors will notify you that program execution is impossible if you specify a system partition. At the same time, the question will appear on the screen: "Do the task after the PC restarts?" Press the Y key to answer in the affirmative, or N if you do not wish to check the HDD.
If the OS does not boot
If the Windows file system fails to start due to a problem, the hard disk check for errors may be started from the Recovery Console. Open the BIOS by pressing the DEL key on the startup screen of the computer. Install the laser disk drive as a First Boot Device. Insert the disc with the Windows Installer.
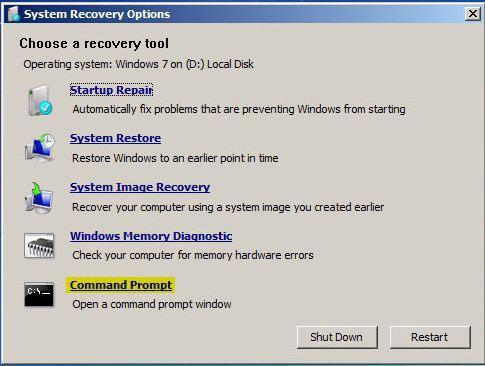
After downloading from the DVD, the language selection window will open. At the bottom of it will be located the item "System Restore". Remember that when errors occur on the HDD, it is pointless to roll back to the early recovery points, overwriting the data can lead to even greater problems.
In the window that offers a choice of recovery options, click on the "Command Line" button. The command syntax remains the same - chkdsk [drive letter]: / f / r. In this case, the disk check will start immediately without rebooting.
Third-party software
If the chkdsk utility did not lead to a positive result, and critical errors due to HDD continue to occur, you should perform a more thorough check with the help of special programs. Hard drive manufacturers themselves produce special tools for testing their equipment. In addition to this software, you can use Victoria and MHDD applications.
Be prudent! Checking the disk for errors by a third-party application should be performed only after creating backups of all important data. And you need to keep copies of the data in the external storage.
Tools for diagnosing HDD can be found on the CD-ROM that came with the drive, or on the official website of the manufacturer. Important: always use such tools only for testing those brands of "hard drives" for which they are intended.
Victoria
Victoria program can be downloaded from the official site for free. In this case, it is advisable to download not a Windows application, but a boot image, which can be burned to a CD using, for example, Daemon Tools.
After burning the image, reboot, enter the BIOS, and select the CD-ROM as the first boot device. After starting the program, press the F2 key to read the passport of the drive and make sure that the program can access it. If you have several HDDs installed on your computer, you must first select the one you want to work with by pressing the P button. Checking the hard disk for errors will start after pressing F4. All error information will be displayed in the "Messages" area.
Mhdd
The MHDD utility, like the previous one, needs to be burned onto a CD and then downloaded from it. On the main screen, you will need to select the device with which the program will work. In this case, you will have to press the key with the number, opposite which the drive name is located.
To check the hard disk for errors started, press the F4 button. A list of advanced options appears on the screen. Without changing anything, press F4 again. During testing, statistics will be displayed on the right side of the window, if a number other than zero appears opposite the X and S characters, it means there are bad sectors on the disk.
So, the disk check for errors has been completed, the program has found many problem sectors. How to fix them? To get rid of the bad sections on the drive, press the F4 key again, but this time in the advanced settings window set the value On to the Remap parameter.