Let's get to the task at hand:
1) First, download the program through which the replacement will be made. (or ). Unpack it somewhere and run it.
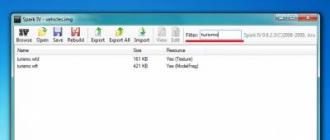
3) We open it. Next, you need to find the files of the machine that you want to replace. Just type in the name in the field filter in the upper right corner ( tourism, For example). By the way, not necessary change Turismo to Turismo. In the case when the author of the mod offers you to replace the model you have already replaced, you can easily replace the new model with any other standard model of the game. It is required that it be one class of transport (two-door, with opening headlights, four-door, etc.).

4) Now you need to replace the found files (sometimes just one) with the ones you downloaded. Look in your archive and see what files are there.

We only have turismo.wft here (do not confuse the extensions), so we will only change it. It is done like this:
Click on turismo.wft in Spark "e;
- Click "Import";
- In the window that appears, we are looking for a file from the archive with the downloaded car;

We open it;
- Click "Rebuild" (a window will pop up);

We close the program, the car is installed in GTA 4.
5) In some cases, you will need to change colors and control settings using notepad. This item is optional. And it is difficult to write it down in general terms. For GTA 4 Episodes from Liberty City, the settings files are encrypted. You can always replace them.
It should be noted that the files you work with and which store car data (handling.dat, carcols.dat) must be cleared of the "Read Only" attribute.
P.S. In the same way as described above, the replacement weapons(weapons.img), clothes, textures and models characters(playerped.rpf).
If you still have any questions about installing cars and other mods in GTA 4, please. Questions in the comments are equated with a flood and are deleted.
Thanks for understanding!
III. How to add a car to GTA 4?
If you do not want to replace existing machines, but add new ones, then this instruction is for you. Of course, this is not an easy task, but it is worth it.
|
|
IV. How to change clothes and stuff?
Just like cars. The only thing you need to edit other files. For example, for clothing or replacing the main character entirely:- "...\Rockstar Games\Grand Theft Auto IV\pc\models\cdimages\playerped.rpf"
And to replace the pedo:
- "...\Rockstar Games\GTA IV\pc\models\cdimages\componentpeds.img"
V. How to replace sounds?
For weapons:- From "...pc/audio/sfx/resident.rpf" using SparkIV or OpenIV export the file "weapons.ivaud";
- Open weapons.ivaud using the program and replace the standard sounds with new ones from the archive with the mod;
- Save the changes to weapons.ivaud, import it back into resident.rpf and save the changes again.
For machines:
- From "...pc/audio/sfx/streamed_vehicles.rpf" using SparkIV or OpenIV, export the desired file, for example, "MUSCLE_CAR_3.ivaud" and so on.
V. How to change weapons?
Just like cars. The only thing you need to edit another file is:- "...\Rockstar Games\GTA IV\pc\models\cdimages\weapons.img"
|
|
Tell your friends!
How to install cars in GTA?


Fans of GTA games can be found all over the world. Due to the wild popularity of these games on the Internet, you can find many different modifications to them. The most common modifications to the last two parts of the series: GTA San Andreas and GTA 4. These modifications add many new items to the game: new weapons, locations, characters and, of course, cars. Let's focus on cars and find out how to install cars in GTA.
You can read about installing various mods for the GTA game in the article.
Installation of cars in GTA San Andreas
To install new cars, first of all, you need to download the archive itself with the files of the car you want to add. Similar file archives can be found on various gaming forums and websites. After downloading the archive, the files must be installed. To do this, you need to download two programs:
We proceed to the installation of the car. The installation process itself is quite simple and does not take much time. Before installing mods, be sure to make copies of the Data and Models folders.
- Unpack the archive with the files of the new car into a separate folder;
- Launch the IMG Tool 2.0 program and click the File button;
- In the menu that opens, specify the path to the Models folder in the game directory;
- In the program window, open the GTA3.Img file;
- Often the installation of new cars is done by replacing standard gaming cars. When installing a new machine, find the files with the same name in the folder with game materials and replace the standard files with new ones. In the program window, select the necessary files and delete them, then add new files to the same directories.
The car is installed, but you don't want to look for it on the roads of a virtual city, do you? Use GTA Garage Mod. With it, you can add any car to any garage in the game world.
Installing new cars in GTA 4
To install new cars in GTA 4, you need the SparkIV or OpenIV program.
- First install one of these programs, they have a similar interface and functionality. Run the program of your choice;
- In the program window, click the Browse button and find the vehicles.img file in the game directory;
- In this archive, find the files of the car you want to replace and select them. Unzip the files of the new car from the archive into a separate folder and drag the files to the program menu, or click the Import button and specify the path to the files from the archive;
- Next, click on the Rebuild button, and the installation of new files will be completed.
Mods allow you to transform almost any game. So quite old projects get new graphics, or characters of a completely different one are added to one game world. Sometimes these files are used to work with gameplay. It can be completely redone or partially improved. Many are interested in how to install a mod on GTA San Andreas.
In general, installing mods is one of the activities best left to relatively experienced PC users. This process involves replacing existing game files with new ones., and sometimes making changes to the old ones. In this regard, if a person does not understand a computer at all, it is better for him to provide such work to someone who is unlikely to spoil everything.
Folders and existing mods
For starters, it's worth considering what folders and files the original game has. For some of them there are already many modifications, while others are almost never touched. For example, this can be said about the anim folder, which stores the animation of characters and various processes.
- Audio, as the name implies, contains the sound component. It is quite often used when installing mods aimed, for example, at the voice acting of characters, or, alternatively, at the sounds of the forest and animals.
- Data is in the highest demand. Most players are looking to diversify their weapons, improve vehicles or some characteristics - all this will be associated with this place. It is also where the data responsible for the plot is stored.
- Movies contains gameplay videos, titles, and logos. Usually no one touches them.
- Text stores subtitles. Various Russifiers are also added here.
Only a number of files remain, like ReadMe, stream.ini, Install, vorbis.dll and some others. All of them have nothing to do with installing mods, and therefore are not required for such a process. The only point is that stream.ini is used by some programmers to work with optimization.

How to install mod on GTA San Andreas?
Thanks to mods, you can greatly diversify the game, literally give it a second life. In most cases, for each downloaded extension, its author attaches detailed installation instructions. Just follow it and you'll be fine.
Most often, to work with modifications, you have to download and enable a specialized utility called Crazy IMG Editor. In general, the preparatory process is as follows:
- You need to install the original version of the game.
- You need to get into the root folder and find a section called "models" there.
- Inside it is a file gta3.img. It must be copied to the desktop or to some other folder. If it happens that the installation of mods will lead to some serious problems, it will be enough to throw this file back into the game folder and confirm the replacement.
- You need to download the above program. Most often, it is completely in English, but, having gone through the File-Language path, you can change the language to Russian by checking the box.
Now you can proceed directly to work with mods. First, you need to run the program and use the Open button to find the gta3.img file (not the one that was copied, but located in the data of the original game).


How to install mod on GTA San Andreas:
- After successfully uploading the file to Crazy IMG Editor, you need to click on Edit and select Add with replacement from the available options.

- A window will appear in which you will need to find the pre-downloaded mod. Select it and click on Open.

- If everything is done correctly, then the phrase Files added will appear at the very bottom of the program window.

- Now you need to click on File and select the Rebuild archive item there.

- Another window will appear in which you need to find the models folder. It was from it that gta3.img was previously copied, so there should be no problems.
- You need to save the changes made and confirm the replacement of the files.

The green bar below will indicate that the process is in progress. When it is full, the phrase Archive is open will appear on the left side. This indicates the completion of the installation. You can turn on the game and check if everything worked out correctly.

Other programs to install
In order to install modifications on cars and parkour, you can turn to other programs. For example, there is GTA Img Pro. The work will again be carried out through the gta3.img file.
- You need to run the program and set the path to this file in the settings.

- The pre-downloaded mod is unpacked into a prepared folder.
- Through the Add section, unzipped data, in txd and dff formats, is loaded into Img Pro.

By pressing the Replace button, the resulting modification is loaded into the GTA. This completes the process. Another option is the GTA Garage Mod Manager program. It is used not only for working with extensions, but also for viewing variety 3D models. With its help, you can study the characteristics of gaming equipment. Sometimes mods loaded this way do not display correctly in windowed mode, but otherwise look normal.
How to install mod on GTA San Andreas cars:
- First you need to download the necessary modifications and unpack them.
- After that, the program starts.
- In it you need to find the Installer button.
- After pressing, the item Manual Car Installer is selected.
- In the window that appears, specify the path to the required files.
- To add new machine characteristics, you need to copy them from the ReadMe file and place them in the appropriate place in the program.
It remains only to click on Install to load the modification into the game.
Movement in the game world of GTA San Andreas is limited to walking, running, small jumps and driving. To add variety to this, you can try to use the modification. How to install mod on GTA San Andreas parkour? Usually it is enough just to unzip the downloaded file into the game folder.

Working with skins and possible problems
Some modifications do not replace the existing game model, but, as it were, paint it by adding a skin. Most often, the IMG Tool is used to install such mods. It opens gta3.img. From the list that appears, delete the txd file and replace it with the car mod.
- Approximately the same method is used to load skins for outfits and character appearances.
- In this case, the player.img file is opened through IMG Tools.
- From here they remove txd and insert their own skins instead. Typically, clothes loaded in this way are found either in the protagonist's closet or in stores.
- To add skins to weapons, exactly the same method is used as when working with cars.
When installing absolutely any mod, you need to remember that a lot depends on who and how did it. Such files are not an official element of the game and are often developed by amateurs, so no one is safe from a variety of bugs and errors. Sometimes problems arise due to the fault of the wrong installation process.
It is worth making out one more point. Having loaded a car mod into the game, it is easy to run into a situation where you have to run around the whole city in search of it. To avoid having to do this, you should turn to the help of Garage Editor.
- You need to enable GTA San Andreas.
- Press Alt+Tab.
- Turn on the program.
- Choose a garage in it, located as close as possible to the character.
- Add the desired car there.
It remains only to expand the window with the game and hold down Alt + Tab again. If everything is done correctly, then a loaded machine will appear nearby.
Video instruction
GTA 5 has a huge collection of all kinds of vehicles in its assortment, which can satisfy the needs of almost all fans of this series of games from Rockstar Games, as well as ordinary enthusiasts. However, sometimes in GTA 5 you want to see some unusual car, which, in principle, cannot be in the world of the Car Theft. What to do in this case?
Answer: just take it and add it to the game. You can easily find files with the car you need on the net, and then insert them into GTA 5. There are three ways in which you can add the desired vehicles to the last part of GTA - replacement, automatic and addon. In this guide, we will look at these methods. First, let's look at the replacement method,
How to install cars in GTA 5
Installing mods on cars in GTA 5 - a way to replace
First, let's turn to the method of installing a vehicle in GTA 5 through replacement, since it is much more reliable than its automatic version. To start installing the desired vehicles, you need to go to the official website of the OpenIV utility and download the latest version of it from there.
Once you download the installer to your computer, run the file ovisetup.exe and install the OpenIV utility in the specified directory (it cannot be changed). This is where the most difficult part begins. Having previously downloaded the car you need from a third-party resource, you have probably already read on the mod page that its application is carried out by the principle of replacing the files of the original vehicle with the files of the modified one.

In order to best explain the process of replacing one vehicle with another, let's take a look at one small example. An explanation of the process will be given using the Bugatti Veyron mod as an example, with which you can add the car of the same name to the GTA 5 game world. Download the archive with this mod, and then extract the files from it to any directory convenient for you on your computer, for example, to the Desktop. So, to add a Bugatti Veyron replacement to GTA 5, you will need to do the following:
- open the installed program OpenIV;
- specify which game you want to interact with and set the path to the game's executable file - GTA5.exe;
- then you need to activate the Editing mode in the utility - click the corresponding button in the window menu bar;
- go to directory GTAV\mods\x64e.rpf\levels\gta5\vehicles.rpf
- highlight extracted files Adder.ytd, Adder_hi.ytd, Adder.ytd(they are located in the Replace folder of the downloaded mod) and drag them into the OpenIV program window;
Ready. You confirm the replacement of the files of the original Adder, after which the real Bugatti Veyron will start racing on the streets of Los Santos instead. As you can see, the process of adding a car through replacement in GTA 5 is extremely simple and does not take more than five or ten minutes.
Of course, different vehicle mods will have different directories for replacing the original vehicles, so you will always have to carefully read the information posted by the author of the modification. As a rule, most of the vehicles you need will be located in the following three directories:
- GTA5\x64e.rpf\levels\gta5\vehicles.rpf
- GTA5\update\x64\dlcpacks\patchday2ng\levels\gta5\vehicles.rpf\
- GTA5\x64w.rpf\dlcpacks\mphipster\dlc.rpf\x64\levels\gta5\vehicles\mphipstervehicles.rpf\
In most cases, you will need to open these three directories in OpenIV's Edit mode, but there may be others. Many users also ask the question from time to time: how to find the added car in GTA 5? The answer to it is extremely simple and, having read the material on this page, you probably already guessed what it is like: by the name of the previously replaced transport. You are replacing the original vehicle with a modified one, which means that the name will remain exactly the same.
Installation of cars in GTA 5 - automatic
Ok, if for some reason you do not want to perform the above steps with OpenIV, despite the fact that they are extremely simple, you can use a utility called Vehicle Installer, which will automatically replace the original vehicle with the downloaded modification. Download it from any source convenient for you, and then run it.

You will see a small window with several options. Frankly, the Vehicle Installer program is essentially semi-automatic, so you still have to tinker with the settings in it a little, but everything is much simpler than in the installation method discussed above. Let's quickly figure out what you need to do to install a new vehicle in GTA 5.
- Download the vehicle you need and place it in any convenient place. Again, you can place it on the Desktop.
- Find in the instructions for the transport mod the directory in which you need to make a replacement, and remember it.
- Open the Vehicle Installer utility.
- Select the directory where the root folder with your installed GTA 5 is located.
- Then select the archive with the loaded vehicle.
- Now check the box next to the option that will determine in which folder to install the mod - main or for add-ons (look at the instructions for the mod).
- Click on the "Install" button.
Ready. Automatic installation using the Vehicle Installer is much easier, but you still need to use minimal effort.
How to add a car without replacement in GTA 5?
After reading the above instructions, you may have another question: is it possible to add some kind of transport to GTA 5, but at the same time not replace anything from the original content with it? Of course, there is such a possibility. This method is called adding an addon to the game - and we will now look at how to add a car without replacement in GTA 5.

We will again consider the process of installing the addon in the form of transport using the example of the modification of the Bugatti Veyron, which was used by us in the paragraph about the replacement method. To add an addon to GTA 5, you will again need to resort to the services of the OpenIV program. So if you don't have it yet, download and install from the link above.
Once everything is ready, do the following:
- drag the "BUGATTI" folder into the directory mods\update\x64\dlcpacks\;
- open OpenIV in Edit mode and then go to mods\update\update.rpf\common\data;
- copy the file dlclist.xml, add a line to it
- dlcpacks:\bugatti\
, and then return back with a replacement; - copy extratitleupdatedata.meta, add a line to it
dlc_BUGATTI:/
update:/dlc_patch/BUGATTI/
,
and then return back with a replacement;- save changes and close OpenIV.
Adding an addon to GTA 5 is just as easy: insert the vehicle addon files into the GTA 5 files, and then use OpenIV to add a few lines to certain lists. Of course, in the modification instructions for the transport you need, you may need to do something a little differently, but the general principle will remain the same. Also, do not forget that you will need to resort to the services of trainers or other utilities with which you can call the added vehicles to the game world.
Found a typo? Select the text and press Ctrl + Enter
One of the most interesting areas of modding in GTA 5 is the replacement of cars in GTA 5 on PC with their real prototypes. In this article, we will describe in detail all the possible stages of replacing cars in GTA 5 on PC. Before starting, we advise you to always make backups of the replaced files.
Replacing a car in GTA 5 using the program
At the moment, you can use the program to automatically install cars in GTA 5. The principle of operation of this program is simple, you just need to specify the desired path to the folder that is indicated in the description for each mod and click the install button.
The manual installation method is described below.
How to install car mods in GTA 5 on PC
And so, in order to add a car to GTA 5, you must:
- Install the program . This program is a multifunctional editor and archive manager for GTA 5.
- The next step is the most difficult, you need to find the location of the vehicle model files. The difficulty lies in the fact that the model files can be located in different folders. Below we will give the possible paths for the location of vehicle models (“GTA 5” at the beginning of the path will mean the root folder of the game). Note that the description for each mod will always indicate the desired installation path:
— GTA5\x64e.rpf\levels\gta5\vehicles.rpf\(this path is the most common)
— GTA5\update\x64\dlcpacks\patchday2ng\levels\gta5\vehicles.rpf\
— GTA5\x64w.rpf\dlcpacks\mphipster\dlc.rpf\x64\levels\gta5\vehicles\mphipstervehicles.rpf\
- By going to the necessary paths in the OpenIV program, you will find vehicle model files with extensions .yft, .ytd, _hi.yft. We will replace these files. - You need to activate the editing mode in OpenIV before replacing the files, this is done as follows - open the "File" tab -> select the "editing mode" item. In order to activate the editing mode, click on the button, which is marked in the screenshot below:
- Now unpack the archive with the vehicle model files, select files with extensions .yft, .ytd, _hi.yft mouse and drag them into the program window.
- Note that in our website, in each mod, we indicate detailed instructions for installing them and indicate all the necessary ways to install them. Therefore, if you follow the instructions, then you will not have problems with the installation.
That's all, we have described all the necessary steps for replacing vehicle models in GTA 5 on PC. We hope that a special program will be released soon, which will allow you to easily replace cars in the game.
If you have any difficulties in replacing machines, describe your problem in the comments, we will try to help you.