CrystalDiskInfo is a free program for servicing computer HDDs and SSDs with ATA (PATA, SATA), USB and IEEE1394 connection interfaces. If something strange happens with the hard drive, do not be too lazy to download CrystalDiskInfo in Russian for a computer for free using the link from the site https: // site without registration and SMS. The advantages of the utility include: the output of detailed reliable status information, powerful monitoring and verification tools, as well as effective tools for changing the settings of hard drives. If problems are found, Crystal Disk Info displays a warning and sends the user an e-mail.
Before a large number of bad sectors appear, read and write errors, unpleasant noise, temperature rises, performance decreases, it makes sense to download the useful CrystalDiskInfo program for a computer running Microsoft Windows XP, Vista, 7, 8, 10 (32- bit and 64-bit). The utility is quickly installed on the computer and correctly uninstalled, without "tracking" in the system registry. At startup, the program checks the status of the computer’s hard drive or laptop, it takes some time.
Check, monitor, analyze, graph and change settings
When checking the utility displays detailed information, including about external USB HDDs and IEEE1394. The following are displayed: firmware version, AAM * / APM ** data, interface type, spindle speed, buffer size, operating time, number of bad sectors, temperature and even a graph of temperature dynamics over time, as well as other technical characteristics. S.M.A.R.T *** parameters are monitored, including: the number of read errors, overall performance, start-stops and other data. CrystalDiskInfo dynamically monitors changes in a large amount of data from drives in the system, keeps a log and allows you to beautifully display this in graphs. This format allows you to visually see the overall picture of the health of the computer's disk subsystem.
Those who want to download CrystalDiskInfo for free without registration and SMS, without leaving the site https: // the site can also be found because the utility allows not only to diagnose the hard drive, but also take care of its health. Changing the settings of AAM and APM allows you to control the performance parameters and the corresponding amount of acoustic noise produced, as well as energy consumption parameters. If necessary, zeroing of bad sector counters is possible. In the "Tools" menu there is a link to the system "Disk Management", where they perform all the necessary transformations: create a partition, expand or compress partitions, and more.
CrystalDiskInfo Interface and Functionality
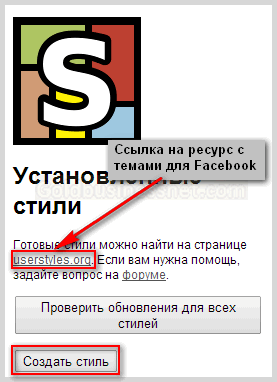
A nice modern interface supports many localizations, as well as themes (skins), three of which are available immediately after launch. Positive feedback and user comments cause an intuitive display of the status in color: blue (or green) - good, yellow - warning, red - problem / alarm, gray - no information.
This small, free, open source utility is developed by the Japanese programmer Noriyuki Miyazaki (known by the nickname Hiyohiyo), so many in Europe and America find the menus and settings confusing. The Japanese do not share this opinion. Unfortunately, there are no hints and explanations about the importance of parameters unfamiliar to a simple computer user, and sometimes you have to turn to the help section to figure it out.
The rich functionality allows CrystalDiskInfo to compete not only with free, but also with paid programs. According to the reviews and comments of many users all over the world, it is definitely worth downloading CrystalDiskInfo for Windows 10, 8.1, 8, 7, Vista, XP (32-bit and 64-bit) in Russian for free. Among competitors, it is worth noting the paid programs HDDlife Professional and Hard Drive Inspector and free [email protected] Hard Disk Monitor with support for the Russian language, as well as paid HD Tune Pro in English. As for the functionality of Crystal Disk Info, you definitely need to know about the following advantages of this utility:
- high reliability of data
- correct interaction with S.M.A.R.T technology,
- monitoring of more than 25 parameters,
- data on current operating modes in real time,
- temperature and data control S.M.A.R.T,
- display of disk temperature in the system tray,
- prompt e-mail about problems,
- the ability to change AAM / APM settings,
- control of speed and amount of acoustic noise,
- settings to save power,
- lack of conflicts with the latest versions of SSDs,
- work with external HDDs with USB and IEEE 1394 interfaces,
- compatibility with a large number of equipment ****.
reference Information
* Automatic Acoustic Management (AAM) - control of the track search time parameter, while the faster the block of magnetic heads moves along the radius when searching, the more noise.
** Advanced Power Management (APM) - energy management.
*** Self-monitoring, analysis and reporting technology (S.M.A.R.T.) - an internal system of self-diagnosis and self-monitoring using the built-in disk equipment with the ability to generate reports and predict the term failure.
**** An exhaustive list of compatible equipment is available on the official crystalmark website in the info domain.
The latest version of CrystalDiskInfo download in Russian
Free software free download
Now you are on the page "Russian Crystal Disk Info - checking the hard drive and taking care of its health", in the Tests section for the computer site, where everyone has the ability to legally download programs for a computer running Microsoft Windows OS. This page was created / significantly updated 11/20/2018. Thank you for visiting the section.
All modern homes have a desktop computer or laptop. Someone needs it for games, someone for work or study. In any case, photos are stored on the computer, some important notes, contact details of people, necessary addresses, etc. And the storage location for all this information is a hard drive.
Not without reason, experienced programmers say that in a situation where a computer has a hard disk error, formatting it is a real disaster. After all, formatting is fraught with the loss of all information. But this is in case if you do not take appropriate measures. But if you notice some errors and malfunctions in the drive in time and fix them, you can avoid this global catastrophe
The main causes of HDD failures are “bad” sectors - pieces of disk space that are somehow damaged.
They are divided into physical and logical. The latter appear when software errors occur and can be corrected, while physical ones cannot be corrected. In the latter case, you will have to replace the hard drive.
Such damaged areas can appear on both magnetic and standard SSD drives.
Causes of bad sectors and errors
Railway failures depend on the type of damaged areas:
- brain teaser “Broken” - are displayed during malware or viruses, as well as during a sudden power outage or power cable during recording;
- physical “Broken” - found on a completely new product. Then you need to contact the manufacturer with a request for a replacement product.
In magnetic drives, “broken” sectors may appear as a result of wear of moving parts of the device, if foreign bodies get on the disk mechanism, and when they fall to the floor. In the latter case, the magnetic head of the disk is scratched, which leads to its errors.
SSDs give errors because they tried to write some information on them many times.
Check the "hard" on the "broken" sector is quite real. Windows has the chkdsk (disk check) application. You need to open the folder on the desktop or in the Start menu "My computer"by clicking on the drive to be scanned. Using the context menu, select "Properties" - "Service". Under the phrase "Check" there will be a button by clicking on which, you can see the number of "broken" sectors.
During the check, the computer will eliminate errors of logical “bad” sectors, as well as mark areas with physical damage.
Attention! You can start the verification system manually, however, if Windows detects “bad” sectors on its own, the utility will start itself when the system starts.
Check Utilities
Some software does not have a built-in check. For such cases, there are special programs that help identify “bad” sectors and errors and, if possible, correct them.
"Victoria"
It is a popular software for searching for damaged areas. In addition to various methods for analyzing and reassigning problem areas, it has a function for searching for damaged contacts in a loop, as well as a function for evaluating the performance of a hard disk. The only "minus" of the program is the lack of official assemblies. Therefore, experts recommend using it separately from the OS.
“HDD Regenerator”
This utility uses its methods to restore “bad” sectors (a combination of high and low signals) and supports any drive connection interfaces.
Minus - the high cost of a license ($ 90).
One of the best and multifunctional tools for checking the device for damaged areas. It has the following functionality:
- restores and reconfigures sectors;
- corrects partition tables
- restores files and creates their backups;
- selects files in a table;
- copies data of deleted partitions;
- backs up data.
This utility uses several methods for identifying problems, as well as the ability to track SMART attributes and clean up the hard drive.
Important! The program supports all versions of Windows, however, it does not scan / test the drive where the OS is installed.
Using it, you can check both one and several hard drives at the same time.
Seagate Seatools for Windows
The application supports all modern Windows systems. Using it, you can do both basic and advanced testing. Simpler than Seagate Seatools for DOSbut less powerful.
A hard disk is an important, but far from perfect, component of a personal computer. For some users, it works unreliably, is "strewed", data from it is lost or can be significantly damaged. One of the most common problems of a hard disk is the appearance on it of the so-called “broken” (bad) sectors, which become the “headache” of many users. In this article, I will talk about the reasons for the appearance of bad sectors on the hard drive, list a number of programs that allow them to be recognized, and also explain how to check the hard drive for bad sectors on your PC.

What are bad sectors?
As you know, a traditional hard disk consists of several rotating magnetic disks, over which magnetic heads move, magnetizing any part of the disk and thus recording information on it (in the form of zeros and ones).
The disc itself is divided into tracks, and the latter, in turn, are divided into sectors into which the information the user needs is recorded.
Due to certain reasons (I will list them below), information from a number of sectors cannot be read by the hard drive. Such sectors receive the status of “bad sectors”, and the system tries either to restore the operability of such a sector (restore), or to reassign the address of such a broken sector to the backup sector (remap), or to conduct its total cleaning of the broken sector (erase). In the case of remapping (spare remap), spare efficient sectors are usually located at the end of the hard drive, and the hard drive spends additional time accessing them, which will inevitably affect the speed of the hard drive, loading various applications and programs. Next I will tell you how to check the computer’s hard drive for bad sectors.

Reasons for the appearance of bad sectors
What are the reasons for the appearance of bad sectors on the HDD? Usually they are as follows:
- The gradual "shedding" of the surface of the hard disk due to its wear, due to which there are more and more bad sectors on the disk;
- Physical impact on the hard disk due to various external impacts;
- Power surges in the network, directly affecting the integrity of data on the hard disk, and leading to the appearance of bad sectors;
- Incorrect shutdown of the computer (incorrect operation), as a result of which bad sectors appear on the hard drive.
Symptoms of the appearance of bad sectors
Due to the described reasons, there are more and more bad sectors on the hard disk, which begins to directly affect the operation of the operating system. In particular, you may notice the following:
- The system is loading slowly;
- The system slows down (freezes) when reading and writing data from the hard disk;
- The system generally refuses to boot (quite often - in the middle of the process);
- The computer sometimes restarts for no reason;
- During the operation of the OS, various errors regularly occur.
After we have described the symptoms and causes of the appearance of bad sectors, we will go on to describe how to check the hard drive for bad sectors.
The best ways to check a hard disk for bad sectors
So how to check bad sectors (and fix them)? Below I will describe a number of methods that have proven their effectiveness in working with various hard drives.
Method 1. We use the system utility CHKDSK
The easiest and most convenient way to find and fix bad sectors on an HHD hard drive is to use the functionality of the CHKDSK system utility.
- To take advantage of its capabilities, launch Explorer, right-click on an inactive volume (on which there is no installed operating system), select "Properties" in the menu that appears.
- In the window that opens, go to the "Service" tab, then click on the "Run Scan" button.
- Check the boxes next to the two verification options, click on "Run", and wait for the process to complete.

The same can be done with respect to the system volume (on which the OS is installed). The only thing that may require a reboot of the system, but after the system reboots, it will begin checking the disk for bad sectors.
You can also run CHKDSK through the console. To do this, run the command line as administrator, and in it write:
chkdsk c: / f / r - (instead of with: if necessary, specify another letter of the problem disk) press enter and wait for the process to complete.

Method 2. We use the Victoria HDD program for analysis and treatment of the disk
Victoria HDD is probably the most popular program for checking a hard disk for bad sectors (and for restoring the latter). It effectively checks and restores bad sectors, has good reviews from experts, and can be used both in classic graphics mode and in DOS mode.
One of the “Wikis” bonuses is the ability to read the SMART indicator of your hard drive, which allows you to track its performance level in sufficient detail (the “SMART” tab of the program). In addition, the Victoria program performs “remapping” (reassignment of damaged sectors), nullifies bad sectors, conducts a detailed test of the hard drive surface, ranking sectors into various groups depending on the speed of reading information from them.
- To use this program, download and run it.
- Then go to the “Test” tab, select “Ignore” there and check the surface for bad sectors.
- If these are found, it is worth choosing the “Remap” mode in the same tab, this will allow you to reassign addresses from bad sectors to backup ones.
- If, after remapping, the bad sectors remain, you can try to restore them using the “Restore” function, while the “Erase” function completely erases the data in the bad sectors by writing zeros there.
In general, the functionality of "Victoria" is quite extensive, and to familiarize with its full description, it is necessary to switch to material specifically about using the program.
Method 3. We use the HDD Scan program to check the hard drive for bad sectors
Another program that can check the hard disk for bad sectors is HDD Scan. This is a fairly popular utility that offers several different tests (Surface Test, Smart Offline Tests, etc.). Select Surface Test, check the box next to “Read” on the right and run a disk surface check.
The program will analyze the response time of existing sectors, and give us the result in graphical mode.

Method 4. Check your hard drive with HDD Regenerator
HDD Regenerator program allows you to check and recover data on your hard drive, the same applies to bad sectors. I note that the program is paid, but those who wish can search the network for its free options.
- To take advantage of the program’s features, you need to run it, select a drive to work with, decide on the scanning mode (I recommend Normal Scan), and then select the “Scan and repair” option (scan and restore).
- Then it will be necessary to indicate the boundaries of the scan (starting from sector 0) and monitor the scanning process itself.
- In difference from the response speed, sectors will be marked with different letters and colors.

Method 5. Scan the disk with the HDD Health program for damaged sectors
Another program for checking the surface of a disk is bad sectors. HDD Health analyzes the general condition of the disk, provides detailed statistics on the available partitions (using SMART technology, which includes the general state of the structure, an indicator of the temperature of disk rotation, the presence of bad sectors, and so on).
The icon of the running program is located in the system tray, the program itself notifies the user as necessary about any problems in the hard drive.

Hard disk recovery, removal of BAD (bad) sectors [video]
Typically, checking a hard disk for bad sectors is carried out using special software tools such as Victoria HDD or HDD Regenerator. The most effective of all the programs listed in the article - Victoria HDD allows not only checking the surface of the hard disk for bad sectors, but also restoring them, remapping and cleaning them. If bad sectors started appearing on your hard drive, then I recommend using the functionality of the above programs, they have proven their effectiveness in working with hard drives of many users.
- One of the most unreliable computer components. With active use, modern hard drives live on average 3 years. Therefore, in order not to lose your data, it is very important to regularly check the status of the drive (and do not forget to make backup copies). In this article we will look at several ways to check the hard drive for performance.
Checking the status of a hard disk using S.M.A.R.T.
If you want to check the hard drive for performance, then you should start with data from the "S.M.A.R.T." system, which can be viewed in the CrystalDiskInfo program. This program is completely free, and you can.
The CrystalDiskInfo program receives data about the hard drive from the S.M.A.R.T. system and gives an assessment of its technical condition. If the hard drive is in good condition, you will see a rating of “ Good conditione. " If there are any problems with the device, then you will receive a rating of " Anxiety. " Well, in case of serious problems, you will receive an assessment of the technical condition of "Bad".
If you wish, you can independently analyze the information from the "S.M.A.R.T." system. To do this, examine the list of parameters located at the bottom of the CrystalDiskInfo window. As a crib according to the parameters "S.M.A.R.T." can be used.
Checking hard drive health under load
If “S.M.A.R.T.” does not show any problems, then the hard drive must be checked under load. To do this, just try to copy a large number of small files (weighing 2-5 megabytes) onto it. For example, you can try to write to a hard disk a large folder with photos. If it is faulty, then the following symptoms should appear when copying files:
- A sharp decrease in copy speed;
- Hopping copy speed;
- Hanging copy process;
- Freezing of a computer or Windows Explorer;
- Not pleasant sounds (crackling, rattle, squeak);
- Drive off;
If such a manual check did not reveal any obvious problems, then you can resort to more serious ways to test the drive.
Checking your hard drive with HD Tune
The next option is to test the health of the disk using HD Tune. This program is free and you can. Just do not confuse with the paid HD Tune Pro, a link to which is on the same page.
Launch the HD Tune program on your computer and go to the “Error Scan” tab. On this tab, you need to start the scan using the "Start" button and wait for it to finish.

If a large number of errors were detected during the scan, this means that your hard drive is in poor condition. Perhaps he will soon fail.
Checking the hard drive in Victoria 3.5
For the most accurate verification, you need to use the program, it can be downloaded as an iso-file, for example, (here is version 3.5, it is optimal for checking HDD outside the operating system). The resulting iso-file must be written to a CD (or USB flash drive) and boot from it a computer. After booting from the CD, you will need to select one of the options for starting the Victoria program. If you have a desktop PC, then select “Victoria for Desktop”, “Victoria for Notebook” is suitable for a laptop, other items launch DOS and the Volkov Commander program.

To start checking the entire surface of the HDD, press the F4 key. As a result, a menu opens in which you need to select "Ignore Bad Blocks" and "Linear reading". Please note that you do not need to use the options “Record (Erase)”, “Record from a file”, or “BB \u003d Erase 256 sect”, since they delete information from the drive.

In order to start scanning, press the F4 key again. After that, you need to wait until the program finishes checking the hard disk. At the end of testing, if the HDD has no problems, then you will see this result.

If the drive has any problem areas, orange and red spots will appear in the scan window. The more such spots, the worse the condition of the drive. If the number of red spots is especially large, then most likely the hard drive is inoperative and it is time to throw it away. Detailed information about the problems will be displayed in the “Defects” block, in the right part of the window.
Checking the hard drive in Victoria 4.46 (for Windows)
Also, the hard drive can be checked for performance using the program Victoria 4.46 from the Windows operating system. In this case, it is not necessary to record iso-images and it is not necessary to boot from them. Everything is done right in the Windows environment.
You can download Victoria 4.46 for Windows, for example. The downloaded archive will need to be unpacked to any folder and run the program vcr446f.exe. After starting, the main window of the Victoria program appears, which looks something like the screenshot below.
First, consider the “Standart” tab. Here, on the right side of the window, all the drives that Victoria was able to identify are indicated, information on the currently selected drive is indicated at the top left (if necessary, you can choose another one), and all actions, errors and other information are recorded below.
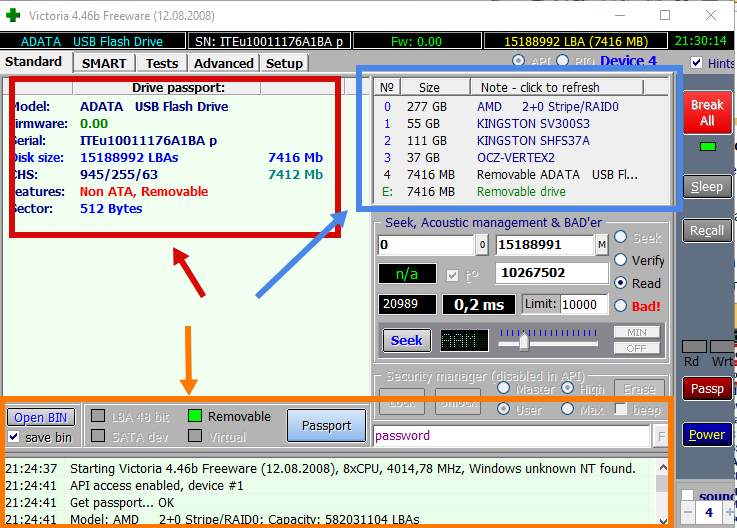
To check the hard drive, go to the "Tests" tab. Here, first you need to click on the “Passp” button (this will allow you to get information about the selected drive), then you need to start the scan using the “Start” button.

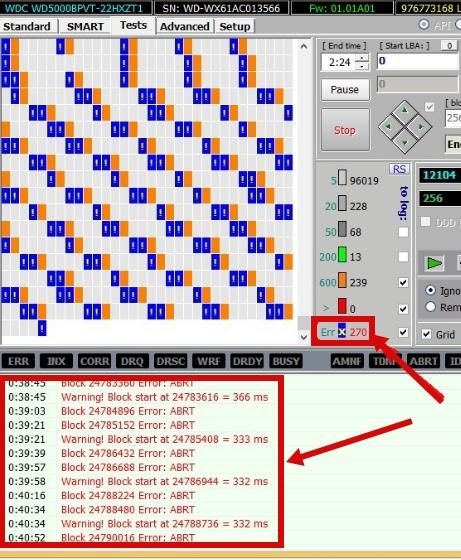
During the verification process, the program will detect bad and problem sectors, the number of which can be seen in the column on the right, as well as in the lower part of the screen.
As you know, all computer data is stored on a small, but often very capacious drive - a hard disk, or hard drive, HDD (Hard Disk Drive). So, like any device, the hard drive gradually wears out, which affects its performance and performance. You may notice this: if your PC (laptop, netbook) is an “experienced” comrade who has been working for more than a year, he may begin to freeze, “think” for a long time when accessing certain folders, etc. These are sure signs of the appearance of “bad” sectors on the hard drive. In this case, he just needs your help in the form of verification and, if possible, correcting errors in the work. You can do this in several ways, I will talk about everything in order. If you decide to figure out how to check the hard drive for errors, then my recommendation is to read this article to the end, and only then begin to follow the steps that are described in this article.
In order to properly maintain your hard drive and extend its life for many years, you need to understand some of the basics of the drive. Therefore, at first I will try to tell in as simple a language as possible what is happening inside the hard drive, and because of which it loses its “former grip” over time, and after that I will mention which programs will help you in maintaining and fixing the hard drive. If you don’t have a desire to delve into the problem literally from the inside, but plan to just go over the instructions like “click here - click here” - move to the second part of the article with a description of the methods and programs for checking the hard disk. The very first section of the material will be devoted to theory, and I will try to make it as interesting and understandable as possible. Go!
How Hard Drive Works and Formatting
A hard drive is a device consisting of several glass / aluminum plates coated with a ferromagnet. Above the surface of each plate (disk) at a distance of about ten nm are magnetic heads that read and write information to the disk.
In the production of hard drives at the final stage, tracks, sectors and marks are applied to the magnetic surface of the disk. This process is called low-level formatting. Thus, service information is applied to the disk. In simple terms, the “magnetization” of service information is higher than that to which we will subsequently fill the disk. That is why user data, files can be written and erased many times, but service information is not.
IMPORTANT: if you read / heard somewhere that low-level formatting will help fix hard disk errors, and you can do it using any program, remember: this operation is performed once and only at the factory using expensive equipment. It is not possible to perform low-level formatting using software at home! Of course, you can format it, but it will not be the formatting that we would like.
Sometimes I resort to such formatting (there are special utilities), but I do this procedure to format the disk when other programs refuse to do this. Ask why this is happening? Because some programs, if they cannot format the disk, write a message, for example, “Formatting the hard disk could not be completed,” and if you use special programs that format several times in the same area, sometimes this option works - when the disk does not lend itself to simple formatting.
The hard drive is equipped with a kind of operating system (not Windows, which we all know and use). With the help of labels and OS commands written on the disk, the drive “understands” where exactly it is necessary to deliver the magnetic head at the current time for reading / writing. The table of tracks, sectors and labels, as well as the disk OS - Firmware, firmware - is stored in a special zone, which is closed to the BIOS and the operating system familiar to us. Therefore, if you suddenly wonder if you need to update the firmware of your hard drive, you should know that this is not necessary. After all, a hard drive is not an IPhone, and it does not need updates for the normal operation of a modern hard drive.
Bad sectors HDD - physical, logical, software
We are getting closer to the problem - the loss of hard drive performance.
So, discs are marked on tracks and tracks are divided into sectors. By the way, the minimum hard disk sector size available to a user is 512 bytes. What happens if a sector suddenly becomes unusable? The Winchester controller gives the command to make a few more attempts to read (at this moment we can see on the other side of the monitor how the PC is slightly “dumb”), and if the operation is unsuccessful, the system marks the sector as malfunctioning (bad, bad block ), and the information that was supposed to be recorded in this sector is recorded in another working sector in the backup section. At the same time, information about the fact that this sector is now considered inoperative is entered in the label table. The process of forwarding from bad sectors to backup sectors is called “remapping”, or “remap” on slang.
Note: imagine: a magnetic head cannot always continuously move along paths sector by sector - because of bad sectors, it has to skip to the backup track and back and forth. For this reason, by the way, you can hear extraneous sounds, crackles from the HDD. Naturally, the more bad sectors on the disk, the slower the hard drive.
Bad sectors are of several types:
- Physical Bad Block. Such sectors arise as a result of physical, mechanical damage to the hard drive - shedding of a ferromagnet, cracks, chips. It is logical to assume that their occurrence is due to physical impact - vibration, shock or high temperature (overheating), dust penetrating into the disk. It is impossible to fix a physical failed sector with any software; the only solution is to put it in the defects table and assign it a “substitute” on the backup track. Therefore, do not knock on your laptop and also be attentive to the system unit of the computer, which is usually placed under the table.
- Logical Bad Block. They are the result of a violation of the logic of the hard disk and are divided into two categories: recoverable and incorrigible.
- Incorrigible logical bad block. In this case, service information is violated - sector label, address, etc., which can sometimes be corrected, but is available only to narrow specialists in the presence of expensive equipment.
- Correctable logical bad block. Together with the information, an additional parameter is written to the sector - the checksum, or Error Correction Code (ECC), which allows you to restore information even in the event of a failure. It happens that you turn off the computer (for example, from a power outlet while the system was still running), the information was written to the hard drive, but the checksum was not entered in the table. Here, in this case, HDD recovery programs come to the rescue, which, without asking the sectors, force zeros into them, and, accordingly, new checksums. After that, the sector returns to work, and the disk is formatted without problems using standard Windows tools. If you do not format, the hard drive will repeatedly access the drive and, due to an incorrect checksum, your computer or laptop will freeze.
- Software Bad Block. The name itself tells us that such blocks arise during the operation of the program, which means that with the help of some program such bads can be fixed. Here we include incorrectly marked sectors and other "small things", which are corrected by conventional formatting.
IMPORTANT: I \u200b\u200bam sure that you all know this perfectly, but just in case, I’ll say: formatting will destroy all your data on disk. Therefore, before formatting a disk, make sure that all the necessary information from it is copied to another medium. Otherwise, you simply lose it.
Standard Windows utilities for checking hard drives
We’ve sorted out the theory, let's move on to practice. There are several applications for working with “problem” hard drives that have established themselves as a powerful and reliable tool. About everything in order.
By tradition, I’ll say a few words about standard Windows tools. Functionality, of course, leaves much to be desired, but to prevent disk errors, it will do. To check a disk using the OS tools, open the "Explorer", right-click on any of the disks and select the "Properties" line in the menu.
In the window that opens, go to the "Service" tab and see that we have few options - you can check for file system errors or run defragmentation. We will not stop at the check (we press the button and check), but I will say a few words about defragmentation. As the name implies, this process is the reverse of the process of disk fragmentation as a result of remap (this was discussed in the theoretical part of the article above). Simply put, defragmentation - organizing the disk table and backup sectors for faster access to the latter and accelerate the response of the hard disk as a whole. It is recommended that you sometimes run disk defragmentation. However, remember: any operation to check or repair a hard disk is a lengthy process, so take some time.
Conclusion: you need to check the disk for errors in the file system and you can also defragment the disk.
Another way to check the disk using standard tools is through the command line. We launch it - click on the keyboard "Win" + "R", then enter "cmd" and click "OK". Next, we write the command “chkdsk C: / f / r”, where “C:” is the letter of the disk being checked, “/ F” and “/ R” are parameters indicating that it is necessary to automatically fix errors, as well as check for bad sectors and try recover information.
Attention! If you cannot use this command, namely, you will not have enough privileges to use this command, then below I will tell you what to do in this situation.
Note: the method that I described above does not save much when it is, so I highly recommend the chkdsk utility, which saved me more than once.

Also note that if your physical disk is divided into logical drives, for example, C, D, etc., then you need to check all your logical drives.
If the disk you are checking is currently being used, the system will prompt you to schedule a disk check the next time you restart the PC, you need to press the Y key: “Y” - “Yes” (“Yes”), and “N” - “No” (“No” ) Then you must reboot your device.
If the disk is free, then a check will be carried out, the results of which the program will display on the screen. Perhaps the program will ask you to disconnect the volume (local disk), in this case also press the "Y" key on the keyboard. Below I showed an example of this message:

If you run the command “chkdsk /?”, The program will give a complete list of parameters that can be used with this utility, but in most cases, the method described above is quite enough for diagnostics.
If the utility writes that you do not have privileges to execute the command, then you must run it as an administrator. It is easy to do. For users who have installed Windows 8 or 10, you must press the "Win" + "X" keys, a menu will open where you must select "Command Prompt (Administrator)". After that, you can safely enter the command you need. If Windows 7 or XP is installed on your computer, then you need to search for “cmd” or “command line”, right-click on it and select start as administrator.

By the way, you can return to the results of the disk check later, even after closing the command line and rebooting the PC. For this:
- Click "Win" + "R", write in the line "eventvwr.msc", click "OK".
- In the "Event Viewer", open "Windows Logs", right-click on the item "Application" and select "Find ..." in the menu that appears.
- Enter “chkdsk” in the search bar and find the corresponding log entry.

Well, we’ve figured out the standard verification tools, now we’ll go over the software from third-party manufacturers.
If your Windows does not boot, then connect the hard drive under test to another computer. Thus, you boot from another hard drive, and you will check your own (on which there may be errors).
Checking a drive with Seagate SeaTools
This program, as the name implies, was released by the manufacturer of the same name HDD - Seagate, but this does not prevent it from being "omnivorous" and working with any drives. You can download it from the official website, the software is free:. At the time of this writing, click on the link “SeaTools Diagnostic Software for Windows” located on the left. After downloading and installing the program, you need to run it.
Next, select the disk that you are trying to restore to normal operation (by checking the left) and click "Basic Tests". Here you can select options for working with a hard drive. In the picture below, I showed what checking options this utility has. You can use all the options that this program offers. You can click on the picture below to see the program interface:
Like any self-respecting utility, there is an image of a boot disk (Seagate for DOS), starting from which will allow you to use the verification functions before loading the OS. For example, when the system does not boot. It is advisable to check the hard drive in this mode. Because this way you will not have problems checking.
In addition, the program has a “Help” section, which is completely in Russian.
Checking Western Digital Drives
The following utility is more specific and designed to work exclusively with Western Digital HDD. Her name is Western Digital Data Lifeguard Diagnostic. To download the program, go to the manufacturer’s website http://support.wdc.com/downloads.aspx?lang\u003den, find the program in the list and download it. Next, run the program, right-click on the desired drive and select “Run Diagnostics”.
Traditionally, there is a version of the bootable iso image and the capabilities are similar to the previous software, the interface is elementary.
Disk Analysis with HDDScan
I will mention another worthy representative of the “army” of fighters with hard drive errors. It is worth noting here the check function in the linear recording mode - “Test” - “Erase”. When starting the program, sector by sector forcibly writes data, thereby returning the majority of bad sectors to work (this was also mentioned above). By the way, if it is possible to disconnect the hard drive from your PC and connect to another with the installed HDDScan on board, then use this test option. This way you will achieve maximum validation efficiency. You can download the program on the site. After downloading you need to unzip the archive, go to the unzipped folder and run the file “HDDScan.exe”.
To run the test, select your hard drive on the left, then click on the picture with the hard drive and select “Surface Tests”.
In the window that opens, leave everything by default - “Read” and click “Add Test”. So, we started the scan, now we can click on the “RD-Read” record by double-clicking the left mouse button to open a window where there will be detailed information about working with the hard drive.
If you have a lot of delays - from 20ms and above, then this means that your disk is already very bad and you need to think about where to copy all the important data that is on hire. In the future, you need to replace the bad hard drive with a new one. It is advisable to use the program on another computer so that no processes interfere with checking your disk.
Hard Drive Recovery in Victoria
So we got to perhaps the most popular tool for revitalizing magnetic data storage devices. This program is sometimes very problematic to download from the official site and therefore I will give you a link to another site where you can download this program http://www.softportal.com/software-3824-victoria.html. I always try to give links only to official sites, but sometimes developer sites do not open for some reason, and so I had to give a link to third-party resources. This site is popular and therefore do not worry about viruses.
After downloading the archive, unpack it and run the program as administrator. Be sure to take this step!

At the beginning of the work, select the “Standard” tab, and in the window on the right, select the desired drive, and then click on the “Passport” button. In the log window below you will see how your HDD is determined. If a log appears in the log, it means that the program was able to read information from this hard drive.
If this did not happen, and you saw “Get S.M.A.R.T. command ... Error reading S.M.A.R.T! ”- probably, the HDD controller does not work in the mode that we need. To change it, you will have to go into the BIOS and go the following way: “Config” - “Serial ATA (SATA)” - “SATA Controller Mode Option” - change from “AHCI” to “Compatibility” (IDE). Save the changes to the BIOS and continue to work with the program.
Note: do not forget to return everything to its place after finishing work with Victoria.
So we got to the disk test: go to the “Test” tab, click “Start”.
During the check, cells in the left window will be filled with colored rectangles. It is in our interests that they all be gray - this is the color of a workable sector. But blue and red - an indication of the bad sectors of the disk. If after checking there will be especially a lot of blue cells, then you need to run the test again by turning on the “Remap” option (located at the bottom right). As a result of such a check, the program will try to isolate the broken blocks (I also talked about this in theory) by hiding them. It is also worth noting that the orange and green rectangles means that there are sectors on your disk where there are very large delays. If they are present, then this is also very bad.
IMPORTANT: if the results of a disk check are disappointing, I recommend that you copy the information to the backup disk, or be prepared to replace it. Once the disk began to “lose” sectors, then most likely this process will continue. How long the disc will last you is impossible to predict. If there are no necessary files on this hard drive, and you only use it to work on the Internet, then of course you can not buy a new storage medium. If the next time you have problems with this hard drive, it means that it is already unstable, and you will need to buy a hard drive.
I tried to describe theory and practice as simply as possible. Of course, it will be difficult for an ordinary user to study the material in 5 minutes, and therefore devote enough time to your disk to resolve the issue with its unstable operation.
In this article I gave an example of a utility that computer wizards use, and if you use other programs, then there is nothing to worry about. After all, the most important thing in your case is the result. Namely, to understand what to do with your media is to restore or it is time to buy a new hard drive.
I hope I and this article have been useful to you. Good luck in checking and only high-quality hard drives!
Video that will help in working with Victoria: