The bright screen of your computer or laptop can negatively affect a person. For example, when you are constantly near the display, especially with the onset of night, due to the excessive brightness of the screen, the vital hormone melatonin is suppressed, which begins to be produced in smaller quantities and ceases to signal in time about the imminent preparation for bed. Following this, a decrease in performance follows. For this reason, the most appropriate solution would be to reduce the brightness of the monitor by at least half. If you use a laptop or phone, you can save additional battery power. In this article, you will learn how to reduce the brightness of the monitor when working on a computer or laptop.
Change the brightness settings on the laptop
It is worth taking into account that, depending on the manufacturer, the overall brightness indicator and the possibilities for customization will differ greatly.
Option 1 - Change the brightness level using hot keys
In the vast majority of laptops, in order to change the brightness, you need to use a combination of several function keys. For example, holding down the “Fn” button, using the arrows it becomes available to adjust the brightness level of the monitor. Despite the fact that, along with the “Fn” button, completely different input keys can appear, the screen brightness symbol is always depicted as a sun symbol.

Option 2 - adjust the brightness using the control panel
You can also change the brightness using the display settings through the control panel. In this case, you must perform the following steps:
- We go to the control panel menu (in the search for Windows 10, enter “panel” in the list, select “Control Panel”).
- We open the screen control option - an icon with the inscription "Screen".
- In the window that opens, find and open the item "Brightness Settings".
- After which, you will find yourself in the laptop power consumption settings menu. A slider will be located at the bottom of the window that appears, which is responsible for adjusting the brightness.
- Next, you need to set a comfortable monitor brightness level and exit the settings. All new options will take effect immediately.
In my case, there were no “Screen” settings, there was a setting for Intel HD-graphics:


Option 3 - change the brightness using the video card driver
All modern laptops run on a base video adapter from Intel, AMD or Nvidia. It is with the help of a driver preinstalled on your laptop that you have the right to independently change the color rendering settings of the display, making it brighter or more saturated.
If you are using an AMD video adapter
Using the driver from AMD, you can change the default settings for the sharpness of image transmission to the display. Due to the fact that the company has released a huge number of driver updates, the items in the settings panel can vary greatly. For example, in Catalyst 10.2, to apply the new settings for brightness settings, you need to visit the Color menu. To get into the driver settings menu, just use the short click of the right mouse button while on the desktop and select the “Catalyst Control Center” item.

If you are using a video adapter from NVIDIA
- Right-clicking on the desktop, select "NVIDIA Control Panel" .img8 in the context menu
- In the navigation bar that appears, in the left row, select the item "Adjust desktop color settings."
- You will be offered several displays at your choice, if you have more than one, where you need to select the one you need, and then click on the "Use NVIDIA Settings" item. Then you will have access to the display settings, which includes brightness, contrast and gamma. For all the settings to take effect, you need to click the "Apply" button.

Option 4 - If all of the above options do not suit you
If you still could not adjust the brightness of the display using the function keys or all the corrections made to the driver were inactive, then most likely you are faced with a problem with the operation of the driver of your video card. This can happen after updating the drivers to the latest version. One way to solve this problem is to roll back the video card software to the previous version or completely remove it and clean install it.
Change the brightness of the monitor on the computer
If you use a desktop computer (PC), all of the above options are also applicable in practice. However, for the convenience of the user, it will be better to use the monitor functions. Thus, it is possible to calibrate the brightness parameters much better. Each monitor must have buttons for control. As a rule, their number is from 5, among them are: presets, brightness / contrast, menu, exit and monitor off. 
Naturally, it all depends entirely on the model. Therefore, try to configure it by “poke method”, even if you get to the wrong menu, click on the exit button and try again until you understand how to manage your monitor settings.
The brightness settings are in the monitor menu, the menu for each monitor is also different:

On a sunny day, you need to raise the curtains and change the brightness of the display by reducing the overall rate to 15-30%. It is not recommended to increase the brightness level by more than a third of the maximum value. If the sun's rays hit the screen directly, you need to unscrew the brightness to the maximum value.
1890This article is about how to adjust the brightness of a computer screen automatically and manually. So that everything can be clearly seen on the screen, you can manually increase the brightness if you are in a bright room, or, say, on the street in bright sunshine. Or when you are in a dark room, on the contrary - you can reduce the brightness so that your eyes do not strain. It will also help to save energy, respectively, the laptop battery power.
In addition to manually changing the brightness, you can make Windows automatically adjust the brightness of the screen, depending on the computer’s power supply, battery level or using an ambient light sensor, which is found in many modern devices.
Manual brightness control of a laptop or tablet screen
On laptops, you can quickly increase or decrease the brightness using the keyboard shortcut. You can find them among the function keys f1 - f12, which are located above the numbered keys. Find the key where there is an icon corresponding to brightness, often it is the sun or something like that and click on them.
Since these keys are multifunctional, you may have to press them in combination with the Fn key (while holding) at the lower left of the keyboard.
If you do not have such keys on the keyboard, or you use a tablet, you can adjust the brightness of the screen directly inside the Windows OS.
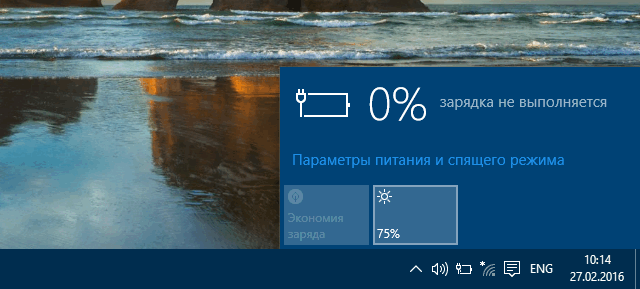
In Windows 10, click on the battery icon in the notification area, and click on the corresponding tile, which with each click will change the brightness by 25%. You can do the same by opening the notification center on the taskbar, or swipe from the right edge if you have a tablet.
You can also find this option in the settings of Windows 10. To do this, open the Settings via the Start menu, select System and then Screen in the left menu. There you will find a slider with which you can change the brightness level.

In Windows 7 and 8, this option is located in the "Power Options" section "Hardware and Sound" in the control panel. In the lower part of the window you will see the adjusting slider “Screen brightness”.

You will also find this option in the Windows Mobility Center. Right-click on the Start menu and select Mobility Center (on Windows 10 and 8.1). On Windows 7, press Win + X.

Monitor screen brightness
Everything that we discussed above is mainly applicable to laptops, tablets and all-in-one computers. However, if you use a desktop PC or even a laptop / tablet with a monitor connected to it, you will have to adjust the brightness in the monitor itself. In addition, you will not be able to set automatic adjustment.
Since the menus and settings of each monitor model are different, I will not be able to give you step-by-step instructions on how to do this. Nevertheless, you can figure it out on your own by picking up the user manual (book or leaflet that came with the monitor) or even without it. To do this, you just need to open and understand the menu and monitor settings by clicking on the buttons, which are usually in the monitor itself next to the power button. In some monitors, they may be located on the back.
You can also increase or decrease the brightness of the screen using third-party programs such as Screen Bright or Display Tuner, although they will not work with all monitors.
Auto brightness change:
1) Depending on the power connection
On laptops or tablets, you can set the brightness level to automatically change depending on how the device is connected to power. For example, you can set the brightness at the maximum level when you connect to the power from the outlet, and low when the power comes from the battery. Windows will change the brightness automatically.
To do this, go to Control Panel\u003e Hardware and Sound\u003e Power Options and select "Configure Power Scheme." Here you can adjust the screen brightness for both circuits: “On Battery” and “On Line”.

2) Depending on the battery level
You can set up automatic adjustment of the display backlight depending on the battery level of your laptop or tablet. In Windows 10, this is called “Battery Saver,” which is located in: Settings\u003e System, where you need to find and click on the link “Battery Saver Settings”.
In the window that appears, make sure that the option “Automatically turn on battery saver when the battery level is lower” is turned on and set the percentage you need (by default the option will take effect at 20% battery charge). Unfortunately, it is not possible to set the exact (automatic) brightness level; instead, use the battery icon in the taskbar or other manual methods given above.

3) Depending on the lighting conditions
Many modern devices have an ambient light sensor that adapts the brightness of the screen to external light conditions, automatically increasing brightness when you are in bright areas, and vice versa - decreasing when you are in low light conditions.
Some users find this convenient, while for others it’s the other way around. In any case, you can always disable or enable this option by going to: Control Panel\u003e Equipment and Sound\u003e Power\u003e Setting the power scheme (current scheme, of course). Next, select "Change advanced power settings", then expand the "Screen" and in it "Enable adaptive brightness control." Here you will see two options for adapting brightness based on external light for two circuits.

A modern person spends a lot of time at the computer, whether it be stationary equipment or a laptop, therefore it is advisable to create the most comfortable conditions for himself when working with him.
In addition to external factors, such as indoor lighting, device settings play a large role in ensuring convenient and safe use.
For the most fine-tuning, you may also need a program to configure the monitor.
Introduction
What are these programs and what are they for? Such software involves quick access to all possible settings and parameters of the computer screen. With it, you can configure any monitor parameter optimally precisely "for you".
Of course, access to most of the features provided by such a program, can provide their own computer resources, for example, they can be accessed through the Control Panel.
Nevertheless, it is much more convenient to do this through a special program, in fact, with one click of the mouse.
The functionality of such programs is quite wide - they help to change color, brightness, screen resolution, control it, adjust the position of buttons, panels and shortcuts, etc. That is, in this software all the possibilities of changing the screen settings are “collected” to simplify access to them .
In addition, some software helps to configure more complex parameters that cannot be changed using your own computer resources.
Why is it so important to carefully fine-tune the monitor settings? This is due to the fact that the main load when working at a computer is on the eyes, and it is the screen that creates it. Thus, with careful adjustment of the monitor, such a load can be reduced, which can potentially even help maintain good vision.
Main characteristics
It is often difficult to choose the most optimal program, since it is necessary to take into account a whole host of parameters at the same time.
To simplify and speed up this process, the summary table below shows the main characteristics of all the software included in the TOP, which may be of primary importance when choosing.
| Title | License | Multimonitor | Russification | Installation | Reference materials |
|---|---|---|---|---|---|
| Ultramon | Paid | yes | yes | Is required | Are absent |
| Nokia Monitor Test | Free | not | yes | Not required | Are present |
| Power strip | Paid | yes | not | Is required | Are present |
| UD Pixel | Free | not | yes | Is required | Are absent |
| Is My LCD OK | Free | yes | Not required | Are absent | |
| Innjuredpixels | Free | No, but suitable for working with TV | yes | Not required | Are absent |
| Actual Multipal Monitors | Paid | yes | yes | Is required | Are absent |
Accounting for these parameters will allow you to quickly choose the most suitable software for yourself.
Ultramon
The most functional and simple program of all presented in the TOP. It is easy to work in and it helps to make rather fine-tuned monitor settings, to change even the most insignificant parameters in a wide range. Distributed for a fee, but has a trial period.
Especially convenient for working with multi-monitor systems - it allows you to copy and move the desktops of one monitor to another, copy them, stretch the taskbar to multiple monitors, etc. It also allows you to make technical adjustments to the screens - change color, resolution, and more.
The advantages of such software are as follows:
Positive:
- "Sharpening" under multi-monitor;
- Simple operation and intuitive interface;
- Wide functionality.
Negative:
- Paid license
- The rather narrow functionality is precisely the settings of technical parameters;
- A large number of functions that are not required by the average PC user.
And here is what users who already worked in this program say: “I didn’t find anything better than this program”, “It doesn’t have some functions that Actual Multipal Monitors have, but in general it’s satisfied with the software”, “It works stably, enough functionality to optimize screen management. "
Nokia Monitor Test
This is a small and lightweight utility designed to configure monitor settings (geometry, contrast, and others) without changing its control systems. The name should not confuse you - the software is designed to work specifically with the screens of computers and laptops.
It has high-quality Russification, and help files installed in the utility will help you decide on the settings depending on the nature of your work and the amount of workload.
This will reduce the load on vision when working at the computer.
Positive:
- No need to install the program;
- The presence of reference materials for setting up;
- Minimum load on the hardware and memory of the device.
Negative:
- Narrow functionality;
- The lack of the possibility of any adjustments, except for "technical";
- Stable on most systems.
The opinions of users who are already actively using this program are as follows: “It is a pity that it is impossible to run on Windows 8 X64. I tried everything and it doesn’t work out ”,“ Allows you to fine-tune the monitor and evaluate all the basic parameters of the picture. A set of reference tables. Great program! ”,“ Helped bring the monitor back to life. ”
Power strip
An application that allows you to configure technical parameters and control both one monitor and several at once. It is distributed for a fee due to its high complexity and wide functionality.
It differs in that it supports many video cards, including old ones.
It has 500 display, video card settings, both the simplest and the most complex. There is an extensive and understandable help for all complex and simple functions and parameters.
Positive:
- Support for multi-screen mode;
- Very wide functionality;
- It is equally convenient both in working with multi-screen systems, and with simple ones.
Negative:
- Paid software distribution;
- The need to install it;
- A fairly significant load on the memory and hardware resources of the computer.
But what those who use it actively say about the program: “My favorite program”, “This program will allow you to open up new possibilities, so download soon”, “I have been using the program for a long time, I consider it the most valuable of the similar ones”.
UD Pixel
A fairly simple free program that is suitable for setting up computer monitors, as well as TVs.
It is mainly intended for restoring broken and sticky pixels on monitors, but it also allows for other settings. Pretty light and functional.
The principle of the program is that it forces the pixels to change colors in high speed mode.
In most cases, this helps to restore them, although no software is able to give a 100% recovery guarantee.
Positive:
- The only program in the TOP that allows you to restore pixels;
- Free distribution.
Negative:
- Lack of multi-monitor mode;
- A fairly long time to restore the pixel (but it does not interfere with working on a PC);
- Inability to make settings of another type.
User reviews about this software are: “A very good utility, at work on one computer there were 2 broken pixels, in different places of the screen, which was closer to the center, it was possible to revive, but it doesn’t work near the edge,” The monitor has been cured from 2 red dots on the screen. "
Is My LCD OK
To a greater extent, this program is designed to diagnose LED and LCD monitors, but it also allows you to configure.
It is distributed free of charge and is a utility, that is, it does not require installation on a computer and can be launched from removable media.
Its principle of operation is that the screen is alternately filled with different colors, as a result of which the user can detect broken pixels and restore them. There are also some special monitor tests.
Positive:
- Free distribution;
- Very low weight - only 29 Kb;
- Really wide monitor diagnostic options;
- Suitable for working with TVs.
Negative:
- Sufficiently narrowed screen settings;
- “Sharpening” is not so much about tuning as much about diagnostics;
- Not always effective troubleshooting.
Instruction manual
Boost brightness monitor You can use the image settings buttons located on its front panel. Beyond Management brightnessin the menu through the menu and selecting the appropriate parameter, manufacturers usually program quick access to this function. To raise brightness monitor, press the button located on the front panel on which is displayed. It is with this generally accepted symbol that brightness.
If this does not help, and the picture is still darker than you want, use the image adjustment software. To do this, go through the “Control Panel” to “Display Settings” and click the “Advanced” button. If you have installed video card drivers from the manufacturer or similar, then in the new settings window that opens, you will see a tab with the name of the card model. If you don’t have one, then install the drivers, since using standard Windows programs, increase brightness monitor will not work.
By going to the settings tab of the video card, select "Graphic Characteristics" or a similar parameter related to the color adjustment. You will see the “runners” with which you can change brightness and image contrast. To do this, simply move them to a new position. Generally increase brightness monitor It turns out right away.
On old CRT monitorx dullness is his first sign of an impending breakdown. Today, it makes no sense to repair such as it was done before in the absence of alternatives and at high prices for equipment, since its analogue is much possible on hand. Yes, and modern "thin" monitors are not very expensive. Therefore, if yours began to get dark, it is better to look at the new models in computer equipment stores.
Sources:
- Adjust the brightness, contrast and sharpness of the picture
Sometimes it happens that the colors on the display become paler, the shades of colors are less distinguishable. Or you do not like the brightness of the monitor, the text is perceived poorly. Then you need to adjust the brightness of the display.
You will need
- - monitor.
Instruction manual
Settings are made using special calibration programs that are installed on a personal computer from the installation disk or downloaded from the Internet. These programs activate the image on the screen. They are associated with a special device, temporarily mounted in front of the monitor. This device allows you to determine the brightness level. Then it automatically changes the settings. Special drivers for a personal computer are not needed for this.
You can adjust the brightness of the monitor manually. For this purpose, a number of buttons are provided on its front panel. By turning them on, you can adjust the brightness and contrast of the display. The buttons are indicated by standard icons. They can be located on the side of the monitor. It is also worth noting that on new models of monitors the buttons can be touch sensitive, so look carefully so that you don’t accidentally press a button with your fingers.
Click the contrast adjustment button. The setup window will open. By clicking on the plus or minus, choose a contrast that is convenient for you. Save the settings and turn off this window. You can make these settings several times in a row to compare the brightness position on the screen in all cases. As a rule, each user selects the most optimal option for himself.
Now proceed to adjust the brightness. As in the previous case, click on the button to adjust the brightness of the display. In the window that appears, again, moving to plus or minus, set the brightness you need. Save the settings again and close the window. The brightness of the display is adjusted. It is worth noting that the settings made using a special calibration program are better than manual settings.
Quite often, the image on the monitor screen is darkened for various reasons. At the same time, it is impossible to adjust the picture in the video file, on the photo, and on the usual desktop using one setting. But in all these situations, it’s quite easy to increase brightness images separately.

Instruction manual
To raise brightness in a static image, for example, open it with a viewer. Standard Windows programs are not suitable for this: they do not have functions even for such simple editing. However, you can find a lot of other programs of this kind on the Internet if you wish: ACDSee, FastStone Image, IrfanView - the most common and far from the only ones in their class. Depending on the selected program, the items and names of the menu will differ, but in general the order of your actions to increase brightnesswill correspond to the following pattern. Using the example of the IrfanView program: select the Color corrections item in the Image menu and in the window that appears, drag the Brightness parameter slider as necessary. Then click OK and, if desired, re-save the image.
To raise brightness when performing, examine the available output settings in your player. Menu items and settings are different in all players. In general, you need to find the video output settings, which can be located both in the "Settings / Tools" menu and in the "Video" sub-item. VLC-player as an example to increase brightness, go to the "Tools" menu and select the item Extended Settings ... In the window that appears, go to the "Video Effects" tab, check the "Image Settings" field and use the brightness slider to set new display options.
If you are not satisfied with the overall image on, rather than the quality of individual files, and the settings on do not help, then you can increase brightness using the settings itself. To do this, through the Control Panel, go to Display Settings and click the "Advanced" button. Next (for the example of Intel Graphics), go to the settings tab for the parameters of the video card from the manufacturer. Then select “Graphic” - “Color Settings”. You will see the brightness parameter slider already familiar from the previous steps. Move it and click on "OK".
Properly configured PC monitor settings, such as brightness, contrast and others, can significantly improve the perception of graphic information. And if everything is clear with setting, say, contrast with desktop monitors (the buttons for adjusting monitor parameters are located on it itself), things are more complicated with laptops and netbooks.

Instruction manual
On the keyboards of most laptops there are buttons for adjusting the display parameters, but they relate only to brightness. You can change the contrast in the driver settings installed on your video card.
In the case of a video card from the manufacturer Nvidia, the contrast is adjusted using the control panel of the video driver. Right-click or on the desktop, and then select the item called “Nvidia Control Panel”.
Go to the menu item "Adjust desktop color settings" using the link on the left side of the window. Then select “Use Nvidia Settings” and increase the contrast in the corresponding item using the slider to the desired level.
In the case of a card from an ATI manufacturer, first of all, download the latest version of the Catalyst video driver on the Internet. The functions in this case are similar to those of the Nvidia control panel. Click on the Color tab located on the left side of the program window. Now you can adjust the contrast in the corresponding item (Contrast) using the slider. When you finish adjusting the contrast, save the changes.
If your equipped with a built-in Intel Graphics, in the settings of the video driver, select the item titled "Graphic Characteristics", followed by "Color Settings". Here (again, using the slider) adjust the contrast as you wish.
If you need to increase the contrast directly during, individual pictures or videos and films, use the functions of the application with which you are viewing a particular file. For example, in the VLC player, access to the contrast settings is carried out as follows: left-click on the touchpad or on the menu item "Tools" and select the Extended Settings sub-item. In many programs, the contrast can be adjusted by going through the chain of menu items: "Options" -\u003e "Image Settings" (or "Display Settings").
Sources:
- how to increase contrast

Instruction manual
If you need to increase brightness monitor Acer, press the combination of the Fn key and the right arrow key. This feature is only available for laptop models that have a scan code for the Fn key.
Also use the change function through the power menu. To do this, right-click on the desktop, select "Properties". A window with several tabs will appear on your screen, select the one that is responsible for the screensaver settings.
Open the "Power" section and adjust the brightness of the screen in different modes, save and apply the changes. Also note that often when changing the working power scheme from economical to normal, the brightness of the screen backlight does not change, in this case it is best to set the same backlight level for both modes so as not to change the parameters in the future.
If you need to change not brightness highlighting, and the parameters of the image itself, go to the “Settings” tab, click on the “Advanced” button in the lower left corner of the window. You will see the connection module setup menu monitor. Open the tab on which the name of your video card is written.
Click on the button “Graphic Characteristics”. You will see a new video card settings window. Select in them those that are responsible for adjusting the brightness monitor and color. Adjust the parameters of your choice, save and apply the changes.
Download and install a program on your computer to assign functions to certain keyboard shortcuts, such as MediaKey. Open it and set the brightness change action. monitor when you press the Fn key with any other, it is best left and right arrow, apply and save the changes.
Related videos
note
Be careful when changing the parameters of a video card, consider its performance.
Helpful advice
Assign the buttons to the keyboard to change the brightness of the monitor using a special program.
When changing power modes, the screen brightness changes. If the monitor backlight is turned on at almost maximum power when working from the network, battery operation requires saving, so the brightness is lower.

All people want to sit and work at a well-showing monitor, especially if it qualitatively conveys all color tones and image details both in light and in shadow. It is in order to configure the monitor in such a state that we need special calibrators - hardware complex programs that use certain metric sensors and software. They are recommended for professional use with color shades.
The program for calibrating the monitor Samsung and other manufacturers
However, calibrators are not cheap, and only computer experts can use them. For ordinary users, special programs have been created that help customize the display using the natural natural indicator - the human eye. Such a program for calibration of the monitor uses certain test images and parameters and functions of the video card, giving the operator the task of controlling the accuracy and correctness of adjustment.
The most commonly configured functions are brightness, contrast and gamma. The last parameter is responsible for the response of the screen to the set values \u200b\u200baccording to the color of the image and its intensity. For the most part, the standard gamma coefficient adopted for the Windows system is 2.2.
How to calibrate a laptop monitor and PC
Display setup begins with the arrangement of the workplace. Its external lighting should be constant and directed. The main thing is that the light does not shine in the eyes of the operator and does not create glare on the display.
Great importance is given to the color of lighting. Most experts recommend ordinary lamps or fluorescent. Even such a detail as a screen background should be equipped with calm tones to ensure uniform lighting and color neutrality, which does not irritate vision.
In addition, the calibration of the laptop monitor should take place on a warm monitor, which allows to stabilize the backlight. For this, according to some research data, it must be kept on for 0.5-1.5 hours. At the same time, all the various modifiers, especially those responsible for brightness and contrast, all image quality amplifiers, must be turned off.
Many experts advise close attention to the displays of laptops and monitors that support the TN + Film matrix, since the picture quality on these screens depends on the angle of inclination.
When calibrating such a monitor, the angle of the display should be constant, otherwise all the setup work will be in vain. After all, even a small change in the viewing angle of the image greatly changes the test image.

Setup process
Calibration of the monitor at home is carried out using special programs that are based on changing the image settings with the capabilities of the monitor and software equipment, while simultaneously monitoring the result of the changes in the appearance of the test pictures. Such patterns have a mesh or trellised appearance. The user, making changes to the tinctures of brightness, contrast and gamma, tries to achieve complete merging of the image areas with the background.
However, it should be borne in mind that calibrating the monitor at home is a time-consuming process for human vision, especially during the use of colored substrates. For high-quality and fine-tuning, you will need to spend a lot of time in front of the computer display. At this time, the eyes can get the effect of "defocusing", therefore, it is strictly recommended to periodically allow the eyes to rest during the calibration process. But nevertheless, vision can only be given by subjective assessment, which means that the result of tuning will also be subjective.

As practical studies have shown, thoughtless and ignorant actions to configure the video system, during which the program is used to calibrate the monitor of a laptop or personal computer, often lead only to a deterioration in the quality of the depicted image. It is necessary to have a full understanding of what exactly, how and for what changes will be made in the settings. If there is no such understanding, then it is better to leave all the factory settings parameters, especially for displays that already have a decent work experience.
Now we will look at popular and well-known programs that help to carry out high-quality work on changing display parameters.

Atrise Software LUTCurve App
Most experts agree that this utility is the best program for calibrating a monitor. It has a large set of functions for setting screens. True, to make the most of its capabilities, you must carefully study the instructions, which are written in English. For example, in the description of the program, owners of laptops and TN-matrix monitors are strongly recommended to maintain a constant angle of view on the display.
On the first page of the program the basic parameters of arranging the workplace before setting up the display are painted and the rules for setting the system profile and colors are found. The application supports sRGB color space. and gamma are set at 6500 K. The utility can work in a multi-monitor configuration, fine-tuning any device.
The Atrise Software LUTCurve monitor calibration program in its work relies on the maximum sensitivity of the human eye to gray. Therefore, all test pictures are executed in neutral colors.
But the program also has its drawback - it lacks a hardware sensor. Its settings are based on the factory brightness settings that are set by the manufacturer in the display settings. But very often this method gives negative results, especially on old or used monitors, for which these settings have already gone astray. The advantage of this utility is the ability to adjust the gamma of three elements in all 256 points. However, adjusting the parameters according to these data is a task for a patient person who has a lot of time at his disposal, and this method leaves a lot of subjective perception.

Eberhard Werle QuickGamma Utility
This program is for calibrating monitor colors and for adjusting gamma with 2.2. The feature set and instructions are minimal. More complete configuration information can be obtained in the Help menu. There are also links to the necessary applications for the program to work.
The test picture is executed in the form of horizontal columns. Calibration is based on the principle of orienting the degree of their fusion with the background. This is difficult for the eyes, especially if the picture takes on a color component from RGB substrates.

TFT Test 1.52
This application has a set of 12 pictures for adjusting and comparing displays. The utility contains sample data for checking screen resolution, accuracy and geometry. The TFT Test 1.52 monitor calibration program with its gray and color, linear and circular smooth saturation gradients allows you to compare the quality of brightness and contrast calibration and the quality of halftone playback. To control the performance, two tests for the response speed of display elements are built into the program.
PassMark Software MonitorTest
This monitor calibration program contains 13 test images that are designed to configure simple and LCD displays. These test pictures allow the professional, using the means of the monitor, to adjust the gamma parameters so that the displayed detail of the picture has the correct appearance in a large range of brightness.
The only minus of the application is that there are no tools in it; all changes are made only through the “menu” of the monitor.
It is necessary to remind that testing for the speed of components of LCD screens and electronic displays has a certain number of contrasting objects that simultaneously move at different speeds. But, according to experts, the frequency of movement is designed for old models of monitors, for new modern models this frequency is already insufficient for testing.

Total
There are many programs for setting up monitors, but each of them assumes that the user has the ability and knowledge to use. As already mentioned in the article, if a person does not know how to use the tools of calibration utilities, it is better to leave the factory settings alone. Well, if you still need to make color adjustments, especially on old, old-used monitors, and there is not enough knowledge on how to do this, then it is better to contact specialists who will safely and harmlessly calibrate. All the above programs and those that are not included in the review of this article are designed to work on a professional level. Not every user can customize their display using these applications.