Skyrim is a game with very beautiful graphics. The landscapes encountered while exploring the world can be admired endlessly, and the battle scenes are completely breathtaking. But there is a downside to all this. On insufficiently powerful computers, the game starts to slow down or refuses to start at all.
It would seem that owners of weak PCs can only fix this problem by purchasing new hardware. But still there is another way out - to make the game work better. In Skyrim, optimization can be achieved in several ways, and how to do this will be discussed below.
Standard settings
The developers have provided a number of settings that can worsen the graphics in the game, thereby increasing performance. You will find them right in the launcher by going to the "Settings" menu. The most important parameters are:
- Permission. The lower the value of this setting, the better the game will work. However, it is not recommended to select a resolution that is not supported by your monitor.
- Smoothing. It greatly affects performance, therefore, if brakes occur, this parameter must be disabled first.
- Filtration. In general, it does not load the computer much, but by disabling this option, you will achieve an increase of several FPS.
- Detailing. Select "Low" if you want to increase performance by several times.

After setting all settings to minimum, try launching Skyrim. The optimization of the game, of course, does not end there, but if the method described above helped, you can start playing calmly and not fool yourself.
Additional settings
Another way to improve performance is to set advanced options. This can be done by launching the launcher and clicking "Settings" and then "Advanced". A window will open with two tabs, in each of which you need to perform several actions:
- In the "Details" tab, you need to set all the parameters to a minimum, as well as uncheck the reflections (there are four types of them here) and anti-aliasing. The most demanding are "Texture Quality" and "Shadow Quality", so you should pay attention to them first of all.
- In the View Distance tab, simply drag all the sliders to minimum. In addition, reduce the quality of distant objects and enable "Disappearing Objects".
The settings mentioned above will greatly reduce the graphics, however, this is the best Skyrim optimization for weak PCs. You can also try different combinations of settings to achieve average picture quality and tolerable performance.
Editing the ini file
If Skyrim is still slow for you, optimization can be done by editing the SkyrimPrefs.ini file. You will find it along the way" My Documents/My Games/Skyrim”, and open it with notepad. Now you need to edit the following options:
- iShadowFilter - change to 0.
- iWaterReflectHeight and iWaterReflectWidth - set to 256.
- iWaterMultiSamples - must be zero.
- bTreesReceiveShadows and bDrawLandShadows - set to zero.
After you have edited all the parameters, close the file and confirm the changes. Now launch The Elder Scrolls V: Skyrim, which should noticeably increase its optimization. If there are no noticeable changes, then you most likely did something wrong, so try again.

Please note that errors in the ini file can cause the game to stop working altogether. Therefore, in order to avoid such situations, make a backup copy of SkyrimPrefs.ini before you start editing it.
Patches
Developers periodically release patches with fixes for their games, and Skyrim is no exception to this rule. Such updates, in addition to eliminating all sorts of bugs, often improve performance, and in Skyrim, optimization has improved since update 1.4.21.
In the event that you have not yet managed to update the game to the latest version, you urgently need to do this. Thus, a noticeable increase in productivity (up to 40%) can be achieved. For this you have two options:
- If you have a licensed version of Skyrim, you can simply run the automatic update. After that, wait for all the necessary files to download and install, and then launch the game.
- If you have a pirated version, you will either have to install all patches manually or download a repack that includes all updates.
In any case, the optimization of the game after installing all the updates will improve significantly, so do not neglect this method.
Special edition version
In 2016, a re-release of Skyrim: Special Edition was released, the optimization of which, according to the assurances of the developers themselves, has been noticeably improved. At the same time, the picture in the game has become prettier, but despite this, it works much more stable even on weak computers.
This was made possible thanks to a redesigned graphics engine, which learned to use the power of multi-core processors more productively and became less demanding on hardware. The developers also fixed errors in the system code that led to a drop in FPS.

Therefore, you can try to install the Special Edition, and it is possible that the performance will be higher in it. Judging by the feedback from gamers, most of them have noticeably more FPS in the new version than in the original.
In addition, all the optimizations mentioned in this article are valid for the reissue, so you can safely apply them.
Fashion
Third-party developers have released a number of modifications for Skyrim. Some of them allow you to increase performance, while not greatly lowering the graphics. To use any of these mods, you need to download it and then place it in your game folder.
For Skyrim, the optimization mod (one of the most famous) is called the ENB Series. It contains an antifreeze program that fixes freezes, increases contrast (the game world becomes brighter) and makes textures less resource-intensive.

After installing ENB Series, you will need to activate it. To do this, you need to launch the launcher, go to "Settings" and select ENB instead of your video card. After that, you must restart the operating system for the changes to take effect.
Keep in mind that you can only download mods from trusted sources. Detractors often disguise themselves as malware, so do not be lazy to check everything you install with an antivirus.
RAM optimization
In the case of Skyrim, optimization may lie in the fact that the game is very demanding on it, so by freeing up a few megabytes, you can improve performance. There are several ways to clear RAM:
- Close all unnecessary programs. These include: antivirus (it can be disabled during the game), OneDrive, Skype and other applications running in the background.
- Quite a lot of RAM is occupied by the visual design of Windows. Just turn off all kinds of decorations in the settings and see how much faster the game starts to work.
- You can use special ones. One such application is Ram Booster, which automatically closes all unnecessary and improves performance.
Please note that all the methods described above should be used at the same time. Only in this way will you achieve the most noticeable effect.
Driver update
For Skyrim, optimization can be increased by doing this is quite simple, but you can achieve an increase in FPS this way. The biggest performance impacts are:
- Video card driver. It should be paid attention to in the first place. It is this driver that determines the speed of image processing, so go to the official website of the manufacturer of your video card and make sure you are using the latest software.
- Motherboard drivers. They affect the speed of all devices on your computer. So again, make sure you have the latest drivers installed.
- Sound card driver. It does not affect performance as much, but it can still lead to freezes and microfreezes. Just update the driver to the latest version to eliminate the possibility of such problems.

Please note that for some models, earlier versions of the driver may have a positive effect on performance. On this issue, you should consult on the Skyrim forums.
OS optimization
And finally, optimizing Skyrim for weak computers can be achieved by increasing the speed of the operating system. This may help:
- defragmentation. Increases the speed of the hard drive and, as a result, allows the game to load textures faster.
- This can be done either manually or using a special program (for example, CCleaner). Both the OS and the game will start working faster after this procedure.
- Installing updates. They fix Windows errors and allow the operating system to work more stable. As a result, Skyrim also improves performance.
- If errors are not periodically corrected, they can lead to freezes of programs, including games.
- Search and removal of viruses. Malicious programs can load the computer, so try to find them in time and neutralize them.

By following these simple steps, you can achieve performance improvements in the game, so do not neglect them.
SkyrimLauncher.exe > Settings
Video adapter and resolution:
- Selecting a video card (Video adapter). (ENB is such a graphical mod, details later)
- Aspect of the parties. But first...
- Set the resolution of your monitor.
- Smoothing. 8x reduces performance, but you will hardly notice a difference in quality.
- Texture filtering. The higher, the more beautiful, the parameter slightly affects performance.
Detailing. Set all settings at once to a certain position by clicking on one of the buttons. Suitable for beginners. Advanced - opens another tab, which is described below.
Mode:
- Window mode. If you do not check the box, the game will run in full screen.
- Vertical sync. Eliminates streaks when moving the camera vertically. Preferably for LCD monitors.
- Show all permissions. Check the box if you did not find your permission in the list.
 Opened by clicking the "Advanced" button. Detail tab:
- Texture quality. A very important parameter that significantly improves graphics and adds brakes on weak video cards with low memory. However, this setting is the last one I would sacrifice.
- Blur quality. Doesn't affect performance.
- Shadow quality. "Ultra" will steal a lot of frames per second from you. Shadows can be improved in another way.
- Particle quality. Decrease if the game starts to stutter due to magic.
- Full screen FXAA. Minimal impact on performance.
Reflections on the water. If the game lags near water, disable this.
 View Distance Tab Decrease the draw distance of various objects if your graphics card is low on memory. The same settings are in the game (Esc > Settings > Screen), where you can clearly see the difference without closing the game. Disappearance of distant objects. Feel free to check the box if you do not often look into the distance and do not complain about the excess frames per second.
 Section updated 02.02.2012
Today is a significant day! An update is out! Starting from it, fps in the game has increased up to 40%!!!
Of course, this effect will be retained by all patches coming out later.
The performance modifications described below may not be relevant. It's hard to say for sure, because now the game should just fly on most configurations.
ENBSeries
You will be able to find the latest version of the mod for Skyrim. Download and unzip to the game folder. Settings are made in the enbseries.ini file Firstly, this modification contains antifreeze, which eliminates slowdowns. Secondly, it adds the following effects: True HDR Bloom SSAO (initially disabled, impacts performance a lot) Lenz FX (glare)
What is very cool - disables the "dullness" of the game. A special effect that causes the game to lose color. The mod disables it. You won't want to go back to old Skyrim! Updated 02.02.2012. Due to the release of a patch that greatly improved performance, you can stop using ENB. But if you want to keep the colorful effect, you can modify
Also, if you need antifreeze (slowdown without fps reduction), you can download the old version, for example. It does not change graphics, it only fixes freezes, and they remain even after 1.4.21.
Skyrim Script Extender (SKSE)
This is an alternative game launcher. It generally improves optimization. Also on its base there are many additions.
Acceleration Layer (incompatible with 1.4.21)
Improves performance up to 40%. Requires launch via SKSE. SkyBoost (incompatible with 1.4.21)
An alternative to Acceleration Layer and SKSE. It is not compatible with them, but it runs through a regular launcher.
Making backup copies of SkyrimPrefs.iniChapter
BMouseAcceleration=1
If you want to disable mouse acceleration, you can change it to 0.
Chapter
IPPresentInterval=0
vsync
IBlurDeferredShadowMask=3
It improves the sharpness of shadows. It is recommended that you change this value to 1, but if the shadows are too harsh, you can set it to 2.
In other words - the clarity of the shadows, the smaller the parameter - the clearer.
FPS does not change.
FTreesMidLODSwitchDist=0.0000
The distance to see distant lods of trees, you can change it to 10000000.0000 if you want to increase the LOD distance.
FShadowLODStartFade=200.0000
Distance to display shadows. You can change it to 1000.0000. (increases the shadow rendering distance)
IShadowFilter=3
Shadow filtering. You can set it between 1 and 4 (Low, Medium, High, Ultra).
BTransparencyMultisampling=0
Change it to 1 to enable transparency multisampling (experimental), you can set it to 4.
IWaterMultiSamples=0
Water smoothing. You can change this from 1 to 4 (Low, Medium, High, Ultra).
a value of "4" will improve the smoothing of water surfaces
BTreesReceiveShadows=0
Value "1" enables additional shadows on trees
BDrawLandShadows=0
A value of "1" enables additional landscape shadows (subtle effect)
FGrassMinStartFadeDistance=0.0000
The range of the beginning of the attenuation of the display of grass, performance. You can bet 400.0000.
IWaterReflectHeight = 512
iWaterReflectWidth = 512
Reflection texture resolution Can be changed up to 1024.
UiMaxSkinnedTreesToRender=20
More skinned (swinging) trees.
IMultiSample=8
Smoothing slows down the game the most. Range 0-8
IMaxAnisotropy=16
Anisotropic filtering
BUseWaterReflectionBlur=1
Blur reflections on the water.
IWaterBlurAmount=4
The amount of reflection blur.
BreflectExplosions=1
Reflection of explosions (special effects)
BAutoWaterSilhouetteReflections=1
Reflection in the water in the form of silhouettes.
BForceHighDetailReflections=0
Increases the detail of reflections, change to 1.
FHighBlockLoadDistanceLow=20000.0000
Improves lody. (Visibility distance)
Forced inclusion of qualitative reflections in water.
UInterior Cell Buffer=8
Size, in cells, interior buffers
UExterior Cell Buffer=36
Size, in cells, exterior buffers
IPreloadSizeLimit=104857600
FMasterFilePreLoadMB=100.0000
How many MB of the master file is kept in memory.
FSunUpdateThreshold=1.0000
fSunShadowUpdateTime=1.0000
UGridsToLoad=5
The number of simultaneously loaded cells of the game world. 5, 7, 9, etc.
It is recommended to leave 5, if a powerful system then 7.9
INumHWThreads=4
The number of processor cores.
IRenderingThread2HWThread=1
iRenderingThread1HWThread=0
iHWThread6=5
iHWThread5=5
iHWThread4=5
iHWThread3=4
iHWThread2=4
iHWThread1=4
bMultiThreadMovement=1
iAIThread2HWThread=5
iAIThread1HWThread=3
bUseThreadedMorpher=1
bUseThreadedParticleSystem=1
bUseThreadedTempEffects=1
bAnimateDoorPhysics=0
bPreCullActors=1
bUseHardDriveCache=0
bKeepLowDetailTerrain=0
Disables low vegetation detail.
IShaderPackageMemoryCap=409600
Memory limit for shaders.
BCompileOnRender=1
Compiling Shaders on the GPU instead of the CPU.
UiAudioHWThread=2
Audio processing in a separate thread.
UMaxSizeForCachedSound=262144
bEnableAudioCache=1
Audio cache
BEnableAudio=1
Enable Audio
SAudioAPI=XAudio2
DirectX audio mode
iNumThreads=2
Streams for Havok
BHavokDebug=0
fMaxTime=0.0157
BMouseAcceleration=1 - mouse acceleration, value "0" disables acceleration.
FAutosaveEveryXMins=15.0000 - time in minutes after which autosave will occur in the game.
BShowQuestMarkers=1 - value "0" disables quest markers.
BShowCompass=1 - value "0" disables the display of the compass in the game interface.
BShowFloatingQuestMarkers=1 - value "0" disables quest markers over objects in the game.
BDoDepthOfField=1 - value "0" disables the "depth of field" effect.
BTreesReceiveShadows=0 - value "1" enables additional shadows on trees. ON OFF
BDrawLandShadows=0 - value "1" enables additional landscape shadows. ON OFF
IBlurDeferredShadowMask=3 - value "1" or "2" will improve the sharpness of shadows without noticeable frame loss
FShadowLODStartFade=200.0000 - value "1000.0000" will increase shadow rendering distance
IWaterMultiSamples=0 - value "4" will improve smoothing of water surfaces
Experimental settings that may cause game instability or performance drops:
FTreesMidLODSwitchDist=0.0000 - value "10000000.0000" will improve tree draw distance
iShadowFilter=3 - value "4" will improve shadows
bTransparencyMultisampling=0 - value "1" will improve transparent textures
iWaterReflectHeight=512
iWaterReflectWidth=512 - value "1024" in these two parameters will improve water reflections
Experimental water rendering improvements. Add these lines at the end of the file, after other values:
Attention, may cause game instability.
BUseWaterReflectionBlur=1
b ReflectExplosions=1
iWaterBlurAmount=4
bAutoWaterSilhouetteReflections=0
bForceHighDetailReflections=1
Additional settings:
BUseWaterReflectionBlur=1, Blur reflections on water.
IWaterBlurAmount=4, reflection blur amount.
BReflectExplosions=1, reflection of explosions (effects?) in reflective surfaces.
BAutoWaterSilhouetteReflections=0, reflections in water in the form of silhouettes, probably meaning that with the option on, the reflections will be without detail, silhouettes, and the IRS is faster than normal reflections.
BForceHighDetailReflections=1, increases the detail of reflections.
FBlockLoadDistanceLow=50000.0000
fBlockLoadDistance=125000.0000
fHighBlockLoadDistanceLow=20000.0000, range of 3 levels of model lods.
Including for Skyrim, Bethesda created a separate Creation Engine game engine. This new development incorporates realistic shadow rendering technology and many other advancements. Luckily, the game files and configuration options are readily available, and this allows us to "pump" the Creation Engine ourselves in several different ways:
1. By adding or changing variables in configuration files (.ini).
2. Using the command line.
3. With the help of user-created game modifications (Mods)
4. Changing video driver settings.
Below we will analyze all these methods in detail. But before you start making any changes, we strongly recommend that you protect yourself from possible loss of original settings and saved games. The easiest way is to backup the entire \My Documents\My Games\Skyrim directory and put it somewhere safe.
Changes to .ini files
The Skyrim game engine uses .ini files to store various settings, which are then read and applied as default. The content of these simple .ini files can be changed in any text editor, such as the regular Notepad (Windows Notepad). Many of these files are located in the main directory of the game \Program Files (x86)\Steam\steamapps\common\skyrim, but these are only templates and cannot be changed.
Those configuration files that you can (and should) change are located in the \My Documents\My Games\Skyrim directory: these are Skyrim.ini and SkyrimPrefs.ini. In the process of making changes to one of these files, the specific name will always be indicated. Important: if you mess up something in them and you don’t have a backup copy, or if you suspect that changes in their text will cause some problems, then you can safely delete them. The fact is that the next time you start Skyrim, they will be re-created with the default settings.
When changing in-game settings using the Skyrim Launcher, a number of variables in .ini files will also change or reset. Therefore, it would be better to first adjust all the settings inside the game to the level you need before moving on to the "jewelry" settings in the configuration files. You can also record all changes to these files somewhere (because future official patches may also reset or change some settings in them), but you should never copy the entire .ini file (or a large chunk of it) from an old version to a more new.
The settings listed in this manual are not the only correct ones. In general, this kind of change involves experimentation. We will provide some general recommendations, but it depends on your personal tastes and system capabilities which of the proposed options to choose and what it will cost you. Also, don't just mindlessly copy the contents of the .ini file from someone else. In most cases, there will be content that will not satisfy your personal tastes or even cause problems. Each of our advice implies that you understand the essence and consequences of the changes being made and will test them yourself before finally deciding whether to listen to it and apply the changes on your system.
Important: variables that can be completely changed using daily game settings, and those that do not have a significant impact on performance or game image, were not considered.
General performance
uGridsToLoad=5. This variable does not exist, and in order for the changes introduced by it to take effect, you must add it at the end of the section of the Skyrim.ini file. It controls the radius around the hero, in which the game engine loads the greatest detail of objects, characters, and scenery. This variable also has a significant impact on both the quality of the game image and performance. Any value of this variable must be set to an odd integer (3, 5, 7, 9, 11). Below are screenshots of the game showing the dependence of how much more detailed the world around the character becomes at a distance when changing the values of this parameter.


Since changing this variable provides an enticing change in the quality of the game art, you should experiment with its values in different game locations. Especially where you usually have the lowest FPS. The default value of "5" provides a reasonably optimal balance of image quality and performance. But if you need additional FPS units, then you can reduce this parameter to a value of "3". Although Bethesda strongly discourages doing this, as changing the lower bound can lead to game instability.
Important: also remember that too high values of this variable can significantly increase the level of resources consumed by the game, and as a result, be a potential source of game instability and performance degradation. Also, if you save the game after changing this setting, the new value will be applied to the saved game. This fact deserves special attention, because in Skyrim you can only load a "save" game in which the uGridsToLoad level is less than or equal to your current parameter. And you will no longer be able to load a saved game with the highest level of uGridsToLoad. Simply put, if you change the value of the variable down again, you will not be able to load games that used large values of it. Therefore, you should study in detail any change created by the uGridsToLoad parameter before proceeding to save the game. If you need to “roll back” changes to uGridsToload in an existing game save, then follow this sequence of actions:
1. Launch Skyrim and load your saved game.
2. Press ALT+TAB to switch to Desktop.
3. In normal mode, edit the Skyrim.ini file, lowering the value of the uGridsToLoad variable to the desired level and close it.
4. Use ALT+TAB to switch back to Skyrim.
5. Open a command prompt using the tilde (~) key and type refreshini.
6. Save the game to a new slot. The save game now has the required uGridsToLoad value.
uExterior Cell Buffer=36. This variable controls the number of world cells (depending on the uGridsToLoad settings) that are processed in the RAM buffer to ensure smooth transitions and improve image stability. The general rule for calculating the optimal value for this variable is to add one to the value of the uGridsToLoad parameter and square the resulting number. For example, if you have uGridsToLoad at level 7, then uExterior Cell Buffer should be changed to 64 =(7+1)2.
iPresentInterval=0. In Skyrim, VSync is enabled by default and cannot be disabled using the daily in-game settings. Adding this variable to the end of the Skyrim.ini section and setting it to "0" will force VSync to be disabled. Disabling VSync reduces/eliminates mouse lag, removes the upper FPS limit, and can also improve overall performance. However, disabling v-sync can also have some potentially negative impact: a “weeping screen” effect may appear. By itself, it is harmless, but quite annoying, and the timing and physics of the game world can be accelerated or “buggy” (especially in those locations where the FPS level is high).
The two main methods for using VSync in Skyrim are:
VSync is enabled (default). Instead of using the D3DOverrider utility (which comes with the free RivaTuner software), enable Triple Buffering. This will improve overall performance and reduce mouse lag without causing any additional negative effects. Just keep in mind that Triple Buffering uses more Video RAM (which can lead to problems on some system configurations), and may not reduce mouse lag as much as it would with completely disabled VSync. To achieve the same level, see the other (mouse-related) variables in this section.
VSync is disabled. Use the FPS Limiter Mod to support any FPS you want (regardless of the recommended one). This should prevent game physics issues and mouse lag. But some "streaks" on the screen will still remain.
Note that iPresentInterval can also be set to "2" to allow VSync to run at a lower FPS cap (usually 60 instead of 30). But this will increase mouse lag, will not improve performance, and will also result in very long loading times. Therefore, it is better not to use such a value at all.
You may have noticed that some notable caching and memory settings were not included in this guide. For example, from the Memory Limit Increase mod. When experimenting with them in Skyrim, we didn't find any practical impact on current performance, resource usage, or overall system smoothness. At the same time, we cannot definitively refute their effectiveness on all systems. As a result, we agreed that there is no need to change them.
Only changing the Large Address Aware (LAA) flag on the main game file TESV.exe can have a real impact on optimizing the resource usage of the game. This LAA change allows Skyrim to potentially use more than the two gigabyte limit inherent in 32-bit executables. But this change is recommended only when the amount of system RAM you have is equal to or greater than 4 GB. Steam does not allow any patches that directly change game .exe files, so you will need something like this mod: 4GB Skyrim LAA mod . This should not be taken as a panacea for all instabilities that arise, but it can work if you use a number of resource-intensive mods or make changes to .ini files in Skyrim.
Audio
fAudioMasterVolume=1.0000. This variable in the SkyrimPrefs.ini file is equivalent to the master volume control in the in-game settings. However, here you can give it a value greater than the limit of 1.0000, which is present in the game controller. Thus, if the sound in Skyrim seems too quiet for you, you can make it louder: try, for example, setting the level to 1.5000 or 2.0000. Later, you can adjust other sliders that are responsible for the sound in the game, but remember that further manipulations with the Master volume already "from under the game" will again reset the maximum value of this variable to 1.0000.
bEnableAudio=1.0. Adding this variable to a section of the Skyrim.ini file and setting it to "0" will disable all sounds in the game. Very handy during troubleshooting so that you can determine if the audio is actually the source of gaming problems such as slowdowns and lags.
Interface and control
- defaultWorldFOV=90
- fDefault1stPersonFOV=90
In order to change your field of view (FOV) in Skyrim, you must first add both of these variables to the end of the section of the Skyrim.ini file. Changing their values will correspond to changing the FOV level you want to use. You should also add the variable fDefaultFOV=90 to the end of the SkyrimPrefs.ini section, again setting the value you want. After that, load the last saved game and write the text FOV 90 on the command line (more on the command line will be described later in the text) so that the FOV level acquires the values of the above variables. Save your game for the changes to take effect permanently.
- fSafeZoneX=15
- fSafeZoneY=15
- fSafeZoneXWide=15
- fSafeZoneYWide=15
The above section and its variables are added to the end of the Skyrim.ini file. These parameters control the distance from the edge of the screen where the Heads-Up Display(HUD)-elements (compass, health, magic and stamina levels) are displayed. The lower the value assigned, the closer to the edge of the screen the HUD elements (including status or location messages) will be located. This will help make them less visible and intrusive.
- uLockedObjectMapLOD=8
- uLockedTerrainLOD=8
- fMapWorldMaxHeight=150000.0000
- fMapWorldMinHeight=1500.0000
- fMapWorldZoomSpeed=0.0800
Also, the section and all the variables included in it (if you need the changes that they bring) should be completely added to the end of the Skyrim.ini file. The first two parameters affect the level of detail in the game world that is visible in Map view, while the above values make the map more detailed. The third and fourth variables allow you to zoom in and out further in "zoom" mode than is possible with normal game capabilities. The last setting reduces the zoom speed so you can see the map better when zooming out or zooming in. If you want to completely remove clouds from the game, you can also add sMapCloudNIF=0 to the above section, and then they will disappear.
bDoDepthOfField=1. If this variable is set to "0" in the SkyrimPrefs.ini file, the Depth of Field effect, most often seen on the backgrounds of the Items, Magic, Skills, Maps screens in the Character Menu, will be disabled. Disabling this effect increases the FPS level, but it also makes it harder to distinguish items against the background of the character's menu.
bShowQuestMarkers=1. If this variable is set to "0" in the SkyrimPrefs.ini file, then all arrows that mark quests (including on the map and on the compass scale) will be disabled, but landmarks will be shown. When these markers are disabled, it becomes harder to complete quests, since now you will have to listen and read their descriptions more carefully.
bShowCompass=1. If this variable is set to "0" in the SkyrimPrefs.ini file, then the compass scale will disappear from the top of the screen. This will provide a cleaner game picture, but you will need to access the map more often, or study the pathfinding spell (Clairvoyance) more carefully.
bAlwaysRunByDefault=1. If you set the value of this variable to zero in the SkyrimPrefs.ini file, then by default your character will move not by running, but by walking. You can change this behavior at any time by simply pressing the CAPS LOCK key. If the parameter is assigned a certain value manually, then it is with this manner of movement that the hero will start the game.
bMouseAcceleration=1. When this variable is set to "0" in the SkyrimPrefs.ini file, mouse acceleration will be disabled. This will make mouse movements more consistent, responsive, and predictable, and won't have to move faster for big moves and slower for small ones. Also, with this change, you can reduce the feeling of "lag" inherent in the default enabled Vsync.
fMouseHeadingSensitivity=0.0440. This variable in the SkyrimPrefs.ini file is associated with the in-game Look Sensitivity setting and must first be adjusted through the game menu. However, if you need to assign a larger value to it than is available in the game, then you can make changes here.
- fMouseHeadingYScale=0.0200
- fMouseHeadingXScale=0.0200
The section and its variables must all be added to the end of the Skyrim.ini file to change the sensitivity of the Y (up/down) and X (left/right) axes of mouse movement accordingly. Larger values increase the effective sensitivity of a particular axis.
Shadows
iShadowMapResolution=4096. This variable from the SkyrimPrefs.ini file directly controls the resolution of the shadows and is therefore the main determinant of the quality of the shadows in the game. It is included in the in-game Shadow Detail settings. When Low is selected for Shadow Detail, iShadowMapResolution = 512; medium (Medium) - 1024; high (High) - 2048; ultra (Ultra) - 4096. A higher value of 8192 is also available for shadow resolution, which will slightly improve the quality of shadows, but will significantly reduce the FPS level. The images below show the difference between using 4096 (corresponding to Ultra) and 8192 for this variable. An indoor scene has been selected where the difference in shadow quality will be most noticeable. You can see that the shadow from the character and the large shadow to the right of him have much smoother edges at 8192.


iBlurDeferredShadowMask=3. This variable in the SkyrimPrefs.ini file controls the blur effect applied to the shadows. Low values will give sharp edges to the shadows, and a value of 0 will turn the effect off completely, giving it the most definition. As the value of the variable increases, the shadows will gradually blur until they become completely shapeless. In the screenshots below, you can see the difference between the values 0, 3 and 7, most noticeable in the shadow of the tree. This effect has little effect on performance. You can lower the value of the variable to see more detail at high resolution shadows, or increase its value to blur and completely hide the jaggedness and flickering at low resolution.


iShadowMaskQuarter=4. This SkyrimPrefs.ini file variable also affects the transparency and purity of the shadows. When it is set to high values (like 10) it increases the definition of shadows, but at too high values it will just "muffle" the game. Low values will make the shadows less detailed, but remember that a value of 0 disables indoor shadows entirely. The performance impact is quite noticeable, so you should first use the iBlurDeferredShadowMask settings to change the sharpness of the shadows.
fShadowDistance=8000. This variable from the SkyrimPrefs.ini file has a significant impact on the quality of shadows in outdoor locations. It controls the distance from which shadows become visible. However, due to the peculiarities of the game engine, it also determines the overall level of shadow detail in the game world. Decreasing the value of this variable will increase the resolution of shadows, and on distant objects they will not be visible at all. This greatly improves performance. With a value of "0", the shadows on the street will be completely disabled. The comparison images below show the effect of values of 400, 2000, and 8000. They confirm that at lower values, the shadows will be shorter, but the level of detail will be higher.


fInteriorShadowDistance=3000.0000. This parameter of the SkyrimPrefs.ini file is responsible for indoor shadows. However, decreasing its values simply translates into more areas being shaded, not any noticeable improvement in shadow resolution. An increase in the values of this variable also does not have a noticeable practical effect. In indoor environments, shadows tend to be sharper the closer they are to the light source, regardless of this setting. Only increasing the values of the iShadowMapResolution variable can really have a positive effect on both indoor and outdoor shadows.
fShadowBiasScale=0.15. This variable from the SkyrimPrefs.ini file determines how much the surface will be shaded by changing the angle the light hits the object. In practice, larger values reduce shading, while smaller values increase it on various surfaces.
bTreesReceiveShadows=0. If this variable is set to "1" in the SkyrimPrefs.ini file, then the leaves on the trees will cast shadows not only on the ground, but also on themselves. Visual changes are quite noticeable, as shown in the images below. This effect does not have a noticeable performance impact, so it can be enabled on most systems to give more natural foliage.


bDrawLandShadows=0. When this variable is set to 1 in the SkyrimPrefs.ini file, the terrain will become subtle shading. This effect is not easy to see, but if you look at the screenshots below, you will notice that when the effect is on, the entire foot of the hill in the center of the image and far left becomes darker. It has minimal impact on performance.


- fSunShadowUpdateTime=1.000
- fSunUpdateThreshold=0.500
If the above variables are added at the end of the Skyrim.ini section, then you will be able to adjust the position of the shadows depending on where the sun is. By default, when the sun moves, the shadows only change their position from time to time, which is visually perceived as sharp jumps in their jagged contours from the old position to the new one. As the value of the fSunUpdateThreshold variable changes, the frequency of shadow position changes changes: the higher the value, the longer the gaps will last before the shadow moves to its new location. Changing the value of fSunShadowUpdateTime determines how long the transition itself will be: high values will make the movement stretch in time, and low values will result in a pronounced jump between the old and new positions of the shadows. For example, try this combination: fSunShadowUpdateTime=0.000 and fSunUpdateThreshold=0.100. It will provide frequent and as a result stable updates of shadow positions in short and clearer transitions.
Skyrim is the first Elder Scrolls game to make extensive use of dynamic shading. The quality of the shadows, as well as their flicker and movement speed, can noticeably differ in the game. Since shadows affect the performance of the game quite intensively, it is very often necessary to make compromises with the quality when setting them up and balance between the rich texture of the shadows and a sufficient frame rate level. However, it is not so easy to set the optimal level of detail for all shadow parameters. Many combinations have been considered in this guide for various shadow display settings, but in many ways the final choice comes down to personal preferences and the capabilities of a particular system.
Grass and trees
fGrassStartFadeDistance=7000.0000. This SkyrimPrefs.ini file setting has the most significant impact on the display of grass. It determines the distance at which she appears in the game world and corresponds to the in-game Grass Fade setting. The lower its value, the less grass will be visible in the distance; the higher the value, the more grass. The game setting does not allow you to exceed the level of 7000.00, but you can increase this value yourself if you want more small vegetation to be seen on the horizon. For example, a value of 14000.00 will double the distance at which grass will be visible. The performance impact will vary by system, but should generally be small.
iMinGrassSize=20. This variable must be added to the end of the section of the Skyrim.ini file. She is responsible for the density of grass bushes. With an increase in its value, “bald patches” appear on the surface of the earth, caused by the lack of grass; with a decrease, the grass cover becomes much thicker. We noticed that it makes no sense to go below 20: the grass is not getting thicker anyway. The images below show two opposite values (80 and 20) and the changes in grass bush density are very noticeable. Decreasing grass density can be seen as an additional way to increase productivity levels without reducing the distance from which it can be seen or eliminating it entirely.
Figure 7 - Click here for an interactive comparison of this effect between iMinGrassSize 20 and 80
bAllowCreateGrass=1. If this variable is set to "0" in the Skyrim.ini file, then all grass will be disabled. This can have a positive effect on the performance of not the strongest GPUs in outdoor scenes, but with the loss of grass, a sufficient proportion of the realism of the game is also lost. How to temporarily disable grass in specific locations to prevent the game from "slowing down" will be described in detail in the "Command line" section of this guide.
fTreeLoadDistance=75000.0000. This parameter in the SkyrimPrefs.ini file determines the distance from which trees become visible. Increasing the value of this parameter will also increase the number of visible trees in the distance, while lowering it will decrease their number. But note that even with a value of "0", nearby trees will still be visible. Changing this setting can have a noticeable performance impact depending on the specific location. In the screenshots below, the variable was assigned the values 5,000, 75,000, and 150,000. There is a noticeable change from 5,000 to 75,000. At high values, there are no visible changes in the landscape.


fTreesMidLODSwitchDist=10000000.0000. This variable in the SkyrimPrefs.ini file controls the level of detail for trees at close range. When it is set to a low value, less leaves and branches are visible on trees up close. If you increase the values, then there are more leaves and branches. The performance impact will vary depending on the system.
bRenderSkinnedTrees=1. This SkyrimPrefs.ini file variable determines the amount of foliage on nearby trees. If it is set to "0", then the trees will lose some of the branches and leaves, although they will remain sufficiently detailed. Changing its values increases performance, but reduces the realism of the game. Please note that the uiMaxSkinnedTreesToRender variable in the SkyrimPrefs.ini file also controls the maximum possible tree detail, but increasing its value does not lead to any visible changes and does not increase the number of trees in most game scenes.
Level of detail
fLODFadeOutMultObjects=15.0000. This variable in the SkyrimPrefs.ini file controls the distance at which objects in the game world appear in the field of view and corresponds to the game's Object Fade setting. Inside the game, it can be given a value no higher than 15, however, manually you can increase it even more by increasing the distance of the appearance of objects.
fLODFadeOutMultItems=15.0000. This SkyrimPrefs.ini file variable is responsible for the distance at which objects fall into the field of view and corresponds to the Fade game setting. The in-game maximum for this setting is 15, but you can increase it even further to increase the spawn distance.
fLODFadeOutMultActors=15.0000. This variable in the SkyrimPrefs.ini file is responsible for the distance at which creatures and characters appear in the field of view and corresponds to the Actor Fade game setting. You will not be able to set her level above 15 using the available means of the game, however, you can independently increase her values to increase the distance at which other characters will be visible.
- FblockMaximumDistance=250000.0000
- fBlockLevel1Distance=70000.0000
- fBlockLevel0Distance=35000.0000
- fSplitDistanceMult=1.5000
The above variables in the SkyrimPrefs.ini file control the level of detail for distant landforms and are partly related to the game's Distant Object Detail setting. The maximum values that they can take when changing game settings are listed above. However, you can increase their values if you wish. When these three variables are increased, this will result in subtle improvements in detail in very distant areas, such as mountain tops. The fSplitDistanceMult variable is responsible for the factor at which the overall LOD changes occur. When its value is increased, the landscape in a small radius from the character will look much more detailed. Do not forget that any change in the values of these variables only affects the outlying lands. Therefore, in many scenes, the visual effect will be minimal or not noticeable at all.
fSkyCellRefFadeDistance=150000.0000. This SkyrimPrefs.ini file variable actually controls the distance at which clouds appear in view, especially around mountain peaks. As its value increases, more and more distant mountain peaks are hidden in the clouds. When decreasing - the clouds will become smaller until they disappear altogether at a value of "0". Changing this variable has a moderate effect on performance.
General graphic settings
bDisableAllGore=1. Adding this variable to the end of the Skyrim.ini section and setting it to "1" will disable all blood related effects in the game (such as pulsating wound fountains)
- bBloodSplatterEnabled=0
The above section and variable must be added together to the end of the Skyrim.ini file with a value of "0" (for a variable) if you want to disable bloodstains on the screen. This will not turn off blood spatter when you hit an enemy (or they hurt you); only red spots on the screen, simulating the ingress of blood splashes into the character's eyes, will be disabled.
- bDoRadialBlur=0
The above section and variable must be added to the end of the Skyrim.ini file, and the variable set to 0, if you want to completely disable the radial blur effect, which was discussed earlier in this guide in the game settings section. In theory, turning off the effect should improve performance during battles, but the main reason to turn it off is if you just don't like the radial jitter effect itself.
- bPrecipitation=0
The above section and variable must be added to the end of the Skyrim.ini file, and the variable must be set to "0" if you want to disable precipitation in the game (mainly snow and rain). And let the game lose some of the realism, but turning off this effect will have a positive effect on performance.
iMaxDesired=750. This variable in the SkyrimPrefs.ini file controls the saturation of the "particle effects" that are characteristic of smog, fog, and especially fire and spells. Experimentally, we found that for smog and fog, the effect is almost invisible, but it is clearly visible on fire (in particular, from torches) and spells. For example, as the value of the variable increases, the Flames spell spews significantly more fire from your hand. But with a value of "0", the flame from this spell is not visible at all. The images below show the difference between the values of this variable "0" and "950". Pay attention to both the flash near the hand and the torch: the effect affects both. Changing this variable can have a noticeable effect on gaming performance depending on your system.


- iWaterReflectHeight=512
- iWaterReflectWidth=512
The above SkyrimPrefs.ini file variables determine the resolution of the reflections that are visible in the water. Increasing their values (for example, up to 1024 each) will slightly increase the detail of all objects reflected in the water; while decreasing (for example, to 256 each) will lower its level. The images below show the difference between the resolution of 512 and 1024: with a larger reflection value, it is a little clearer. This is especially noticeable in the distance on the right side of the figure. The effect of this setting on performance and image quality depends on the system configuration; on how high you set the water reflection level in the game settings; from Anisotropic Filtering installations and, of course, from the proximity and size of water areas.


bAllowScreenShot=1. If this variable is set to "1" from the Skyrim.ini file (and it is by default), then at any time you can take a screenshot of the game by simply pressing the PrtScn key. Screenshots are saved in BMP format in the \Program Files (x86)\Steam\steamapps\common\skyrim directory.
In this section, we've covered most of the most useful changes you can make to your game by tweaking .ini files. Many important settings were tested, as well as many minor and unimportant settings were ignored. All of the above changes will work correctly if you make them exactly as shown in this guide. It is equally important to install each individually and observe the effect that it has on your system. Do not directly copy-paste information into your .ini files from the examples in this guide or from other sources.
In the next section, we will talk about other ways to vary the settings of the game's gameplay and graphics.
Command line
Unlike .ini files, which are read and executed at the start of the game by the game engine, the command line is a place where you can quickly change some aspects of the engine during the game and immediately see the results of such changes. The main mission of the commands that are written in it is more to regulate gameplay or interface parameters than to change the quality of the game image or performance. Remember that using these commands does not prevent you from using new items with Steam. Although some of these new products are just cheats, and they can spoil the experience of the game. Moreover, Bethesda warns that commands executed from the command line may break the logic of the quests, lead to incorrect visual display of the game world and dungeons, and some saved games may become incompatible with subsequent patches.
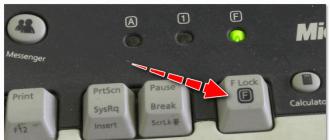
To enter the command line mode, you need to start the game, and then press the tilde (~) key. On most keyboards, it is above the TAB key, to the left of the number 1, below the ESC key, and it shows the letter Y in the Russian layout. Clicking it will open a command prompt dialog at the bottom of the screen. When it is open, the game is paused. You can also close or reopen the command line by pressing the ~ key.

To execute a command, simply type it, specifying the appropriate value (if required) and press Enter. After that, you will receive confirmation of its successful completion. As a rule, commands can be in short and long forms: it is normal practice to use both of these forms. For example, both the ToggleCollision command and its short version, TCL, will have the same effect (this command turns on or off the parameters for hitting objects against each other). If there is a need to assign a value to the command, then this is done as follows: the command itself is printed first, and the required value separated by a space. For example, to change your character's field of view by 90 degrees, type FOV 90 and press Enter: the change will take effect immediately. If you type FOV again without any value, it will return to the default value.
Some commands require you to specify the object to which they will apply. To do this, first call the command line, then left-click on the required character or object, and a code will appear in the center of the screen. It is not worth writing it down or memorizing it, because in most cases this code is simply used as confirmation that you have made a certain choice. Now you can execute the appropriate command and it will be applicable to the selected object or character.
There are many command line commands in Skyrim, but most of them are designed to meet the needs of developers for debugging and testing. A short list of the most useful of these commands, with a few explanations, is presented below:
FOV- this command allows you to change the field of view of your character (FOV). This term refers to how widely you see the game world on the screen. Assign the desired numerical value to this command, and the changes will immediately take effect. Type FOV (no numeric value) to return the standard field of view. Once you have decided on a suitable FOV level, you can change the appropriate FOV variables in the .ini files (detailed in the Advanced Settings section) to permanently fix this value in the game.
Showracemenu- this command opens the character creation menu, which you met at the beginning of the game when you first created your avatar. With it, you can vary the race of your hero, his gender and appearance. But if the appearance changes are perceived positively by the system, then changing the race can provoke “glitches”, so just in case, save the game before using this command.
Set Timescale to- such a command will change the speed at which the playing time passes. The default value is 16, but by increasing it, you can speed up the passage of time, and by decreasing it, you can slow it down. Try, for example, typing Set Timescale to 5000 to see the frame-by-frame effect of the game flowing.
Disable- if you want to remove any object from the game world, then select it, write the Disable command, and it will disappear. In order for the last object you deleted to appear again, use the Enable command.
Kill- select a character (or creature) with the mouse, and then type this command, and he will be killed immediately. To immediately kill several characters (creatures) near you, use the Killall command. To bring the dead person back to life, select it with the mouse and type the Resurrect command. This is also useful if your NPC partner is accidentally caught in the crossfire.
Stopcombat- If you use this command against the specified character that you are fighting, then he will immediately stop and put down his weapon. This can come in handy when you unintentionally hit a friendly character and they don't respond to the normal end-of-fight gestures.
TAI- using this command in the game, you can enable / disable Artificial Intelligence (AI). When AI is disabled, characters and creatures will simply repeat their last actions or do nothing at all. If a character or creature behaves aggressively towards you, then it will continue to attack, in which case you need to use the TCAI command to enable or disable artificial intelligence accordingly during the battle. Combining TAI and TCAI disables AI completely for most characters and creatures, but note that using TAI can result in confusing controls, gameplay glitches, and is not always completely effective at disabling AI. If you just want to stay out of sight of other creatures or characters, you can use the Tdetect command for this purpose.
TCL– adjusts the collision system. When it is off, your character can fly over the game world and pass through any solid objects. This command comes in handy when you get stuck in a certain area of the territory and want to quickly change the location.
TFC– turns on the "flight" of the camera. Similar in action to TCL, however, with TFC, the flight speed is much higher, and the character remains in place. Very useful when you need to quickly explore the surrounding lands.
TG- regulates the grass cover. With this command, you can temporarily turn off the grass in those locations where you feel the slowdown in the game. This option is much better than permanently removing all grass from the game.
TGM– allows you to enable/disable the God Mode. When enabled, you cannot be hurt or killed (and health, magicka, and stamina levels are not reduced). Alternatively, you can use the TIM command to enable Immortality Mode. In this mode, you will be able to play as usual: health, magicka, and stamina levels will deplete, but you will remain immortal, since the health bar will be slightly above the minimum at all times.
FW- sets the weather according to the code you choose. The list of codes is here - Weather ID Numbers. For example, the command FW 10a241 will provoke a storm.
Unlock- first select a specific door (or box, chest) and with the help of this command you can automatically open it. To close the selected item again, select it and use the Lock command.
Movetoqt- this command will teleport you to the corresponding objective in the selected quest, allowing you to complete it faster. Look at the list of quest IDs and substitute the correct code for this command.
PSB- immediately adds all spells, shouts and words to your spellbook.
Player.AddItem- this command adds the specified item to your inventory in the selected quantity. Please refer to the Code List or Code List by Category before use. For gold, the code "F" is used, and for lock picks, the code "A". For example, to add 10000 gold to your treasury, type Player.AddItem F 10000; to add five steel maces, type Player.AddItem 00013988 5 and so on. Text messages will appear to confirm the addition of new items.
Player.Placeatme- Summons any character from Skyrim within a couple of meters from you. Check out the list of NPC IDs to choose which code to use. Remember that the called character will appear only after you close the command line.
COC- teleports you to the specified location. You can equally use both the code and the name of the location, which you will find in this list. For example, the COC Riverwood team will take you to the village of Riverwood where you started the game.
QQQ– a command to quickly exit the game directly to the Windows desktop, bypassing the questions (prompts) that appear during the standard exit procedure.
Changes made using the command line will not take effect when you exit and restart the game. Some of them will still remain if you save the game or autosave occurs. Based on this, we recommend that you manually create a "game savepoint" before trying to use commands from the command line. If, after experimenting with commands, you want to use some of them every time you play, you can do this automatically using batch files.
To do this, create a new text document and give it any convenient name, such as commands.txt. Edit it and enter each command on a separate line. The following is an example of the contents of such a batch file:
- Set Timescale to 1
- fov 90
Save this file to your \Program Files (x86)\Steam\steamapps\common\skyrim directory. Launch Skyrim, load your saved game, open a command prompt and type Bat into it so that its contents start executing. In our example, we need to write Bat commands and the three commands above will start to take effect.
Mods and video driver settings
Bethesda Game Studios games are updated everywhere to be able to be modded. And Skyrim is no exception. Existing mods have replaced and improved textures, but in January Bethesda will release The Creation Kit, free software that allows players to change almost any aspect of the game. New quests, radically different gameplay elements and much more are expected that will keep the interest in the game even years after the release. In addition, Bethesda is integrating Skyrim with the Steam Workshop, giving players the ability to safely, easily and efficiently download and install user-created mods directly to their own computers.
The purpose of this section is to draw your attention to mods, but not in the form of a list of recommended or required modifications. In fact, no mod inherently provides for mandatory use. The game can be great without them. Therefore, if you do not enjoy using these modifications, then you should not attach much importance to them. After all, in fact, mods are not only unofficial developments made by users themselves, but they can also carry the risk of unexpected bugs or performance problems. On the other hand, judicious use of some of them will help make Skyrim the way you like it.
The best mods are located on Skyrim Nexus, which has the widest selection of free mods available for download. As you explore this growing list, don't forget to read the details and user reviews of the mods you're interested in before you install anything. Here are some popular mods you can try:
Another modification that works in a similar way to the FXAA Post-Process Injector is the SMAA Injector. This mod adds a form of post-processing line smoothing known as Subpixel Morphological Antialiasing (SMAA). This type of anti-aliasing can reduce the jaggedness of an entire landscape without the blur that comes with FXAA and without the performance hit that comes with MSAA.
If existing Skyrim mods don't impress you too much, then get ready to encounter hundreds of new mods literally every day. Just in case, we recall once again that modifications in Skyrim are an opportunity, but not a necessity. Therefore, if you start having any problems with the game, troubleshooting should start by disabling all mods first.
Video driver settings
There is another method that allows us to control the graphics fidelity in Skyrim more deeply: graphics card driver settings, which can be changed using the graphics card control panel. This section will cover many of the effects and settings that are not supported by default in Skyrim, but can be force-enabled using the aforementioned control panel. First, make sure you have updated to the latest video drivers available, as described at the beginning of this guide.
Improved Anisotropic Filtering
Anisotropic filtering (AF) has already been covered earlier in the corresponding section of this guide. Its maximum magnification level can be set to 16. However, if you want the best quality anisotropic filtering, there is an alternative: turn off AF in the game settings, and instead adjust it using the graphics card control panel. NVIDIA owners should follow the following sequence of actions:
2. Set the value of the "Texture Filtering - Quality" parameter to "High Quality".
3. To set Anisotropic Filtering, select the AF level. The recommended value is 16.
4. click the "Apply" button
5. launch Skyrim, click "Options", disable anisotropic filtering ("Anisotropic Filtering" -> "Off") and click "OK".
Once done, launch Skyrim as normal and you'll notice much sharper textures, especially from a distance.


In the images above, you can compare the in-game 16x AF settings and the same 16x AF settings, but already selected through the NVIDIA control panel. When AF is set via the control panel, the surface of the water looks much more detailed, and distant objects (mountains and a stone building on the left) are more distinct and defined. The difference in performance level when using both of these methods is minimal.
Transparency Antialiasing
Just like with anisotropic filtering, Skyrim has the ability to independently select different types and levels of anti-aliasing settings using the video card control panel. Let's take a look at transparent anti-aliasing (TRAA), which can't be tuned using purely gaming methods. This form of anti-aliasing evens out jagged lines on transparent textures, typically affecting foliage, objects with bright edges, or objects with transparent parts. NVIDIA owners are recommended the following sequence of actions:
1. open the control panel (NVIDIA Control Panel) and in the "Program Settings" tab, select "Elder Scrolls 5: Skyrim" in the first checkbox. If you do not see the name of the game in the list, then uncheck the box "Show only programs found ..." and try again.
2. set "Antialiasing - Transparency" to the level of multiplicity (Supersample) 2x, 4x or 8x; multiple (Multisampling) TRAA is capable of causing failures, as already discussed earlier.
3. click the "Apply" button
4. Launch Skyrim and select "Options", then make sure the anti-aliasing option is set to something other than "Off" and click "OK".
Multiple TRAA should not be used in Skyrim: it can cause instabilities in the game, due to which some parts of opaque objects become transparent. Major visual changes can be easily achieved through the use of different levels of Supersampe TRAA.


The screenshots above compare regular in-game 8x anti-aliasing, then Multisampe TRAA, and then 2x, 4x, and 8x Supersample TRAA (installed via the NVIDIA control panel). As you can see, the increase in TRAA levels evens out the jagged edges of the bushes on the left and the trees on the right, and the slight shimmer of the foliage is achieved more clearly through the game itself than through TRAA. The performance impact of Multisample TRAA is almost imperceptible on most mid-range systems, and 2x TRAA is acceptable on advanced configurations. However, 4x and 8x Supersample TRAA levels will weigh heavily on performance, especially when MSAA is set high in game settings in parallel, and at Ultra settings.
ambient occlusion
Ambient Occlusion (AO) is a technique that creates more realistic daylight shadows. There is no in-game option to turn on AO in Skyrim, but it can be turned on nicely by NVIDIA owners via their video driver settings. However, remember that if you see flickering, artifacts, or other graphical oddities with AO turned on, then it's best to turn it off or use the Quality mode, which can reduce these manifestations. Players with NVIDIA graphics cards and R290 drivers can enable Ambient Occlusion through the NVIDIA Control Panel:
1. open the control panel (NVIDIA Control Panel) and in the "Program Settings" tab, select "Elder Scrolls 5: Skyrim" in the first checkbox. If you do not see the name of the game in the list, then uncheck the box "Show only programs found ..." and try again.
2. Set the "Ambient Occlusion" parameter to Performance or Quality - see the screenshots below for a comparison.
3. click the "Apply" button
4. launch Skyrim.
For better control of the AO level, you can use the free NVIDIA Inspector utility, which allows you to adjust the NVIDIA driver profile for Skyrim. If you have NVIDIA, then do the following:
1. Launch NVIDIA Inspector and click on the little "Profile Settings" button at the end of the "Driver Version" line.
2. click on the "Profiles" button and select "Elder Scrolls 5: Skyrim" from the drop-down list.
3. edit the "Ambient Occlusion compatibility" setting and select the "0x00000003 (Fallout 3)" profile.
4. In the "Common" section, select "Enabled" for "Ambient Occlusion usage".
5. Assign "Ambient Occlusion setting" to the mode that suits you. We recommend "Performance".
6. Click the "Apply changes" button at the top right.
7. Run Skyrim in normal mode to see the changes.


With this method, AO can be played in Performance, Quality and High Quality modes. Visual differences are shown in the screenshots above. There you can see that the changes between no AO and Performance AO mode are significant, with grass, trees, rocks, and the character itself getting rich shading, while the performance impact is moderate. With Quality and High Quality selected, the shadows are slightly improved, but at the cost of a fair amount of performance, we recommend using the Performance mode.
If you need to undo the changes that were made to the video driver profile using the NVIDIA Inspector, then simply click on the green NVIDIA logo at the top of this utility and it will return to the default values. Similarly with the NVIDIA Control Panel, click the "Restore" button on the top right side of the Elder Scrolls 5: Skyrim profile for the same thing to happen.
Skyrim The day came out and fans were already digging into .ini files looking for ways to fix the most common problems and UI annoyances. The following recipes will allow you to turn off mouse anti-aliasing, adjust the field of view, turn off v-sync, and fix the issue that causes the game to crash to the desktop from the main menu immediately after launch. In addition, there are a couple of recommendations for "cosmetic" improvement Skyrim.
Disable mouse smoothing Go to the Steam folder on your computer, SteamApps\common\skyrim\Skyrim. Just in case, copy the unmodified SkyrimPrefs.ini file somewhere. Open the one in the folder Skyrim, find the section, item bMouseAcceleration=1. Change to bMouseAcceleration=0. Save, get out and play.
Change field of view Go to My Documents\My Games\Skyrim\Skyrim, make a copy of the skyrim.ini file. Open the file, find the section and add fdefaultfov=XX where XX is the field of view you want. Save and exit.
It turned out that the setting in this way is reset after fast moving. Therefore, for the best result, enter the command through the console. While playing, press "~" and write
where XX is the field of view you want. A value of 95–100 should suit you. However, please note that opening the console in the game (even accidentally) will block the receipt of achievements on Steam. We have warned you.
default fov settings

fov 120
Sound problems and/or crashes
If you have audio issues, try the following:
- Open the Windows Control Panel (or right-click on the tray speaker icon, "playback devices").
- Select Sound.
- In the Sound window, select your active playback device (a green circle with a white check mark inside).
- On the Advanced tab, set the settings to 16-bit, 44100 Hz (CD).
Disable vertical sync Open the SkyrimPrefs.ini file (Steam\SteamApps\common\skyrim\Skyrim) and add iPresentInterval=0 to the end of the section. This can improve stuttering frame rates and mouse lag.
Remove Bethesda logo at game start If you do not want at every start Skyrim look at the logo Bethesda before loading the main menu, and immediately go to the main menu - open the Steam\SteamApps\common\skyrim\Data\Video folder and remove the "logo" video from there (copy it somewhere just in case: suddenly Bethesda offended).
Graphics settings SkyrimPrefs.ini (Steam\SteamApps\common\skyrim\Skyrim) has some interesting settings you can experiment with. To enable the function - replace the number at the end of the line with 1, to disable it - with 0. Just in case, do not forget to make a copy of the unchanged file.
The settings are in order of their location in the .ini file with default values:
bDoDepthOfField=1
bTreesReceiveShadows=0
bDrawLandShadows=0
bShowFloatingQuestMarkers=1
bShowQuestMarkers=1
bShowCompass=1
bMouseAcceleration=1
fAutosaveEveryXMins=15.0000
You can also change iWaterReflectHeight=512 and iWaterReflectWidth=512 to 1024, and add the following text to SkyrimPrefs.ini to improve the quality of water reflections:
bUseWaterReflectionBlur=1
b ReflectExplosions=1
iWaterBlurAmount=4
bAutoWaterSilhouetteReflections=0
bForceHighDetailReflections=1
Below are screenshots "before" and "after" manipulations with the shadows and reflections in the water. Adding shadows is good for Skyrim's trees.