Greetings to all!
Screenshots are an integral part of working on a computer, and each of us sometimes needs to take them. And it’s quite sad when Print Screen doesn’t work for some reason - you just want to break the keyboard. However, this will not help the cause ... 👀
You can, of course, take a picture of the screen on your phone or camera, however, the picture quality will be worse. You can go even more radical, like the blonde in the preview picture on the left (But this is absolutely ridiculous ☝).
In this article I will offer several options on how to solve this problem in simpler and more intelligent ways. Even if your button is completely "torn out" from the root and it is simply not physically there - all the same, this article should help you!
What can be done in case of problems with Print Screen
1) First, check the spec. keys
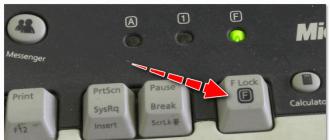
On some keyboards (only seen on PC) there is a special key F Lock. When you press it, the value of some specials changes. and function keys. If you have such a key - try disabling it...

As for laptops, then they often have all these keys (F1 - F12, Print Screen, Pause, etc.) have a double meaning, which can be activated using the key fn(sometimes alt). Thus, try pressing the following keyboard shortcut:
- Fn + Print Screen (and then open Paint and check if the screen is inserted);
- Alt+Print Screen

Another point is that the key fn may just not work! For example, it can be disabled in the BIOS (check its operation with other function keys).
👉To help!
Main reasons problems with key .
Also note, did you install any programs the day before, for example, Yandex-screenshots (included with Yandex-disk), OneDrive, Dropbox, Snipping tool, etc.
The fact is that they can "intercept" the creation of a screenshot in order to automatically save it to a cloud drive. If there is such software, open it settings (see screenshot below 👇) and disable the interception of the Print Screen key.


2) You can install special. screenshot tool
I think that many will agree with me that pressing the Print Screen button, and then opening Paint (or another editor)- not always convenient and fast.
It is much more convenient to install a special application in which you can create and save a screenshot directly to disk with one click (or automatically upload it to the network or add it to the editor).
And, in all programs for creating screenshots (in 99%) - you can change the button for creating them! I would recommend the following software: Capture, Snagit, PicPick, Light Shot.
👉 To help!
Find the best screenshot programs.

3) You can remap one key to another
If in the previous method we simply assigned a "hot" key for one program, then in this I propose a more radical one - change globally for all programs and the Print Screen system, say, to Shift or Home. Here, see for yourself which key would suit you better instead of the broken one.
The change happens quickly enough, just run one of the utilities: Key Remapper, KeyTweak, MapKeyboard.

MapKeyboard: just three steps to replace a key
4) Call the on-screen keyboard
Not everyone knows that Windows has a special center with interesting tools: a screen magnifier, an on-screen keyboard (you can click on it with the mouse), etc.
This section is located at:
Control Panel -> Accessibility -> Ease of Access Center
(to open - press Win + R , and enter the command control ) .

Control Panel - Accessibility - Ease of Access Center (Clickable)
Actually, the on-screen keyboard has all the buttons that are on the regular (physical) one. You can click on the desired key and use the PC normally...

5) Try to clean the keyboard, if there is no effect, replace it with a new one
In most cases, the keys stop working and start to work poorly due to dust, crumbs and other debris that accumulates under them. There are several ways to clean your keyboard:
- just turn it over and knock: all the crumbs and dust will fly out of it (if you want to do this with a laptop - first disconnect the keyboard from the device!);
- there are special keyboard vacuum cleaners - they can quickly collect everything superfluous under the keys (you can also use a regular vacuum cleaner, by the way);
- on sale there are special "lizuns" - cleaners for keyboards. The principle of their work is simple: stick them to the keyboard, they spread, and then "tear off" along with dust and debris.

Another "collective farm" old-fashioned way to clean the keyboard:
- remove the keyboard (disconnect from PC);
- wash it in warm water with detergent (for example, Fairy);
- dry it well;
- collect, connect and try in action. Even in the saddest cases (for example, with juice or coffee) - the method helps out! True, I’ll make a reservation, you do everything at your own peril and risk, I can’t give any guarantees ...
If all of the above did not help, there is only one way out, buy a new keyboard (so that they are not so expensive).
👉 To help!
You can save a lot if you order a keyboard .
Good day!
folk wisdom: there is no such computer user who at least once would not want (or would not need to) take a picture of the screen!
In general, a screenshot (or a photograph of it) is taken without the help of a camera - just a few actions in Windows are enough (about them a little lower in the article). And the correct name for such a picture is ScreenShot (in the Russian manner - “screenshot”).
Need a screen (this, by the way, is another name for ScreenShot, more abbreviated) can in a variety of situations: you want to explain something to a person (for example, how I provide screenshots with arrows in my articles), show your achievements in games, you have errors and failures in the PC or program, and you want to illustrate a specific problem to the master, etc.
In this article I would like to talk about several ways to get a screenshot of the screen. In general, this task is not so difficult, but in some cases it turns into a rather dreary undertaking: for example, when a black window is obtained instead of a screenshot, or it cannot be done at all. I will consider all cases :).
And so let's start...
Important! If you want to take a screenshot of the game screen or some frame of the movie, then this issue is discussed in the article below (in a special subsection, see the table of contents). In some cases, it is impossible to get a screen from them in a classic way!
On the keyboard of any computer (laptop) there is special button (on laptops PrtScr) to save everything that is displayed on it to the clipboard (sort of: the computer will take a screenshot and put it in memory, as if you copied something in some file).
It is located in the upper part next to the numeric keypad (see photo below).

After the image from the screen is saved to the clipboard, you need to use the built-in Paint program (light graphics editor for quick image editing, built into Windows XP, Vista, 7, 8, 10) with which you can save and get a screen. I will consider in more detail for each version of the OS.
1.1. Windows XP
1) First of all, you need to open the program on the screen or see the error that you want to screen.
3) Now the image from the buffer needs to be inserted into some graphics editor. Windows XP has Paint - we will use it. To open it, use the following address: START/All Programs/Accessories/Paint(see photo below).

4) Next, just press the following command: " Edit / paste«, Or a combination of buttons Ctrl + V. If everything was done correctly, then your screenshot should appear in Paint (if it didn’t appear and nothing happened at all, you may have pressed the PrintScreen button badly - try to take the screen again).
By the way, in Paint you can edit the picture: cut the edges, reduce the size, paint on or circle the necessary details, add some text, etc. In general, it makes no sense to consider editing tools in this article, you can easily figure it out on your own experimentally :).

Paint: Edit/Paste
5) After the picture has been edited - just click " File/Save As...(an example is shown in the screenshot below). Next, you will need to specify the format in which you want to save the picture and folder on disk. Actually, everything, the screen is ready!

1.2. Windows 7 (2 ways)
Method number 1 - classic
1) On the "desired" image on the screen (which you want to show to others - that is, to screen) - press the PrtScr button (or , the button next to the numeric keypad).

3) The next step is to click the " Insert" (It is located on the top left, see the screen below). Also, instead of "Paste", you can use the hotkey combination: Ctrl + V .

4) Last step: click " File/save as...“, then choose the format (JPG, BMP, GIF or PNG) and save your screen. Everything!

With method number 2 - Tool scissors
A fairly handy tool for creating screenshots appeared in Windows 7 - scissors! Allows you to capture the entire screen (or a separate area of it) in a variety of formats: JPG, PNG, BMP. Consider an example of work in scissors.
1) To open this program, go to: START/All Programs/Accessories/Scissors(often, after you open the START menu - scissors will be presented in the list of used programs, as in my screenshot below).

Scissors - Windows 7
2) The scissors have a mega-handy feature: you can select an arbitrary area for the screen (i.e. circle the desired area with the mouse, which will be screened). Including you can select a rectangular area, screenshot some window or the entire screen as a whole.
In general, choose how you will select the area (see screenshot below).


Conveniently? Yes!
Quickly? Yes!

1.3. Windows 8, 10
1) We also first select the moment on the computer screen that we want to screen.
3) Next, you need to open the Paint editor. The easiest and fastest way to do this in the new versions of Windows 8, 8.1, 10 is to use the Run command (in my humble opinion, because looking for this shortcut among the tiles or the START menu is much longer) .
To do this, press the button combination Win+R and then type mspaint and press Enter. The Paint editor should open.

mspaint - Windows 10
By the way, in addition to Paint, you can open and run many applications through the Run command. I recommend reading the following article:
- PNG format: should be selected if you want to use the image on the Internet (this way the colors and contrast of the image are more clearly and saturatedly transmitted);
- JPEG format: the most popular image format. Provides the best quality/file size ratio. It is used everywhere, so you can save any screenshots in this format;
- BMP format: uncompressed image format. It is better to save those pictures that you are going to edit later;
- GIF Format : It is also recommended to use the screen format in this format for publishing on the Internet or e-mail messages. Provides good compression, along with fairly acceptable quality.
However, you can try out the formats empirically: save a couple of screenshots to a folder in different formats, and then compare them and determine for yourself which one suits you best.
Important! Not always and not in all programs it is possible to take a screenshot. For example, when watching a video, if you press the PrintScreen button, most likely just a black square will be captured on your screen. To take screenshots from any part of the screen and in any programs - you need special programs for capturing the screen. One of these programs will be the final section of this article.
2. How to take screenshots in games
Not all games can take a screenshot using the classic method described above. Sometimes, press at least a hundred times on the key - nothing is saved, only one black screen (for example).
To create screenshots from games - there are special programs. One of the best of its kind (I have repeatedly praised her in my articles :))- this is Fraps (by the way, in addition to screenshots, it also allows you to make videos from games).
F RAPS
Program description(can be found in one of my articles in the same place and download link):

I will describe the procedure for creating a screen in games. I will assume that you already have Fraps installed. So…
BY STEPS
1) After launching the program, open the "ScreenShots" section. In this section of Fraps settings, you need to set the following:
- folder for saving screenshots (in the example below, this folder is the default: C:\Fraps\Screenshots);
- a button to create a screenshot (for example, F10 - as in the example below);
- image saving format: BMP, JPG, PNG, TGA. In general, in most cases, I recommend choosing JPG as the most popular and frequently used (and also provides the best quality / size).

Fraps: setting up screenshots
2) Then start the game. If Fraps is working, then in the upper left corner you will see yellow numbers: this is the number of frames per second (so-called FPS). If the numbers aren't showing, Fraps may not be enabled or you have changed the default settings.

Note. Screenshots are saved to the folder: C:\Fraps\Screenshots by default.


3. Screenshots from the movie
It is not always easy to get a screenshot from a movie - sometimes, instead of a frame of a movie, you will just have a black screen on the screen (as if nothing was displayed in the video player during the creation of the screen).
The easiest way to take a screenshot while watching a movie is to use a video player that has a special screenshot function (by the way, many modern players now support this function). Stop, personally, I want to Pot Player.
P ot Player

Pot Player Logo
Why do I recommend it? Firstly, it opens and plays almost all popular video formats that can only be found on the net. Secondly, it opens the video, even if you do not have codecs installed in the system (because it has all the main codecs in its kit). Thirdly, the fast speed of work, a minimum of freezes and other unnecessary "baggage".
And so, how to take a screenshot in Pot Player:
1) It will take, literally, a few seconds. First, open the desired video in this player. Next, we find the required moment that needs to be screened - and press the button " Capture current frame» (it is located at the bottom of the screen, see the screenshot below).

Pot Player: Capture current frame
2) Actually, after one click on the "Capture ..." button - your screen has already been saved to the folder. To find it, click on the same button, only with the right mouse button - in the context menu you will see the option to select the save format and a link to the folder in which the screenshots are saved (" Open image folder", example below).

Pot player. Select format, save folder
Is it possible to make a screenshot faster? I don’t know… In general, I recommend using both the player itself and its ability to screen…
Option number 2: use special. screenshot programs
For example, FastStone (one of the best screenshot programs):
1) Run the program and press the capture button - .

2) Next, you can select the area of the screen that you want to screenshot - just select the player window. The program will remember this area and open it in the editor - you just have to save it. Convenient and fast! An example of such a screen is shown below.

Creating a screen in FastStone
4. Creation of a “beautiful” screenshot: with arrows, captions, uneven edge trimming, etc.
Screenshot screenshot - discord. It is much clearer to figure out what you wanted to show on the screen, when there is some kind of arrow on it, something needs to be underlined, signed, etc.
To do this, you need to further edit the screen. If you use a special built-in editor in one of the programs for creating screenshots, then this operation is not so routine, many typical tasks are literally performed in 1-2 mouse clicks!
Here I want to show by example how you can make a “beautiful” screen with arrows, captions, edge trimming.
All step by step:
I will use - Fast Stone .
1) After starting the program, select the area that we will screen. Then we select it, FastStone, by default, the picture should open in its “simple” editor (note: which has everything you need).


3) In the drawing window that opens, there is everything you need:

Note! If you have drawn something superfluous: just press the hot keys Ctrl + Z - and your last drawn element will be deleted.
4) And finally, to make jagged edges on the picture: press the Edge button - then adjust the size of the "crop", and press "OK". Then you can see what happens (example on the screen below: and where to click, and how to get trimming :)).

5. What to do if the screenshot fails
It happens that you screen-screen - but the image is not saved (that is, instead of a picture - either just a black area, or nothing at all). Programs for creating screenshots also sometimes cannot screenshot a window (especially if administrator rights are required to access it).
In general, in cases where you can’t take a screenshot, I recommend trying one very interesting program. greenshot.
Green Shot
This is a special program with a large number of options, the main direction of which is to take screenshots from various applications. The developers claim that their program is able to work almost "directly" with the video card, receiving an image that is transmitted to the monitor. And therefore, you can capture the screen from any application!

Editor in GreenShot - insert an arrow.
It's probably pointless to list all the pluses, but here are the main ones:
A screenshot can be obtained from any program, i.e. in general, everything that is visible on your screen can be filmed;
The program remembers the area of the previous screenshot, and thus you can capture the areas you need in a constantly changing picture;
GreenShot can convert your screenshot to the format you need on the fly, for example, to "jpg", "bmp", "png";
The program has a convenient graphics editor that can easily add an arrow to the screen, trim the edges, reduce the screen size, add an inscription, etc.
Note! If this program is not enough for you, I recommend that you read the article about.
The Android operating system has a function for creating screenshots. They are done by simultaneously holding down the "off" + "volume down" keys for a few fractions of a second. Almost always, this manipulation works and the screenshot is saved. However, some users, under certain circumstances, may see the following message when trying to take a screenshot: " Failed to save screenshot. Maybe the drives are busy"- how to fix this problem, let's try to figure it out below.
Causes of "Failed to Save Screenshot" Error in Android
The first reason why Android may complain about the busyness of the drives when trying to take a screenshot may be that they are corny in reality filled to capacity. That is, there is no place in the internal memory of the smartphone / tablet and on the memory card to save the picture.
The second reason is not so obvious. A message about the busyness of Android drives can also be issued when there is no folder in the file system provided by the system for saving the corresponding files. Yes, it usually creates the Screenshots directory automatically if it doesn't exist, but something can go wrong. How to fix the message "Could not save screenshot. The drives may be busy” below.
How to fix a bug with taking a screenshot on Android

Fixing the problem with saving a screenshot on Android is quite simple. First of all, you will need check if there is enough space on the media on which the screenshots are saved. This can be done in any file manager (including the standard one). If the drive is full to capacity, then you will need to delete some files to free up space. To do this, you can check the system for garbage using the CCleaner application or delete the application cache (Settings - Applications - Clear Cache). You can also remove a couple of unnecessary files or programs.

If there is enough free space on the drive (it takes a little to take a screenshot), then the problem is probably missing folder. In this case, to fix the problem in order to take a screenshot, you will need to perform the following series of actions:
- Go to the file manager;
- Find the Pictures folder and open it;
- Check if it contains the Screenshots directory;
- If the Screenshots folder does not exist, you will need to create it;
- Reboot device.
After performing all these manipulations, the creation of screenshots by the regular means of the system should work. If Android still reports an error "Failed to save screenshot. The drives may be busy", then try, for example, to take any photo. If it persists, then the problem is not with memory and you can exhale with relief. The fact is that the phone's flash memory (and, in particular, memory cards) sometimes break down, which is why the system cannot write new files to it.
Next step is to go to the Google Play Market and download from it any application you like for creating screenshots. Read the instructions describing how to use the program and take screenshots with it. This is the easiest and guaranteed working way to take screenshots when the corresponding standard Android feature is not working.
author Elizaveta Gulyaeva asked a question in Software
Why can't I take a screenshot? and got the best answer
Answer from Mikulinsky Roman Alexandrovich[active]
To do this, the keyboard has a special key - Print Screen (PrtScn), most often located in the upper right corner of the keyboard. When you press the Print Screen key (or the Print Screen + Alt combination), nothing happens. The fact is that the picture is temporarily placed on the clipboard, and in order to “get” it from there, you should use a graphic editor or paste the picture into the desired application. A simple (but sufficient for our actions) graphic editor is also built into Windows. It's called Paint, and you can launch it by going to Start - Programs - Accessories - Paint. To paste a picture from the clipboard, you need to go to the "Edit" menu and select the action "Paste". If desired, the screenshot can be processed in the editor (make captions, highlight something, etc.) and save it to a separate file (File - Save as ...).
Answer from Andrey[guru]
SnagIt 10.0.1 Build 58 Rus RePack
Registered Russian version!
The main purpose of the program is to take screenshots from the monitor screen, and SnagIt can take not only static graphic "snapshots" of the selected area, but also, for example, record what is happening on the screen in a video, as well as capture a picture from applications using Direct X, DirectDraw and Direct3D.
The built-in annotation editor allows you to add a description to the screenshot, underline something, insert it, if necessary, in the right place, for example, an arrow, etc. In addition, the program allows you to "pull out" text from where it cannot be moved using the Copy / Insert. Of the additional features: support for working with scanners and digital cameras, as well as the ability to automatically send screenshots taken by the program to a website. And many other little things: hotkey management, the ability to use presets, pulling out icons and other graphics from EXE and DLL, taking a screenshot from a web page that requires scrolling to view, and much more.
SnagIt 10.0.1 Build 58 Rus RePack (19.78 MB):
Answer from Yoebastian Rachowski[guru]
Screenshot from the game? Press the print screen button, then open paint and control + V. Also in many games it is possible to take a screenshot by pressing a certain button, the pictures are immediately saved to the game folder. Or install the fraps program
Answer from Tepmik[newbie]
I stopped making screenshots in the CS, when I paste it, only a black screen ..
Answer from Misha Tebenev[newbie]
I used to be able to just press Ctrl and PrtSc and the screen was automatically saved to the Screenshot folder, but now it doesn’t work (tell me what is the problem ??
Answer from Baikov Vladimir[newbie]
I have the same problem as my friend above. I usually press PrintScreen, and then stupidly insert the image, for example, into the contact dialog box. But: the last 2-3 days it either works or it doesn't. Tritely I can not figure out in what place the dog is buried. It costs 8 professional x64 if anything
Answer from ImKA70[guru]
Your choice of programs! Timka's blog: How to take a screenshot of a computer screen
https://goo.gl/rTuj3L.
Answer from Yofiya Shentsova[newbie]
Some keyboards have a dedicated F Lock button, which is responsible for the F-key functions, and sometimes the activity of this button interferes with the operation of the PrintScreen. In this case, you just need to disable F Lock.


