Good day! Often after buying a new laptop or after reinstalling the operating system, the question arises, how to turn on wifi on laptop. I hasten to help you solve this problem. I want to point out right away that if you WiFi not turning on or not working, this does not mean that the Wi-Fi adapter is out of order. There are other causes that are often corrected within 5 minutes.
WiFi or WiFi? How right? In official documents, it is more appropriate to use the first option - Wi-Fi. But in the vastness of the Internet, the second option is more and more often used - WiFi. I don’t know what this is connected with, maybe people are too lazy to put a hyphen. But since this is already boring, I will also follow the trend. In addition, there is no hyphen on the official Wi-Fi trademark logo either.
Another note is pronunciation. Correctly in Russian Wi-Fi is pronounced as " Wi-Fi". But there is another common option - " wifi" or " wifi". Someone calls him that for fun, and someone because of his illiteracy, but the fact remains. Even in the vastness of the Internet, you can find its names such as “waffle”, “air” ...
Why is Wi-Fi not working on my laptop?
There are really not so many reasons why Wi-Fi may not work. The most annoying of them is burnt wifi module. But this happens extremely rarely and most likely only on very old laptops. But if none of the methods that we describe below help, then most likely the module has really burned out.
Other common reasons for Wi-Fi not working are not so terrible. Maybe it's just turned off or on it. Or maybe the problem is not at all in the laptop, but in the Wi-Fi router. Yes, this also happens very often. Well, let's sort it out in order.
Oh yes, I almost forgot. Recently, I personally encountered the fact that the laptop did not have Wi-Fi at all in the options. I still think how it was possible to buy such a laptop, because without Wi-Fi it is like a man without hands. But when I reinstalled Windows, it turned out that Wi-Fi was still in it all this time, it was just that the previous Windows was somehow truncated and could not use Wi-Fi in a laptop. So sometimes you may need to reinstall Windows to enable Wi-Fi, keep in mind.
The laptop does not see the Wi-Fi router
It happens that you set everything up on a laptop, everything should work, but you can’t connect to the Internet via Wi-Fi, even though everything works fine from the same router through a wire. The point here, most likely, is not in the network settings on the laptop, but in the settings of the router itself. You can contact your Internet provider, they will help you properly configure the router. Or you can try to do everything yourself, but you need to be extremely careful when you get into the router settings.
Before you start tinkering with the router settings, just try rebooting it. Or better yet, turn it off for a few minutes. Maybe this will solve all your problems.
The problem I encountered once personally was the following. The smartphone saw all the Wi-Fi networks in the house, except for my network, while other devices (tablet and laptop) saw it. I tried a lot of things, but I solved the problem.
You need to go to the router settings. To do this, in the address bar of the browser, write 192.168.0.1 . This is suitable for almost all routers. There you will have to enter the login and password that you (or the network customizer) set.
Find the item " wifi network" and change the value " Mode". It can be either numeric:
- Up to 300 Mbps;
- Up to 145 Mbps;
- Up to 54 Mbps.
Or this standardized mode:
- 802.11B only;
- 802.11G only;
- 802.11n only;
- Auto 802.11b/g/n.
Just try changing modes. One of them should be suitable for your device (laptop or smartphone). This is due to the fact that the Wi-Fi router is newer than the laptop. And the laptop does not understand those modes that the router has already been “trained” in.
Also try changing the " Channel". Maybe the channel you're on is overloaded. Some routers even indicate the degree of channel load. Choose the free one.
Internet connection drops out when using Wi-Fi on a laptop
If Wi-Fi drops out from time to time, then most likely you do not have a very good connection with the router. Perhaps he is standing too far from the laptop, or maybe there is a wall between you that jams the signal of the router.

Wi-Fi signal in the house
Quite sometimes it even happens that the laptop catches Wi-Fi from the router only if they are VERY close, at a distance of 1-2 meters, and then the connection starts to break off. These cases, however, are very rare and individual. You need to experiment with other routers and, if everything is fine, then change the router.
Another common case is the incorrect operation of drivers on Windows 8. To solve this problem, you need to go to the device manager, find your WiFi adapter there, go to "properties" → "update drivers" → "search on this computer" → "select from installed". There will be an item "Only compatible devices." Need to Necessarily uncheck it. And from the available list of drivers, select this driver 5.100.245.200 . Everything will work fine with him. Only after that do not update the drivers for the WiFi adapter.
Another very common reason is a lot of Wi-Fi routers. This happens in multi-storey buildings, where each apartment has at least one router. Moreover, many devices are connected to each of them at the same time. And this whole "zoo" operates on the same frequency. In such cases, it happens that the routers jam each other's signal and the Internet becomes slow or disappears altogether. This is solved either by buying a better (powerful) router, or by buying a router that can operate at different frequencies. In the first case, the signal will simply be amplified, and in the second, the router will be able to automatically switch to another frequency if it realizes that the current frequency is overloaded. Read our article about. It describes the characteristics of routers and Wi-Fi standards, as well as simple recommendations.
Conclusion:

The information in this article should be enough to solve the problem. However, if nothing helped. Then your WiFi module has come to an end. If you look at it, you can even notice that it burned down. It will be blackened slightly (or strongly). And you can find it under the back cover of the laptop, where and.
Now you know how to turn on WiFi on a laptop if it is still alive. If something is not clear, ask questions, and I will answer them.
Did you read to the very end?
Was this article helpful?
Not really
What exactly didn't you like? Was the article incomplete or untruthful?
Write in the comments and we promise to improve!
To connect the Internet on a laptop via a wireless network, you need not only a WiFi module, but also a working access point. To do this, you will need to buy a router at home, and to access the Internet, sitting somewhere in a cafe, it will be enough to turn on Wi-Fi on your laptop and enter the password for the desired network: installing an access point is the task of the owners of the establishment.
A WiFi module is installed in almost all modern laptops, and it's easy to check if your device has such a function. This will require:
- Open the "Control Panel";
- Launch "Device Manager" (you can use the search bar);
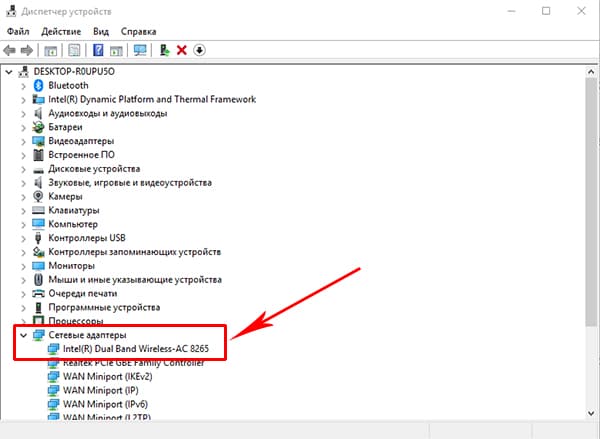
- Expand the "Network adapters" block.
An existing device with the word "Wireless" in the name means that your laptop supports wireless Internet.
Turning on Wi-Fi on a laptop using the keyboard
Most often, “wi-fi” can be turned on with hot keys, usually two, pressed at the same time. For different laptop manufacturers, their combination may vary, but the main Fn key, as a rule, is always there. The second key required to turn it on has a special WiFi icon, and is located on the keyboard in the F1-F12 functional row.
You can learn more about how to enable Wi-Fi on a laptop of a particular brand from the following table.
In devices of the past generation, Wi-Fi is turned on with a special slider on the laptop case, but the network icon remains the same.
How to turn on Wi-Fi on Windows 10
On laptops with the "ten" "wi-fi" can be enabled either in the system settings or using the notification area, and the second method is more convenient and faster:
1. On the taskbar, open system notifications.
2. Open the Network tab.

3. Turn on WiFi by clicking on the corresponding thumbnail.

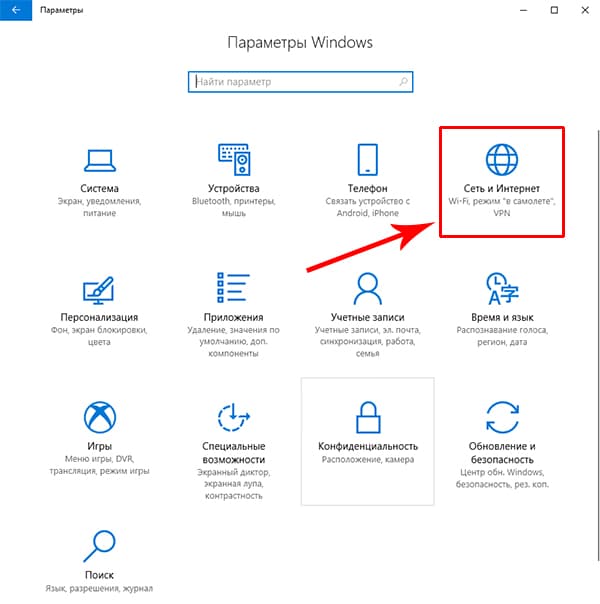
To enable Wi-Fi on Windows 10 using the options menu, you must:
1. Open "Parameters" and select the "Network and Internet" block.
2. Click on the WiFi menu and turn on the wireless status slider.

After these steps, the laptop will start searching for all available wireless networks. If it is already in memory, the connection will occur automatically; if the access point for your device is new and protected (you will see a lock icon) - you need to select it and enter a password to connect to the Internet.
WiFi connection on Windows 7 and 8
For laptops on previous versions of Windows, the Wi-Fi software activation algorithm is different.
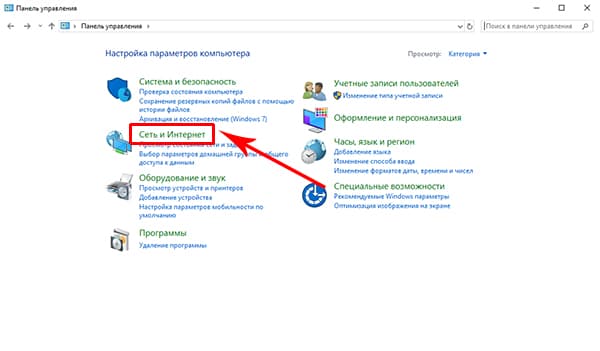
1. Go to "Control Panel" - "Network and Internet", or right-click on the computer icon in the notification panel next to the clock.
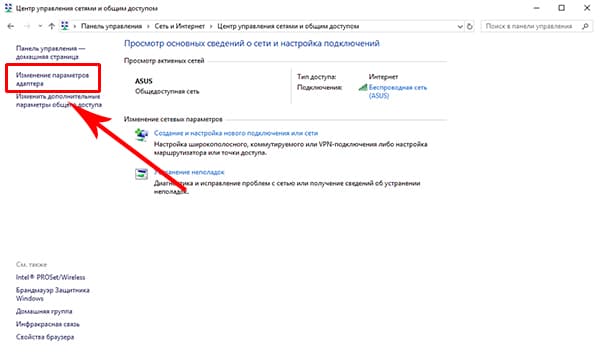
2. Select "Network and Sharing Center".
3. Click on the "Change adapter settings" menu.
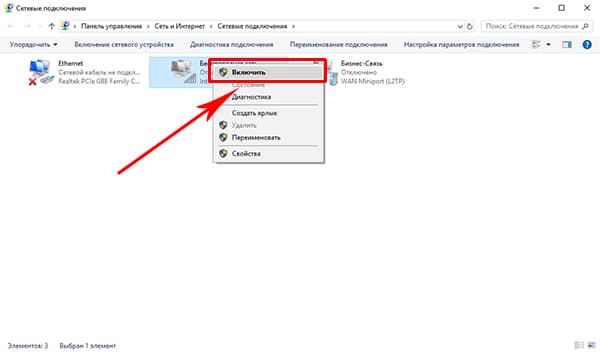
4. Use the right mouse button to turn on the wireless network.
When the “wi-fi” module starts working, you need to select an access point (the list will open by clicking on the WiFi icon in the notification area) and, entering the password if necessary, connect to it.
If the Internet through "wi-fi" does not turn on
If Internet access on the laptop after all of the above did not appear, connect the network cable to the computer directly, open the Device Manager through the Control Panel, select the Network adapters tab, find your Wifi module in the list and try updating drivers. After that, unplug your internet cable and restart your laptop.

If after that you still can’t turn on the Internet, there may be either problems on the provider’s side, or incorrect router settings, or the Wi-Fi module is faulty. The cost of repairs in the service center ranges from 1000 to 2000 rubles, but you can get by with an external WiFi module - on Aliexpress, such devices cost about 150 rubles.
Not every user knows how to turn on Wi-Fi on a laptop in case of any unforeseen problems. Novice users are lost when they fail to activate Wi-Fi using standard methods.
We will try to consider all possible ways to enable Wi-Fi and provide solutions to the most common problems that a laptop wireless network adapter can be subjected to.
The simplest method of activating a wireless network on a Windows laptop is to use the key combination provided for this by the manufacturer.
Here are examples of these combinations for the most common laptop models (in most cases, it is the keyboard that is used, in rare cases, a special switch):
- HP (HP Probook, Satellite, Pavilion, 4535s and others) - Fn + F12;
- Acer (Acer Aspire and others) - Fn + F3, similarly for Packard Bell;
- Asus - Fn + F2;
- Lenovo (G580, G50, G500, G570 and others), including Ideapad - Fn + F5;
- Samsung - Fn + F12 or F9;
- Dell (Dell Inspiron and others) - Fn + F12 or F2;
- MSI (MSI) - Fn + F10;
- Toshiba - Fn + F8 ;
- DNS - Fn + F2;
- DEXP - Fn + F12;
- Sony Vaio - using a mechanical switch.
This method will not always work, so let's move on to considering programmatic methods.
Via system tray
The second method to enable Wi-Fi is to activate the adapter manually via the system tray.
To use the option, just click on the network icon in the lower right corner of the system and click on the Wi-Fi icon. The wireless module will turn on and automatically start searching for available networks to connect to.
It is quite possible that instead of the window presented above, the system will display another one with limited functionality, where the key with which you need to turn on Wi-Fi will simply be absent.
If, for some reason that is not clear to the user, just such a window appears, then proceed to the next method.
In the control center
The previous method might not work for several reasons - for example, the wireless network adapter was disabled in Windows 10 or Windows 7 settings.
To fix this, you need to follow the following instructions step by step:
- Press the key combination Win + R on the keyboard and in the Run window that opens, enter the phrase “ncpa.cpl” through the command line. Click on Enter or "OK".
- We are looking for the "Wireless Network Connection" block in the "Network Connections" window that opens. If it is greyed out and the status bar shows Disabled, then the wireless adapter has indeed been disabled by the system.
- To activate, right-click on the selected block and click on the “Enable” button.
- Successful inclusion will be accompanied by the activation of the adapter and the display of its name in the status bar.
- We return to the first method we considered - the Wi-Fi activation button should appear in its proper place.
Did this method help too? There is nothing to worry about, just move on to the next method.
Enable via Device Manager
This is very rare, however, sometimes the network adapter can be disabled in the device manager of the system. This usually happens after some kind of failure occurs, independent of the user himself.
Determining whether the wireless network adapter is really disabled through the device manager is extremely simple - go to the second method described in this article, open the "Run" window with the Win + R command, enter the appropriate request, click on "OK" and see the network window in front of you. connections. If there is no wireless adapter in this window at all, then the problem really lies in the device manager.
If none of the above methods worked, then there is likely a problem with the wireless network adapter drivers.
Driver update
An outdated or missing driver can be the main reason why there is no access to Wi-Fi or distribution via Wi-Fi Direct does not work. Installing or reinstalling a suitable driver will not take much time - just go to the manufacturer's website, find the laptop model you are using and download the required driver from the list of suggested ones.
conclusions
Do not panic if you cannot turn on Wi-Fi on your laptop - you need to consistently check all possible causes of such a problem, starting from the most likely ones.
Video instruction
We have attached detailed instructions in video format. It clearly reflects the process of applying each of the above methods.
 I welcome everyone! Today I will tell you how to set up wifi on a laptop. Setting up wi-fi on a laptop is not a difficult task. The first thing to check is if the device supports this feature. Modern laptops are already equipped with a wi-fi module, but some manufacturers still produce devices without wi-fi support, but these are mostly cheap models.
If your laptop is not equipped with a wi-fi module, you need to get a special adapter. To understand if there is wi-fi on the laptop, it is enough to carefully examine the device case. Usually, manufacturers stick a sticker under the keyboard or at the bottom of the case, which indicates the presence of wi-fi.
 In addition, the wi-fi symbol is also on the functional button of the keyboard, which is responsible for turning on the module. The button should be used together with the Fn key.
Turning on wi-fi on a laptop

- If it's an Acer brand, then the keys will be Fn and F3 . You will see how the connection manager will appear, where you will need to turn on wi-fi or Bluetooth.

- On Asus devices the buttons will be Fn and F2 . A connection icon will appear, there you need to select wi-fi or Bluetooth.

- Notebooks with Toshiba brand require pressing the Fn and F8 keys. The next steps are the same.

- For Samsung the keyboard shortcut would be: Fn and F12.
To determine the key to turn on wi-fi, the icon in the form of an antenna will help you. If pressing the buttons does not turn on wi-fi, then there may be several reasons for this:
- incorrect operation of the operating system;
- driver problem or conflicts;
- viruses, about
The problem is usually solved by reinstalling the drivers or.
What if the laptop does not have a wi-fi module?
Connection to a wi-fi access point is possible using a special adapter, its cost varies from 15 to 30 dollars. You can easily find such an adapter in any computer store. In terms of external dimensions, the device can be compared with a flash drive. The use of the device is similar, just plug it into the USB port.
Lack of external adapter- high probability of breakage due to careless handling. This also happens because the part protruding from the laptop remains unprotected. Therefore, the built-in wi-fi module installed in the service center will not cause problems. This solution, although it will be more expensive, but you will feel the comfort of work.
In order to turn on the external wi-fi adapter, you need to press a special button located on the case.

Checking if the drivers are installed correctly
If your drivers are installed incorrectly, then even the access point may not respond to a burning indicator and wi-fi will not work. First of all, in this case, you need to check the performance of the network card. Right-click on My Computer and go to Properties.
Next, go to "Equipment" -\u003e " device Manager". You will notice the entire list of devices that are installed on the laptop. We need to find the section " Network adapters", and there we are looking for" Wireless", wi-fi or Wireless. If next to the module you see a yellow triangle with an exclamation mark, then be prepared for what will be needed.

Download drivers from the Internet or use the disk that comes with the laptop. Driver installation is standard and is not much different from installing any program. It is possible that wi-fi will not work immediately, but only after several installations. In order for the adapter to work well and easily detect wireless networks, you must set it to automatically obtain an IP address.
How to set up WIFI on a laptop and how to enable automatic obtaining of an IP address in Windows Xp.
So we almost sorted out the question of how to set up wifi on a laptop. But now we need to turn on the automatic receipt of the ip address. For this:
We open " Control Panel“, we set the view to classic.


Making the transition to Network connections", right-click on the required connection, select" Properties«. Components will open there, we are interested in the TCP / IP protocol, click again on Properties.

In the window that opens, set the automatic receipt of the IP address, as well as the receipt of the automatic DNS, click OK.

Configuring Automatic Obtaining an IP Address for Windows7
We need to open the control panel, go to " Network and Sharing Center«.
In the column on the left, select " Change adapter settings«.
A window will open, there you need to make a selection of the required network and right-click on it, select "Properties". There we select the automatic receipt of the ip-address and DNS. Click OK. For Windows 8, similar steps are taken.
Connecting to an access point.
You will notice a list of available networks. If you have your own access point, then it will certainly be an adapter. The adapter is also able to find nearby networks, which may belong to your neighbors. You can select any network that does not have a padlock icon. This means that the owner of the network does not mind if someone uses his access point. If you have your own network, then click on it, in the window that appears, enter your login and.
In addition, there is another option for connecting to the Internet. If any institution nearby has wi-fi, then perhaps the owner will provide you with a password and you will be able to connect to the network if your adapter reaches this distance.
After the network is selected, you must click "Connect". After that, enter the password twice and see the signal and connection speed.
If a warning window appears, close it and try to connect after a while.

After the wi-fi connection is completed, we will see the corresponding icon in the tray.
We open the browser, the page of the service provider appears in front of us. We click on the "Login" button, and we get to the page specified as home in the Internet Options. If the connection often breaks, then the laptop may have been placed in a place where the signal from the wireless network is weak. In this case, you can drag the laptop closer to the access point.
Note! I recently wrote a lot of useful articles and I want you to read them too, namely what is . But for gamers, I wrote in games or .
With Uv. Evgeny Kryzhanovsky
A connector is sewn in that connects to Wi-Fi. But what if, after turning on a brand new laptop with an operating system installed on it, connecting to a router to get a connection fails? You need to “flash through” the settings by connecting the Wi-Fi itself. We will look at the classic methods for checking the ability of an adapter built into a laptop to connect and present ways to help change Wi-Fi settings and configure it in Windows 7-10 versions.
Turn on Wi-Fi in the laptop hardware
Hardware-type tools will help to enable the connection. To do this, use the buttons designed to connect to wi-fi - this is the easiest option. If it doesn’t work, it’s worth looking to see if the driver on the laptop has “flew off”.
Turn on wireless connections with laptop buttons
Some versions of technology equipped with an element that makes it possible to use wi-fi require its separate activation: not every device assumes the automatic launch of a wireless network. Some devices require the use of two keyboard buttons, some are equipped with one key for adapter launch. On older versions of laptops, there is an independent button on the case, and not on the keyboard, made in the form of a slider.
If the user examined the laptop skin, but did not find an offline slider, it should. As a rule, to turn on the transmitter, which allows you to join the wireless version of the network, the function buttons F (from the first to the twelfth) are used.
You need to look at the symbols drawn on these keys. On one of these keyboard elements, the Wi-Fi icon, made in the form of an antenna, is “knocked out”.
Important: to connect to the Internet, which is of the wireless type, the Fn + F5 combination is more often used, so you should first look at these keyboard elements.
Checking and installing drivers on Wi-Fi
If the above methods failed to enable an element designed to connect to the network wirelessly, the adapter may have been turned off by software - it was disabled in the OS options. The user can start the adapter using the classic Windows settings using two methods.
Method 1
This method consists in using a center designed to manage network access. To start the device that connects the laptop to Wi-Fi, the user should use the Win + R combination, and then, when the window opens, type “ncpa.cpl”.

This query will bring up a section that allows you to change the connector parameters.
Attention! In older XP versions, this item is designated differently: you will need to find a section for connecting the network type.
In the section, the user needs to find a column / option that gives information about connecting to a network that belongs to the type of wireless. If this column is gray, then the element connecting to WiFi is disabled. To start its operation, you need to click the button on the right and assign the option to be enabled. After that, you should try to connect to an available network.
Method 2
This method involves the use of a dispatcher, which is designed to monitor the operation of devices. Connectors are rarely disconnected in the manager: usually the termination of the connector is caused by a malfunction of the laptop (especially inexpensive but convenient models, like).
Important: if the Wi-Fi connector built into the laptop is turned off, then in the column displaying connections related to the type of network, the icon corresponding to the wireless connectors will not be visible.
To enter the manager, the user should press Win + R on the keyboard that is built into his laptop. In the window that opens, for execution, you need to drive in devmgmt.msc and confirm the request.
When the dispatcher window opens, in the graph displaying the adapters, look for the one whose name suggests "Wi-Fi" or "Wireless".
Then you need to select the option in the menu that uses the connector: it is called by right-clicking the touchpad on the device name.
Attention! If an error occurs during startup, check the drivers: they will have to be reconnected, updated or reinstalled.
Additional method
Setting up WiFi on a laptop with Windows 10
Unlike the eighth option, the tenth one (for example,) does not have a panel that drops out on the right, namely, it cannot be “summoned” by clicking on the “network column” located in the system type tray (it is located next to the clock and date).
Because of this, users who used a different version of Windows may get confused during Wi-fi setup. This is also due to the fact that in the tenth version of the operating system, the user receives only a list of connections that are available for the connector built into the laptop and are within an accessible radius for it.
In order to properly configure Wi-Fi in the tenth version of an operating type system created by Microsoft, and not to knock down other settings, the first step is to find a shortcut in the system tray. The icon will display a list of those networks that are open for connection.

Attention!If, after clicking on the network list icon, it is not visible, click on the line that can show the available connections. After the user clicks on the inscription, a panel will be displayed on the right.
When the network is found, you should click on it: if it is protected, enter the password and confirm. After that, a message about successful connection will appear. In order not to drive in a password every time, you should tinker with the settings a little.
Select the option that gives you access to additional options. When the window opens, click on the section leading to the center, which is for designating the grid options. Find the connection in the center, click on it and select the option leading to its network properties.
Important: after the steps taken, it should be noted those functions that the user considers necessary in order to work comfortably with Wi-Fi.
So, the user is free to connect to any, visible to the device, network of a non-password type. This column is located in a tab designed to control connections that belong to the wireless type.
Also, the owner of a laptop that runs on the "top ten" has the ability to open automatically triggered - turning on without a request - access for. This section is in the tab that displays the network connectors.
To start automatic access, the laptop user will need to click on the section for network connections, go to properties and tick the corresponding item.
Interesting:the same column displays other options related to network settings.
In the center, where it is allowed to work with the connected devices of the network plan, the user of the laptop has the opportunity to program the router and “create” a new connection, which belongs to the category of those that connect wirelessly. There is also available setting or network VPN, designed to access work data at a distance.
The user can also create a local group and enable/disable the Firewall.

Setting up Wi-Fi on Windows 8-8.1
To make settings on a laptop that runs on the eighth version of Windows (for example,), you need to find the network tab in the tray and click on it using the left touchpad button (double short press on the manipulator built into the laptop will also work).
This action will “announce” the list of connections available for the laptop connector that belong to the wireless type. After that, you need to click on the Hotspot to which the user wants to connect, and then confirm the action by clicking on the line with the same name. A field will be displayed in which you need to type a password that gives access to the network point.
Attention! In order for the laptop user to be able to see the text of the password that he wrote, he will need to click on the icon made in the form of an eye, which is located on the right side of the field. It should be remembered that the printed text is visible only if you “squeeze” the “eye”.

When the password is typed, the user will need to click on “next”. If the password characters are typed correctly, then in a minute the connection will be established. It takes more time to connect to the network only with slow Internet.
A sign that everything is connected is the changed appearance of the network shortcut, which is located in the tray. It is convenient that Windows 8 (for example,) sets all the parameters to be configured that are necessary for a new connection “on the machine”, excluding the password.
When the system goes online, it will “ask” to determine the type of network. The query concerns whether the user wants a printer or other peripheral class device to connect immediately, without asking for access. The user will also need to indicate whether he wants the information on his laptop to be available to others.
Attention! If you click “yes”, then on the network under the user-selected name, information exchange between the connected PC and MFP will be available (printing without wires). It's convenient for the office. If you click on “no”, the network will only work with the Internet.
We change indicators
All in the same tray, on the “network” tab, you need to use the right button on the touchpad, and in the option window that pops up, click on the section, which is the center that allows you to interact with the network settings.
In the center, you will need to find the name of the “hotspot” and click on it to bring up an option that displays its status. In this window, click on the properties related to the network connection. There it is required to mark the necessary items related to the settings with “checkmarks”.