So you have a recurring blue screen of death, and like many BSoDs, it's because a bad driver is to blame. However, the screen does not give you the correct information, either because it does not contain any drivers at all, or because it lists a system driver that is acting as false.
Driver Verifier is a free utility included with all versions of Windows from Windows XP. It literally checks each of the drivers on your PC until it encounters the problem that caused the problem, intentionally creating the same blue screen, but then writing the information to a log file, helping you pinpoint the problem.
Run driver driver
If you use the same blue screen frequently and would like to get active and fix it, here's how to use Driver Verifier.
- Click the button Start
- Click " Execute "...
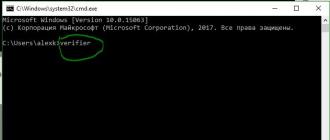
- Enter CMD and press Enter.
- In the new window enter verifier and press Enter.

On Windows Vista and 7:
- Click the button Start
- Enter CMD in the box and click Enter.
- In the new window enter verifier and press Enter.

On Windows 8 and 8.1:
- Press the key Windows + X
- Click " Command line "(" Administrator ") (Windows PowerShell (Admin) in Windows 8.1)
- In the new window enter verifier and press Enter.

All Windows versions:
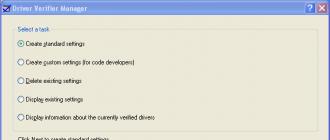
- Make sure to select customizing custom settings (for code developers) .
- Click " Further" .
- Select " Select custom settings "from the full list .
- Click " Further" .
- Deselect low resource system modeling and standby I / O requests... (These two are causing unnecessary workload on your PC.) Make sure everything else is selected.
- Double click " Further" .
- Select " Select driver names "in the list .
- Click " Further" .
- Select all drivers on this screen except those that say Microsoft Corporation under the Supplier. It is very unlikely that a Microsoft driver is causing this issue.
- Click " Ready" .

Note. If you are unable to complete the above steps because the blue screen continues to occur, please try downloading to first.
At this point, you must restart your computer. Then try calling BSoD again by doing what you did before. Windows puts an extra burden on your drivers to help you. If you are unable to reproduce the BSoD, try starting your computer overnight. As soon as BSoD reappears, restart your computer and read the Minidump file.

Reading a dump file
Driver Verifier will start up, run blue screen and write a log file. This log file is located at C: \ Windows \ Minidump \. Read it and you will see which driver is causing this problem. Try searching for the driver name to see which piece of hardware your PC is using.
So how do you read it? You need a debugging tool that you can download from Microsoft.
A . Download the SDK, install it, select Debug Tools, and deselect everything else.
Note that the debugging tools for previous versions of Windows are no longer available; you will have to send the dump file to a Microsoft technician for analysis.

After installing it, find it on the startup screen. It's called windbg (x64). Run it.
- Click " File", then " Open crash " .
- Switch to C: \ Windows \ Minidump \ and open the .dmp file contained inside.
- Look at the bottom of the resulting file where the line says “ Probably caused by "... This is a good indication of which driver is causing the problem.
Fix driver
Update the driver associated with this hardware:
- Click the button Start
- Click on Control Panel
- Click " Switch to classic view "
- Double click The system
- Go to the "Equipment" tab
- Click on Device Manager
- Click " Update Driver ".
On Windows Vista and 7:
- Click the button Start
- Click on Control Panel
- Double click Device Manager
- Find the device causing the problem
- Right click on it
- Click " Update Driver ".

On Windows 8 and 8.1:
- Press the key Windows + X
- Click on Control Panel
- View by small icons
- Click on Device Manager
- Find the device causing the problem
- Right click on it
- Click " Update Driver ".
Or use our app not to be confused with Driver Verifier. Driver Reviver automatically updates all existing drivers on your PC and is especially good for updating ineffective drivers like this one to the latest and greatest version.
After fixing the driver problem, you will want to disable Driver Verifier.
Disable driver verifier
After you are done using Driver Verifier, you will want to disable it, as it is quite tough on your PC while it is running.
On all Windows versions:
- Launch Driver Verifier again using the steps above.
- Select " Delete existing settings " .
- Click " Ready" .
- Restart your computer again.

Please keep this article bookmarked for future reference so that whenever you have a blue screen, you can fix the problem. Also, check out our interactive and enter your bug name for more tips on how to tackle your specific blue screen of death. Good luck!
If you suspect that any of the drivers is not working correctly or, after analyzing the memory dump, you have identified the driver that caused the error, then for a more thorough check of the drivers, you can check the drivers yourself using the built-in checker tool Verifier.exe.
Checking for unsigned drivers.
verifier and press Enter.
2) Select an item and press the button Further.
and press the button Further.
Simulating lack of resources and press the button Further.
Automatically select unsigned drivers and press the button Further.
If unsigned drivers are found, the system will display a list of them with the driver files and their descriptions. Moreover, the drivers found can belong to both devices and applications. Do not close the Driver Verifier window yet or click any buttons.
Option 1. Updating the program or driver.
6) Visit the website of the device manufacturer or the author of the program and download a newer version.
7) Reinstall the program or update the driver.
8) After updating the application or driver, close the Driver Verifier window by clicking the button Cancellation.
9) Restart your computer and continue working in the operating system.
If the system does not encounter errors related to this driver, then updating the driver or program has fixed it.
Option 2. Removing a program or driver.
6.1) Uninstall the program that this driver belongs to.
6.1.1) Open Control Panel All Control Panel Items Programs and Features and uninstall the application that owns the driver.
Before uninstalling the program, make sure that you have its installation disk or that its installation is saved on your disk.
6.2) Uninstall the driver in Device Manager.
1) In the menu Start right click on A computer and select the item Properties.
6.2.2) Click in the list on the left on Device Manager.
6.2.3) B Device manager locate the device, right-click on it and select the item from the context menu Properties.
6.2.4) Go to the tab Driver and press the button Delete.
7) After uninstalling the application or driver, close the Driver Verifier window by clicking the button Cancellation.
8) Restart your computer and continue working in the operating system.
If the system does not display errors related to this driver, then uninstalling the driver or program has eliminated it.
Option 3. Checking unsigned drivers.
Attention! After checking unsigned drivers, the system may not boot (read this option to the end before proceeding to further actions).
6) Press the button Ready and restart your computer.
7) Restart your computer
8) Before Windows starts, press the F8 key. When the drive selection window appears: select the drive on which you have installed Windows, press Enter, and then immediately F8.
9) Select an item Safe mode
10) Open the dialog menu Execute: Start ->
11) Enter the command verifier.exe / reset and press Enter.
If the system has booted normally, the check for unsigned drivers was successful - they are not the source of the problem.
Verification of signed drivers.
1) In the start menu search bar, type verifier and press Enter.
2) Select item Create custom parameters (for program code) and press the button Further.
3) Set the switch to value Select individual parameters from the complete list and press the button Further.
4) Check all the checkboxes except the checkbox Simulating lack of resources and press the button Further.
5) Set the switch to Select driver name from the list and press the button Further.
6) Click on the column heading Provider to sort the drivers by their vendor.
7) Select the first 10-15 drivers by checking the boxes opposite them in the column Verify.
Do not select all drivers at once, as checking them will take a lot of time and system resources.
8) Press the button Ready and restart your computer. If the system booted normally, the selected drivers were checked successfully - they are not the source of the problem. In this case, repeat the above steps with the following 10-15 drivers selected.
If, after rebooting, a blue screen appears with an error, the problematic driver has been identified - its name will be included in the error message. In this case:
1) Restart your computer
2) Before Windows starts, press the F8 key. When the drive selection window appears: select the drive on which you have installed Windows, press Enter, and then immediately F8.
3) Select item Safe mode
4) Open the dialog menu Execute: Start -> Run or press the combination Win + R
5) Enter the command verifier.exe / reset and press Enter. If the check of all drivers was successful, then most likely, the drivers are not the cause of a critical error that occurs in your system.
Sometimes hardware-related DRIVER_VERIFIER_DETECTED_VIOLATION blue screen errors can be due to memory (RAM) corruption. If you experience random computer restarts, startup beeps, or other computer malfunctions (in addition to BSOD 0xC4 errors), then it is very likely that there is memory corruption. In fact, nearly 10% of Windows application crashes are caused by memory corruption.
If you've recently added new memory to your computer, we recommend temporarily removing it to make sure it isn't causing the DRIVER_VERIFIER_DETECTED_VIOLATION error. If this action resolved the BSOD, it means that this is the source of the problem, and, therefore, the new memory is either incompatible with some of your hardware, or is corrupted. In this case, you will need to replace new memory modules.
If you did not add new memory, the next step is to carry out a diagnostic test of the available computer memory. The memory test allows you to scan for severe memory failures and intermittent errors that could be causing your 0xC4 blue screen of death.
Although recent versions of Windows contain a utility for checking RAM, I highly recommend using Memtest86 instead. Memtest86 is a BIOS based test software unlike other test programs that run in the Windows environment. The benefit is that it allows you to test ALL of your memory for DRIVER_VERIFIER_DETECTED_VIOLATION errors, while other programs cannot test the section of memory occupied by the software itself, the operating system, and any other running programs.
Using the Driver Verifier Manager system utility supplied with Windows Vista / 7, you can carry out a comprehensive diagnosis of the drivers installed in the system and find problematic components that disrupt the stable operation of the computer and the equipment connected to it.
To run the mentioned tool, you need to register in Windows with administrator rights, then enter the verifier.exe command in the address bar of the Start -> Run menu and press the OK button. As a result, a window of the driver verification manager will open, in which you will need to scratch your head and decide on the appropriate option for launching the utility. You can perform both selective and full testing of all drivers without exception.
After setting the operating mode of the program and pressing the "Finish" button, you will need to restart the computer and wait for the operating system to load. If a faulty driver is detected, Windows will fall into the so-called "Blue Screen Of Death" (BSOD) and report a critical error containing information about the problematic component, which must be taken in pencil.
The next step is to delete the files of the defective driver. To do this, hold down the F8 key while starting the computer, start the system in Safe Mode and then eliminate the faulty component using standard Windows tools. After that, you need to reopen the console and enter the verifier.exe / reset instruction to deactivate the Driver Verifier Manager application. It is important to note that entering the last command is required even if the computer successfully boots, indicating that there are no problem drivers.
For additional reference information on this matter, visit the Microsoft Support site in the article “Using the Driver Verifier to Identify Windows Driver Problems (Advanced)”.
A faulty driver can cause many problems for the computer. The most common sign that drivers need updating is a blue screen of death. Fortunately, this blue screen shows us error codes, memory dumps, which allows us to identify the cause in a particular driver, device and update or remove it. It becomes difficult when memory dumps and error codes do not help or the computer does not even show error codes, but simply locks the system. What to do in these cases?
Built into Windows Driver verifier designed to test drivers by calling additional loads on system drivers and stress tests to trigger a crash. This will help you identify bad drivers in Windows.
Preparing your system to check windows 10 drivers
Before turning on Driver verifier, please note that drivers can block you from your own computer if you're not careful... When a bad driver is detected, Driver Verifier will give you a blue screen, if there are several of them, then a boot> boot> crash cycle is formed and you will not be able to start back into the windows system to disable the crash test of system drivers. Therefore, we will prepare for every firefighter, otherwise in our time the Russian "maybe a ride" is already working poorly. Before enabling Driver Verifier, do one of the following:.
- Check that you can easily boot into Safe Mode without the need for BIOS. In general terms, entering safe mode must be done using the windows desktop. Hold Shift + reboot, pressing and holding the shift button, click on reboot. Try another way, install the option via Windows.
- Create a system restore point while disabling your antivirus products. Open Windows search and type Create a restore point, choose from the proposed and follow the instructions offered to you.
- Create for your computer so that you can access the command line through parameters when using a recovery drive.
- You can or any other data for which you are worried.
- Be sure to read my crash test at the end of the article. He will help you in case of a failure that happened to me.
Windows Driver Verifier activation
Before activating the drivers, make sure you read the above section on how to protect yourself from endless loading.
- Press Windows + R and type cmd to bring up a command prompt.
Enter the following code on the command line:
- verifier

Specify item (for program code).

Select all items except "DDI Compliance Check" and "Emulate Accidental Resource Shortages".


Click on the supplier column to sort. It is not necessary to select all drivers, only from other suppliers, where there is no Microsoft Corporation label. If you are sure that the error is in any driver, then select all the items with checkmarks.

After all the settings, click Finish and you will be told that the check will be performed after the system reboots. If the checker displays a blue screen, write down the error code, dump the memory and restart your computer.
Back in windows, you can turn off Driver Verification in one of the following ways:
- Go back, as you entered through the command line and select the item delete existing parameters.

Open a command prompt and enter the following code:

How to fix cyclic loading with blue screen of death
- I want to notice I had a cyclic boot with a faulty driver. No error or memory dump code was specified, which is surprising to me.
- After 2-4 cyclical loading of the blue screen, the "System Restore" option was automatically launched. In which I clicked "troubleshoot"> "advanced options"> "boot options"> "restart". Once downloaded, select 4 or 5 to boot in safe mode. Disable Driver Verifier Manager as above.
- To avoid booting into Safe Mode, go to Troubleshooting> Advanced Options and COMMAND LINE. In which just type in the command verifier / bootmode resetonbootfail.
- Copy or take a photo to your mobile phone, before you start checking the drivers, all 3 of the above points. Do not forget to copy the link to the article just in case.
How to open dmp file to view error analysis
- The test files are along the path C: \ Windows \ Minidump.
- You can open the DMP file format with