music: Fred P
The purchased Office for Mac "11 has a rather interesting remote desktop application that comes with the distribution. There are, of course, other alternatives, but once it's available, we'll use it.
The first thing you pay attention to and is always ready on a poppy is for surprises, and even in such a small program, the Cupertians interfere with normal work. And even such a small program does not do everything for you (as you often see in Apple ads).
The manual assumes that you are more or less familiar with the basics of the system (windows), what and where it is located and configured.
Global Action Plan:
1. Find out the necessary parameters of Windows.
2. Enter these parameters into the program Remote Desktop connection for Mac
First stage.
A. Allow remote connection and designate the user through which the entry will be made.
V. Find out the ip-address of the computer itself, to which we will connect.
This is done differently in different distributions, but the principle is the same. Good old Windows XP will be involved here:
- go to "My Computer"
- "View system information" (located on the left side of the window as links)
- in the window that appears, select the tab "Remote sessions"
- Check the box "Allow remote access to this computer"
- click the "Select remote users" button
- "Add"
- Enter the user (I entered the administrator's name and do not forget to write down his password on a piece of paper)
- it should appear in the list (field)
- click "ok"
In the same place, in the "Computer Name" tab, look for the name "Workgroup".
Now you need to find out the ip address of the computer
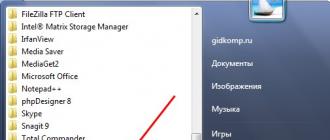
- Start -> Programs -> Accessories -> Command Prompt
- in it we write "ipconfig" and press "Enter"
- write down the "IP address"
Your notebook should now have:
1. Username and password
2. ip address *
* - Of course, you can enter the name of the computer, but, as I said above, there are always some problems and glitches under the poppy: I couldn’t log in in this way.
Second phase
Now we launch Remote Desktop connection for Mac and in the program settings enter:
"User name / Username" - here we write the IP address
"Password/Password" - password for the user.
"Domain / Working group" - we write.
Click connect (the field must be filled with the name of the computer / ip-address)
Go to Windows, which will again ask for a username and password
ALL
If it does not work, then try to disable the Windows firewall / create exceptions / create a user specifically for remote connection.
And one more important point for Windows XP: under this operating system, only one login is possible (two users cannot be there in parallel) and the user from Windows will be thrown into the login while you are in it.
By default, they are immediately available for connection via the standard RDP (Remote Desktop Protocol) protocol - the usual "Remote Desktop Connection" in Russian-language editions of Windows.
This article will describe how to connect to a newly created virtual server on UltraVDS from various devices (operating systems). If you require any other connection method (RAdmin, TeamViewer, etc.) after a successful RDP connection, you can set it up just like any other software.
The article is quite long due to the fact that it describes in detail how to connect from each of the most popular systems, step by step, so we moved up the hot links for navigation:
Connecting to a virtual server from a desktop version of Windows (XP, 7, 8, 8.1, 10)
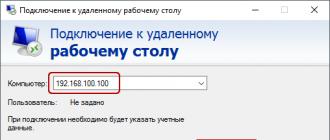
When using a standard Windows operating system, the following path must be opened to connect to the server:Start -> Programs -> Accessories -> Remote Desktop Connection Or just press the key combination Win+R and in the window that opens, type mstsc

In the window that opens, you must specify the IP address of the VDS server created for you. If you ordered a server with several IP addresses, you can use any of them to connect.
The IP address of your server is indicated next to your server in your personal account in the "My Servers" section.


After entering the server IP address, click the "Connect" button and you will see a window with authorization fields. Here you need to log out as a new user:

When creating each new server, the system automatically generates a random password for the Administrator user. This password is also displayed in your personal account near your server:

There is a strange thing in some editions of Windows: if you copy and paste the password from the server into the authorization field before connecting, nothing will happen when you try to connect, and the RDP client will again show the authorization window as if the credentials were entered incorrectly. In this case you must enter the password manually(large letters are large, small letters are small, in the English keyboard layout).
A remote desktop connection is a very handy thing, with its help you can transfer files from a computer to a server and back by simply copying and pasting them, the same with the text on the clipboard. You can also transfer any included USB devices and network printers/scanners from your computer to the server. To do this, the first time you connect to the server, select "Show Options" in the lower left corner.

In the window that opens, go to the "Local Resources" tab and select the options you need:


When connecting to the server, you can see information about untrusted security certificate. The reason for this is that the server encrypts the transmitted data with an SSL certificate that it automatically generated itself. This notification does not indicate a security issue, but only warns you that the connection is encrypted using a certificate that was not issued by an authorized authority.

Check the "Don't ask me again about connections to this computer" box and click "Yes".
The program interface is simple and intuitive. Before you start, you need to configure the connection settings. To do this, we create a new one: 

In the connection settings window, specify an arbitrary name, for example, "Server on UltraVDS", the IP address of the created server and authorization data (the Administrator login and the password assigned to the server in automatic mode) - these data.
After exiting the settings window, everything will be saved automatically and in the list of connections you will see the newly created one:

Double click on it and you will connect to your server.
When connecting to the server, you may see information about an untrusted security certificate. Why does this notification occur and what does it mean.


By adding your server's self-signed certificate to the trusted ones, or simply accepting it once, you will see your virtual server's Windows desktop.


Run the app after installation and click on add new connection:


In the window for creating a new connection, you must specify the IP address of your virtual server and authorization data that are displayed in your personal account ().


Select "Don't ask me again for this PC" and click "Accept".

If the authorization data and the server IP address were entered without errors, you will successfully connect to your server.

Connecting to a virtual server from an Android smartphone or tablet
First of all, you need to download and install the Microsoft Remote Desktop program from Google Play (this is the official RDP client from Microsoft):https://play.google.com/store/apps/details?id=com.microsoft.rdc.android&hl=ru

Run the app after installation and click on add new connection


In the window for creating a new connection, you must specify the IP address of the created VDS server and authorization data ().


When connecting to the server, you may see information about an untrusted security certificate. The reason of that .
Select the "Don't ask me again for connections to this computer" checkbox and click "Connect".


Connecting to a server via RDP from Ubuntu
RDP is a closed protocol from Microsoft, which, in turn, does not release RDP clients for operating systems of the Linux family.However, there are still various working versions from various manufacturers.
We recommend using the client Remmina
For Ubuntu users, there is a special repository with various application packages, including Remmina and RDP.
Installation is done in 3 simple commands, which are entered in turn in the Terminal:
To install the Remmina package sudo apt-add-repository ppa:remmina-ppa-team/remmina-next
Installing updates sudo apt-get update
Installing the RDP protocol plugin sudo apt-get install remmina remmina-plugin-rdp libfreerdp-plugins-standard
If you have previously installed or run an existing version of Remmina, you must restart it. This can be done by rebooting the computer, or by executing the following command in the same terminal:
sudo killall remmina If the process was not started, then an error message will appear: process not found, which also suits us.
Open the search menu and find the freshly installed Remmina package there

Click on add a new connection and fill in the fields with data to connect and authorize to your server ():


After saving, your server will always be available in the list of connections for quick access. To connect to it, double-click on the line of your server.

When you connect to the server for the first time, you may see information about an untrusted security certificate. The reason of that . Just click "OK" and you will see the desktop of your server.


Remote Desktop Connection (RDP) from Debian
RDP (Remote Desktop Connection) is a proprietary protocol from Microsoft, which, in turn, does not release RDP clients for Linux operating systems.But still there are various working versions from various development companies.
We recommend using an RDP client Remmina
To install the Remmina application and the RDP plugin for it, you need to open the package installation manager:

Here, in the search bar, enter "Remmina" and select all the results for installation:

Installation takes literally 3-4 seconds, after which you can immediately use the application.
Find it in the main menu and run:

Before starting work, you need to create a new connection for convenience in the future:

In the window that opens, you must specify the correct RDP connection parameters and authorization data ():


After saving, your server will always be available in the list of connections for quick access. To connect to it, simply double-click on the line of your server.

When you connect to the server for the first time, you may see information about an untrusted security certificate. The reason of that
R0m4c , 03/28/2018
Useful and reliable tool
Use this 30-40 hrs a week for connecting to several Windows systems (Servers, PCs, 2013, 10, XP). Help me earn my living. I've given it only 4 stars because:
It's taken to not closing down when I quit. I have to do "force quit".
There could be more settings. For example, I've not got it to recognize my Apple keyboard layout. Have to remember to swap @ and double-quote.
I like to reserve 5 stars for outstanding excellence!
I recommend it.
Fielde , 01/03/2018
Remotely control a Windows 10 PC - Perfect
I stumbled across this "App" recently and have been using it on my 10 year old iMac, I found that it gave new life to the old girl, it remembers passwords, displays in full screen and has better resolution than my pc at the office . Ive recently started to use this on my new iMac which is running a more up to date version of OS and replaced the old RDP application that I had and its working perfectly. I don't try transfering stuff through it - i just put files I want onto dropbox and then get to them from there. Anyway it works perfectly so it has my recommendation!
GooseBeaks, 08/25/2018
Far better than version 10
There are some longstanding issues with this version, as it seems that Microsoft have abandoned active development in favor of the new version 10.
This version works far better than version 10 does; while it does have some flaws (a failure to quit properly being the most obvious) it lets me work the way I need to, which version 10 does not.
Retiring this version before 10 is properly functional is a terrible decision.
Unfortunately, it is impossible to completely escape from Windows, and in corporate work you have to connect in terminal mode to servers running Windows.
To do this, you have to use RDP client programs, I know several clients for Mac OS X:
- Remote Desktop Connection(Desktop Connection) by Microsoft. Comes with Microsoft Office
- CorD. Freeware (http://cord.sourceforge.net )
- teleport(sold in the AppStore. Price 33 $)
- RDP Business Pro(Sold in AppStore. Price $9.99)
- 2X Client RDP free client (http://www.2x.com/rdp-client/ )
- Jump Desktop(price in the AppStore 979 rubles)
- Remotix for Mac(price $39.99. website http://nulana.com/remotix-mac/)
- iTap mobile(AppStore price $24.99, site http://itap-mobile.com/desktop/rdp)
Remote Desktop Connection
A native program from Microsoft that works well with a good connection, but can hang your apple mac with a bad connection. All my main complaints about this program are related to the unstable operation of the program on a bad channel or with a slow server. The second disadvantage is associated with connecting to the desktop of another user - disconnecting from the desktop with "hot keys" led to the termination of the program.
A well-functioning free program. Of the shortcomings, I can note: the disappearance of the mouse cursor on some forms. To return it, you need to press any key.

2X Client for RDP
teleport
A program designed not only for RDP access to Windows computers, but also a program that can provide remote access to your Mac using VNC. There is a version for OS X and for iOS.
RDP Business Pro
Supports RDP protocol, supports printing to a local printer, allows you to share disks on mac.
 Jump Desktop
Supports RDP and VNC protocols.
Remotix for Mac
RDP and VNC client. There is a 15 day trial version on the developer's website. Didn't test. Supports RDP 7.1 protocol

iTap mobile
These are all RDP clients for Mac that I know of. Unfortunately, none of the programs I've tested support the ability to translate the Cmd+Space combination into a command to change the keyboard layout in Windows.
By default, they are immediately available for connection via the standard RDP (Remote Desktop Protocol) protocol - the usual "Remote Desktop Connection" in Russian-language editions of Windows.
This article will describe how to connect to a newly created virtual server on UltraVDS from various devices (operating systems). If you require any other connection method (RAdmin, TeamViewer, etc.) after a successful RDP connection, you can set it up just like any other software.
The article is quite long due to the fact that it describes in detail how to connect from each of the most popular systems, step by step, so we moved up the hot links for navigation:
Connecting to a virtual server from a desktop version of Windows (XP, 7, 8, 8.1, 10)
When using a standard Windows operating system, the following path must be opened to connect to the server:Start -> Programs -> Accessories -> Remote Desktop Connection Or just press the key combination Win+R and in the window that opens, type mstsc
In the window that opens, you must specify the IP address of the VDS server created for you. If you ordered a server with several IP addresses, you can use any of them to connect.
The IP address of your server is indicated next to your server in your personal account in the "My Servers" section.
After entering the server IP address, click the "Connect" button and you will see a window with authorization fields. Here you need to log out as a new user:
When creating each new server, the system automatically generates a random password for the Administrator user. This password is also displayed in your personal account near your server:
There is a strange thing in some editions of Windows: if you copy and paste the password from the server into the authorization field before connecting, nothing will happen when you try to connect, and the RDP client will again show the authorization window as if the credentials were entered incorrectly. In this case you must enter the password manually(large letters are large, small letters are small, in the English keyboard layout).
A remote desktop connection is a very handy thing, with its help you can transfer files from a computer to a server and back by simply copying and pasting them, the same with the text on the clipboard. You can also transfer any included USB devices and network printers/scanners from your computer to the server. To do this, the first time you connect to the server, select "Show Options" in the lower left corner.
In the window that opens, go to the "Local Resources" tab and select the options you need:
When connecting to the server, you can see information about untrusted security certificate. The reason for this is that the server encrypts the transmitted data with an SSL certificate that it automatically generated itself. This notification does not indicate a security issue, but only warns you that the connection is encrypted using a certificate that was not issued by an authorized authority.
Check the "Don't ask me again about connections to this computer" box and click "Yes".
The program interface is simple and intuitive. Before you start, you need to configure the connection settings. To do this, we create a new one:
In the connection settings window, specify an arbitrary name, for example, "Server on UltraVDS", the IP address of the created server and authorization data (the Administrator login and the password assigned to the server in automatic mode) - these data.
After exiting the settings window, everything will be saved automatically and in the list of connections you will see the newly created one:
Double click on it and you will connect to your server.
When connecting to the server, you may see information about an untrusted security certificate. Why does this notification occur and what does it mean.
By adding your server's self-signed certificate to the trusted ones, or simply accepting it once, you will see your virtual server's Windows desktop.
Run the app after installation and click on add new connection:
In the window for creating a new connection, you must specify the IP address of your virtual server and authorization data that are displayed in your personal account ().
Select "Don't ask me again for this PC" and click "Accept".
If the authorization data and the server IP address were entered without errors, you will successfully connect to your server.
Connecting to a virtual server from an Android smartphone or tablet
First of all, you need to download and install the Microsoft Remote Desktop program from Google Play (this is the official RDP client from Microsoft):https://play.google.com/store/apps/details?id=com.microsoft.rdc.android&hl=ru
Run the app after installation and click on add new connection
In the window for creating a new connection, you must specify the IP address of the created VDS server and authorization data ().
When connecting to the server, you may see information about an untrusted security certificate. The reason of that .
Select the "Don't ask me again for connections to this computer" checkbox and click "Connect".
Connecting to a server via RDP from Ubuntu
RDP is a closed protocol from Microsoft, which, in turn, does not release RDP clients for operating systems of the Linux family.However, there are still various working versions from various manufacturers.
We recommend using the client Remmina
For Ubuntu users, there is a special repository with various application packages, including Remmina and RDP.
Installation is done in 3 simple commands, which are entered in turn in the Terminal:
To install the Remmina package sudo apt-add-repository ppa:remmina-ppa-team/remmina-next
Installing updates sudo apt-get update
Installing the RDP protocol plugin sudo apt-get install remmina remmina-plugin-rdp libfreerdp-plugins-standard
If you have previously installed or run an existing version of Remmina, you must restart it. This can be done by rebooting the computer, or by executing the following command in the same terminal:
sudo killall remmina If the process was not started, then an error message will appear: process not found, which also suits us.
Open the search menu and find the freshly installed Remmina package there
Click on add a new connection and fill in the fields with data to connect and authorize to your server ():
After saving, your server will always be available in the list of connections for quick access. To connect to it, double-click on the line of your server.
When you connect to the server for the first time, you may see information about an untrusted security certificate. The reason of that . Just click "OK" and you will see the desktop of your server.
Remote Desktop Connection (RDP) from Debian
RDP (Remote Desktop Connection) is a proprietary protocol from Microsoft, which, in turn, does not release RDP clients for Linux operating systems.But still there are various working versions from various development companies.
We recommend using an RDP client Remmina
To install the Remmina application and the RDP plugin for it, you need to open the package installation manager:
Here, in the search bar, enter "Remmina" and select all the results for installation:
Installation takes literally 3-4 seconds, after which you can immediately use the application.
Find it in the main menu and run:
Before starting work, you need to create a new connection for convenience in the future:
In the window that opens, you must specify the correct RDP connection parameters and authorization data ():
After saving, your server will always be available in the list of connections for quick access. To connect to it, simply double-click on the line of your server.
When you connect to the server for the first time, you may see information about an untrusted security certificate. The reason of that