Sometimes a situation arises when you need to disable autorun of some programs in Windows 7 in order to reduce significant resource consumption and speed up your computer, namely reduce system boot time when turned on.
The fact is that some programs, after installation, put themselves on autorun when you turn on the computer.
Now we will analyze several ways to disable autorun of those programs that you do not need.
But be careful, because some programs are needed for the system to work and are service ones. Disabling them may affect some of the functionality of the Windows 7 operating system, its security.
Remove programs from the startup folder through the start menu
You may already be familiar with this method, if you have been using a computer for a long time, you could accidentally discover it yourself without any additional information, but for beginners, the information may still be new.
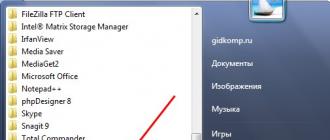
Go to the Start menu > All Programs and find the Startup folder.

Everything that is there is launched when the computer is turned on. And so that these programs do not start, it is enough just to remove them from there.
We use the standard windows 7 utility - MSConfig
This utility, MSConfig, is already on your computer by default and you do not need to install it, just run and use it.
And it's very easy to run it:
Open the Start menu again and type msconfig in the search bar.
It will be found immediately, you just have to click on its shortcut to launch it.

If for some reason you don’t have a search bar in the Start menu, then you can simply press the Win + R keyboard shortcuts and the following window will open:

Enter msconfig there and click OK.
As a result, we should run the msconfig utility. It looks like this:

Go directly to the "Startup" tab. Unchecking the boxes will disable unnecessary programs. But if you do not understand what each of them is responsible for, then it is better not to disable it.
After you click OK, you will be prompted to restart your computer, but you don't have to.

This utility is very convenient, but it is also not functional enough, because. is not able to provide us with the ability to disable absolutely all (any) programs from autorun.
Therefore, we will consider a few more ways.
Removing from the windows 7 registry manually
We start the registry editor. To do this, we press the usual keyboard shortcut "Win + R" or again in the search bar in the "Start" menu, we already type the words "regedit".
A very scary incomprehensible window is launched with many folders that look more like abracadabra than names.

But we are not afraid, but calmly understand everything and gain knowledge!
Among these folders, in the distant wilds, there are two sections of the autorun "seven":
general (local registry), which is used for all users, the address is:
Computer\HKEY_LOCAL_MACHINE\Software\Microsoft\Windows\CurrentVersion\Run
personal registry - for the current user, at the following address:
Computer\HKEY_CURRENT_USER\Software\Microsoft\Windows\CurrentVersion\Run
That is you need to get into the Run folder, expanding the folder tree one by one.
They contain files that run with Windows and you can easily delete them as usual - by right-clicking and selecting "delete".

You can first go to the first address, clean it up, and then take on the second one.
Disabling autorun programs using third-party software
Now we will talk about the third-party program Autoruns, which is distributed completely free of charge (freeware), but at the same time very powerful and functional - in just a couple of clicks it can disable absolutely everything that can automatically start when you turn on the computer.
Download Autoruns program You can follow the link from the official site: http://download.sysinternals.com/files/Autoruns.zip(521 KB)
At the office website - the English version, but we can easily figure it out, even without knowledge of this foreign language.
The downloaded archive has the .zip extension and can be unpacked by any archiver.
There are 4 files in the folder. We are interested in "autoruns.exe", which we run (it is advisable to right-click on the file icon and select "run as administrator").

At the first start, we will be asked to accept the license agreement, which we will do by clicking on the “Agree” button.

The program looks like this:

We immediately open the “Everything” tab, which is a list of absolutely all startup objects.
But in order not to get lost there, there are tabs in which all this is broken down separately: Winlog, Drivers, Explorer, etc.
If you uncheck the box, we will disable autorun. If you click on a line, then below you can see a description of the object: the version of the program, the path of its location on the computer, size, etc.

In the “Logon” tab, there is a list of programs that we could disable using the previous methods described in the article.
You may notice that some lines are highlighted in pink - these are just objects that do not have a detailed description, and in yellow are those whose files have been deleted and can no longer be loaded, but are simply listed. Those. they may or may not be removed.
Again, be careful when disabling something you don't know anything about. Perhaps this is necessary for the main operation of Windows 7 and after disabling these services, the computer will not work as it should.
For the laziest we provide video tutorial of the whole process:
If your operating system takes a very long time to load when you turn on the computer, then the point is in those programs that open automatically. A whole bunch of applications run at the same time. This significantly slows down the computer. Therefore, you need to disable the automatic launch of applications. We will consider the most popular methods for various systems.
Autorun programs in Windows 7. MSConfig utility.
This method is very simple. Go to the start menu. Next, enter msconfig in the search bar. Open the first (and only) result.
Here you see a huge list of applications. And they all run on boot. Review the entire list carefully. Uncheck those utilities that you do not need at startup. Then save your changes and be sure to restart your computer. The OS should boot many times faster.
Tip: if you accidentally disabled some necessary utility, don't worry! Just go back and check the boxes in the right place.
How to disable autorun through the registry?
This is the hardest way. It is better not to do anything in the registry, as you can disrupt the computer if you do something wrong. So, open the Start menu. Below, in the search bar, type regedit.
Then find the two Run sections. You can see the full paths in the screenshot. One of them is responsible for automatic launch for the current user, and the other for all users.
Go there and just remove the components of those utilities that you don't need.
Programs to disable autorun
There is an Autoruns utility, it is quite powerful. In it you can find absolutely all applications that start at boot.
You can download it from this official site: https://download.sysinternals.com/files/Autoruns.zip.
Then unzip the archive and run the utility. This is how it looks like:
Go to the Everything tab. This means that programs are collected there that automatically open on your computer. After, uncheck the boxes next to those that you want to disable at startup.
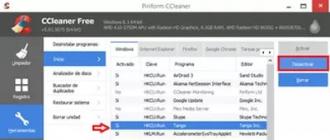
CCleaner utility.
This utility is convenient in that, in addition to disabling autorun, it can also remove any garbage from the computer, making it even more productive.
You can download it from this site: http://ccleaner.org.ua/download.
Select the required setting. If you do not know which one to choose, then choose the first one.
Disable unnecessary utilities and they won't bother you the next time you start.
In this way, you can easily and simply disable any program from autorun. The following methods will be covered for other versions of Windows.
How to disable autorun programs in Windows 8
Through the system partition.
Hold down keys such as Win + R.
A window like this will open. Type shell:startup, then click OK.
This is where the applications of the current user are stored.
And if you want to open to all users, then enter shell: common startup.
Now just click on any of the folders you don't need at startup and delete it.
Via Task Manager
In the following versions of operating systems, automatic startup is not in the MSConfig utility, but in the Task Manager. Call the context menu on the control panel with the mouse and select the item you need.
Select an unwanted application and click on the "Disable" button.
How to disable autorun programs in Windows 10
For this operating system, those methods that are listed for version 8 are suitable. Even the location of the folders in the registry is the same.
Tip: use any means other than the registry. It stores important data that is very easy to damage. If you are bad at the registry, it is better not to even go there.
Thus, now no unnecessary applications will interfere with the boot of the computer. Just do not disable all the utilities in a row. Of these, some are extremely important for the full operation of the computer.
How to disable autoload programs m starting with the operating system? Hi admin! I installed two operating systems Windows 7 and Windows 8 two months ago, and now they both slow down and freeze, and they take forever to load.
In Windows 7, I launched the built-in msconfig utility, went to the "Startup" item and turned everything off there: Skype (a program for communicating over the Internet), Download Master (file downloader), DAEMON Tools Lite (working with ISO images), Zune Launcher (a program for phone) and so on, by the way I found one virus. Two weeks later I looked at startup, and some programs are again there. Do you know why? I worked with all these programs for two weeks, and when they start, they again install their services in startup. What to do? My computer is powerful and copes, but it's still a shame, a month ago Windows loaded in 15 seconds, and now in 40 seconds.
. With her, the situation is better, after two weeks only a few programs arbitrarily returned to autoload, but the programs that I reinstall everything calmly go to autoload.
I installed the AnVir Task Manager program on your advice, launched it, the program is good and does not start anything at startup and warns about everything, but what's interesting, I found the All entries tab in this program, and was stunned, there are 500 entries, and that's all I have in autoload! Andrey.
How to disable autoload programs
Hello friends, it is quite easy to disable the startup of any program, you can do it using the "msconfig" utility in Windows 7 and the Task Manager in Windows 8. In addition, you can enter the settings of any program and uncheck the "Run at Windows startup" option .
Something else is a little more difficult - to prevent a certain program from being automatically loaded when it is installed on your computer, and the matter here will not do without one good free program.
The whole secret is that most of the programs, when installed on your computer, will not ask you for permission to go into autoload, it will just go through and that's it, and you won't even know about it.
Today I will tell you two interesting stories, and at the same time we will learn how to disable autoload programs in Windows 7 and Windows 8 operating systems and how to prevent the program from being autoloaded again.
If you reinstall the operating system and actively use it - install various programs, drivers (printer, scanner, camera ...), antiviruses, and so on, then in just a month there are so many of these programs that Windows loading slows down very much. And most importantly, users simply do not know (and most are not interested) where to find all these programs that slow down the loading of the operating system, they only catch on after Windows starts to load and work very slowly.
In Windows 7, you can disable startup programs using the msconfig utility built into the operating system.
start, run, msconfig,

Then in Windows 8 you can disable the program from startup directly in the Task Manager in the special Startup tab. For example, let's remove the Skype program from startup, call the Task Manager,


In my opinion, the main mistake of users is that they control the startup of programs only using the tools built into Windows, which cannot show all the programs that are in startup and, moreover, cannot stop the services of programs going into startup. When users install the AnVir Task Manager program specially created to control startup and see everything that is actually happening in their startup, they are in shock for a long time after that, watching numerous unnecessary services and processes, sometimes even remote programs.
To emphasize the seriousness of the situation, I want to tell you this. Working for several years in the Windows 7 operating system, in which a licensed antivirus with the latest updates was installed, a firewall and the AnVir Task Manager program (a program that monitors startup, which will be discussed later), I got into this situation about once a week. Working on the Internet, I often had to go to unfamiliar sites (like all of you), sometimes in search of drivers, and sometimes the right information. So, during the day I was browsing a lot of sites and being on some web pages, at first glance harmless, the AnVir Task Manager program installed by me (controlling autoload) quite often signaled me with such a window,

saying that an unfamiliar program is rushing to autoload me, and this is with complete silence and connivance. Such programs, friends, are nothing more than a terry virus.
I foresee your question, what will happen if you do not have the AnVir Task Manager program and the program will quietly go into autoload? And it will be something like what I described in my articles "" and "". This is how we catch viruses with you.
True, with the advent of the Windows 8 operating system, the situation has become a little better, all programs that are in startup can already be seen more clearly in the Task Manager in the Startup tab. The system, according to Microsoft, is better protected, and so on. Although a small problem remains. All programs, when installed, still quietly go into autoload.
I’ll tell you another interesting case, in which I will tell you in detail how to disable startup programs.
One of my classmates asked me to reinstall his operating system and install a package of free software. Three months ago, he bought a laptop with Windows 8 preinstalled. This laptop was used by his entire family, even without one for each family member. And now the laptop freezes, loads for a long time and slows down. My friend agreed to my proposal not to reinstall the system, but to figure out what was the reason for the long system boot.
To see all the programs that are in the startup of the new Windows 8 operating system, launch the Task Manager, select the Startup item. We carefully look friends at everything that is in my friend's autoload, as we see what is not here. Please note that he even has two antiviruses installed.

and this despite the fact that the Windows 8 system also has a built-in one that can also work. Of course, in this case, the computer will boot by no means 4 seconds. My friend claims that he installed the second antivirus out of curiosity and then removed it. But the facts say otherwise, the antivirus program works, we remove the second antivirus program correctly, through the "Install or change a program" panel

A more interesting picture of autoload will open if we install the AnVir Task Manager program, official website http://www.anvir.net/. If after reading our article you want to download and install this program, then be sure to read our article, it contains a more detailed description of working with the utility.
Note: if you open the “All entries” item, then all files, drivers, services, registry keys will open, that is, rather redundant information for a novice user, but in fact you can figure it out (for example, I have about four hundred any codecs and filters for working with video).

1) Drivers for C-Media sound card. It's rather strange how they got here, because the built-in sound card on my friend's Realtek computer, disable the C-Media drivers from startup or delete them altogether.
2) DAEMON Tools Lite is a good program for creating disk images and emulating virtual CD/DVD drives. They use it once a week, so it is also not needed in autoload.
3) The Download Master program is needed to download files, but the owner of the computer does not even know about it and has never used it, we disable the program from startup, if necessary, it will be launched manually.
4) Skype (a program for communicating via the Internet), if you do not use it constantly, uncheck it.
5) The process known as ZuneLauncher.exe belongs to software Zune by Microsoft. With the help of this program, files are exchanged and synchronized music, images, video files on a computer and a phone running Windows Phone. The strangest thing is that my friend has a Samsung phone based on Android and his wife and child too, which means he does not need the Zune program at all. Disable the program from startup or better delete it.
In the "Services" at the very top there are two services related to the HP laser printer, we will not touch these services. Also here is the TeamViewer 8 service, which is related to the very good remote access program TeamViewer (for those who are interested, read the article). But unfortunately my friend does not remember exactly who installed it and why. We delete it from startup, if necessary, it can be started and so, disable it from startup.

That's basically it.
We restart the computer and after the reboot, our Windows 8 literally came to life. In my opinion, all the problems were created by the second anti-virus program.
But what we see is that all our programs removed from startup are asked to go there again, we kick them out through the door, and they climb out the window, that's the attack.


Check the box Don't ask again about this startup item and click Remove. Send the program to quarantine if you want.
If you want to return the desired program to autoload, this can be done in the settings of the AnVir Task Manager program.
In this way, with the help of this program, you will instantly put things in order in your autoload.
Articles on this topic.
Apple provides a three-month free trial subscription to the Apple Music service, but requires you to enter payment information when connecting to the service. If you do not unsubscribe in advance, funds will be debited from your bank card monthly in accordance with the selected tariff plan: 169 rubles for an individual service or 269 rubles for a family service up to six people.
Those who start using Apple Music today will be charged on October 1st. Before that time, a lot of things can happen - for example, you can be completely disillusioned with music and you will not need any music services.
To avoid being charged as an unpleasant surprise, you can cancel your subscription right now, and pay money only when you are one hundred percent sure that you want to continue using Apple Music. You can cancel the subscription through the music player on iOS 8.4 or the program on Windows or Mac.
In the player on iOS 8.4, you need to click on the silhouette that is shown on the main page in the upper left corner and go to your Apple ID account. At the bottom of the page there will be a link to the section for managing subscriptions. Go to it - you will see all your active and inactive subscriptions. Here you can change the type of Apple Music subscription (individual or family) or turn off its auto-renewal with a toggle switch, which magically in iOS 8.4 from iOS 4. Funds will not be debited after cancellation.

Similarly, you can manage your subscriptions on your computer through iTunes. Run it, go to the iTunes Store section, find the "Account" link, click it, enter your Apple ID password, scroll down to the settings page and go to the subscriptions section. In it, you can disable automatic debiting of money from a bank card, including for Apple Music.

It's important to note that once auto-charge is turned off, you'll be able to enjoy Apple Music for the duration of the trial period. This does not affect the functionality of the service.
Windows updates are sometimes of dubious value. In the case of the tenth version, all updates except the first after the installation of the system are very specific and controversial. Moreover, they always start unexpectedly, without notifying the user about it, and their sudden use causes a long restart of the computer. However, updates can be interrupted at any stage.
How to quickly abort an update
If you want to quickly interrupt a Windows 10 update, depending on its stage, the first step is to do the following:
- if the update has just started downloading, disconnect your Internet connection;
- if the update has downloaded and the system asks for a restart to apply it, in no case do this;
- if when you turn on / off / restart the system, the installation or application of updates starts, turn off the computer by holding the power button on the case.
Regardless of the option you are faced with, all further actions will look almost the same. Now you need to start canceling the update that has begun. For the last variant of the problem, start the system in safe mode.
Starting the system in safe mode
Starting the system in safe mode is guaranteed to help start the computer without installing the downloaded updates.
If you skip downloading updates and turn off your computer, there will be some difficulties with canceling them: every time you try to log in, an attempt will be made to apply the updates. On later versions of Windows 10, this problem has been fixed, but just in case, it's better to start the computer in safe mode.
How to cancel an update
The described method is suitable for quickly interrupting an update that has begun. Now the update needs to be canceled so that you can safely turn on the Internet or restart your computer.
There are several ways to cancel an update that has started. For example, turn on metered connection or Airplane mode. However, such methods will only interrupt the download of new packages and in no way prevent the installation of already downloaded ones. It is guaranteed that the update that has begun can be canceled only through the command line.

To resume the update, you need to repeat the above commands, replacing stop with start.
How to permanently disable downloading updates
The method mentioned in canceling the update also includes preventing further system updates. But there are others that will be more convenient and reliable in the long run.
Through the Group Policy Editor
This method will not work for Windows home and some unlicensed versions of the system, but by using it you will still be able to manually run system updates.

Through Services
This method is available on all versions of Windows, but it completely prohibits updating the system: you will not be able to download updates even by starting the check manually (the check will start, but it will not be able to find anything).

Through the registry editor
This method can be considered the most correct, but also the least safe: it makes changes directly to the system configuration, and you can cancel it only by doing the same steps again. If you intend to use this method, store the path to the parameter you are changing somewhere so that you can roll back the changes.

Via Windows Update
Blocking updates through Windows Update is official, but the least reliable. In this way, you will mark your own Internet connection as limited: updates are not downloaded through such connections in order to save traffic.