In our age of digital and modern technologies for the average city dweller it’s impossible to imagine life without the Internet. One of her sons can be called WiFi. And the question naturally arises, how is it still necessary to distribute WiFi from a laptop if there is no possibility (or desire) to connect a router. Let's take a look at this in more detail.

Before handing out wifi from laptop
Before you start setting up the distribution of WiFi through a laptop, you need to make sure that your device is equipped with a built-in device for distributing the Internet: a WiFi adapter, either USB or PCL type. Their presence can be viewed in the Control Panel in the Network and Internet tab. If you find the item Wireless Network in Network Connections, then you can safely proceed to the organization of the distribution of WiFi.
WiFi is a trademark of the Wi-Fi Alliance. It is a connectivity standard IEEE 802.11 protocol. In general, is a wireless network that can be used by all devices that support a similar transmission standard.
Programs for creating a virtual WiFi distribution point
The first step is to create a virtual access point. She will be your laptop. To make it a WiFi point, you can download free software from official sites.
mHotspot
One such program is called mHotspot. This software does not need to be installed. After it is downloaded, you need to run mHotspot. There will be indicated the necessary program settings. For example, a field called Mhotspot name is entered for the name of the future network. That it will be seen in the list of available connection points.
You can download the program from the official website mHotspot.
The window working with the program mHotspot
The next field is called Password. This is the password. It must be no shorter than eight characters. It is important to introduce it in order to protect the network from being accessed by unauthorized people.
The field called Max Clients regulates the number of gadgets that can be simultaneously connected to the network. The maximum number is ten. If this field is a unit, then no one except your computer will be able to connect to it. Click Start Mhotspot and go to create an access point.
Video: how to use the program mHotspot
MyPublicWiFi
This is another program that can be downloaded on the Internet is MyPublicWiFi. Following the link to the official website of the downloader, you can download the software on your laptop. The program does not require installation and works immediately after downloading.
MyPublicWifi working window
The program MyPublicWifi allows you to make a Wifi access point from your computer. Instructions for work:
- Download MyPublicWifi (preferably version 5.1).
- To install the program.
- Reboot the laptop.
- Start MyPublicWifi (or start the MyPublicWifi program as an administrator, this is if you get an error during a normal start).
- Specify the Automatic HotSpot configuration item.
- select the name of the network to be created in the Network Name (SSID) field.
- In the Network Key, specify the password.
- Select (tick) Enable Internet Sharing.
- In the list select a laptop connection to the Internet network.
- Click the Set up and Start Hotspot button.
The program MyPublicWifi works great and does not require much effort to connect
Create an access point: the three best ways
Distribution through an existing Internet connection
Distribute Wi-Fi through an existing Internet connection under the force of the operating systems Windows 7 and 8.
In order to make the Internet distribution, you must follow these steps:
- Start.
- Control Panel.
- Network and Internet.
- Network and Sharing Center.
- Change adapter settings.
- Wireless network connection 2. Rename it as desired. As you wish.
- We find our own active connection. It is basically called a local area network connection. Also referred to as Virtual WiFi.
- In the properties of the active connection, you should find the tab "access" and go on it. In this tab, put a tick, that is, we agree with all the points. Namely:
- we allow other users to use this network;
- allow other users to manage connections to the selected network.
- From the list choose your active connection. That is: a local network connection (or the name you renamed the connection to).
- Click "OK" and restart the computer.
If you want a smartphone, tablet or laptop to use this access point, you should only run the program to distribute wi-fi. And on devices that will be connected, you must enter the network access passwords.
The way to configure the distribution of WiFi using the command line
The above methods do little to work if it is necessary to distribute WiFi from a computer on which Windows 10 is installed.
How does the command line on the laptop screen
Steps to distribute wireless networks using the command line:
- Check the possibility of distribution. You must run the command line as administrator and enter the netsh wlan show drivers command in it.
- Read the item "Hosted Network Support" (if the settings are in English, it will be written Hosted Network). There must be the word "yes."
- The next item on the command line is: netsh wlan set hostednetwork mode = allow ssid = remontka key = secretpassword. At the same time in the command, such instructions as “remontka” is the name of the wireless network (you can write your own, no spaces are used). Secretpassword is a WiFi secret password. You choose it yourself.
- After all the data have been entered, enter the command: netsh wlan start hostednetwork.
- Right-click on the Start menu on the desktop and select "Network Connections" there.
- In this list, select the Internet connection that is currently used. Click the right mouse button to open the Access tab. Allow access by other users.
We configure network capabilities via the command line
In the end, a notification appears on the screen that the wireless network is running. If there were no errors and failures, you can connect phones, tablets and laptops to this network. They will now have access to the Internet.
Access Point with Windows 7: computer-to-computer network
Video, how to adjust the distribution of WiFi from a computer through Windows 7
In order to make a wireless connection on Windows 7, you need to create a network "computer-to-computer". In the lower right corner of the screen (where the clock, date, and quick launch icons are located. This is called “tray”) find the “Internet connection”. Click on it, and then select "Network and Sharing Center".
A window will appear. In it, you must select the item "New Connection Settings". And click "Configure the wireless network" Computer-Computer "and" next. "
In the new window fill in the three columns:
- network name (think for yourself);
- security type (WPA2-ptrsonal best);
- security key.
Go to the "Network and Sharing Center" in the "Modify advanced sharing options" section and check the box "Enable" on all items. Do not forget to put a tick on the moment: "remember the network settings." Click the "next" button.
After the system configures the distribution of the Internet via WiFi, in the window that appears, you will need to click "Enable Internet Connection Sharing".
Setup was successful, if after that the computer will be able to distribute the Internet via WiFi without difficulty.
Security issues when distributing Wi-Fi without a router
Since, as a result of organizing a virtual access point, an account is created with standard parameters, the admin name, any person who is at least somehow familiar with the network can easily connect to it.
To avoid this, it is important to know some points. Actions that are necessary to protect themselves and the network from the invasion of the guests surveyed.
Window 192.168.0.1.
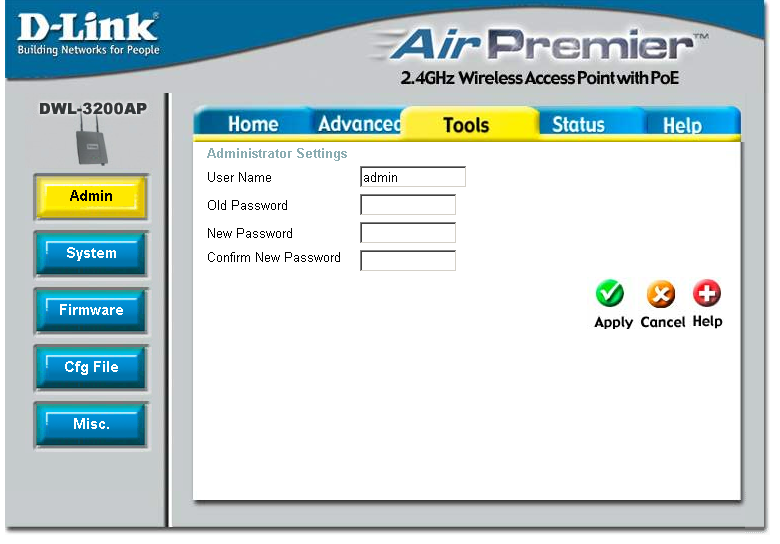
In the address bar of the browser (any) enter 192.168.0.1. A window will appear on the screen in which you will need to enter an admin name and password. Go to the Maintenance tab in the section called Administrator. In the New Password field enter a new, complex password. It is necessary to remember. You will need it when connecting other devices to the network. With a blade on Confirm Password, we confirm that we are saving the written password. By the same principle we change Login Name. At the end of each done action click Save Settings. This means: save the settings.
Thus, we have protected the account. With more help, it is possible to change all network settings. Including connecting and disconnecting devices, as well as blocking gadgets so that they cannot connect to this network.
We proceed directly to the protection of the access point. In the already open tab in the browser, we find an item called Setup, that is, Settings. In it, select the section Wireless Settings. Will open a new window. It is required to select a function called Manual Wireless Connection Setup. In the settings section, which is located in Wireless Network Settings, we set a new network name (SSID). It should be quite complicated.
If you want users of other gadgets not to see a custom network, then in the Enable Hidden Wireless field, check the box.
We connect the tablet, smartphone and laptop for distribution
After the distribution of Wi-Fi will be organized, to the newly-minted "router" in the form of a laptop you will need to connect smartphones, planets and other gadgets with support for a wireless connection.
Connection features have devices running on the Android operating system. Of course, first of all, it is better to check whether access to the network by other devices is allowed.
If it is, then you need to download the adb program. It is designed for the Internet with Windows on Android devices. The next step is to enable in the settings of the tablet or smartphone on Android mode called "USB debugging". And then connect the gadget via USB cable to the laptop.
Unzip the folder with the adb program and run AndroidTool.exe. A window will open, in which you will need to click the Refresh Devices button. On the right will be a list called Select Domain Name Server (Dns) ... There you choose your own DNS server. After clicking the Show Android Interface button, the application will be installed on your tablet.
Program USB Tunnel allow superuser rights on the tablet. And feel free to click the Connect button.
WiFi wireless technology allows you to create home groups, combining several laptops, PCs and other devices that support this connection into groups for data exchange, communication and sharing games. However, as a rule, a router is used to organize such a group, which is not always at hand. Many are interested in the question, can a WiFi access point be organized on a laptop with Windows 7?
After all, every modern laptop has a built-in Wi-Fi adapter, which theoretically can work as a wireless module of the router. In other words, is it possible to create a virtual group without a router? The answer is yes, it is possible. How to do this, you learn by reading this article.
In fact, everything is very simple. For this there is a mass of programs. Moreover, the developers of the Windows 7 operating system have provided such an opportunity, allowing users to use the built-in tools for organizing a virtual network, saving you from searching for any programs. So, you guessed it, you can create a virtual group in two ways:
- By installing a special program (for example - Connectify).
- Use the built-in Windows 7 tools and laptop wireless adapter.
How to create a virtual WiFi access point in Windows 7: Video
Let's consider both options. Then you can determine which one is better to use.
Creating a virtual group in Windows 7 using built-in tools
It should be noted that the implementation of this method does not require the search and installation of third-party programs, it works more stably. In addition, the laptop can be used as a WiFi access point in Windows 7 with the simultaneous reception and distribution of the Internet wirelessly.
The fact is that the Wi-Fi adapter of the laptop is able to work simultaneously on receiving and on returning a signal. Accordingly, he can take the Internet and at the same time distribute it.
So what is needed for this? First you should check for driver updates for the wireless module and install them. The fact is that outdated drivers may not support the function of creating a virtual WiFi mini-port. Everything is solved by a simple software update.
It is worth noting that there are two ways to create a WiFi access point on a laptop with OS Windows 7 using built-in tools:
- Using the command line.
- By creating a connection "Computer-Computer".
How to distribute Wi-Fi from a computer without a router: Video
Creating a home network on a laptop using the command line
To do this, you need to run a command prompt with administrator rights. This is done as follows: press the key combination Windows + R on the keyboard. In the window that appears, write CMD and press "Enter". The service will automatically start the necessary service with administrator rights.
Run command line through service execute
- Creating a local network: netsh wlan set hostednetwork mode = allow ssid = My_virtual_WiFi key = 12345678 keyUsage = persistent. Here SSID = My_virtual_WiFi is the name of the network, and Key = 12345678 is the password. This data may be different, the only rule is that only Latin letters and numbers can be used.
- Launch wireless group: netsh wlan start hostednetwork.
- Stop the network: netsh wlan stop hostednetwork.
Related articles
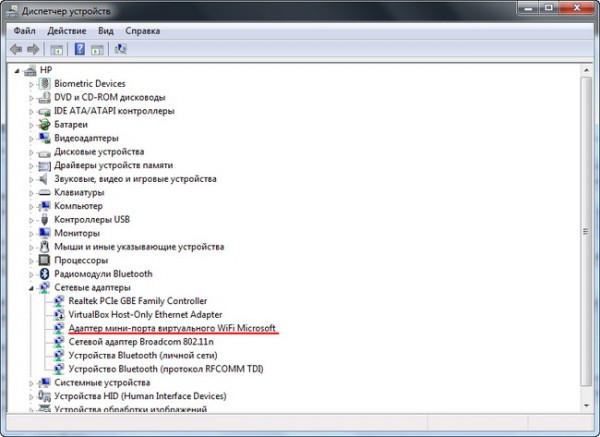
After writing the first command on the command line, press "Enter". If everything is done correctly, a new equipment will appear in the dispatcher “Microsoft virtual WiFi mini-port adapter”. In addition, a new connection "Wireless Network Connection 2" will appear.
Creating a virtual WiFi access point in Windows 7 using the command line: Video
This completes the creation of the virtual group. If you need to share files, you need to do the following. Open the network and sharing control center through the tray (as in the photo) and go to the item “Change advanced sharing options”.
Network detection should be enabled here. In addition, you should disable sharing with password protection. After that you can share any folder or file by clicking on it with the right mouse button, and selecting “Sharing a Homegroup (Read)”
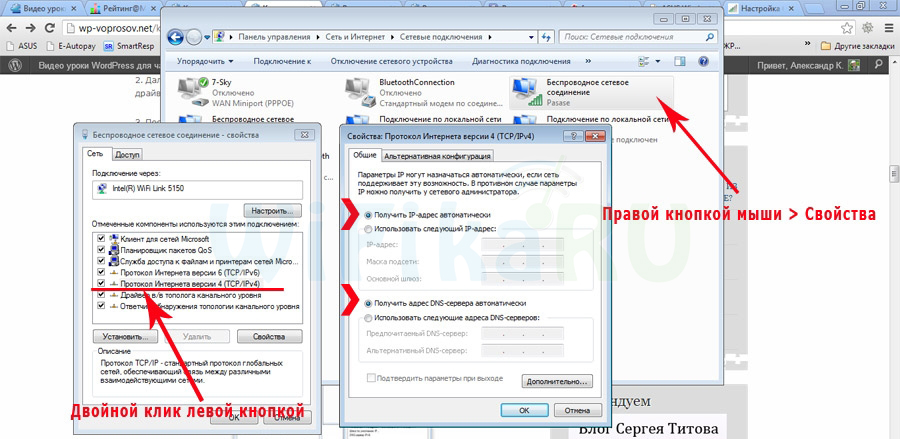
If you want your virtual WiFi access point in Windows 7 to distribute the Internet to all group members, you should return to the network control center and go to the section “Changing the adapter settings”. Here we find the connection with which the computer goes to the Internet, right-click on it and select "properties".
In the window that appears, go to the “Access” tab, where you need to set two checkboxes as in the photo, and in the “Connect your home network” line, select the created group “Wireless network connection 2”. After that, click "OK" and close all windows. WiFi access point from the laptop adapter with OS Windows 7 is ready, now you can connect other devices to it.
Creating a Computer-to-Computer Wireless Connection
Let's get right to the point. Creating a WiFi access point on a laptop with Windows 7 is to do the following:
- We start the network management center and click "Settings for a new connection or network."
- In the window that appears, select "Configure computer-to-computer wireless network".
- Next, enter the name of the group, select the security type and set a password (security key). Group name is the name of the connection to which other devices will later be connected. Network key is required to connect. At the bottom you should check the “Save this network settings” box.
- Introduction of the name of the network.
- Set the security type.
- Set network key.
- Select the connection with which the computer is connected to the Internet (if required).
- Ad-Hoc mode (point-to-point) - in this case, customers interact directly, bypassing intermediaries.
- Infrastructure mode (client-server) - in this case, the interaction between the network hosts occurs exclusively through an intermediary - an access point.
It remains only to share. This is done similarly to the previous method. This completes the creation of a WiFi access point on a laptop with Windows 7.
Creating a wireless group in Windows 7 using third-party programs
This method is the simplest. The main task is to find and download the appropriate program. It should be noted that such software is quite a lot, from a variety of developers and with different capabilities. However, despite this diversity, they all have the same principle of operation, and, accordingly, the settings.
It all comes down to four parameters:
Perhaps there will be additional settings, however, they differ in each program, therefore it is impossible to describe a universal method. As a rule, the instruction is attached to the software.
How to distribute WiFi in Windows 7 using the program Conectify Hotspot: Video
Now you know that the laptop's WiFi adapter can be used as an access point in Windows 7 - this is quite real. Moreover, the creation of such groups is easily accomplished without any particular difficulties and problems.
Which option to choose in a given situation you choose. One thing can be said - the built-in tools work more stably, although third-party programs are much simpler in settings.
Do you need to distribute the Internet to several devices or create a small network to enable data exchange, and you do not have a router or switch at hand?
This problem can be solved by having only a laptop with an installed Wi-Fi adapter.
As you know, the work of devices in Wi-Fi networks can occur in two modes:
Theoretically, the simultaneous operation of a single Wi-Fi adapter in two modes is impossible, just as the simultaneous operation of several operating systems on a single host.

After starting the virtual AP, the built-in DHCP server is activated. In order for client devices to access Internet resources, go to the "Network Connections" menu. RMB click on the adapter through which you connect to the Internet network.
In our example, this is a wireless adapter, go to the “Access” tab and put 2 checkboxes in the respective fields:

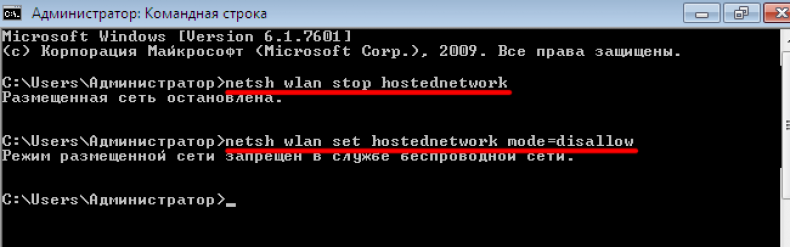
To disable, use the command:
netsh wlan stop hostednetwork
To deactivate the access point, enter:
netsh wlan set hostednetwork mode = disallow
The use of Virtual AP organized by built-in Windows has a number of limitations: the creation of only one virtual adapter that works only in the access point mode.
The maximum number of wireless client devices running on the network is 100.
It so happened that at work to get a full Internet without restrictions, I have to use a netbook and a 3g modem. Having recently bought an iPod Touch, I really wanted to connect it to the Internet. If the smartphone could still get out on the Internet on its own, then with a player it is somewhat more difficult.
One option is to connect using a sync cable. The option is not very convenient, since there is absolutely no desire to carry around with you the cable all the time, and you don’t want to install iTunes either. The second option, the one that is described in this article - is to connect via WiFi. On Habrahabr already, but for Linux. Our task is to configure the same for Windows.
So what we have
- Netbook, ASUS 1215B- Internet via USB 3G-modem
- Player and smartphone with WiFi
Task
- Get Internet on all devicesDecision
Before you begin, many advise you to update your wifi card driver on your computer. Personally, I did not do this, but everyone decides for himself.Ways
- You can use graphical utilities, such as Connectify and Virtual Router. They work, they even work well, but they eat resources. Some people complained that they were eating a lot of resources.You can do everything yourself through the console using netsh. This is the way I chose. All actions must be performed on behalf of the Administrator.
Create a network
First of all, you need to create a wireless network using the following commandnetsh wlan set hostednetwork mode = allow ssid = "MyHomeInternet" key = "pass12345678" keyUsage = persistent
where MyHomeInternet is the network name (ssid), pass12345678 is the login password.
The success of the command will look something like this:
Hosted network mode is enabled in the wireless network service. The SSID of the hosted network was successfully changed. The passphrase of the user key of the hosted network has been successfully changed.
Now you can go to Control Panel \
\
. I have it called "Wireless Network Connection 2".
Connection control
Since the connection is in the status of "No connection", we need to enable it. To do this, run the command:After receiving the phrase Hosted network running, the network will start and in the list of connections we will see the connection of your network. In our example, this is MyHomeInternet.
To stop the network, you need to use the command:
netsh wlan stop hostednetwork
We connect the Internet
WiFi network is created and you can even connect to it, but the Internet will most likely be absent. In order to correct this misunderstanding, it is necessary:- go to Control Panel \ Network and Sharing Center \ Change adapter settings;
- go to the properties of the connection through which you go online(I have this Internet MTS);
- tab Access;
- set the checkbox at the point " Allow other network users to use the Internet connection of this computer"and select our created network from the list -" Wireless Network Connection 2 ";
- click OK;
- disable and enable the 3g connection; (ideally reboot)
- disable and enable the WiFi network.
What happened
Ideally, after these actions, the laptop will turn into a small WiFi point. To do this, take the iPod, turn on WiFi and see our network created MyHomeInternet. Enter the password and connect. The Internet is.Restrictions
- first of all, after each launch of Windows, it is necessary to start the network using the command netsh wlan start hostednetwork. It is solved by writing a small script and sending it to autoload. Another option is to create a shortcut on the desktop and start the network only when necessary.- The OS must be Windows 7.
- the connected device must support WPA2-PSK / AES
Problems
No network is created
- update the wireless adapter driver to a newer one- run the console as an administrator
The network has been created, but it does not start.
- may help restart the computer and start the network as an administratorThe network has been created, launched, but it is impossible to connect to it.
- check password- manually register in the TCP / IP properties of the connection on the "server" and the client network settings. For example, for the server: ip - 192.168.137.1, mask - 255.255.255.0 and for the client: ip - 192.168.137.2, mask - 255.255.255.0, gateway - 192.168.137.1, dns - 192.168.137.1
Connected to the network, but the Internet does not go
- make sure that you share it (see "Connecting the Internet")- Try to go not by the domain name, but by IP-address. If it passes, then it’s time to think about entering the DNS server into the client and / or server settings.
Total
As you can see, this simple task can be solved without using third-party software. Nevertheless, it sometimes happens that without it you will not have to go. In my case, there were problems with DNS and even indicating the Google Public Domain server in the TCP / IP settings, I could not do anything. Therefore, I had to resort to help14
Wi-Fi access point - The concept is quite broad. First of all, it can be understood as any device that distributes an Internet connection to a computer, laptop, or smartphone. But still the access point is called a separate popular device for creating wireless access to the Internet to several computers. It is often confused with the router - today we will figure out what it is and how to set up a wifi access point.
Laptop as a wifi access point on Windows 7
Let's start the conversation with how to create a WiFi access point from a laptop running Windows 7. In, if you remember, we distributed the Internet to other computers. Today we will consider a method in which tablets and smartphones can join the computer directly. It is easy to make a laptop an access point, since in Windows 7 this mode is already built into the shell of the system and is called. This technology turns your laptop into a virtual access point and can support up to 100 connected clients simultaneously.
So, we start to customize. To begin, also, as in the previous case, you need to activate the wireless network connection. After that, go to the command panel (Start - All Programs - Accessories - Command Line) and in administrator mode enter a request to activate the virtual adapter mode:
Netsh wlan set hostednetwork mode = allow ssid = "MS Virtual WiFi" key = "123456" keyUsage = persistent netsh wlan start hostednetwork

Here “MS Virtual WiFi” is the name or SSID of your network, and “123456” is the password to connect to it. After that, press “Enter” and wait until the system configures it, after which a new virtual device is detected in the device manager - “Microsoft Virtual WiFi miniport adapter” or “Virtual WiFi mini-port adapter”.
It should be borne in mind that
The driver of the wireless adapter installed on the computer must support Virtual WiFi
Otherwise, the computer as an access point will not work - you will need to update the driver.
Now go to "Control Panel - Network and Sharing Center - Change adapter settings" and see the newly created wireless connection:

Now your computer or laptop with Windows 7 has become a real wifi access point with the ability to access the Internet. The network is visible in the list of wireless networks and you can easily connect to it by double-clicking and entering the password you set:

Other commands for managing virtual wifi:
netsh wlan show settings - show network properties and its status
netsh wlan show hostednetwork settings = security - display the security settings of the hosted network, including the password
netsh wlan start hostednetwork - start the network
netsh wlan stop hostednetwork - stop network
A way to automate this process from Evgeny Bogdanov:
1) do everything as written through the command line,
2) create a file.txt in it we write “netsh wlan start hostednetwork” (without quotes)
3) change the file format from .txt to .bat (right mouse button / rename)
4) drag this file into autorun and ta-da-m access point starts automatically when you start the laptop
Miscrosoft Virtual WiFi Adapter Software
The practicality of using a laptop as an access point using Virtual wifi is obvious, but every time using the command line when turning on the computer is inconvenient. In order to facilitate the process, an application was developed - Connectify. He has a free limited version, and he has a full-fledged one, which today costs as much as a thousand rubles. After installation, the utility starts working simultaneously with the launch of Windows 7, and the settings are the same minimum - you just need to set the network name and password.
But before you start using it, you need to check a few important settings that can interfere with your work. In particular, I often get asked a question:
Why am I connecting to another computer, but I can not get online?
1. Make sure your network card is supported by this program. You can find out on this page of the official website of the developer. If your card is there, but still the Internet on another computer does not work, then you may need to update its driver supporting Virtual WiFi technology. "Firewood" will find on the official website of the developer, and the version and manufacturer of your network card can be found using the program Speccy, about which I wrote.
2. Disable all antiviruses and third-party firewalls, and transfer the built-in Windows firewall to the "Auto" mode.
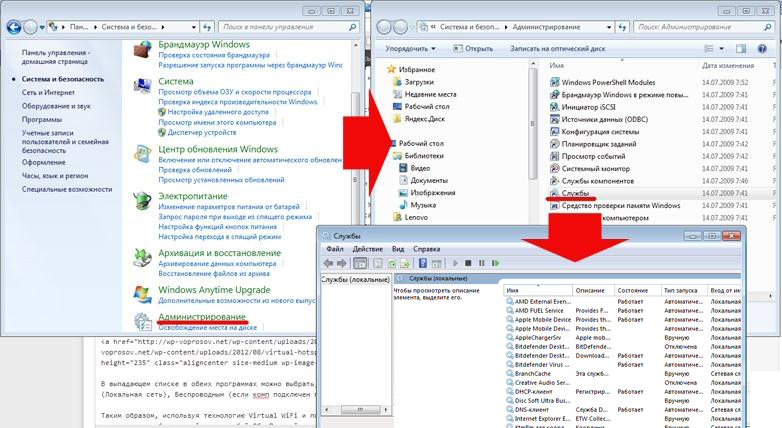
To do this, go to Win 7: Control Panel\u003e System and Security\u003e Administrative Tools\u003e Services
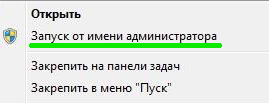
3. Run the program as an administrator.
To do this, go to "Start", right-click on the program and select "Run as administrator" in the menu
4. A new wireless connection created by the program must allow access to the Internet connection of this computer. We have already entered this section above: start\u003e Control Panel\u003e Network and Internet\u003e Network and Sharing Center\u003e Change adapter settings\u003e Right-click on the newly created connection\u003e Properties\u003e Access tab. We tick the boxes “Allow other network users to use this computer’s connection to the Internet” and “Allow other network users to control sharing of access to the Internet” and in the drop-down list select this connection created by the program.

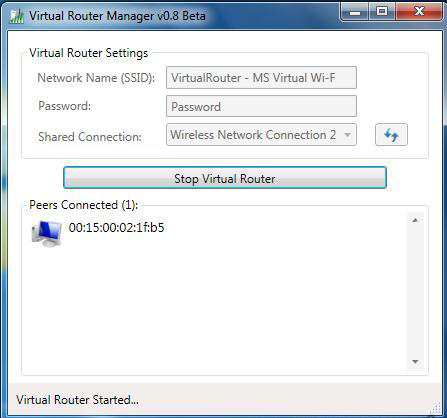
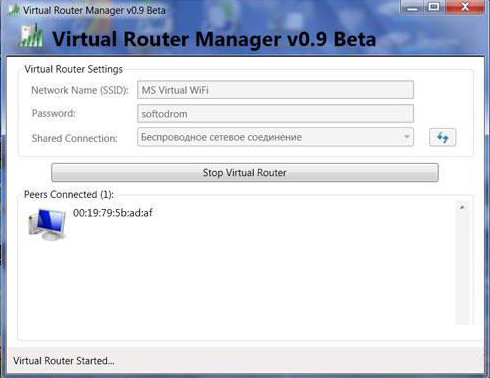
There are two more similar programs that you can use for free if it didn’t work with Connectify - Virtual Router Hotspot Manager, which I use myself, and mHotspot. The principle of operation is the same: open the program, enter the SSID and key and start its operation. It will save the settings and will be launched automatically with the operating system.
For clarity, I suggest watching several video tutorials in which all of the above ways to use a computer or laptop as an access point — integrated with Windows or through programs — are described in detail.
Virtual WiFi on Windows 7
Distribution of the Internet by means of Windows
Configuring the Connectify program
Work with the program mHotspot
Thus, using Virtual WiFi technology and using the help of the utilities described, you can easily distribute wifi internet to any device with any OS. Use!
There is such a device - an access point
Briefly about the main differences of the device, called access point from the router I have already said in the article about. The main one is the inability to connect to the Internet. That is, the access point is used only to organize a local wireless grid. If you need to share all computers on the Internet, then either a router or a router connected to an access point, on which your entire network is connected, is used. From this we conclude that the access point in its pure form may be needed only either to create an internal network in the office, or to connect two different local area networks wirelessly. I repeat that in detail with the explanations in the video format, the differences are described in another article.
Wireless Access Point D Link
So, let's start in order already specifically about the access point. Suppose you set out to make a wireless network in your office without, in which there is already a local network between computers connected through a router. Either you have internet access to the apartment to the main computer via cable via an ADSL modem into which the provider cable is inserted, and you want to make wifi, but do not want to purchase a combined router with ADSL support. In this case, we use the first and main mode of the point, called Access Point.
We buy an access point, they are produced by all companies with products of network equipment, but I will show how to configure the D-Link access point as one of the most common on the example of the model DWL-3200AP. The settings, regardless of the specific device, are about the same, so I think everything will be clear.
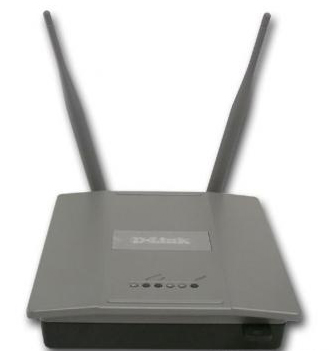
This model is made in a metal case, which is especially important for the office, as it meets all the necessary fire safety standards.
We insert the patchcord with one end into the only available RJ-45 outlet and the other into the network interface card of the computer.

By default, this access point has a local IP - 10.0.0.1, which means we need to enable the computer in this address range. Go to the Control Panel and set the following values in the settings for local connection:
IP - 10.0.0.10
DNS - 255.255.255.0 (in the screenshot below, the last digit is written incorrectly)
Gateway - 10.0.0.1 (point address)

(Start - Control Panel - Network and Internet - Control Center - Adapter Parameter Changes. Then right-click on “Local Area Connection” - Properties - TCP / IPv4 Protocol - General Tab)
Save the settings and go to the browser address http://10.0.0.1. To login use the username / password pair admin / admin. You can also configure all the parameters using the Windows program D-Link AP Manager, but it is more convenient and correct to do everything manually via the web interface.
Go to the menu item "Wireless" and set the data for the wireless network - SSID, encryption type and password.

Mode - Mode of operation, set the Access Point (Access Point)
SSID - Network ID (name) that the user will see in the list of available wireless connections
SSID Broadcast - SSID Broadcast; in order for the network identifier to be visible when the network card is automatically searched for a wireless network, you need to enable Enabled
Channel - the channel of frequencies used - you can use another
Authentication - authentication mode
Apply to the building button "Apply". In this field, we configure the distribution of IP addresses for devices connected via wifi. To do this, go to the "LAN" menu and set the address range and enable their dynamic or manual distribution. If you select “Dynamic”, then computers will be assigned automatically when connected, “Manual” will have to be assigned to all manually, as we just did for the computer to configure the wifi access point D Link. Choose for yourself how you prefer, but manually safer and more convenient later if you work not only with the computers or laptops themselves, but also with devices connected to them, for example, a webcam.

PassPhrase Settings - Encryption Settings:
Cipher Type - Encryption Type, select TKIP
PassPhrase - Password to connect to wifi. it can be any Latin combination of letters and numbers.
DCHP settings will be taken from those that you can configure in the tab "Advanced\u003e DHCP Server"

Now you can turn on the computer's WiFi adapter, set the network settings for automatic acquisition if you have chosen the dynamic IP distribution mode at the access point, or enter a static one within the configured address range, and specify the point address as the gateway.
After that, we take out the patchcord from the laptop or computer, insert it into your router or modem, which is connected to the Internet. This scheme will work, of course, if you have configured the ADSL modem or router for Internet access, but this is another topic. Reboot the point and modem and enjoy the wireless network. By the way, now you can change all the settings in it at wifi at the same address - 10.0.0.1. For example, change the password for access to the admin panel