Many users very often encounter update problems in Windows 7. The system constantly displays a message that it is searching for updates, but does not find anything.
There is one solution to this problem. It is enough to manually download and install just one package from Microsoft, which will eliminate this error. Let's look at why Windows 7 Update doesn't find updates.
For quite a long time, Windows 7 Update has been causing serious problems for its users. Unfortunately, I myself belong to the group that, in its own skin, experiences problems with centering on the “seven”. On one of my computers, every time I try, the search ends with the endless message “Searching for an update...”. At first I assumed that the system was looking for updates for a long time, but when I left the computer turned on overnight, it did not bring the desired result. What should I do if Windows 7 Update doesn't work properly?
It turned out that this problem can be solved quite easily. Of course, I do not guarantee that the proposed method will solve the problem for absolutely all users, but for me it was instantly resolved manually - by installing the KB3172605 package and performing a few other simple steps. Here's what you need to do to fix the problem.
Step 1: Download the update for your system (but do not install it)
The first step is to download the KB3172605 package directly from the Microsoft website using a web browser. You will find direct links below for 32-bit and 64-bit versions.
You need to download the package, but not install it yet - we'll do that in step 4. First you need to perform two simple steps.
Important! If in the fourth step you encounter a problem installing the above package (for example, a message about system incompatibility is displayed on the screen), then instead of the above, you need to download the KB3020369 package from the links below. But only do this if the above updates are not working.
Step 2: Disable Internet access
Downloaded files should be installed when the Internet is turned off. If you are using Wi-Fi, then click on the wireless network icon in the notification area (lower right corner of the screen) and turn off the connection. If you are connected to the Internet using a network cable, you can disconnect it from your computer.
Alternatively, right-click on the network icon, select Network and Sharing Center, then go to the Change adapter settings tab and disable the network card you are using to connect to the Internet.
Step 3: Stop the Windows Update service
After disconnecting from the Internet, we need to stop the Windows Update service. To do this, press the Windows + R key combination, enter the following command in the “Run” window that appears and confirm its execution by pressing Enter:
services.msc
The System Services window will open. Find the Windows Update service in the list, then right-click on it and select Stop. Make sure the service is stopped and then close this window.
Step 4: Install package KB3172605 (or KB3020369)
Only now can you begin installing the previously downloaded KB3172605 file for your system. Run the installer file and confirm installation.
If you receive an error that the update is not compatible with your operating system, make sure you download the correct version for your system (32-bit or 64-bit). If it still gives an error, use the alternative package from the first step.
After installation, you will be prompted to restart your computer. Confirm and wait while the update is installed and the operating system boots.
After the system boots, connect to the Internet and turn on the Windows Update service (right-click on it and select “Run”).
Now go to the Windows Update window (for example, using the search bar in the Start menu) and then click on the search for updates button.
After about 5-10 minutes, a list of updates available for installation will open. In my case, the search continued for several minutes and thus finally solved the problem with the endless search in Windows Update.
Updating Windows 7 without Windows Update
Sometimes Windows 7 Update does not download updates, especially if there are a lot of them. Most often, this happens after reinstalling the system - we installed a fresh operating system and suddenly the center displays a message stating that several hundred updates are available for installation. Just downloading them one by one takes a lot of time, not to mention installing them. This is often problematic and ends with a message about restoring the computer to previous settings, since so many updates cannot be installed (the solution is to install them in small batches).
Fortunately, after several years, Microsoft decided to do something about this problem, due to the fact that many users do not properly update the "Seven" to the latest version. The company decided to put up cumulative packages for download on the Microsoft Catalog website. The packages are constantly updated and are currently available for 32-bit and 64-bit versions of Windows 7 and 64-bit Windows Server 2008 R2.
A huge advantage of this packaging is that we don't have to download hundreds of individual packages through Windows Update.
In order to install them, the “seven” must include:
- installed Service Pack 1 (SP1);
- package KB3020369 since April 2015
When these conditions are met, we can download a rollup package that will update our system to the latest version in one click. To do this, follow the following link using the Internet Explorer browser (unfortunately, the following page only works under IE):
Download update rollup for Windows 7 / Server 2008
When you log into the site, a list of found updates will be displayed. Three will be available for download:
- for Windows 7 (32-bit version only);
- for Win 7 computers based on x64 processors (64-bit version only);
- for Windows Server 2008 R2 x64 (64-bit version only).
Download the package that matches the bit size of your Windows and install it as standard by running the installation file. The rollup requires a minimum of 4 GB of free disk space.
Some users prefer to decide for themselves which updates (updates) to install on their operating system, and which ones it is better to refuse, not trusting the automatic procedure. In this case, you must perform the installation manually. Let's find out how to configure the manual execution of this procedure in Windows 7 and how the installation process is carried out.
In order to carry out updates manually, first of all, you should disable auto-updates, and only then perform the installation procedure. Let's see how it's done.
- Click on the button "Start" at the bottom left edge of the screen. Select from the drop-down menu "Control Panel".
- In the window that opens, click on the section "System and safety".
- In the next window, click on the subsection name "Turn automatic updates on or off" in the block "Windows Update"(CO).

There is another option for moving to the tool we need. Call the window "Run" by pressing Win+R. In the field of the window that opens, enter the command:
Click "OK".
- Windows CO opens. Click "Settings".
- No matter how you got through (via Control Panel or by means of a tool "Run"), the window for changing parameters will open. First of all, we will be interested in the block "Important Updates". By default it is set to "Install updates...". For our case, this option is not suitable.
In order to carry out the procedure manually, select the item from the drop-down list "Download updates...", "Search for updates..." or . In the first case, they are downloaded to the computer, but the user makes the decision about installation himself. In the second case, a search for updates is performed, but the decision to download and subsequently install them is again made by the user, that is, the action does not occur automatically, as by default. In the third case, you will even have to manually activate the search. Moreover, if the search gives positive results, then to download and install you will need to change the current parameter to one of the three described above, which allow you to perform these actions.
Select one of these three options according to your goals and click "OK".


Installation procedure
Algorithms of actions after selecting a specific item in the Windows CO window will be discussed below.
Method 1: algorithm of actions for automatic downloading
First of all, let's consider the procedure for selecting an item "Download updates". In this case, they will be downloaded automatically, but installation will need to be done manually.

Method 2: algorithm of actions for automatic search
As we remember, if you set the parameter in the Windows CO "Search for updates...", then the search for updates will be performed automatically, but downloading and installation will need to be done manually.


Method 3: Manual search
If in the Windows CO when setting the parameters the option was selected "Don't check for updates", then in this case the search will also have to be carried out manually.

By the way, even if you have one of three modes installed, according to which the search is performed periodically automatically, you can activate the search procedure manually. This way, you don't have to wait until it's time for a scheduled search, but start it immediately. To do this, simply click on the inscription on the left side of the Windows CO window "Search for updates".

Further actions should be performed in accordance with which mode is selected: automatic, download or search.
Method 4: Install optional updates
In addition to important ones, there are optional updates. Their absence does not affect the performance of the system, but by installing some, you can expand certain capabilities. Most often, this group includes language packs. It is not recommended to install all of them, since the package in which you are working is quite sufficient. Installing additional packages will not bring any benefit, but will only load the system. Therefore, even if you have auto-update enabled, optional updates will not be downloaded automatically, but only manually. At the same time, sometimes you can find new items useful for the user among them. Let's see how to install them on Windows 7.
- Go to the Windows CO window using any of the methods described above (tool "Run" or Control Panel). If in this window you see a message about the availability of optional updates, click on it.
- A window will open containing a list of optional updates. Check the boxes next to the items you want to install. Click "OK".
- After this, you will be returned to the main Windows Central window. Click "Install updates".
- The download procedure will then begin.
- When finished, click on the button with the same name again.
- Next comes the installation procedure.
- After it is completed, you may need to restart your computer. In this case, save all data in running applications and close them. Next, click on the button "Reboot Now".
- After the reboot procedure, the operating system will be updated taking into account the installed elements.


As you can see, in Windows 7 there are two options for manually installing updates: with pre-search and with pre-download. In addition, you can enable exclusively manual search, but in this case, to activate the download and installation, if the necessary updates are found, you will need to change the parameters. Optional updates are downloaded separately.
A common situation that many people encounter after reinstalling Windows 7 or resetting a laptop with Windows 7 preinstalled to factory settings is the subsequent downloading and installation of all released Windows 7 updates, which can take a really long time, prevent you from turning off the computer when necessary and fray your nerves.
However, there is a way to download all updates (almost all) for Windows 7 once in the form of one file and install them all at once within half an hour - Convenience Rollup Update for Windows 7 SP1 from Microsoft. Learn how to use this feature step by step in this manual. Additionally: .
The Windows 7 Convenience Rollup is available for download from the Microsoft Update Catalog site under number KB3125574: http://catalog.update.microsoft.com/v7/site/Search.aspx?q=3125574

Here you should keep in mind that you can only open this page in a working form in Internet Explorer (and the latest versions, that is, if you open it in IE pre-installed in Windows 7, you will first be asked to update the browser, and then enable the add-on to work with the update catalog). Update: They report that now, as of October 2016, the catalog works through other browsers (but does not work in Microsoft Edge).
In case, for some reason, downloading from the update catalog is difficult, below are direct download links (in theory, the addresses may change - if it suddenly stops working, please notify me in the comments):
After downloading the update (which is a single standalone update installer file), run it and just wait for the installation to complete (depending on the performance of your computer, the process may take different times, but in any case, it will take significantly less time than downloading and installing updates one at a time).

Finally, all that remains is to restart the computer and wait for the update setup to take place when turning it off and on, which also does not take too long.
Note: this method installs Windows 7 updates released before mid-May 2016 (it’s worth noting that not all of them - some of the updates, the list is on the page https://support.microsoft.com/en-us/kb/3125574 , Microsoft did not include it in the package for some reasons) - subsequent updates will still be downloaded through the Update Center.
04.02.2009 06:29
Installing Windows 7 in update mode is intended for the following situations:
- when Windows Vista is installed on your computer and you need to switch to Windows 7 while maintaining the operating system settings and installed programs;
- when Windows 7 is already installed on the computer, but you need to reinstall it, saving the settings and installed programs.
1. Turn on your computer and wait until the version of Windows you have installed is completely loaded.
2. Insert the Windows 7 installation disc into your DVD drive.
3. On the Windows installation page that opens, click (Install now).
4. Select Connect to the Internet to receive the latest installer updates(Get important updates) so that operating system updates are automatically downloaded before installation (an Internet connection is required).

5. On the next page, read the License Agreement carefully and if you agree to its terms, check the box I accept the license terms(I accept the license terms) and click Further(Next) to continue installing Windows 7.

6. On the page Select installation type(Which type of installation do you want) select Update(Upgrade).

7. Please review the hardware and software compatibility report carefully before proceeding with the installation. Pay attention to the language of the version of Windows 7 you are installing. If you are trying to install English-language Windows 7, you will only be able to do this if the version of Windows from which you are running the installation is also English-language.
8. Follow further instructions.
9. Once the installation is complete, be sure to activate your version of Windows 7 with your 25-digit product key within 30 days, otherwise it will be locked. Do not use pirated activation keys.
If for some reason you are unable to install Windows 7 in update mode, use the mode.

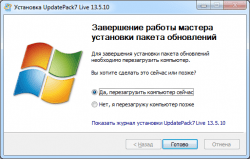
If you update through Windows Update, this is why a Windows 7 update package was created that will safely unpack the latest updates. We recommend updating after a clean installation of Windows 7; you do not need the Internet for this, run the UpdatePack7 utility and wait for it to unpack.
You can see what updates have become available in the control panel; be sure to run the program as an administrator. The update package can be installed on any version of Windows 7 (Elementary - Ultimate) 64 or 32 bits. UpdatePack7 is completely in Russian, it’s not difficult to understand, just a few clicks and the process is started. Upon completion, the system will prompt you to reboot, agree to this action and wait for Windows to load.
It doesn’t matter whether it’s a laptop or a home PC, the program starts on any hardware, the main thing is to run it in Windows 7. Ideally, the process should be like this: installing Windows 7 - activation and then installing updates. The latest version of 2018 updates will make the system more secure against all kinds of virus software.
Program for updating Windows 7 - UpdatePack7 you can download the torrent file at the beginning of the description using the link without registration. A set of Windows 7 2018 updates that will most likely be prohibited from receiving from the official server, since the system is becoming outdated and will no longer be serviced.