Any processing of a photo can be compared to the development of a film - without this, you will not be able to get an impressive result. In the simplest case, the camera is editing the frame. We don't even notice it. But in-camera algorithms don't always work perfectly. Firstly, the capabilities of the camera are limited (the processor is not as powerful there as in the computer). Secondly, automation cannot accurately predict your creative ideas, so it will produce an average result.
By the way, the author's ideas are not always embodied even in ideal conditions for shooting. For example, when photographing in low light, we often get "noisy" shots. What if the camera can't handle the noise on its own? In this situation, you should resort to post-processing in a photo editor.
In this article, we will explain how to remove noise from an image. This is one of the first operations with which photo retouching begins. We will be working in Photoshop CC. All screenshots were taken in the MacOS operating system, but in Windows the windows and settings dialogs look the same.
There are several ways to remove noise in Adobe Photoshop, we will look at two of the simplest ones.
We recommend that you duplicate the original layer and perform all operations with noise on the copy of the layer. If the correction turns out to be very strong, you can always reduce the opacity of the layer or add a mask to it to remove the effect from certain areas of the image.
To duplicate a layer, use the keyboard shortcut Command + J or select the menu item Layer → Duplicate Layer.
Removing noise in a RAW converter
You should start working with noise at the stage of RAW conversion. This is what will allow you to get the highest quality image without loss of detail. By the way, sometimes it is better to leave a little noise, but keep the details in the image, than to get a "clean" but blurry and undefined picture.
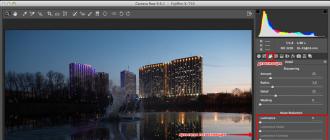
But even if you are processing an already converted image or taken in JPEG format, you can use the Adobe Camera Raw module for conversion, it works great on any images.
To launch Camera Raw, either open the RAW file in Photoshop or use the menu item Filter / "Filter" → Camera Raw Filter.
In Adobe Camera Raw, noise reduction controls are located on the Detail / "Detail".

It is customary to divide noise into two components: color (Color) and luminance (Luminance). The color component is visually expressed in the form of multi-colored grains and is quite easy to remove. The luminance component is the grain. And here, when adjusting, the main thing is to find a balance between the moment when noise interferes with the perception of the image, and when the photo becomes "plastic" due to excessive blurring of details in the process of dealing with noise.
It is often sufficient to remove only the color noise. Luminance is left because it looks more like a film grain and does not interfere with the perception of the image so much. Work with noise removal should be done at 100% magnification of the image and select the values of all parameters based on the structure and size of the photo.
Let's now take a look at the parameters that can be affected when removing noise in Adobe Camera Raw.
Color noise:
Color- force of impact of the tool. The higher the value, the stronger the effect on the color component. 0 - the degree of influence is 0, the parameter is not applied.
Color Detail retains color details in border areas. High values protect subtle, detailed color gradients, but can cause discoloration. Lower values allow better noise reduction, but may cause discoloration. Anything outside this radius will be perceived as noise and gag.
Smoothness helps fight remaining color artifacts. Raise the values if the color spots do not go away.
Luminance Noise (default off):
Luminance- force of impact.
Luminance Detail- everything outside this radius will be perceived as noise and choke. The lower the value, the greater the loss of detail and the softer the image becomes, but more noise is removed. Increasing the value of this parameter retains more detail, but also more noise.
Contrast / "Contrast of brightness"- adding local contrast at the border areas while preserving details. As you increase the values, the noise will return, but the image will become more contrasty.
All these and many other techniques of retouching images are discussed in detail and described in the course at Fotoshkola.net.
Here are 100% fragments of frames at different stages of noise removal:


Remove noise with the Reduce Noise filter
The second way to remove noise is to use a filter Reduce Noise: Filter / "Filter" → Noise → Reduce Noise.
Let's take a shot shot at ISO 12800 with a lot of noise.

This filter has two modes of operation: Basic / "Basic" and Advanced / "Advanced"... And any set of parameters can be saved as a preset by clicking on the icon in the header of the parameter block. Then the selected settings can be used for all pictures in the series or for all pictures taken at the same ISO value.

The following parameters are available for adjustment here.
The possibilities of Photoshop are endless: with this program you can create luxurious renderings, the desired atmosphere, emphasize the mood of the picture or completely transform it. It is not always necessary to spend hours or even days processing one photo - often a few minutes and knowledge of several techniques in Photoshop is enough.
You will learn how:
Getting rid of the "ladders" in the gradient
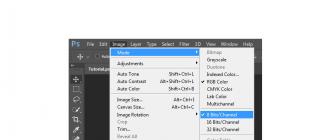
Often the use of a gradient leaves behind "ladders" - color transitions visible to the naked eye. Many designers have no idea how to get rid of them, although there is a simple and quick way. First, change the image mode from 8-bit to 16-bit in the tab Image / Image... Convert the layer to a smart object, if it is not, you can do this in the tab Filters... Find the item here Blur / Blur and turn on Surface Blur... Move the sliders to get the result that suits you.
If after blurring there are several sharp transitions, create a new layer with the key combination Ctrl + Shift + N, in the window that opens, select the mode Overlap / Overlay and check the box next to the function Fill with Overlay-neutral color... Open the tab Filters, Choose a section Noise and turn on the tool Add Noise... In the window that opens, set the value that will help to hide the remaining transitions.
How to make the gradient softer
How to create a sunburst effect
To add the rays of the sun to the image, first you need to select the lightest areas of the picture - it is from there that the sun will shine. The easiest way to do this is with a tool. Color Range.
When the tool window opens, select the mode in the first drop-down list Backlight / Highlights... Then move the parameter slider Dispersion / Fuzziness left and focus on the parameter Range / Range... You need to make sure that the lightest areas of the image are selected.
As soon as you click the "OK" button, the program will select the necessary areas by itself - copy them to a new layer using the command Ctrl + J and convert the layer into a smart object. Go to the tab Filters, select Blur / Blur and then - Radial Blur... In point Blur Method put Linear / Zoom and set the parameter Quantity / Amount to the maximum. In a small window on the right, the program will show you how the blur will be positioned - it is very important to correctly mark the center, which should coincide with the light source.
To make the rays more saturated, it is enough to duplicate the layer using the command Ctrl + J the required number of times. Select all created layers, right-click on them in the list of layers and select Convert to Smart Object... Now all that remains is to add a little blur: go to Blur Gallery and select the tool Field Blur- with its help you can adjust the degree of blurring in different parts of the layer.
If you want to make the image more realistic, try different layer overlay effects; you can also create a mask and remove some rays from the image using the tool Brush Tool... To make the picture even more attractive, you can create a fill layer, set its opacity to about 3-5%, or experiment with the tool Curves.
How to create a sunburst effect in Photoshop
An unusual way to control brightness with Curves
Everyone who works in Photoshop uses the tool Curves, but few people know what the horizontal Curve, but its use is one of the simplest and most convenient techniques in Photoshop.
To test a new way of using the tool, open any image, create an adjustment layer Hue / Saturation, decrease the parameter Saturation to the minimum and put the layer in blending mode Soft Light... Then create a layer with Curves, apply it to the saturation layer by Alt-clicking on it and make a neat horizontal curve. Select the hand icon on the panel Curves and click on the fragment, the brightness of which does not suit you - now you can easily control the light and dark areas of the image with the mouse, without affecting the shades.
The horizontal curve is a convenient way to control brightness without affecting hues
Making the sky richer
Open the desired image in Photoshop and create a new fill layer on top of it. Set the color to a darker shade of the sky. Now make it so that the layer with the color remains only in the sky - turn on the mask and go through the required areas with Brushes / Brush Tool... Then go to Blending Options- we are interested in the settings Blend, if... Move the cursor to the arrow next to the parameter Underlying Layer and click on it while holding down the Alt key - the arrow will be divided into two parts, moving which, you can achieve the desired effect. If you overdid it and the sky is too saturated, you can always change the opacity of the layer.
It's easy to create dramatic effects
How to create the rain effect
Photoshop already has a special function for creating a rain effect, you just need to find it. Go to the tab Window / Window, select item Operations / Actions, and then - Image Effects... In the list that opens, find the tool Light Rain, select it and click the arrow at the bottom of the window. The program will create the effect itself, but you can manually correct it.
The rain effect can be created in a couple of minutes
Changing the time of day in a minute
First, create an adjustment layer. Color Lookup, in the tool settings find the file NightFromDay.CUBE- the image will already change colors. Then create a new adjustment layer Gradient Map... Among the gradients you need to find Blue1 / Blue1 or create the one you need yourself. After the gradient layer is created, change its Blending Mode to Soft Light... It remains only to correct the image using the tool Curves.
1. Press Tab to hide the toolbar and palettes, Shift + Tab will hide only the palettes.
2. Double click on the gray background will open a dialog box for opening a file.
3. Press Alt + Ctrl + A to select all layers.
4. Caps Lock will change your cursor to a clearer cross.
5. Press the F key and you can select one of three different screen modes to make the work area larger.
6. To draw a straight line with a brush or pencil, make one click at the start point, then hold down Shift + Click at the end point.
7. Pressing Ctrl will turn any tool into a Move Tool (Move), while holding it.
8. Pressing Space (Space) will turn any tool into a Hand Tool (Hand), while holding it.
9. Pressing Ctrl and "+" or "-" increases and decreases the scale of the image.
10. If you use the Eyedropper Tool (Eyedropper) with pressed Alt - this will take a color swatch for the background color.
11. Use Ctrl + Alt + Z and Ctrl + Shift + Z to undo and redo a series of actions.
12. The size of the canvas can be easily enlarged using the Crop Tool, drag it outside the canvas and click OK.
13. Ctrl + J will create a copy of the current layer.
14. Ctrl + Shift + E will merge all visible layers into one, Ctrl + Shift + Alt + E will merge a copy of the visible layers into one new layer.
15. Ctrl + D to deselect, Ctrl + Shift + D to return the selection.
16. Shift and "+" or Shift and "-" will change the blending mode of the layer to: Normal, Dissolve, Multiply, Screen, Overlay, etc.
17. If the Brush tool is selected, the transparency of the tool can be changed by clicking on the corresponding number on the keyboard.
18. Hold Alt and click on the eye icon next to the layer thumbnail on the layers palette to hide all other layers except the current one.
19. Select the layer, hold Alt and click on the border between the top and the current layer to create a Cliping Mask.
20. Hold Alt and click on the "Create a new layer" button on the layers panel to open a dialog box with settings for the new layer.
21. Hold Alt and click on the "Create a new channel" button in the channels panel to create an alpha channel.
22. The Move Tool has an option of auto-selection of the layer “Auto Select Layer” in the settings, depending on the place of the click.
23. Working with the Grid, drag the upper left corner where the scales for the Grid are located, and the origin for them will be at the point where you release the mouse button. Double click in the upper corner will reset the reference point to its original position.
24. Having created a path with the Pen Tool, you can hide / show it again using the Ctrl + Shift + H combination.
25. Ctrl + Tab will switch you between different image windows.
26. Holding Shift + Alt the object will be transformed proportionally from the center.
27. If you have the Move Tool selected and you want to copy something, just hold down Alt and drag the image. Holding Shift + Alt the object can be easily moved along the Grid lines.
28. If you want to align the horizon or uneven edges after scanning, then take the Ruler Tool (Ruler), draw a line along your curve, then go to Image> Image Rotation> Arbitrary, Photoshop will substitute the rotation angle values by itself, it remains to click OK and the image rotated.
29. Press Ctrl + R to display the Rules panel.
30. Ctr + E will merge the current layer with the underlying one.
31. If the Brush Tool is selected, you can control the brush diameter using the buttons "[" and "]".
32. Double click on the Zoom Tool will return the image scale to 100%, and on the Hand Tool will stretch the image onto the screen area.
33. Change the active layer with Alt + [or].
34. Move the active layer up or down using Ctrl + [or].
35. To hide the Grid guides, press Ctrl + H.
36. Press X to switch the foreground and background colors in places.
37. Press D to reset the foreground and background colors to the default black and white.
38. Press F5 to display the Brushes palette.
39. Ctrl + click on the layer thumbnail in the layers panel will create a selection of the layer's contents.
40. If you want to see the contents of the layer mask, hold down Alt and click on the layer mask.
41. Alt + click on the layer mask creation icon will create a black mask.
42. For better organization of layers - group the selected ones by pressing Ctrl + G.
43. Ctrl + Shift + N will create a new file, displaying a dialog box; Ctrl + Shift + Alt + N will create a new layer in the working file.
44. When the Brush Tool is active, the [and] keys increase and decrease the diameter of the brush, and Shift + [or] change the hardness of the brush.
45. Press Alt to make the Burning Tool perform the function of the Dodge Tool, and vice versa.
46. When you create text, pressing Enter creates a new line, to finish writing press Ctrl + Enter or Enter on the numeric keypad.
47. You can move the layer to any other open image in Photoshop, thus. a copy of the layer will be created. Hold down Shift while dragging and the content of the layer will be pasted clearly in the center.
48. After applying the filter, its effect can be softened using the Fade function by pressing Shift + Ctrl + F.
49. You can copy the layer mask by dragging it with pressed Alt to another layer.
50. From the vertical Grid you can easily get the horizontal one by selecting the Move Tool, hold down Alt and click on the guide itself. And vice versa.
Keyboard shortcuts for manipulating layers.
Note: the "Cmd" key is used for Mac computers, for PC computers this key is replaced by the (Ctrl).
Creation of a new layer.
Usually, when working in a program, you need to quickly add new layers.
You can save time by using the following keys:
New Dialog Layer (Ctrl + Shift + N);
New layer without dialog (Ctrl + Shift + Alt + N).
Zoom in and out:
Zooming in and out is a necessary step when creating a monoblock with a lot of detail or when working on a large printed sheet.
Zoom in (Ctrl + =);
Zoom out (Ctrl + -).
Another useful trick for resizing the canvas to the size of the monitor's working window is to fit the window (Ctrl + 0).
Merging layers.
This keyboard shortcut lets you combine two or more layers into one and reduce the size of your document or the number of layers in your work.
Merging layers (Ctrl + E).
Grouping layers.
Sometimes you need to combine certain layers into a group to organize your work. To do this, first select the layers we need in the layers palette. (Ctrl + click on the layer data thumbnails), then click (Ctrl + G).
Creation of a new layer with all visible layers.
This trick can be a great find for many reasons. You can experiment with flattening a file without actually flattening it. This is often used in the final process to sharpen the entire image or when adding other final adjustments. To create a new layer with all visible layers of work, press: (Ctrl + Shift + Alt + E) (Print visible).
Using activities to personalize your workflow.
One of the useful features of Photoshop is the Operations panel. (Actions)... What are these operations? Why repeat an infinite number of steps for any similar action, if all this can be simply recorded, like on a tape recorder, and activated with one click of the mouse or a keyboard shortcut?
What it looks like.
Let's take a look at the palette of operations in Photoshop. Open it through the Windows-Actions menu (Window-Operations)... Then, load the operation "Production" (click on the arrow on the right in the operations dialog and select Production from the menu)... There are many simple steps in this collection. Let's consider in detail the operations of this function.
For example, notice the first action in the set: Canvas 150 .. (Letter Canvas 150)... Create an 8.5 x 11 inch document (inch) US paper size you probably do often. But such a blank in the operations menu will greatly speed up the creative process. Activate this line of operation and press the Start button (Play) at the bottom of the operations bar. The required file has been created.

Create your own operations.
This is very easy to do. At the bottom of the operations panel, click the new operation icon. When you create a new activity, the record button is activated at the bottom of the panel (Record)... Now Photoshop will record your every action until you stop this process with the Stop key. (Stop).

For example: you want to convert your document to 800x500px, then add a logo watermark and save the file in JPG format for the Web (Internet)... All these operations can be recorded sequentially and then used at the touch of a button.
Did you know?
Did you know that the operations palette (Palette Actions) can be thought of as buttons? To do this, click on the arrow on the right in the operations dialog box and select the first item from the menu - Present as buttons (Button Mode)... Now you can start actions by clicking on the corresponding button.
Simultaneous batch processing of 500+ files.
Batch processing is an extremely powerful tool. Imagine that you have 500 images that need to be reduced to 100x200 px, converted to black and white images, and saved in Gif format.
We just learned that you can create an activity and execute it with the click of a button. Given the size of this task, we need to open 500 images and press the action button 500 times?
Not properly! To do this, we will use batch processing (Batch Processing) to open all the images one by one, perform the desired actions, and save each file. What can take hours of your work, Photoshop will do in a few minutes. Let's explore the possibilities of batch processing through the File | Automate | Batch (File-Automation-Batch Processing).

Did you know?
You can use batch processing to save a copy of your files to a new directory, leaving the original files intact. Just specify the output folder (Destination) in the batch dialog box.
Using the parameter sets function (Tool Presets) to save your best brushes.
If you've taken the time to create specific brush presets, why not save those presets as a preset? For example, let's say you took the time to customize the splatter brush from the watercolor set. Instead of re-adjusting this brush each time, open the palette of presets for brushes via the Window - Tool Presets menu. (Window-Parameter Sets) and click the new set icon (looks like a new layer icon) at the bottom of the palette.
If you already have a set of brushes, you can save them for later use. To do this, click the arrow on the right in the parameter sets dialog box and select from the menu - Save Tool Presets (Save parameter set).

Several sets of tools are already presented in Photoshop. Just choose a brush (Brush) and in the top menu, look at these sets by opening their panel.
Keyboard shortcuts for canvas manipulation.
Several cancellations.
Typically, most Adobe software packages combine (Ctrl + Z) makes multiple undo actions. In Photoshop, the same combination cancels only one action, and if a repetition is needed, pressing is done again.
For multiple undo (Ctrl + Alt + Z).
Moving from one document to another.
This is a handy trick that allows you to work with multiple files at the same time in Photoshop. Switch between documents (Ctrl + Tab).
Moving (Move tool).
Very easy to remember. When working on a large canvas or moving the work in a zoomed out version, the Move tool makes a big difference.
Hold down the space bar and freely move the document in the working window, or switch to the Hand tool (H).
Show or hide rulers and guides (Show / Hide Rulers and Guides).
With rulers and guides, you can accurately position objects on the canvas. But sometimes you need to turn them off to view your work without these distractions.
Switching rulers (Ctrl + R);
Toggle guides (Ctrl +;).
Rotate view.
If you are working on a tablet, you will need to rotate the document 45 degrees for a more realistic view. Rotation is carried out with the R key.
History palette (History) for quick experimentation.
If you are a designer like me, then you are probably familiar with experimentation. For example, your project is nearing completion and you want to try a few filters or tweaks to see how the project will look. But if you are not happy with the result, you need to go back to the previous state of work.
Before starting experimenting, click on the camera icon at the bottom of the "History" panel. This takes a snapshot of the current state of the document in the history palette. You can create multiple snapshots to compare different experiments.

Did you know?
Snapshots are not saved with the document. They only work while you are working on a document, so be sure to save your work as you want before closing it.
Create seamless textures with Patterns (Patterns).
An often overlooked feature for creating seamless textures in Photoshop. You can do powerful things using this feature. For example, you might want to create a grunge-style background that grows larger as your document expands.
We will do this using the technique of creating seamless patterns.
Creation and definition of patterns.
Not all textures are seamless, so you'll have to be creative to achieve a one-piece effect. The best way in Photoshop to create a seamless texture is with the "Shift" filter. (Filter | Other | Offset)... Let's say your canvas is 500x500 px, so you need to do a vertical and horizontal shift of 250 px, i.e. half.

After clicking the OK button, you need to remove the boundaries of the shift. For this purpose, we use the Stamp tools (Clone Stamp [S]) or Healing Brush (Healing Brush [J]).

To define the texture, go to the Edit | Define pattern (Editing-Define Pattern) and give a name to our pattern. This pattern will be available when you activate the Fill tool (Paint Bucket tool) in pattern mode (Pattern) or when creating a fill layer (Layer-New Fill Layer-Pattern ..).
![]()
Create your own brushes.
Creating your own brush sets is a favorite way to customize your workflow. You can do incredible things with just one brush stroke.
There are very few restrictions on how to create brushes. The only thing you should keep in mind is the size of the brush. It should not exceed 2500x2500 px with the result in black and white. I usually create a grayscale document (grayscale mode) with the maximum size for a brush.
We scan the object and photograph it as a print material for the brush.

By loading the image into Photoshop in grayscale mode (Grayscale), define it as a brush using the Edit | Define Brush Preset (Edit-Define Brush)... Assign a name to our brush and click OK. Now your brush is in the set of brushes of the program and you can see it at the very end of the brushes palette by activating the Brush tool (Brush) and opening this palette.


Creating custom brushes is fun. Experiment with your options for images and create your own brush style.
Custom vector shapes.
Custom shapes are a very handy tool in Photoshop, but some of them are hidden in the program. To find what we need, activate the Freehand Shape tool (Custom Shapes), it is in the same group with vector tools, press the other mouse buttons on the "Rectangle" tool icon (Rectangle Tool) and select the "Freehand Shape" tool from the context menu (Custom Shape).

In the top menu, open the shape palette (Shape), then, to see all the shapes in the program, click the arrow on the right in the palette dialog box and open the drop-down menu of shape sets. Select the one we need and press either the Add button (Apply), or Ok (in case of replacement of previous figures)... In our example, all shapes are loaded.

You can also create your own custom shapes from vector files. Create an outline of any shape in Illustrator with the Pen tool (Pen tool), then transfer the shape from Illustrator to Photoshop (Ctrl + click on the shape outline in Illustrator, then Ctrl + C (copy)) and insert (Ctrl + V) like outline (Path)... Define the path as a vector shape via the Edit - Define Custom Shape from menu (Editing-Define an arbitrary shape) and give the shape a name, click OK. Your shape is now in the program's shapeset at the very end. Open up and see for yourself.

Keyboard shortcuts for brushes and tools.
Default colors or color change:
Default colors ("D");
Switching foreground and background colors ("X").
Tools Brush (Brush) and eraser (Eraser tool):
Brush ("B");
Eraser ("E").
It is very convenient to change the size of the brush or eraser with the square brackets keys while you work.
Increase brush size (]) ;
Reducing size ([) .
Using a clipping mask (Clipping Mask) to show / hide the layer.
I'm sure a tool like clipping mask (Clipping Mask) is a powerful tool for non-destructive and flexible design.
To create a clipping mask, you need two layers: the bottom layer (or the visible part of it), according to the shape of which the mask will be created and the upper one, which is the mask itself and will correspond to the shape of the underlying layer. A clipping mask can affect multiple layers.
In the example below, the top layer of the grunge texture will serve as a clipping mask, and the text layer below it will serve as the base for the mask. This means that when creating a clipping mask, the texture will be placed inside the letters of the text and will correspond to their shape, as shown by the down arrow on the mask thumbnail.

To create a clipping mask on a texture layer (our example), press the mouse button on the thumbnail of this layer and select from the context menu - Create Clipping Mask (Create Clipping Mask)... You can remove the clipping mask by clicking the other mouse buttons on the thumbnail of the layer with the mask and choosing from the menu - Release Clipping Mask.

This is a good practice as the interacting layers remain virtually intact and can be edited any time you want.
Did you know?
You can always add layer styles to a layer with a clipping mask. (Layer Style) for additional design. Try shadows and strokes!
Scaling while maintaining proportions.
Scaling is such a commonly used tool in Photoshop that you rarely think about it. There are several tricks you can use to keep the proportions of your artwork or the ratio of width to height.
I often see photos that are incorrectly scaled and, as a result, noticeable distortion of proportions in the form of stretched vertically or horizontally objects.
When resizing an object (Ctrl + T or Edit-Transform) be sure to hold down the Shift key to maintain the proportions of the image.
An alternative method is to introduce height and width parameters in the top menu when scaling (Ctrl + T).
![]()
If, after entering the width values, you click the paperclip icon next to the field, then the height value will change automatically according to the width value, i.e. proportions will be preserved.
Using smart objects and filters for non-destructive design.
This new feature has been around since Photoshop CS4. It allows you to keep the layers intact and at the same time add some effects to the image and even replace the content of the layers!
Yes, you can replace the Smart Object with something completely new and the change effects will remain separate from the processed layer.
How it works.
Let's try to practice with an example. We have an image that we need to convert to a smart object first. (click on the thumbnail of this layer and select Convert to Smart Object from the menu).

Now, apply the Gaussian Blur filter to the Smart Object. (Filter | Blur | Gaussian Blur)... Have you noticed that the filter is applied as a smart filter (Smart Filter)... This means that the filter is applied as a mask and you can paint on this mask by adding something or removing unnecessary filter elements. Very comfortably!

But wait, that's not all! You can always replace one smart object with another as you wish, without canceling your existing smart filters.
To do this, click the other mouse buttons on the miniature of the smart object and select from the menu - Replace content (Replace Contents)... Select the image you need and press the Place key (Place).
To edit the smart object itself, double-click the mouse button on its icon in the layers palette and edit it in a new document.

This is an incredible tool for avoiding destructive effects on the image.
Layer Compositions with Layer Comps.
Layer compositing is an easy way to maintain multiple layouts in a single file. This method is much more convenient than managing multiple files in one composition.
To apply this function, open the Layer Comps panel. (Layer Composition) via the menu Window-Layers Composition (Window-Layer Comps).
After a certain layer structure has already been formed in your document, you can write it in the program's memory by clicking the icon of a new composition at the bottom of the panel (New Layer Comp)... Now continue editing freely. At this point, you can update the current layer or create a new composition.

Once you get used to using Layer Comps, you won't be able to work without it.
Masking in Quick Mask Mode (Quick Mask).
One of the time-consuming tasks in Photoshop is selecting objects. Selecting can be very easy using the Quick Mask mode (Quick Mask).
To select an object, first enter the quick mask mode by clicking its icon at the very bottom of the toolbar, and start painting over the selection area we need. Having painted over, exit the quick mask mode by clicking on its icon again, and we get an object selection.

Did you know?
In quick mask mode, you can adjust the size and hardness of the brush. Try adjusting the softness of the brush to highlight areas of the image that are out of focus.
Quick masking with the Quick selection tool (Quick Selection).
If you want to select an object even faster than in the previous example, then use the Quick Selection tool (Quick Selection).
This tool highlights similar colors, as if you were painting the selected object on a canvas.

How to refine the edges of your selection.
Now that you have selected an object, you’ll ask yourself, "What about jagged lines and a hard selection edge?" The Refine Edge function will help us to make the selection neat. (Select | Refine Edge)... A dialog box with refinement functions opens.

The main advantage of this method is full control over changes and the ability to see the process in real time.
Fine-tuning your selection has never been easier.
Did you know?
You can bring your selection to a new layer with a mask following the principle of non-destructive design! At the bottom of the dialog box, select the "Output to" section (Output To) and in the drop-down menu, select "New layer with layer mask" (New Layer with Layer Mask).
Using the Background Eraser tool (Background Eraser Tool) to quickly remove the background color.
It would be nice to erase only the background without affecting the foreground image. This is possible with the Background Eraser tool (Background Eraser Tool)... It's in the Eraser toolset. (Eraser tool).

The top panel has three options for how the tool works:
Sample continuously (Sampling Continuous): Erases colors where you swipe the instrument.
Sample once (Sampling Once): erases the colors you selected (before deleting, specify this color by holding Alt and clicking on it).
Sample sample background (Sample Background Swatch): erases the color set as the background swatch. This is my favorite use of the tool.

Did you know?
You can set the foreground color to a color that you do not want to remove from the image. In the top menu, activate the checkbox "Primary color" (Protect Foreground Color) and your chosen shade will not be deleted.
Keyboard shortcut for handling selection.
Add / remove from selection area.
After you have made a selection, it is sometimes necessary to delete or add an additional selection to this area, not starting from scratch.
Activating the Quick Selection tool (Quick Selection), then to add a selection, press Shift + click the mouse button while dragging the cursor. In case of deletion from the selection, press Alt + click the mouse button while dragging the cursor.
Limiting selection.
With the selection tool (Marquee tool) you can create an even circle or square. Hold Shift and drag the cursor in any direction.
Making a selection from the center.
Instead of selecting from the edge of the shape, try creating a selection from the center. Hold Alt and drag the cursor.
To draw from the center of the square and circle, press Alt + Shift + drag the cursor.
Preserve color schemes using the Swatches panel (Swatches).
So you've created a logo and color palette to use branding materials for a specific client, and you should be able to access these diagrams across multiple documents. Why not save this color scheme as a swatch set in the Color Picker panel (Swatches Palette)... It's pretty easy.

Open the palette through the Window-Swatches menu (Window-Swatches) and to create a new color swatch, click the new swatch icon at the bottom of the panel (looks like a new layer icon)... The foreground color will be taken as a sample of your color. If you need to save the swatches for later use, click the arrow in the upper right corner of the palette dialog box and select Save Swatches from the menu.
Non-destructive editing using adjustment layers.
Adjustment layers are another example of non-destructive design, leaving the original image completely intact.
You can add adjustment layers using the icon at the bottom of the layers palette.

A menu with corrections appears. For example, let's use a Levels adjustment layer. (Levels).

A new layer appeared above all the previous ones and the setting for this correction opens. This is where you make the adjustments necessary for the layer to which this adjustment is added.
One more detail. An adjustment layer has a mask on which you can edit your adjustment with a brush. (Brush).
Saving your layer styles for use in other documents.
If you are a designer, then you often come across creating buttons in Photoshop. The appearance of buttons assumes styles such as gradient overlay (gradient overlay), stroke (stroke), subtle shadow (drop shadow) or external glow (outer glow).
It will take a lot of clicks and time to create each button, especially in multiple documents. You can save your layer styles in the styles palette (Styles Palette) for future use.
After adding layer styles to the image, click on the right in the style dialog box, the "New Style" key (New Style).

Your style is now saved in the Styles Palette. If you have a collection of styles, then they can be saved anywhere on your computer by clicking in the upper right corner of the styles window and choosing from the menu - Save Styles (Save Styles).

Using multiple sources with the Clone Stamp tool (Clone Stamp tool).
Everyone knows the Clone Stamp tool and its use with one clone source. But I'm sure you didn't know that the Stamp can be used with several sources, namely up to 5 inclusive! You can switch between sources in the Clone Source panel (Clone Source)... The source can be many layers or documents.

Activating the Clone Stamp tool (Clone Stamp tool) and turn on the cloning panel in the top menu (stamp icon)... Inside the window, click the icon of any cloning source (from 1 to 5) and indicate the source of cloning (Alt + click l. Mouse on the sample)... We continue to indicate the sources by alternately clicking the icons inside the window.
Apply multiple filters simultaneously with the Filter Gallery.
Sometimes the hardest part is deciding on which artistic filters you choose in Photoshop. To make this easier, let's use the filter gallery. (Filter | Filter Gallery)... Here you can add many effects, edit and remove them as you want.
Pay attention to the lower right part of the filters dialog.

You can add a new filter layer by clicking its icon at the bottom of the window.
You can even swap layers for different effects.

Content-Aware Fill (Content-Aware Fill).
This new feature allows you to delete an image or part of it without using old methods such as cloning (Stamp Clone tool) and Healing Brush (Healing Brush).
For example, let's choose an image with some element that needs to be removed. I have a telegraph pole against a cloudy sky.

Create a selection around the pillar with any selection tool (Lasso)... We outline the pillar at some distance from its borders, the selection should not be perfect - this is one of the advantages of this function.

Go to the Edit-Fill menu (Edit-Run Fill) and specify in the fill dialog box "Content-Aware Fill" (Content-Aware).

Typically, the fill effect depends on the image being edited and the result may not always be satisfactory. However, it is still better than using the Stamp as it saves a lot of time.
I am sure these tips will help you in your creativity and replenish your Photoshop knowledge box. Good luck!
Hello everyone! There is such an interesting tool in Photoshop - a mix brush. It has many different possibilities and uses, especially in drawing.
Post written by at
 Postcard for the holiday.
Hello dear subscribers and guests of the site
Today we have a conversation about how to make a postcard yourself for some holiday. And since on the threshold of March 8, we will make a postcard From March 8. I will show only the most basic, and you already turn on your imagination ...
It's a really simple job, no hassle, but this site is for beginners! I hope that you will learn at least something useful for yourself. And also under the video you will see links to download materials for creating postcards for the 3rd holidays: March 8, Valentine's Day and Defender of the Fatherland Day. 2 of them have already passed, but there will be next year as well.
Post written by at

Greetings to all Photoshop lovers!
This wonderful program has a lot of all sorts of filters, with which you can make interesting and beautiful processing of our photos very quickly and easily. I suggest you get acquainted with two filters and see what effects you can use in Photoshop (a small part of them!). After watching the video and reading the text version, try experimenting and come up with your own options, it is very interesting and you will definitely succeed!