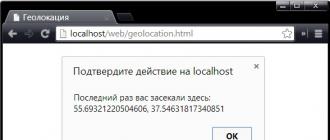
Sometimes, looking through the pictures, you find that you are in the frame extra items... Or you need a photo to place the logo, but it already has other inscriptions. How to remove the caption from the picture and remove the unnecessary object in Photoshop?
For these tasks use the tool Clone Stamp Tool or Patch Tool... The latter is preferable if the extra object is located on a simpler (monochromatic) background.
Working tool Patch Tool, we cut (copy) the donor area and cover everything unnecessary with it. How it works? Hold down the left mouse button, outline a suitable area and move the patch. This tool has two modes:
Source... When using it, the selected area will be filled with the donor fragment into which the selection was moved.
Destination... In this mode, the selected area will cover the area to which it will be moved.
Let's consider some examples.
Patch Tool
Open the photo in Photoshop and create a duplicate layer ( Ctrl + J). On the toolbar, in the group of repair tools, select Patch Tool... If the tool is in the group by default, just press the key J.
To make it easier to work with the image, scale it ( Ctrl + and Ctrl-).
We will be removing the Shell logo. So, we select the first donor site. Press the button on the control panel "Appointment", parameter "Diffusion" set it to 7. Move the cursor and outline the area for the patch (it will be highlighted with a dotted line).

Then drag the selection onto the logo. If the first time the patch does not completely cover the area to be painted over, move it again until the unnecessary object disappears completely. You can undo an unsuccessful action by simultaneously pressing the keys Ctrl + Alt + Z.

Save the finished image ( Shift + Ctrl + S) by choosing a file type convenient for you (for example, JPG).
Here's our result:


To learn more about Photoshop, take a course at Fotoshkola.net.
Clone Stamp Tool
Now let's take a more complicated case. Let's remove the person from the image.

For this we need a tool Clone Stamp Tool... It is called by the key S... You can adjust its size with the keys [ and ] ... This tool creates a clone of the donor site. They are corrected gradually, with small strokes.
Select the donor area next to the painting area. To do this, move the cursor to the donor site and hold down the button Alt, click once with the left mouse button. The donor site is marked with a cross. When moving over the image, it follows the cursor, so the donor site needs to be changed periodically. Now we move the cursor and click the left mouse button.

This image has many vertical and horizontal stripes in different shades. In place of the umbrella, you need to add a ceiling. For the boy, one door is ajar, the other is closed. All this should be taken into account when painting.

So that the lines of beams and boards do not look broken, the donor site should be selected carefully. It is important to place the stamp so that the stripes match.

One of the stages. Here is the gap between the doors.

Gradually paint over the lines horizontally and vertically. To draw the door on the left, the donor area is taken from the leftmost edge, and the vertical lines are taken from above. We brought the stamp, clearly combining the sections so that the straight lines would go smoothly.

We remove unnecessary objects on photos. Today we will talk about how to remove an unnecessary object in a photo using Photoshop - online EDITOR ... For example like this. The first photo contains an unnecessary empty basket. On the second, I removed it.


For a long time we have used a wonderful site Webinpaint , in which such objects were removed easily and quickly, in three clicks. On this site, I had a lesson delivered in 2010, which. During this time, the lesson has spread very far, and many have used it. But now THE SITE IS MADE PAID, and I get a lot of questions and requests to find something similar.
Alas, everything in our world is becoming more expensive, and all such sites are now paid. Therefore, to everyone who does not know how to use Photoshop, I will show you how to remove an unnecessary object in a photo with the help of photoshop - online online Pixlr, simply called EDITOR
If you just need to remove an object on a colored background, then you can do this using tool BRUSH... For example, let's take this picture. And we will remove a month on it. 
Since here the object is on a uniform, blue background, we take the tool BRUSH.

And we select a color to paint over an unnecessary object.
1- open the color selection.
2.- Click with the brush in the place which color we need to paint over the object. COLOR PROGRAM WILL SELECT BY ITSELF.
3.- Confirm the color selection.

Now choose the size of the brush and paint over the object with it. In the color selection window, the one that we need is lit.

Now we just paint over the unnecessary object. That's all.

ATTENTION.
This is the easiest way to remove an object, as it requires ONE color. If the unnecessary object is located on several colors, then you need to CHOOSE A COLOR every time. Although this is not difficult, as it is selected automatically. But pretty boring.But if an object we don't need is located on grass, sand, forest background, and so on, then you can't do anything with a simple color selection. Then we start using the STAMP tool.
Let's take a picture from the previous lesson. And we also remove the Christmas tree in the foreground. 
We go to the site at Pixlr.com Editor. , and load the picture.

ATTENTION. If you insert a picture from the Internet, after inserting its address, a download plate will appear. Just wait until the picture is loaded, then the plate will remove itself.
We choose sTAMP tool, its size and shape.

Let's get to work. Take the Clone Stamp tool and, holding down the Ctrl key, select the clone sourceby simply clicking on it (it should be next to the object to be removed; this is essentially what we will sketch this object with):

ATTENTION! Please note that the copy point moves along with the stamp tool, that is, you periodically, if the pattern does not match, you need to set a new copy point using the Ctrl.
In our example - the top of the Christmas tree is on the background of red Christmas trees. Having set the copy point, I painted over the top with red. Then the yellow grass went, and I again set the copy point, holding down the Ctrl key, and select the cloning source - GRASS.

And I move to the bottom, where there is green grass, and also set the copy point, holding down the Ctrl key, select the cloning source - GREEN GRASS

And I remove the very bottom of the tree. That's all.

Believe me, this is done much faster than I describe. Hold down the Ctrl key, click, paint over the desired part, click again with the Ctrl key, and paint over again. Everything is pretty fast.
Recovering the lost texture. As you may have noticed, when sketching the Christmas tree, below, the grass was slightly disturbed, so I propose to restore it also using the Clone Stamp tool. Select a clone source with a good texture and using a stamp brush big size, preferably a square one, sketch in a place with a disturbed texture.

If everything suits us, then we save our photo. Click FILE - SAVE, or click on the cross in the right corner. We write the name of our picture, select the format and click on "Yes"
This is what we got, with a slightly tweaked texture.

So pretty quickly, you can remove all unnecessary objects from your photos. Do not be afraid to spoil something, you can always undo your actions, or paint over again. Try boldly and you will succeed!
We remove unnecessary objects in photographs. Today we will talk about how to remove an unnecessary object in a photograph using Photoshop - online EDITOR. For example like this. The first photo contains an unnecessary empty basket. On the second, I removed it.
Read more...
For a long time we have used the wonderful Webinpaint site, where such objects were cleaned easily and quickly, in three clicks. On this site, I had a lesson delivered in 2010, which. During this time, the lesson has spread very far, and many have used it. But now THE SITE IS PAYED, and I get a lot of questions and requests to find something similar.
Alas, everything in our world is becoming more expensive, and all such sites are now paid. Therefore, to everyone who does not know how to use Photoshop, I will show you how to remove an unnecessary object in a photo using Photoshop - online online Pixlr, simply called EDITOR
If you just want to remove an object on a colored background, then you can do this using the BRUSH tool. For example, let's take this picture. And we will remove a month on it.
Since here the object is on a uniform, blue background, take the BRUSH tool.
And we select a color to paint over an unnecessary object.
1- open the color selection.
2.- Click with the brush in the place which color we need to paint over the object. COLOR PROGRAM WILL SELECT BY ITSELF.
3.- Confirm the color selection.
Now choose the size of the brush and paint over the object with it. In the color selection window, the one that we need is lit.
Now we just paint over the unnecessary object. That's all.
ATTENTION. This is the easiest way to remove an object, as it requires ONE color. If the unnecessary object is located on several colors, then you need to CHOOSE A COLOR every time. Although this is not difficult, as it is selected automatically. But pretty boring.
But if an object we don't need is located on grass, sand, forest background, and so on, then you can't do anything with a simple color selection. Then we start using the STAMP tool.
Let's take a picture from the previous lesson. And we also remove the Christmas tree in the foreground.
We go to the site at Pixlr.com Editor. , and load the picture.
ATTENTION. If you insert a picture from the Internet, then by inserting its address, a download plate will appear. Just wait until the picture is loaded, then the plate will remove itself.
Select the STAMP tool, its size and shape.

Let's get to work. Take the Clone Stamp tool and, holding down the Ctrl key, select the cloning source by simply clicking on it (it should be next to the object to be removed; this is essentially what we will sketch this object with):
ATTENTION! Please note that the copy point moves along with the stamp tool, that is, you periodically, if the pattern does not match, you need to set a new copy point using the Ctrl key.
In our example, the top of the Christmas tree is against the background of red Christmas trees. Having set the copy point, I painted over the top with red. Then the yellow grass went, and I again set the copy point, holding down the Ctrl key, select the cloning source - GRASS.
And I go to the bottom, where there is green grass, and also set the copy point, holding down the Ctrl key, select the cloning source - GREEN GRASS
And I remove the very bottom of the tree. That's all.
Believe me, this is done much faster than I describe. Hold down the Ctrl key, click, paint over the desired part, click again with the Ctrl key, and paint over again. Everything is pretty fast.
Recovering the lost texture. As you may have noticed, when sketching the Christmas tree, below, the grass was slightly disturbed, so I propose to restore it also using the Clone Stamp tool. Select a clone source with a good texture and using a large size stamp brush, preferably a square one, paint over the affected area.

If everything suits us, then we save our photo. Click FILE - SAVE, or click on the cross in the right corner. We write the name of our picture, select the format and click on "Yes"
This is what we got, with a slightly tweaked texture.
So pretty quickly, you can remove all unnecessary objects from your photos. Do not be afraid to spoil something, you can always undo your actions, or paint over again. Try boldly and you will succeed!
Good day to all, my dear friends. I am with you again, Dmitry Kostin. I remembered here many moments when you are photographed, and some extra person or some object that is inappropriate in the photo gets into the frame. Sound familiar? You only notice it already when there is no possibility to take another picture. Leave it as it is? No way!
Excess items can be thrown out of the photo, and no one will notice the difference. Do you want to know how to remove an unnecessary object from a photograph in Photoshop? Then read on.
Content-Aware Filling
As you can see, the cat has disappeared, but you do not have the cut out area as it usually happens. The void has filled adjacent pixels, which, in the opinion of the program itself, most likely could be in this place.

I had a small "joint". when I removed the cat, in the area where the tail should be, a piece from the handle appeared (apparently a clothes dryer). But it is removed in exactly the same way. And now you have a clean blanket without belly.
Likewise, I decided to remove the textbook from the desk. Agree that it's very simple? But that is not all.
Stamp tool
Sometimes the first method may not be quite suitable for the purposes we need. But it doesn't matter. Photoshop almost always has several solutions for a specific task. And this case is no exception.

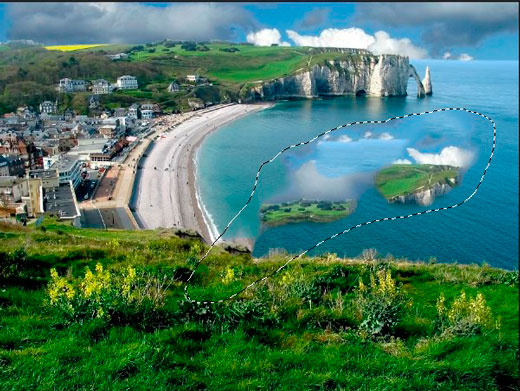
Let's take a picture of a beautiful coastal view. A beautiful view, but as you can see impudent birds flew past and got into the frame. I got it nicely, but let's say it's not needed there.
Then we roll up our sleeves, take the lasso and do all the operations from the first paragraph. Let's see what we've got. Somehow not very good, right?
The tool "Stamp" will help us with this. This tool is somewhat similar to Healing Brushwhich we used, but there are differences. With the restoration brush, we took the donor area and painted over the unnecessary detail with it in such a way that then the colors that correspond to this area were superimposed. When stamped, nothing like that happens.

If it is somehow difficult for you to understand this process in a text version, then I have made a separate video tutorial especially for you. Happy viewing.
It turned out quite a good picture, as if it were. You can combine several methods to achieve the desired result.

Do you have photos where you can remove anything unnecessary? If so, then it's time to get rid of it. Well, if you want to explore all the possibilities of Photoshop in a short time, I recommend that you look excellent video course... In it all the information is presented amazingly and is designed for any level of user.
Well, that's all for me. I hope you enjoyed my tutorial today. Do not forget to subscribe to blog articles updates, then you will be the first to know about interesting articles and other interesting information. Check out other blog articles as well. I am sure that you will find something interesting for yourself. Well, I say goodbye to you. Bye Bye!
Best regards, Dmitry Kostin
The situation when you need to get rid of any inscription present in the picture arises quite often. For example, you may need to remove from advertisement company logo or even just a date from a photo taken by yourself. You can erase an unnecessary part by means of almost any of the existing ones. graphic editors... So how do you remove text from a picture?
Graphic editor Paint
In the event that the inscription is located on, you can delete it using the tools of the Paint editor. This program is available on any home computer with Windows OS. In order to open it, you need to press the "Start" - "All Programs" button, and then go to the "Standard" item.
How to remove text from a picture in Paint?
So you've found the app and opened it. What's next? And then we open our picture by going to the main menu and clicking on the "Open" item. We select the desired image in the folder in which it is located.
You can delete the inscription in Paint by simply copying a part of the background and putting a patch on it. To do this, click on the triangle under the item "Select". In the menu that appears, select the Rectangular Marquee Tool. Next, place the cursor that has been transformed into a cross on the part of the picture where there is a background free from the image. Then hold down the mouse button (left) and select a small rectangular area. Place the cursor in the resulting rectangle, press the mouse button (right) and select the "Copy" item in the menu that appears.
Now click anywhere on the picture and again click on the right button. In the window, select the line "Insert". Now let's see how to remove the captions from the picture. To do this, drag the resulting patch onto the text by clicking on it and holding the mouse button (left). Most likely, it will not completely cover the inscription. Therefore, it will need to be stretched. To do this, place the cursor in the corner of the patch. As a result, it transforms into a diagonally directed arrow. Hold the mouse button (left) and drag the patch sideways, down or up until it enlarges to the required size. Correct its position so that the inscription is completely covered.

Photoshop editor
The graphics editor "Photoshop" is by far the most popular of all applications for working with images. The widest possibilities of this program are used by both professionals (artists, photographers, etc.) and amateurs. The editor is not free. However, it is much more convenient to work with it than with most similar programs. With its help, you can remove unnecessary text not only from a plain, but also from a background that is not uniform in texture.

Graphics editor Photoshop® CS5
First, let's take a look at how to remove the caption from a picture in Photoshop CS5. The way to get rid of unnecessary parts of the picture in this version is slightly different from that used in earlier versions of the program. It is somewhat lighter and takes less time. We will tell you how to get rid of the inscription in earlier versions below.
How to remove decal in Photoshop® CS5?
Open the purchased program and click on the "File" - "Open" buttons. We select the photo requiring correction. In order to work with the inscription more conveniently, it is worth increasing it. This can be done using the Loupe tool.
Now let's see how to remove the captions from the picture. To do this, in the navigator, take the Lasso or Rectangular Selection tool and select the text. Next, on the control panel, go to the "Editing" tab and in the menu that appears, select the line "Fill". After that, the "Fill" dialog box will be displayed on the screen. Here, in the "Use" area, select the "Content-Aware" item. In the Overlay area, apply the following settings: Opacity - 100%, Mode - Normal. Now click on the OK button. As a result of all these manipulations, the selected area will be filled with the background.

Removing Decals in Photoshop® CS6
Let's look at how to remove the caption from the picture in Photoshop CS 6. This is done in the same way as in Photoshop® CS5. We also open our picture by going through the items "File" - "Open". Then again copy the Background layer and enlarge the unnecessary label. After that, go to the "Edit" - "Fill" section and make the necessary settings in the dialog box that appears.
How to remove labels in other versions of Photoshop using the Clone Stamp tool
In earlier versions of the program, you can remove unnecessary details from the picture using the Stamp tool. This work is very simple, but requires a certain amount of accuracy. In this case, the Background layer also needs to be copied.
So how do you remove captions from a picture with the Clone Stamp tool? First, enlarge it with the Loupe tool. Take the "Stamp" and place the cursor-circle on a free area of \u200b\u200bthe background somewhere near it. Hold down the Alt key and click on the selected area. In this case, the cursor circle will decrease in size, and a cross will appear inside it. Next, move it to the inscription. Releasing the Alt key, click on it. As a result, part of the background will be copied over the inscription. Step by step fill in the entire area that needs adjustment. You may have to click on the background while holding down the Alt key more than once. In this case, the final result will look much more accurate.
How to remove an inscription in the Photoshop program by cloning?

The cloning method in the Photoshop editor is similar to the one we considered at the very beginning for paint programs... The inscription is removed using the Lasso tool or the Rectangular Region tool. All that is required is to select the area of \u200b\u200bthe background that will serve as a patch. Using the Rectangular Marquee Tool, simply stretch the square over the desired area. More complex selections can be made with the Lasso. The resulting patch must be copied to new layer... To do this, also using the "Lasso" or "Rectangular Region" tools, click on the selected area with the mouse button (right) and select the line "Copy to a new layer" in the pop-up window. A new one with a patch will appear in the layers window. It will not be highlighted in the working area.

Next, take the Move tool (black arrow) and drag the patch (being on the layer with it) onto the text. In the event that it does not completely cover it, you should go to the "Editing" - "Free Transformation" tab. After that, holding the mouse button (left) on one of the squares on the transformation outline, you need to stretch the patch to the required size. Next, it should be moved so that it is on top of the text, which in this case is located one layer below. This can be done without leaving the transformation field. After the text is closed, press Enter. Thus, instead of an inscription in the picture, only a piece of the background will be visible, merging with the surrounding.
At the very last stage, you will need to merge all layers into one. To do this, click the mouse button (right) anywhere in the picture and select the "Merge layers" item in the pop-up menu. As a result, there will be one Background with the inscription already removed.
So, you, most likely, now understand how to remove the inscription from the picture. "Photoshop" and others allow you to perform this operation in just a few clicks. In Paint, this can be done by selecting the patch, copying and closing the text with it. The same technique, along with the method of painting over with the Clone Stamp tool, can be used in the earlier versions of Photoshop. In Photoshop CS5 and later, deleting is even easier — automatically, using the Content-Aware Fill tool.