Some time after installing Windows 7, the user may encounter such a nuisance as a slowdown in the operating system.
In order not to resort to drastic measures and help your PC cope with assigned tasks faster, you can optimize the OS. Often this procedure helps speed up the computer and thus increase its performance.
Figure 1. Windows 7 operating system logo
Why is Windows 7 optimization needed?
For optimization, you can use a program to fix Windows 7 errors, or use the tools built into the system. You can carry out the optimization and cleaning procedure in this way:
- Go to the Start menu;
- Open “all programs”;
- "standard";
- "official";
- "disk cleanup";
- Select “C”;
- Select unnecessary elements (Figure 2);
- Click "OK".

Figure 2. Drive C cleanup window with selection of files to delete
Fix errors using the built-in Troubleshooter
If your PC starts to run slower, you can try using the Windows diagnostic and error correction program that is included in your computer.
Using this function requires the following sequential actions:
- Open “My Computer”;
- "properties of the system";
- “control panel - home page”;
- "troubleshooting";
- When the menu appears, select the item that is relevant to us (Figure 3).

Figure 3. Computer troubleshooting window in Control Panel
Checking the hard drive using CHKDSK
Another way to speed up your computer is to troubleshoot problems using the CHKDSK command.
You can do it this way:
- go to the “start” menu;
- select “all programs”;
- open “standard”;
- launch the “command line” console;
- Next, we select the drive that we want to check and fix, most often we start the check from drive “C”, to do this, enter the command “chkdsk /r” in the line;
- A notification should pop up in front of us stating that this manipulation is impossible, due to the fact that in this case we press the letter “Y” on the keyboard;
- we reboot the computer, at startup we see a blue screen with a running timer, wait, the system will start without failures (Figure 4).

Figure 4. Command line window showing the results of checking the hard drive via CHKDSK
Disk optimization and defragmentation
To achieve the highest results in speeding up the OS, you can additionally perform defragmentation after checking and optimization.
You can carry out this procedure using a Windows 7 error correction program downloaded from the Internet, or you can use a service that is already on your computer. We carry out the procedure in the following sequence:
- click “start”;
- "all programs";
- "standard";
- "official";
- "defragmentation".

Figure 5. Results of defragmenting the hard drive using the Piriform Defraggler program
The best free programs to fix Windows 7 errors
Of course, Windows 7 is a fairly strong and well-equipped operating system, which is equipped with many tools that allow you to fix problems.
But for a novice user, carrying out complex optimization actions can be quite problematic; in this case, it will be much easier to use free software to fix Windows 7 errors.
Microsoft Fix it
In 2008, Microsoft created the Fix it program, which automatically monitors OS failures and corrects them. For its operation there is no longer any need to perform any manual actions.
You just need to register on the company’s website, download the program and install it, then it will work independently and no troubles, freezes or slowdowns will haunt your PC. This application is capable of recognizing and eliminating several hundred OS errors (Figure 6).

Figure 6. Appearance of the Microsoft Fix it program interface
Anvisoft PC PLUS
The program for fixing system errors in Windows 7 allows you to solve virtually any problem with the operating system, is extremely easy to manage and multifaceted.
Anvisoft PC PLUS can be downloaded on the Internet, installed and used to neutralize hundreds of problems, the presence of which you can find out from the information in the working window of the program.
Registry Repair
Since it is the registry that is often the cause of incorrect system operation, a program was created to fix Windows 7 registry errors to resolve problems.
It can independently scan the registry for problems, improper fragmentation, and much more. After scanning, the software neutralizes all faults, thus increasing PC performance (Figure 7).

Figure 7. Interface of the program for fixing registry errors Registry Repair
NetAdapter Repair All In One
A multi-faceted and easy-to-manage utility that automatically fixes problems of any complexity related to network connections.
It easily optimizes network applications and makes your Internet experience fast, convenient and hassle-free.
Kerish Doctor
Windows 7 hard drive error correction software Kerish Doctor is a real OS healer. Unlike many other utilities that can fix only a certain type of failure, Kerish Doctor completely controls the state of the computer, optimizes and speeds up its operation.
In addition, this software eliminates not only crashes and problems, but also viruses.

Figure 8. Interface of the program for optimizing the operation of the Kerish Doctor computer
Kaspersky Cleaner
The brainchild of the legendary Kaspersky antivirus, the Kaspersky Cleaner utility helps not only clean the system of faulty programs and irrelevant processes, but also performs optimizations to improve computer performance.
Glary Utilities
If you are looking for a program to fix Windows 7 errors , The multifunctional utility Glary Utilities can come to your aid. With its help, you can monitor and eliminate problems with individual elements of the system or “treat” the OS as a whole (Figure 9). The program is possible
Damage or accidental deletion of these particles leads to problems such as the inability to start a program or Windows. To eliminate such troubles, there are special programs for fixing Windows 7 dll errors.
DLL-Files Fixer
The most effective and easy-to-manage utility that contains a software package that allows optimization and troubleshooting.
It is also capable of restoring DLL files, protecting the OS from crashes, defragmenting the registry automatically and speeding up the computer (Figure 10).

Figure 10. Interface of the program for fixing dll errors - DLL-Files Fixer
What to do if Windows does not start after fixing errors
Despite the high effectiveness of programs that correct Windows 7 errors , sometimes their actions can lead to not very good consequences in the form of Windows not starting.
In this case, you can try to restore the system; to do this, turn off the computer and press the F8 key at startup.
Note: In some cases, you have to click several times until the automatic recovery window appears.
Next, we set the “restore” command and the OS independently tries to update and start; for most cases, this method is the most effective. But if, nevertheless, the launch does not occur, you will have to reinstall Windows.
Errors when loading Windows are quite common. It may indicate a malfunction of the hard drive, RAM, processor or operating system.
Let's figure out what errors mean and how to get rid of them.
System boot
Read also: TOP 12 Programs for computer diagnostics: description of proven software tools
Let's look at the OS boot process. When the computer is turned on and successfully boots, the processor executes a series of instructions that the BIOS provides it.
These instructions are stored in volatile CMOS memory. After startup, the processor accesses the addressable cell of the chip. It depends on the underlying properties. It contains the BIOS code.
The initial set of instructions executed by the processor is called the POST (Power-On Self Test) procedure.
With its help, the following actions are carried out:
- An initial check of the hardware is performed, including the state of the processor and the size of RAM. At the same time, the operability of the OP is checked.
- Retrieving system configuration settings from CMOS memory.
- The bus frequency is set in accordance with the configured settings from CMOS.
- The presence of the device from which the OS will be loaded (hard drive, floppy drive, etc.) is checked.
- A sound signal indicates the end of the test.
- Other devices are being initialized.
- At the end of the POST procedure, other adapters, such as a video card, sound card, and hard disk controllers, begin their internal checks. When checking, all information is displayed on the monitor screen.
The BIOS stops booting when it finds the master boot record on the hard drive (or OS record location) and transfers control of further booting to it.
Now the programs recorded on the media are loaded.
We list the main loading problems:
It is necessary to find out the cause of the failure and eliminate it. And so that problems do not arise again, do not repeat these mistakes.
This is very important for the continued correct operation of the system, otherwise you will have to reinstall the software and operating system again and again, which will lead to wear and tear on the hard drive.
The fact is that the error when loading Windows varies depending on the OS version.
So, different versions will have different most common errors. That is why you need to look for a solution to the problem for your operating system.
Read also: 3 ways to install Windows XP from a USB flash drive
At the present time, this version of Windows has practically ceased to exist.
However, some computers (often these are older models) still run on this OS.
And although people who have known XP for a long time are accustomed to its mistakes, it is worth understanding the most common of them.
Lost bootloader
This is the most common problem when loading Windows XP. It usually occurs when trying to reinstall the OS.
When this error appears, the system displays one of two messages:
1 Violation when loading the OS.
2 Damage to partition tables.
Elimination of these errors is possible by following these points:
- start the recovery process from the disk on which the OS is recorded;
- run the installation program;
- After the greeting, press the “R” button;
- the recovery console will appear, you must specify the installed OS version in it;
- enter “fixmbr” and press Enter.
After this, the system will restart and the error will be resolved.
Although there are other reasons for the loss of the system bootloader, the above happens most often.

NTLDR is missing
This problem is also quite common. When it appears, users often simply format the disk, which leads not only to eliminating the error, but also to the loss of all memory.
However, this problem can be solved without such radical methods; it is enough to understand the reason for its origin. And eliminating and at the same time saving data is not so difficult.
This error is a black screen with the message NTLDR is missing.
Sometimes, to fix a problem, it’s enough to press the popular key combination Ctrl+Alt+Delete (this is written in the error screen).
This combination should restart the system, but this does not always help.
The error means that the files responsible for loading the system are not available. There may be several reasons for this:
1 Hardware failure. This is the most unpleasant problem, since it means that the fault lies in the hardware and is not a consequence of any failure in the system. Correcting this error will involve replacing/repairing the faulty component.
2 Connecting an additional hard drive. This is also the cause of the error. The problem is resolved using the BIOS after performing a series of simple steps.
3 Conflict between two installed operating systems. Some computers have two operating systems installed at once, which can lead to their reluctance to work with each other. The problem is resolved using the Windows installation disk.

HAL.dll
With this problem, when loading the OS, the user sees a message similar to “Cannot start HAL.dll” or “File not found or damaged.”
When it appears, the first solution that comes to mind is to reinstall Windows. However, you can cope without such drastic measures.
The fact is that this file is responsible for the interaction of the hardware (the computer itself) and its software components.
The problem arises because XP, as the oldest version, is most prone to various errors.
As such, there can be many reasons for an error to occur. However, it can still be eliminated using a series of actions in the BIOS without reinstalling the operating system.
Nevertheless, it is worth understanding that sometimes only a radical method will help you cope.

Read also: TOP 6 Ways to clean Windows 7-10 from unnecessary junk, simply clear the memory cache, remove updates and clean the registry
Despite new versions of Windows, Windows 7 still remains the most popular. It's more a matter of habit.
Many consider this version the most convenient and average between XP and the same eight (in principle, it is so)
It is precisely because the version is the most popular that the Windows 7 loading error is a common problem.
Most often, when loading Windows 7, various error codes appear that indicate a particular problem. It is worth understanding the most common problems that arise.
System bootloader
Like Windows XP, the 7 has problems with the bootloader. The cause of the problem is the same as in the previous version.
However, you can restore the seven bootloader either automatically or manually.
The first method is the most convenient and even the most inexperienced user can handle it, but it cannot always help get rid of the problem.

0x80300024
This error occurs when installing the OS. This happens due to the inexperience of many users who, when reinstalling, forget to format one of the hard drive partitions.
This error usually indicates that there is not enough space to install the system.
To ensure that the error does not occur, you need to check the memory on your hard drive and, if necessary, format it.

A well-known error that occurs when the system starts. Usually occurs after installing the OS. Large red letters are displayed on a white background.
To solve the problem, you need to restart the computer with the installation disk inside and run the disk when you turn it on.
Go to the “System Restore” item, and then check the box next to “Use recovery tools...”, however, it is worth considering that you will have to select the system.
In the command line you need to enter “bootrec /fixboot”. After this, the problem will be fixed.

Startup Repair Offline
Literally, this problem means “offline startup recovery”, sometimes it is eliminated after a reboot.
However, often the system tries to restore itself without connecting to the network and fails. Therefore, we will have to help her.
This is usually solved in several ways:
- Resetting BIOS settings.
- Connecting loops.
- Startup recovery.
- Using the Command Line.
All these methods require certain knowledge and it is better for an inexperienced person to call a person who is well versed in this.

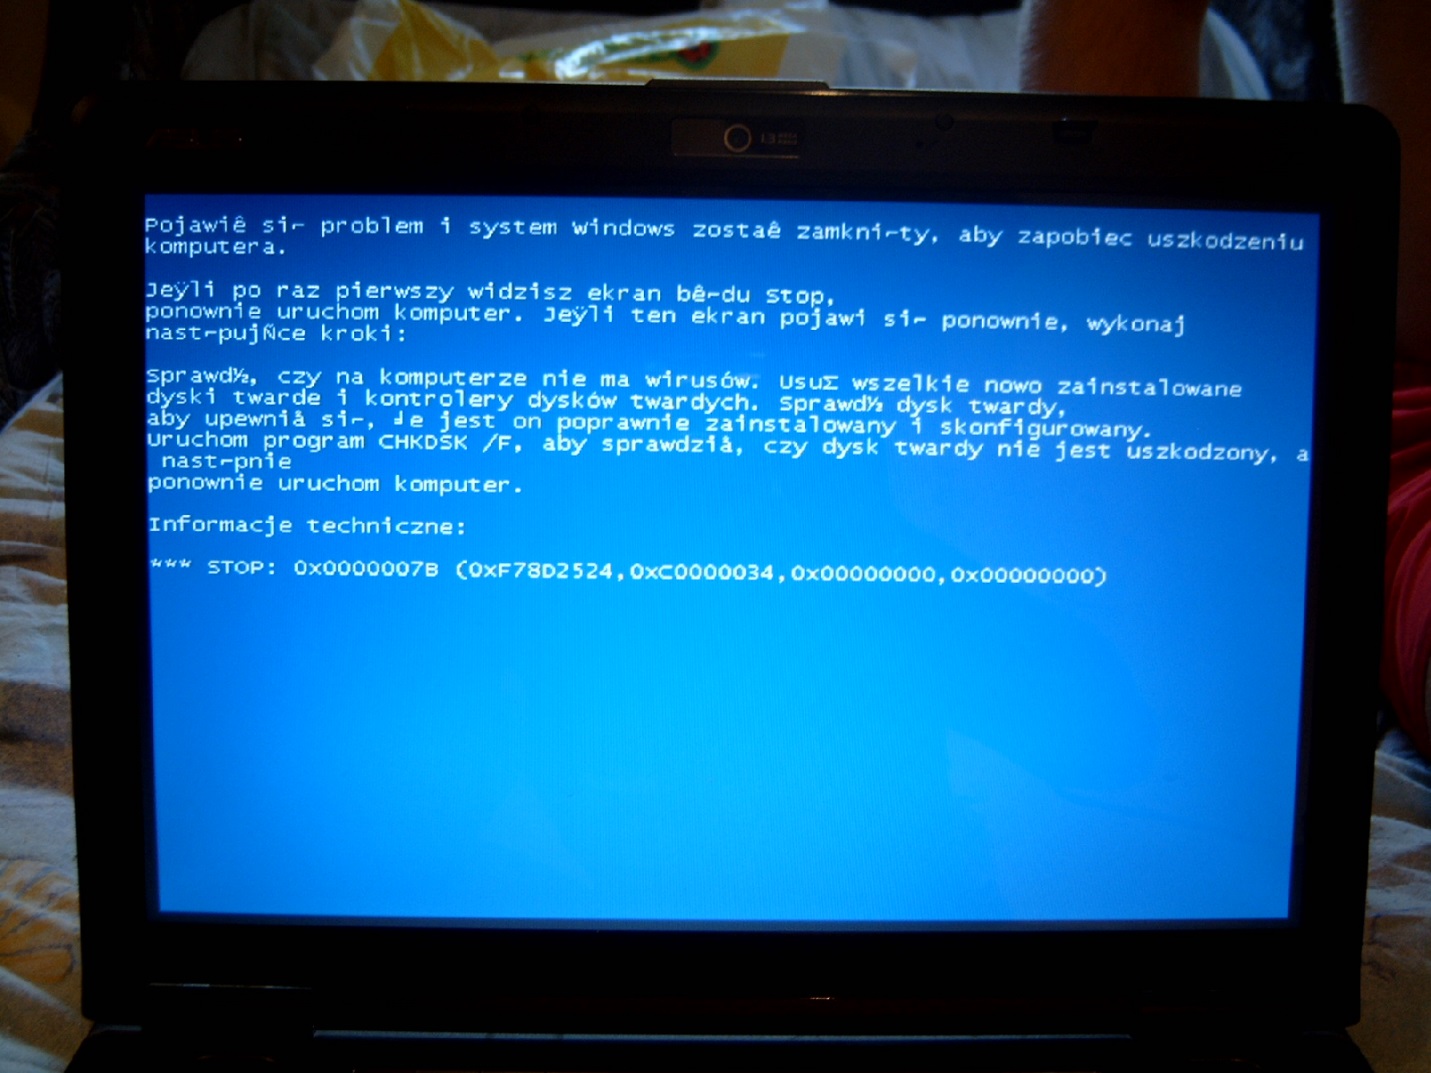
0x0000007b
The most frightening error for users is the “blue screen of death.” Often this means that the system has “gone down” and only drastic measures will help it.
However, sometimes it happens that after restarting the computer the error disappears and does not appear again, but it is worth understanding that in this way the computer signaled a serious problem that needs to be fixed.
There may be several main causes of the problem:
- Hardware incompatibility.
- Driver problems.
- Antivirus problems.
- Problems in the registry.
First of all, it is necessary to diagnose the error in order to find out the cause of the problem, and then begin to eliminate it, depending on the identified causes.
Unfortunately, Windows 7, like any other “operating system” of the entire family, is not immune from the appearance of various kinds of errors and slowdowns compared to what it was immediately after installation, so to speak, from scratch. Let's look at why problems occur and how to fix Windows 7 errors of various types.
Why is Windows 7 optimization needed?
As a rule, the process of fixing some system problems in all Windows operating systems is also called system optimization. What is it used for? To speed up work by correcting system errors that are invisible to the user's eye, optimizing data access, deleting junk files, correcting or deleting incorrect entries in the system registry, etc.
Which Windows 7 error correction program will be used is a purely personal matter for each user. However, it is worth noting here that almost all applications of this kind work on similar principles.
Correcting "seven" errors using the system's own means
Before we talk about what it means to fix Windows 7 system errors using third-party utilities, let’s look at the system’s own standard tools. They are not as primitive as many people think.

It’s just that some users who have a very superficial understanding of the settings or use of the “seven” do not even know how to use the simplest commands, for example, disk check. But when you specify additional parameters in the form of letters entered after the command itself, you can achieve a lot.

Of course, to automate the process, you can use a program for fixing Windows 7 errors called Windows 7 Manager, which, in fact, was created exclusively for use in the “seven” environment, but first let’s say a few words about the simplest methods for finding and fixing problems using built-in tools .
Checking the hard drive
So, the first means of correcting system errors is checking hard drives and their logical partitions. As a rule, due to the presence of errors on the system disk (where the “seven” is installed), the system may slow down or display messages about the impossibility of executing a particular process.

Probably everyone knows that the simplest way to check a hard drive is to start this process from the property parameters called from context menu in regular Explorer, right-click on the drive or partition letter. On the general properties tab, you can immediately clean the disk from unnecessary files, and in the service section you can use scanning and defragmentation.
Interestingly, during the cleaning process, even data on recovery points that is no longer needed is deleted. When checking, it is best to also use the automatic error correction option. Defragmentation allows you to speed up access to programs and files that are used most frequently by the system by moving them to the fastest areas of the hard drive without changing the logical address.
Separately, it is worth saying that checking the hard drive can be launched from the same “Run” menu or from the command line as an administrator by entering the line chkdisk c: \f (to automatically correct problems on drive “C”). And, for example, the chkntfs c: \x command allows you to get rid of errors associated with the functioning of the NTFS file system itself. This option, by the way, is best suited when the system tries to check the system disk every time it starts, say, due to an incorrect shutdown of the system or the process itself last time. As is already clear, such Windows 7 error correction leads to the fact that the annoying message about the need to check disappears, and the system itself boots faster.
In general, to use this command, it is best to read the technical documentation, since there can be many options for adding characters to a line to call additional processes and parameters.
Program to fix Windows 7 registry errors
One of the most important aspects is correcting keys and optimizing the system registry, since the system, even at startup, not to mention calling programs, refers to it. It is probably clear that the more records there are, the slower the system works.
In addition, if there are incorrect keys or outdated entries in the registry, say for a file association, such access can even cause conflicts between several programs that are responsible for opening them.
Unfortunately, in the “seven” itself their own funds, except registry editor No. No user seems to want to make changes at their own risk. So the entire system can be brought to complete “crash”. Here, automated optimizer programs will be the most suitable, allowing you to correct or delete keys in the registry without compromising the performance of the entire system as a whole.

Naturally, you can find many special applications exclusively for the registry, but it is better, in the broadest sense, to install full-fledged optimizers. In any such application you can find a function for scanning and optimizing the system in one click. You just need to enable the required element before starting the process.
Among other things, say, in the Advanced System Care application versions 7 and 8 there is a special registry defragmentation utility, which is akin to a regular defragmenter. Again, frequently used keys are moved to the top of the entire system record database, and the operating system takes much less time to access them.
The best programs to fix Windows 7 system errors
As for the most popular and most powerful applications for eliminating problems with the "seven", they need to be divided into functional sets.

So, for example, fixing Windows 7 errors can be done using software packages, so to speak, of the standard type: Advanced System Care, CCleaner, Glary Utilities, AVG PC TuneUp, Windows 7 Manager, etc.
To remove debris or complete uninstalling programs the most suitable utilities are iObit Uninstaller. For solving problems with system updates, the best applications can be called Fix It or System Update Readiness Tool, not to mention the capabilities system recovery, offered by the recovery console, which is located either on the original installation or on the Windows 7 rescue disk.
Conclusion
As can be seen from the above, fixing Windows 7 errors is not such a difficult matter. The main thing here is to decide which process should be launched, and, of course, with your knowledge, because sometimes you can do without additional utilities.
On the other hand, ordinary users can be advised to use software packages for automatically finding and fixing problems, since this will only affect the performance and safety of the “Seven” for the better.
Critical errors when starting Windows 7 occur for many reasons: due to hardware failure, due to problems with the system itself, or due to software failures. In some cases, a direct relationship between cause and effect can be traced if a failure occurred after installing an application, driver, connecting a new device, etc. In other cases, the source of the error is difficult to determine.
Hardware problems
Problems that arise before Windows 7 starts loading are related to the hardware, so just a few words about them. The culprit of the failure can be any of the devices, but most often they are RAM and hard drive. The message that appears on the screen in case of a critical error will help you understand in more detail.
Every user has ever seen a blue screen of death (BSOD). We will leave most of what is written there behind the scenes, since to make a diagnosis, only the following is important to us:
- error type – a line at the top of the screen, written in capital letters separated by an underscore (item 1 in the picture);
- error code – a numeric identifier in hexadecimal form and its additional parameters (point 2 in the picture);
- the driver or application that caused the BSOD, as well as the address where the failure occurred (point 3 in the picture). In case of problems with the equipment that arise before the initialization of drivers and in a number of other cases, this parameter is not available.

The following data may indicate problems with the hard drive or its controller:
- 0x00000077 – KERNEL_STACK_INPAGE_ERROR
- 0x0000007A – KERNEL_DATA_INPAGE_ERROR
- 0x0000007B – INACCESSIBLE_BOOT_DEVICE
- 0x00000024 – NTFS_FILE_SYSTEM
- 0x0000008E – KERNEL_MODE_EXCEPTION_NOT_HANDLED
Memory errors often make themselves known with messages like this:
- 0x0000002E – DATA_BUS_ERROR
- 0x00000050 – PAGE_FAULT_IN_NONPAGED_AREA
- 0x00000077 – KERNEL_STACK_INPAGE_ERROR
- 0x0000007A – KERNEL_DATA_INPAGE_ERROR
- 0x0000012B – FAULTY_HARDWARE_CORRUPTED_PAGE
- 0x0000007F – UNEXPECTED_KERNEL_MODE_TRAP
- 0x0000004E – PFN_LIST_CORRUPT etc.
Often, RAM malfunction is manifested by a variety of errors that can happen at any time when starting up and operating the computer.
Restoring the BIOS Setup to default settings or, as they say, resetting to default often helps to resolve a simple hardware failure. This can be done in several ways: using your own BIOS option, by switching a special jumper to the mat. board or temporary loss of power to the CMOS chip (BIOS storage location).
To return BIOS Setup to default settings using its own option, you need to:
- go to the menu by pressing the designated key immediately after turning on the machine (F2, F4, F12, Delete or others - this is written at the bottom of the motherboard splash screen);
- open the Exit tab (usually), place the cursor on the LOAD BIOS DEFAULT option (in some versions it is called LOAD SETUP DEFAULTS or LOAD FAIL-SAFE DEFAULTS) and press Enter;
- press F10 and Yes (or Y) to exit and save the settings.

Other methods are to switch the special jumper for resetting the BIOS to the CLR CMOS position (variants of the name are CCMOS, Clear CMOS, Clear CMOS, Clear RTC, etc.) or temporarily remove the battery on the board. On some, mat. boards have a special button for this.

If the method does not help, the failure is probably more serious and is associated with a breakdown of one of the devices. At home, you can try to find the problem unit by disconnecting it or replacing it with a similar working one. If this is not possible, you need to contact specialists.
Using Windows 7 Safe Mode
In some cases, startup failure occurs only in normal mode, but in safe mode the system boots without problems. If this is your case, use this opportunity.
To get into safe mode, press the F8 key several times before starting Windows. When you see such a list on the screen, select the desired item from it:

After loading the desktop, you need to open Start, go to the “All Programs” menu, open the “Accessories” folder, then “System Tools” and select “System Restore” from there.

This Windows 7 tool will help you fix startup errors caused by system registry corruption, deletion or corruption of important files, installation of faulty drivers, virus attacks and other system and software related issues.
- After launching “Recovery”, you need to select a checkpoint that was created no later than the date when the failure occurred, and then click “Next”.

- After confirming the point selection, click “Done” and wait for “Restore” to complete its work. This will return Windows 7 to the state it was before the boot errors occurred. Registry, files, drivers, updates, programs installed or changed after this date will be deleted or returned to normal. Files in user folders will not be affected.
Additionally, you can use the system to automatically search for problems and their solutions. For this:
- boot into safe mode with network driver support;

- Open the Control Panel, select the “System and Security” section from “Settings” and then “Check your computer status”.

- Expand the “Maintenance” tab and in the “Search for solutions for problems indicated in reports” section, click “Search for solutions.”

In some cases, the system generates error reports that are sent to Microsoft Support Center. If there is a ready-made solution for your problem, you can use it.
Recovery Environment
If the system does not boot into safe mode, if the recovery tool does not find any checkpoints or does not work, there is one more option - Windows RE. Windows RE is an addition to Windows 7, a recovery environment that works whether the main system boots or doesn't boot. The tools built into Windows RE allow you to:
- fix problems that prevent the PC from starting normally;
- undo recent changes by rolling back to a checkpoint;
- check RAM using Windows 7;
- restore the system from an archived image, if it was previously created;
- run the sfc system file checker and repair tool, scan your hard drive, run antivirus utilities, registry editor, etc.
To get into the Windows RE environment, you need to select “Troubleshoot computer problems” from the F8 menu.

Once you reach the “Recovery Options” window, you will be able to select the tool you need.
Startup recovery
To identify and fix problems that cause Windows 7 to not boot, select the first option from the list of options: “Startup Repair.” This tool will automatically check and fix the MBR (Master Boot Record), the status of bootable registry keys and system files. Most often, startup errors with Windows 7 can be successfully resolved with its help.

If restoring startup did not help solve the problem, you can use the same already familiar tool to undo the latest changes - “System Restore”. It happens that in safe mode Windows does not see a single checkpoint, but in the Windows RE environment it does.
To launch this tool in “Recovery Options”, use the second item from the top.

If you have a backup image created when Windows and programs were stable, you can restore from it right here. To do this, connect the drive with the image to the computer, select the third item from the list of recovery options – “Restore system image” and follow the instructions of the wizard.

The Windows Memory Diagnostics option will help identify problems with RAM if you suspect it is faulty. Above we have listed which errors when starting your computer may be a sign of problems with RAM. It is possible that it is because of them that your system does not boot.
In addition to memory failures, startup problems can also be caused by the hard drive, or more precisely, by file system errors and “bad” sectors. The recovery environment also allows you to troubleshoot and resolve these issues. To do this, via the command line, you need to run the chkdsk system utility with the /f and /r parameters, which means searching for and correcting errors, as well as restoring the contents of bad sectors, and wait for the results. No user intervention is required in this procedure - it is completely automatic.
And finally, if you suspect that the system does not boot due to a virus infection, the recovery environment allows you to run anti-virus tools.
To do this, launch the command line and open Explorer through it.
- Enter the command into the command line notepad and press Enter to open Notepad.
- From the “File – Open” menu, launch Explorer - note that in the recovery environment, the drive letters sometimes do not match the letters when Windows boots in normal mode.

- To see all the contents of directories, in the “Files of type” field, check “All files”.

- Go to the folder where the antivirus program is located, for example, the CureIt.exe utility, and run it.
After this, restart your computer. It can be said with a high degree of probability that the next Windows release will be successful.