Good afternoon everyone! Today we will talk about how to set up VPN (Virtual Private Network) in Windows XP, Windows Vista or Windows 7 and Lynix.
VPN stands for Virtual Private Network, which stands for "Virtual Private Network". A VPN is built on top of an existing network, such as a regular local area network or the Internet, and can unite computers in different parts of the world into one logical network. Moreover, all data transmitted over such a network is usually encrypted to protect against unauthorized eavesdropping and interception. Thus, traffic encryption is one of the main advantages of using VPN technology. If computers are physically connected with each other by cable or radio waves (wi-fi), then their logical connection via VPN is possible only using special equipment called a VPN server. It might just be a computer with special software. The VPN server manages the connection of other (regular) computers to the virtual network.
A special VPN connection is configured on the computer connected to the virtual private network, the configuration of which specifies the name of the VPN server and other parameters necessary for a successful connection. In each case, these parameters may differ, but the sequence of steps for creating a VPN connection is the same. We will consider it on the example of Windows Vista and Windows XP operating systems.
Setting up a VPN connection in Windows XP
This section describes how to configure VPN on Windows XP.
New Connection Wizard
Press the button "Start" in the lower left corner of the desktop, in the appeared main menu of the system, select the item "Control Panel" if your control panel looks like "XP Style" and you cannot find the icon "Network connections", go to the classic view of the panel by selecting the appropriate item on the left side of the window:
or select "Network connections" directly from the main menu "Start":

If you have a classic view window, find the icon in it "Network connections" and open it, in the window that opens, find and run "New Connection Wizard":

In the first window, just click the button "Further":

In the second, select "Connect to the network at the workplace" and press the button "Further":

In the third select "Connecting to a virtual private network" and press the button "Further":

In the fourth, in the free field, enter a name for your connection, for example, "Internet VPN" and press the button "Further":

On some computers where there are other connections, between step 4 and step 5, an additional window appears asking you to dial the number to connect. In this case, you need to refuse to dial the number and go to step 5.
In the fifth window, enter the IP address of the default access gateway nas.iksnet(or nas3.iksnet for some subscribers) and click the "Next" button (note that there should not be any spaces or other invisible characters before and after the server name):

In the sixth, for the convenience of work, check the box "Add a shortcut to the connection to the desktop" and press the button "Ready":

Connection properties
After that, you will immediately open a connection window, at the bottom of the window find the button "Properties" and click on it:

Or press the button "Cancel" and with the connection selected, right-click on it and select "Properties":

In the window that opens, select the tab "Parameters", uncheck the box Include Windows Logon Domain:
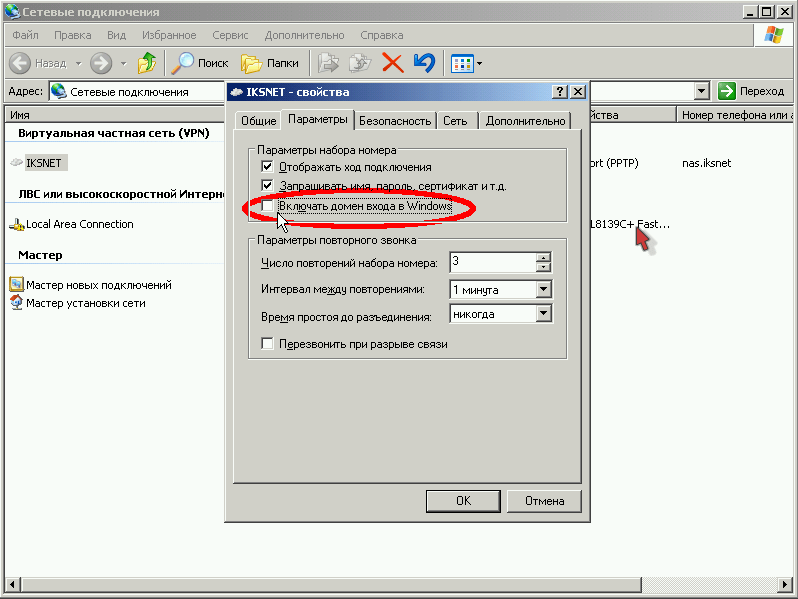
In the "Security" tab, take off tick off the item "Data encryption required" and click on the "OK" button:

In the tab "Parameters" you can check the box opposite "Call back when the connection is broken", then, in case of an unexpected break, the connection will be restored on its own:


We connect:

Now in the field "User" you must enter the number of your contract ( for those subscribers who have a three-digit contract number, add "0" in front! For example, a contract 111 typed as 0111 .), and in the field "Password", your access password for viewing statistics and mail from the contract. Please note that there should not be any extra spaces after the contract number in the "User" field.

After a successful connection, for ease of use, on the tab "Parameters" you can uncheck the box "Prompt for name, password, certificate, etc.", then the username and password will no longer be prompted.
Save password
Attention: it is not recommended to save the password in the system, because the saved username and password can be stolen by spyware or your computer can be used to access the Internet in your absence.
Please note that Internet access control is carried out by name and password, so take this point more seriously. Do not disclose this data to unauthorized people. If your password is too simple and short, in order to increase security, we suggest changing it. You can do it yourself, from your workplace, using the client part of the new settlement system, available at the link: Statistics.There you can change the password separately for entering the statistics page and separately for accessing the Internet. We hope that there you can still find a lot of new, interesting and useful things!
Note
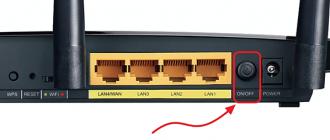
When the VPN connection is disconnected, you, as before, can freely use the resources of the local network, the VPN connection is needed only to access the external network. If you turned it off, then to create a VPN connection, be sure to turn on "LAN connection" otherwise, the VPN connection will not be established.
Errors
Most often, the system generates the following errors:

Error 619 or 734
- Occurs if you forgot to uncheck the "Required data encryption"In the connection properties, the" Security "tab.
Error 629
This error occurs if your username and password are already connected (remember if you did not let any of your friends use your Internet), if not, then this connection is not broken on the server. To do this, wait 10 minutes, and then try to reconnect after this time ... If nothing helped from the 3rd attempt, then I advise you to contact the support service.
Error 650
"Remote Access Server Not Responding":
- Internet access server unavailable. Check if "Local Area Connection" is enabled, if the network card is working, if the network cable is working, if a specific IP address is set in the IP connection settings.
Error 651 or 800
Your modem (or other device) reported an error " or "There is no connection with the VPN connection server"
- These errors can occur if you removed or disabled the old "Local Area Connection" connection.
- Or if you specified in step 5 wrong address... Check it out, make sure the numbers are separated by periods and not commas.
- Firewall blocks outgoing requests for VPN connections.
- The request does not reach the server for some reason, i.e. it is possible that the gateway of your segment is not allowing the request due to the arisen load or failure.
- The server sends a response about the impossibility to connect because there are a lot of concurrent connection attempts at the moment.
Possible fixes
- Check if the local network is working at this point in time.
- Check the signal flow with the ping command to your gateway, and then to your authorization server.
- Fix the key pair in the registry or reinstall Windows
Error 678
"No response received"
- If it does not help, then try to recreate the VPN connection again (pay attention to the connection type, it must be PPTP, not PPPoE or L2TP).
- Also, this error can occur when negative balance your personal account.
Error 679
- This error occurs when the network adapter is disabled. You need to enable the network adapter by going to "START-> Control Panel-> System-> Device Manager-> Hardware".
Error 691 or 718
"Wrong login or password"
- Check if the login (contract number) is typed correctly. It must be 4-digit (three-digit contract numbers must be padded with a leading zero). Try typing your username and password again. When typing, check that the correct keyboard layout (typing language) is turned on, the state of the Caps Lock indicator.
- Or if at the moment
- If the operating system does not prompt you to enter a username and password when connecting, then you must do the following: Open the "Control Panel", select "Network Connections", right-click on your VPN connection and select "Properties" from the menu. The properties of the VPN connection will open. Now you need to go to the "Options" tab and put a checkmark next to "Request a name, password, certificate, etc.". After that, confirm the changes by clicking the "OK" button. The next time you connect, you will be prompted for a username and password.
Error 711
This error occurs when the required service is not running on the computer. In this case, it is impossible to connect to the network, and also in some cases - the installation of network adapters. This problem can occur if some or all of the following services are not running.
- Plug and Play Plug and Play Support
- Remote Access Automatic Connection Manager
- Remote Access Connection Manager
- Telephony
To resolve this error, follow these steps for each of the above services.
- Open the Administrative Tools by clicking the Start button and selecting Control Panel, System and Maintenance, and Administrative Tools. Administrator Permission Required Enter the administrator password or confirm password if prompted.
- Double click Services. Administrator permission required Enter the administrator password or confirm the password if prompted.
- Right-click one of the above services and then click Properties.
- On the General tab, under Startup Type, select Manual.
- Click Apply and then click Run.
Error 720
"Unable to connect to remote computer."
This error occurs when the network protocol stack in Windows is damaged. You can check the integrity of the stack using the netdiag utility.
- Enter the command
- Netdiag displays the results of a number of network components, including Winsock. For more information about this test, type the netdiag command in the following form:
- If Netdiag reports an error, you must restore the Winsock2 registry key.
- The easiest and fastest solution:
- After that, we restart the computer and configure the local network connection, since executing this command will overwrite the registry settings that are used by the TCP / IP protocol stack, which is equivalent to removing it and reinstalling it. Recreate the VPN connection if necessary.
- If this does not help, then you can completely reinstall the TCP / IP stack like this:
- Delete the registry key with REG DELETE HKEY_LOCAL_MACHINE \ System \ CurrentControlSet \ Services \ Winsock
- Delete the registry key with REG DELETE HKEY_LOCAL_MACHINE \ System \ CurrentControlSet \ Services \ Winsock2
- Reboot your computer
- Open the folder% winroot% \ inf
- Find the nettcpip.inf file in it, make a backup copy and then open it in a text editor (eg Notepad).
- Find the lines in it:
- Fix them to:
- Save changes to nettcpip.inf file
- Open Network Connections and by right-clicking on the property of the network connection we need, select Install-> Protocol-> Add. Then select "have disk" and specify the path% winroot% \ inf (usually this folder is hidden!)
- Select TCP / IP from the list. After that, you will again be taken to the network connection properties window, but for TCP / IP, the Uninstall button will now be active.
- Select TCP / IP from the This connection uses the following items list and click the Uninstall button.
- Reboot your computer
- Install TCP / IP protocol in the same way as in steps 2-5.
- If all of the above does not work, then look at the instructions at
Error 733
- Occurs if you forgot to uncheck all protocols except Internet protocol and QoS.
Error 734
- Most likely you have a virus WIN32.Sality.
Error 735
- "The requested address was rejected by the server": Occurs when you enter IP address in "TCP / IP Properties"(it should be obtained automatically).
Errors 741 - 743
"Incorrectly configured encryption settings"
- Go to the VPN connection settings, and in the "Security" tab, disable the "data encryption" item.
Error 764
"Smart card readers are not installed"
- This error occurs if you configured the VPN connection incorrectly. Try to remove it and configure it again according to these instructions.
Error 769
"The specified destination is unattainable."
- The error occurs due to a disconnected local network connection or the absence of a physical link. It is recommended to check the LAN status (must be on) and the physical network connection (network cable must be connected).
- Sometimes it occurs if the router, for some reason, did not issue the correct IP address via DHCP
Error 781
"The encoding attempt failed because no valid certificates were found."
- Reasons: VPN client tries to use L2TP / IPSec protocol to connect.
- Tip: Go to connection settings VPN-Properties-> Network-> VPN type and select PPTP VPN
Error 789
"Wrong VPN connection type selected"
- Go to the VPN connection settings and on the "Network" tab from the "VPN type" list select "Automatic" or "PPTP". Try to reconnect.
- This error also occurs if you made a mistake when entering the IP address, and enter commas instead of periods to separate octets.
Error 807
If you are using the "Automatic" VPN connection type, then try changing to "PPTP". In the properties of the network card, set Receive-Side Scaling State - disable and Receive Window Auto-Tuning Level - disable. It is also possible that the connection to the access server is blocked by a firewall (firewall). You can also re-create the VPN connection according to the instructions, if the problem persists, uninstall the KB958869 system update, or restore the system to an earlier state.
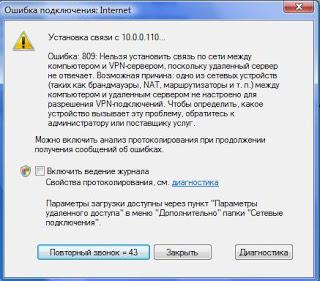
Error 809
Occurs when:
1Using L2TP VPN connection type in Windows Vista and Windows 7 because the connection is blocked by the Windows firewall. Solution: Correct the VPN connection type to PPPtP. Enable Routing and Remote Access (PPPtP) firewall rule
2 Blocking by the firewall or antivirus with firewall function you installed Solution: Correctly configure your firewall.
Error 1717
"Unknown interface"
- Try restarting your computer
- If it does not help, then run from the command line (check the integrity of system files)
Configuring VPN connection in Windows Vista / 7
New Connection Wizard
Similarly, setting up a VPN connection in Windows XP, start "Setting up a connection or network" and select "VPN connection":

We select the creation of a new connection and type PPTP, then press the button Further:
If you have not yet created a single VPN connection, then in the window that appears, select "Use my Internet connection (VPN)"

If connections have already been created in the system, then in the window that appears, select "No, create a new connection"

Fill in the field for the server address, put a tick Don't connect now and press the button Further:

Enter in the field Username contract number, and in the field Password- the password for the VPN connection (specified in Appendix # 2 to the agreement as the Password for viewing statistics, mail and VPN connections) and press the button Create:

VPN connection properties
After that, select "VPN connection properties" and fix in the marked places:

If you uncheck the box "Prompt for a name, password, certificate, etc." then when the connection is made, the computer will not display the connection window and ask for a username and password. If Windows forgets the login and password (and this happens), the connection will not be established. Error 691 will be displayed. In this case, the user will not be prompted to re-enter the username and password. What to do in this case.


The connection shortcut on the desktop in Windows Vista and 7 can be done as follows: Open the "Network and Sharing Center", in the left column, click the link "Changes to adapter settings", in the window that opens you need to find your "VPN connection" (the name may be different depending on how you specified the Destination Name during setup). Right click on the connection and select "create shortcut". By default, you will be prompted to position this shortcut on your desktop. Click "Yes".
Errors
Error 609
This method of solving the problem does not always work.
- Run Command Prompt (CMD) as Administrator
- Enter the following commands (remove miniport drivers):
- Now the following two (installing miniport drivers):
Error 619
"Port disabled"
Possible causes and solutions:
- Operating system problems. In this case, we recommend contacting specialists.
- Firewall is enabled. In this case, we recommend disabling the firewall.
Error 651
"Your modem (or other device) reported an error."
Possible causes and solutions (in order of execution):
- Operating system crash. In this case, we recommend that you restart your computer.
- The driver of the network card is downed. We recommend that you reinstall the drivers and re-configure the network.
- OS malfunctions. We recommend that you reinstall the operating system.
- The network card is defective. We recommend replacing the network card.
Error 678
"No response"
Often occurs when MAC-IP binding is down. At the same time, VPN servers and gateway are not pinged. In this case, it is recommended to call us and reset the MAC-IP binding.
The error may appear if an attempt is made to connect to a server that does not support PPTP VPN. We recommend that you reconfigure the VPN connection using the Autoconfigurator or manually check the settings.
Error 691 (Vista / 7)
"Access denied because such username and password are not valid in this domain."
Appears in the following cases:
- Incorrect username / password entered. Completely clear the login / password entry window and retype them. Login must be 4-digit (three-digit contract numbers must be padded with a zero in front). When typing, check that the correct keyboard layout (typing language) is turned on, the state of the Caps Lock indicator.
- The VPN session was not completed correctly (connection failure, abnormal computer shutdown). In this case, you need to wait a few minutes.
- Or if at the moment a connection has already been created with your username and password... (If you have more than one computer connected).
- Quite often it happens that Windows “forgets” the entered username and password, and then they must be re-entered, after deleting them from the input fields.
- If the operating system does not prompt you to enter a username and password when connecting, then you must do the following: Open the "Control Panel", select "Network and Sharing Center", in the left column, go to the link "Change adapter settings", right-click click on your VPN connection and select "Properties" from the menu. The properties of the VPN connection will open. Now you need to go to the "Options" tab and put a checkmark next to "Request a name, password, certificate, etc.". After that, confirm the changes by clicking the "OK" button. The next time you connect, you will be prompted for a username and password.
Error 711
run in the command line with Administrator rights:
Secedit / configure / cfg% windir% \ inf \ defltbase.inf / db defltbase.sdb / verbose
in order to start the command line with administrator rights, you must click the start menu, then in the run tab, type cmd in the English layout, an icon with the inscription cmd will appear in the menu, right-click on it and select the item "Run with administrator rights"
Error 814
"Basic Ethernet connection not found"
- The error is caused by the unavailability of the network adapter used for this connection.
Error 868
"DNS name not resolved"
- This error occurs only on "Windows 7". The crux of the problem is that the DNS client is unstable in some builds of this Windows.
- Solution:
- Check that the addresses of DNS servers in the local network connection are obtained automatically (at the moment, 10.0.1.5 and 192.168.2.1 should be issued)
- Disable IPv6 (or better - everything except IPv4) in the properties of the local area network connection
- Set the access server address instead of nas.iksnet in the form of an IP address (10.0.1.11 or 10.0.1.13 at the moment, or better check with the command
- In some cases, resetting directories helps: at the command line, enter the commands
Configuring VPN on Linux
Debian
First, install the required package:
$ apt-get install pptp-linux
Then edit the file describing the network interfaces. Here's an example:
$ cat / etc / network / interfaces auto lo iface lo inet loopback auto eth0 ppp9 iface eth0 inet dhcp iface ppp9 inet ppp provider iksnet pre-up ip link set eth0 up
Then edit the file describing your VPN connection. It should be something like this:
$ cat / etc / ppp / peers / iksnet unit 9 lock noauth nobsdcomp nodeflate #mtu 1300 persist maxfail 3 lcp-echo-interval 60 lcp-echo-failure 4 pty "pptp nas.iksnet --nolaunchpppd --loglevel 0" name
After that enter your credentials
$ cat / etc / ppp / chap-secrets After that, you can manually connect the VPN: $ ifup ppp9 And turn off: $ ifdown ppp9 The connection can be checked using the command: $ ifconfig ppp9 ppp9 Link encap: Point-to-Point Protocol inet addr: 89.113.252.65 PtP: 10.0.1.11 Mask: 255.255.255.255 UP POINTOPOINT RUNNING NOARP MULTICAST MTU: 1450 Metric: 1 RX packets: 40 errors: 0 dropped: 0 overruns: 0 frame: 0 TX packets: 418 errors: 0 dropped: 0 overruns: 0 carrier: 0 collisions: 0 txqueuelen: 3 RX bytes: 7750 (7.5 KiB) TX bytes: 1189 (1.1 KiB) Original article http://www.iksnet.ru/wiki/index.php/%D0%9D%D0%B0%D1%81%D1%82%D1%80%D0%BE%D0%B9%D0%BA % D0% B0_% D0% BF% D0% BE% D0% B4% D0% BA% D0% BB% D1% 8E% D1% 87% D0% B5% D0% BD% D0% B8% D1% 8F_% D0 % BF% D0% BE_VPN Many businesses use a VPN to transfer data between computers. To set up a VPN, Windows 7, XP, 8 and 10 have built-in software that allows you to create a private virtual network in a few minutes and use it to protect your private information. On Windows XP, Vista and later versions of the OS, you can create and connect to the VPN network using the built-in software. Let's consider such a connection step by step: If the remote VPN server receives the correct data, the computer will connect to the new private network within a few minutes. In the future, you do not need to configure the connection every time, it will be located in the quick connection selection section. For the connection to work correctly, it is recommended to slightly change its parameters. To do this, after clicking the Connections button, select the Properties button in the menu that appears. Also, these properties can be opened through the "" section of the Control Panel. Follow the instructions: Setting up a VPN on Windows xp, 7, 8, 10 through the Control Panel is the same in terms of the execution algorithm. The exception is the slightly modified design depending on the version of the operating system. After the connection is established, you need to figure out how to remove the VPN. To do this, just go to the section " Change adapter settings»From the Control Panel. Next, right-click on the unnecessary element and select “ Delete». The process of establishing a connection is almost the same as in Windows 7. Now the connection can be made through the networks menu. You just need to enter your username and password to login. This instruction is valid for versions from XP and higher. Unfortunately, only one user per session can be connected through the standard VPN tool. If you do not create a permanent IP or domain name, you will have to change the server address every time to connect the user. This completes the creation of the server, now you can connect one user to it. To log in, use the username and password from the previously created account. This instruction is relevant for setting up Windows 7, 8 and 10. In XP, the settings wizard is used for settings. In the future, the user settings and the IPv4 protocol are made as on other versions of Windows. VPN connection on Windows 8 is now easier to use and is done through a small program. It is located in the section " Net» - « Connections» - « VPN». VPN connection on Windows 10 and 8 is configured not only through " Control Panel", But also through the built-in program. In it you need to specify the connection name, server address and login information. After entering the data, the network can be started from the connections menu. On this question, how to create a VPN connection can be considered disassembled. If the user has any problems connecting to the VPN, then a pop-up window with a number and a description of the problem will inform about it. It is the most common one, it occurs when connecting through a MikkroTik gateway with L2TP protocol. To fix it, you need to complete 3 configuration steps: If after these settings error 809 is not resolved, then you need to change the registry. To do this, use the key combination Win + R and enter regedit Next, go to the section HKEY_LOCAL_MACHINE\System\CurrentControlSet\Services\Rasman\Parameters... Next, create a DWORD parameter named ProhibitIpSec with a value of 1. Then restart your PC. After setting up VPN Windows 8 may appear error 806... It occurs when the network settings are incorrect or the network cable is connected. Let's consider a solution to these problems: Thus, the deleted server will transmit everything given through this port and the connection will not be broken. On Windows 7, it occurs when the VPN connection security is incorrectly configured. In most cases, it occurs when the username and password are entered incorrectly, but it can also appear when the firewall is blocking the connection or when the access point is incorrect. If all the entered data is correct, then the error lies in the wrong security setting. They need to be reset: VPN connection allows you to reliably protect all transmitted data. Thanks to additional encryption protocols, unwanted persons will not be able to view information sent between users and servers. The main thing is to correctly configure the connection to the server. VPN (Virtual Private Network) - Virtual private network. VPN can connect computers in different parts of the world into one network through another network, for example, the global Internet. And all traffic transmitted over such a network will be encrypted. This allows you to remotely control another computer from anywhere in the world. Thanks to VPN, the user can access both the corporate network and a separate computer. To do this, they must be properly configured, and the user himself must have access to such a connection. both on individual client computers and on servers for VPN connections we will look at later. Today we'll go over the topic "How to set up a VPN connection on a client computer." This will mean that it is from this computer that another computer will be conducted. In order to create a VPN connection in Windows, you need to sequentially go through the following windows: I would like to note that to facilitate such surfing through the bowels of the Control Panel will help, which allows you to get to the desired point in one single click. Next, in the window that opens, you need to enter some data, namely: After setting up, click Next. The created VPN connection can be found in the window Network connections... There you can also create a shortcut for this connection. I mean, many have a shortcut for connecting to the Internet on the desktop. Here is the same topic. The VPN connection is connected in the same way as all other connections. During this setup, the user does not have access to most of the VPN connection settings. Therefore, after creating a connection, you can enter VPN connection properties and change the parameters you want. But in general, these parameters should not be changed. VPN Reconnect is a new feature in Windows 7. And as you might guess, this feature belongs to VPN technology. We have already learned what VPN is. What is VPN Reconnect? VPN Reconnect is a feature that can initiate reconnection to the VPN server when it is disconnected. With traditional VPN connections, if the connection was lost, you had to manually reconnect the connection again. Moreover, any process that took place at this moment will have to be started from the beginning. But times are changing. The new VPN Reconnect feature allows you to automatically re-initiate a broken connection without re-authorization. All this is possible thanks to the new IKEv2 tunneling protocol with the MOBIKE extension. And since we're talking about protocols, it's worth noting that the rest of the protocols (PPTP, L2TP / IPsec, SSTP), which are also supported in Windows 7, are not compatible with the VPN Reconnect function. And given the fact that the IKEv2 protocol is the most secure of all the protocols listed above, it follows that the use of the new IKEv2 protocol is not only safe, but also convenient. The IKEv2 protocol with the MOBIKE extension allows you to automatically re-initiate the connection even after 8 hours of disconnection. More precisely, the maximum break time is 8 hours. You can leave the computer for a couple of hours, turn off the Internet, then come in and continue working on the remote computer. Also, this protocol allows VPN clients to change their Internet addresses. So, you can safely move from one place to another, while disconnecting the previous connection and connecting to a new connection to the Internet, but you will still be connected to the VPN. Although in truth, you disconnect from the VPN connection first, VPN Reconnect will return it to you immediately. So you won't notice anything. I recently introduced readers to a new technology that bypasses VPN technology in several ways. So, one of the advantages of DirectAccess - always-on connection - can be easily compensated by the new VPN function. The main thing here is not to lag behind fashion and use new software: I have already mentioned about Windows 7 (by the way, in the article you can find other examples of XP really lagging behind the advanced operating systems), but I forgot about Windows Server 2008 R2. This means that IKEv2 only supports VPN servers running Windows Server 2008 R2 or later. Well, in the end, I will indicate the place where you can configure the maximum time for disconnecting the connection. To do this, you need to go to Network connections, find the created VPN connection there and go to it Properties a. Next, on the tab Safety find and poke button Extra options... In the opened window Additional properties go to tab IKEv2, check the box Mobility and indicate the maximum break time. This is how the VPN Reconnect function is configured. It is no secret that many people, in some cases, use a virtual private network or VPN when connecting to the Internet on their computer or smartphone. This may sound paranoid, but there are real threats and situations are only getting worse. On Wi-Fi networks, unscrupulous people can try to intercept your information. And whenever you connect to the Internet, your Internet Service Provider (ISP) has access to everything you send. On the web, advertisers and spies can track your movements between websites and differentiate your location by looking at your IP address. This is scary! And in order to prevent and protect yourself, you need to use a VPN, and we will describe how to set up a VPN in this article. The point is, the internet itself was not designed to protect your privacy. It was created for easy exchange of information, not user privacy, anonymity, or encrypted communication. Although HTTPS is designed to protect your information, it does not protect against attempted internet attacks or local network attacks, which is a major problem if you've ever used a connection that doesn't belong to you. For example, in a hotel or cafe. Thus, a more private, closed internet will not become a reality (perhaps never), using a VPN is the easiest way to make sure you share as little information as possible. As with any security tool, it is important to understand the capabilities of a VPN. When you enable VPN, your traffic is routed through an encrypted tunnel to a server managed by the VPN company. This means that your ISP or anyone connected to your router will not be able to see your web traffic. From the VPN server, your traffic goes online. Since your traffic is coming from the VPN server, your actual IP address is hidden. This is important because IP addresses are distributed geographically and can be used to determine location. If someone checks your IP address, they will see the IP address of the VPN server. This can come in handy if you want to spoof your location. By connecting to a VPN server in London, it looks like you are connecting to the internet from the UK. What the VPN won't do is completely anonymous traffic. To do this, you will need to use Tor. This excellent anonymization is easily accessible through a special version of the Firefox browser. Instead of just sending your data through one VPN server on the network, your data is being pushed across several different computers. This makes it much more difficult for anyone trying to track your actions and understand what you are doing. In addition, websites can track your movements using cookies, online trackers, and other sophisticated tools. Using an ad blocker like Adblock Plus will help suppress these nasty things and will make access much more difficult and it will be more difficult for advertisers to study your internet traffic. Finally, just because you have a VPN doesn't mean you can forget about the basics of security. While some VPN services claim to be able to block malware, we recommend standalone antivirus software for your computer because these tools are specifically designed to protect your computer from malicious software. Another precaution is to use common sense when clicking on links or opening email attachments. Phishing attacks - when an attacker uses a bogus website that mimics a familiar one to trick you into entering your credentials - are very common, so stay alert. When we look at VPNs, there are several key metrics we are looking for. First, the VPN service must allow you to connect to at least five devices at the same time. Another is whether the VPN service supports BitTorrent traffic on its servers. Speaking of payments, the average cost for a VPN service is $ 10.53 per month. A VPN service that charges more per month should offer something substantial, like a great interface or multiple server locations to sweeten. You can usually get a discount if you buy for a long term, but we recommend avoiding them until you are sure you are happy with the service. Before signing up for a VPN, be sure to read its terms of service. Recently, at the WoW IT editorial office, we surveyed 1,000 people asking questions about using a VPN. According to our results: Some services offer a free trial, but usually for a limited time. Others, like TunnelBear and AnchorFree Hotspot Shield Elite, are completely free versions, but may limit some of the options for paid users. For example, TunnelBear has a data surcharge for free users. On the other hand, Hotspot Shield has a free ad-supported version. The Opera browser, until recently, had a free VPN and did not charge anything to use it. Opera separately offers great VPN apps for Android and iOS, also completely free of charge, extending your protection wherever you go. After you buy the service, the first thing to do is download the company's app. The VPN service website usually has a download page. Next, download applications for your mobile devices; you will want to protect as many of your devices as possible. Typically, you pay one subscription fee for a certain number of licenses (usually five), you can use this service on any device for which applications are provided. If suddenly you run into problems and you are unable to set up a VPN, the support service of the company where you purchased the VPN will always come to your aid. This is another plus of the paid app. After you have installed the application, you will be prompted to enter your login details. In most cases, this is the username and password that you created during registration. Some companies, such as Private Internet Access, assign you a different username from your credentials to give customers more privacy. Once logged in, your VPN app usually connects to the VPN server closest to your current location. This is done to provide faster VPN speeds as latency and speed reduction increases with the distance to the VPN server from your actual location. Like this: Your information is now securely tunneled to the VPN server. Note that you do not need to install the VPN company's app. Instead, you can configure your device's network settings to connect directly to the VPN service. If you are concerned about in-app surveillance, this might be a good option for you. Most VPN services will have documentation on how to set up your device. Perhaps you want to spoof your location, use BitTorrent over a VPN, or want to take advantage of some of the custom servers provided by your VPN company. The choice of server depends entirely on what you want to achieve. For safety and speed, you must choose a server that is nearby. To access region-specific content, you need a server that is local to the content you want to watch. If you're trying to watch the BBC, you need to sneak into the UK. Some VPN companies like KeepSolid VPN Unlimited and NordVPN have dedicated servers for streaming video. These dedicated servers are useful because streaming services like Netflix block VPNs. It's about licensing Netflix deals. For example, Netflix is eligible to provide Star Trek: Discovery outside of the US, but in the US you need to pay for the service. It's also a good idea to check if your VPN service is giving BitTorrent traffic on any server or only specific ones. NordVPN clearly notes that the servers do not provide torrenting traffic. Other services like NordVPN and ProtonVPN have advanced security options such as access to Tor virtual networks or multihop. Tor, as mentioned above, is a way to better protect your privacy and allows you to open hidden websites on the so-called Dark Web. Multihop VPN instead of just routing your traffic through one VPN server, connecting through multiple hosts connects you to one server and then to another. If you choose to ignore third-party applications and manually configure your network settings, you may have to enter information for each VPN server separately. The feature set in each VPN varies from service to service, so we can only summarize what you can see when you open the Settings panel. But we recommend that you read the documentation and try a few buttons. In the end, the best way to learn how to use the tool is to give it a try. Most VPN services include a Kill-Switch feature. Once enabled, this setting prohibits the computer from transmitting or receiving information over the Internet, unless VPN is enabled. This is useful when your computer is disconnected from the VPN, and it can prevent small pieces of data from penetrating unencrypted ones. We recommend using the OpenVPN protocol. Open source, so as many potential vulnerabilities have been tested and set up a VPN, you can easily. IKEv2 is also a good, secure option if OpenVPN is not available. Please note that on some platforms, such as macOS and iPhone, OpenVPN is not always available due to additional restrictions set by the developers. The best VPNS for iPhone give you access to the latest and greatest protocols available on this platform. For maximum security, you should use a VPN as often as possible and ideally all the time. But this is ideal, and it is not always achievable. At a minimum, you should use a VPN when you're using a network that you don't control, and especially if it's a public Wi-Fi network. But in general, we recommend that users install VPN by default in their applications. You can always disconnect if it causes a problem. VPNs for Android and other mobile devices are a little tricky, especially if you move frequently and get cell phone coverage. Every time you lose and restore your connection, the VPN should reconnect. At the same time, it is less likely that your mobile traffic can be intercepted, but as the researchers prove, it can be done. And given that law enforcement and intelligence agencies have virtually no hindrance to access telecommunications data, it is recommended to use a VPN even over a cellular connection. Plus, most mobile devices can automatically connect to any familiar Wi-Fi network. At a minimum, you should be using a VPN over Wi-Fi. If you are concerned that a VPN is slowing down your connections or blocking important traffic, you should take a look at the split tunneling options. Again, different companies give this feature different names, but the bottom line is that you can decide which apps will use the VPN for their traffic and which apps can work without the VPN. For example, TunnelBear includes the option to not tunnel Apple apps to ensure they function correctly on a Mac. Chromecast and AirPlay let you stream music and videos from your computer or mobile device to speakers, TVs, and streaming boxes. But they all require Wi-Fi, which can be a problem when using a VPN. When VPN is enabled, your traffic travels through an encrypted tunnel, preventing devices from finding each other on the same Wi-Fi network. This is as it should be, since you don't want anyone to follow the network and know what you are doing. Unfortunately, this also means that Chromecast and AirPlay won't work if you enable VPN. The easiest solution is to turn off the VPN, but that's not the only option. You can use split tunneling, as mentioned above, to route only traffic that you want to protect over the VPN. You can use a VPN browser plugin that only encrypts your browser traffic and nothing else. Alternatively, you can install and configure a VPN on your router. This means that all devices connected to your router, from your phone to your smart juicer, will have encrypted traffic. This is a great option for a smart home. Too many of you don't use a VPN just because they think it's a covert security tool. But many companies have worked hard to make them user-friendly and easy to use. Most install and forget about security tools, as it should be. And while opening your wallet to defend against potential threats is always annoying, buying a VPN is one of the best and easiest ways to protect your web traffic. If you are unable to set up a VPN or have problems with it, the WoW IT team is always ready to help.Configuration via Control Panel


Additional connection properties

Configuring Windows XP Connection


Creating a VPN Server


VPN Server on Windows XP


Setting up a connection via Windows 8 and 10


How to create a VPN server errors
809


806

619

Related Videos
Configuring a VPN connection in the Windows operating system
What is VPN Reconnect?
What a VPN does and does not
After all, you don't expect a Kevlar vest to keep you from falling out of an airplane, it's built to stop a bullet.
How to choose a VPN
This document will outline the information that the VPN collects and what it does with that information. Most companies say they don't log traffic, which is great. Others go further by saying that they have no control over user activity at all. This is important because the VPN provider has access to all the information you are trying to protect from others. Be sure to read this question and consider trying a different service if the conditions don't work for you. The most important thing about a VPN is trust. If location, pricing, or terms of service don't fill you with confidence, try a different service.Free VPN or Paid?
How to set up a VPN and get started with it

 Many VPN companies include an interactive map as part of their app. For example, NordVPN allows you to click on countries to connect to these servers. This is a useful way to understand where your information is going.
Advanced VPN settings
How do I set up a VPN and use it?
How to set up VPN for streaming using Chromecast or AirPlay
Chromecast Ultra
VPNs are not a rocket