Supported file systems: FAT12, FAT16, FAT32, NTFS, NTFS5 (created and used in Windows 2000/XP/2003/Vista/7, exFAT, ReFS (new file system introduced by Microsoft in Windows 2012 Server), Ext2/3/4FS (created in Linux or other OS), HFS, HFS+, HFSX, and UFS1, UFS2, UFS BigEndian (used in FreeBSD, OpenBSD, and NetBSD OS).
An example of practical use of R-Studio
Let's look at how to recover data using a specific example.
Given: USB flash SanDisk Ultra 32GB.
Symptom: Windows, when you try to open a disk, asks you to format it, below is a screenshot.
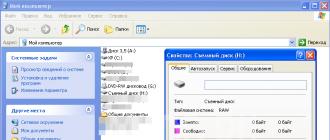
In the disk properties, the file system is defined as RAW.

It is important to note that the flash drive itself is working, but the partition is damaged. A section or volume is an exclusively logical concept, a volume is a broader concept that can consist of several physical media, but, nevertheless, is seen as a single space.
And so, we launch the program. The example uses the Demo version with a limitation on the size of restored files.
In Windows Vista and older, the program must be run as an administrator, even if your account has administrator rights.
In the Drives window on the left we see a list of devices and partitions. On the right, in Properties, are the properties of the selected device or partition. You can scan the entire device and existing partitions for file systems and data, or you can set the scanning area manually.

But we don’t need this now, right-click on our flash drive and select Scan.

The following window with scanning parameters will open.

Disk size shows us the storage capacity in bytes and sectors. If 0 is indicated in this line and the Size column of the Drives window, then the drive is physically faulty (since it does not detect its capacity). In the Start and Size input fields, you can specify the beginning and length of the scanning area; by default, the full volume of the disk is indicated there. The Change button at the end of the File systems line allows you to force the type of file system to be searched - this reduces the memory occupied by the program when scanning; it can be useful when scanning large, heavily filled disks. This is used if you know exactly in which file system the information on the disk was stored; if in doubt, leave the entire list. The Extra search for known file types option allows you to search for information based on the characteristic features of file types; all files in this mode will be restored without names or structure. Scan view sets the amount of information displayed about the scanning process.
- Simple – displays only the scanning progress indicator
- Detailed – information about found boot sectors, file systems, document files, if Extra search is enabled
- None – no additional information about the scan is displayed.
The process has begun... The map of the location of information on the disk shows in color what data structures were found. Below, under the map, is a transcript. To fully recover data, you need to scan the entire surface of the drive. In this example, there is little information on the flash drive; it is located in the first half of the flash memory and there is no point in scanning further, so Stop was pressed. After pre-processing, the scan result will open.

The search results are shown as a tree rooted in our device. The color indicates the completeness of the file system recovery.
- Green - file system and boot sector found - the best option
- Orange - the file system was found, but there is no boot sector, often present in several variants, differing in the amount of data being recovered
- Red - only the boot sector was found without a file system, and there can be many of them, as a rule they are not of interest.

At the end of this process, we will see the restored structure, as in a conductor. There will be folders on the left, files and subfolders on the right. You can open any file with the built-in viewer. To do this, select the desired file and select Preview in the context menu.

If the built-in viewer supports the selected file type and it can be fully read, then we will see the contents of the file. Example below.

Now all that remains is to rewrite the found information onto another medium. To do this, you need to mark the necessary files and folders or select everything by checking the box next to the Root element. And select Recover marked in the context menu.

A dialog with options for saving information will open.

Output folder – you need to specify where to save the data. The rest can be left as is.
Attention! Never save data to the same drive from which you are restoring it. Otherwise, the recovered files will be written in the place of the restored files, which will lead to their irreversible damage.

Some parameters should be changed in the Advanced tab.
File already exists option – what to do if such a file already exists
- prompt – ask on each repetition
- rename – rename automatically
- overwrite - overwrite
- skip – skip (should be selected so as not to increase the amount of data).
- rename and change invalid symbols to – rename, replacing invalid symbols with a given symbol
- skip – simply skip (select, often with the first name the contents are also damaged).
- prompt – ask every time
- remove – remove (select).
Attention! If you have lost data on FAT or NTFS, we recommend that you first take a look. In most cases, it shows results on par with the best paid programs and will allow you to save time and money.
If you need to restore from file system types that are not supported by R.saver, or work from under Mac OS, Linux or FreeBSD, we recommend a good program written by our compatriots. It costs less than analogues, the results are at the same level, the range of applications is wider.
We also recommend reading the article if you are faced with this task for the first time. It describes in detail and clearly methods for recovering data from working media; the article also describes terminology, without knowledge of which it will be more difficult to understand the text.
As a rule, the operating algorithms of different utilities differ even on the same file systems. And in case of a specific severe damage, the maximum amount of data can be recovered by not the program that shows the best result in most cases. Therefore, if you find yourself in a situation where the first program you used could not save everything that was required, try several others.
In the general case of working with physically functional drives, the algorithm is as follows: download demo versions, scan, see what has been restored, purchase the program that showed the best result. If the media is physically faulty (or you suspect it is), first make a sector-by-sector copy to a healthy one. You can download programs for making sector-by-sector copies from our
The interface and use of several popular data recovery programs are briefly described below:
Detailed description of interfaces R.saver And UFS Explorer available on their home pages and in the built-in Russian-language documentation.Warning: Although the software described below does not perform destructive actions (it should not write to the disk from which data is being recovered at all), there is a certain possibility that the loss of information occurred due to a physical malfunction that you cannot determine. And further work with this disk using software methods will lead to aggravation of the situation, up to the complete impossibility of data recovery. Therefore, in In case of loss of critical information, we strongly recommend that you immediately contact specialists.
We also draw your attention to the fact that during the data recovery process, you should exclude any write to the media (or partition, if data is lost only on a specific partition) from which you are going to recover information. This applies to both the installation location of the program and the location where the result is saved.
R-Studio
Developer: R-Tools Technology Inc.
Version at the time of writing: 5.4 build 134120
Demo version limitations: does not recover files larger than 64KB
About the program
- Microsoft Windows: FAT and NTFS, including FAT12, FAT16, FAT32, exFAT, NTFS, NTFS5.
- Apple Mac OS: HFS, HFS+(HFSX).
- FreeBSD, OpenBSD, NetBSD, Solaris: UFS1, UFS2.
- Linux: Ext2, Ext3, Ext4.
System requirements:
- Network connection for data recovery over the network.
Main features:
- Recovery by signatures.
- Working with software and hardware RAID arrays.
- Built-in hexadecimal editor.
- Creating a startup disk for data recovery.
Interface
This program has clear instructions in Russian, where all functions are described in detail.
Let's launch R-Studio with administrator rights. On the left we see a list of drives connected to the system with the partitions located on them (hereinafter referred to as the drive selection interface). If you select a device or partition, its status and properties are displayed on the right side of the interface. At the bottom of the screen there is an area where the operation and error log is displayed, and at the top we see a toolbar.
The buttons are implemented in the form of icons, the appearance of which changes from version to version. You can find out what an icon means by hovering over the button and waiting for the tooltip to appear. You can also start scanning or open a partition from the drop-down menu after right-clicking on the drive or partition icon.
data

If, as a result of the above actions, it was not possible to recover part of the data, or the recovered files contain incorrect information, then in the drive selection interface we open another card option (from the “green” or “yellow”) and repeat the operations described in paragraphs 5-8 .
If R-Studio displays read errors, this may indicate the presence of unreadable sectors. Perhaps the loss of data was caused by their appearance. The more there are, the slower the scanning and reading of information will be. If there are a large number of bad sectors (>50), we recommend reducing the number of read attempts. To do this, select the hard drive in the drive selection interface, select the “I/O Tries” parameter in the list that appears on the right side of the screen and set it to 1. As a radical solution to this problem, we can also recommend contacting a specialized organization - where As a rule, there are software and hardware systems specifically designed to perform this type of work.
The package contains many functions, such as creating a virtual media image, restoring data over the network (including without loading the operating system using R-Studio Agent Emergency), working with RAID arrays, a HEX editor, etc. There are also more fine-grained reading and recovery settings. But using these features requires a significant amount of specialized knowledge, so there is no point in describing them in one article.
EasyRecovery Professional
Developer: Kroll Ontrack
Version at the time of writing: 6.21
Limitations of the demo version: recovers only 1 file, works for 30 days
About the program
The following file systems can be accessed in read mode:
System requirements:
- Windows XP/2003/Vista/Windows 7 on an Intel compatible platform.
- Minimum 64 MB of RAM, a mouse and sufficient disk space to save the required information (files, disk images, etc.).
- Microsoft Internet Explorer® 6.0 or higher.
- Screen resolution no less than 1024 x 768.
- Administrator rights? required for installation and launch.
- Disabled antivirus protection.
Main features:
- Recovering deleted files based on service records.
- Recovery by signatures.
- File system reconstruction.
- Diagnosis of disk condition.
- “Repair” of documents, ZIP archives and Microsoft Outlook files.
- Creating a startup disk for recovery or diagnostics.
- Ability to fine-tune recovery.
Interface
The software package does not have a Russian-language version of the interface and help, so working with it is somewhat more complicated.

On the left we see the toolbar, on the top - the control panel. The toolbar contains the following icons: “Disk Diagnostics”, “Data Recovery”, “File Repair”, “Email Repair”. We are primarily interested in data recovery.
In this menu we see various recovery options, a button to continue the saved recovery session and a button to create a boot floppy disk for the program. We will not consider the last two functions now.
Approximate recovery algorithm
First we need to decide on the type of recovery. If the file system is not damaged, no recording was made to the media, and you need to recover deleted files - select “DeletedRecovery”. If the file system was damaged or the media was formatted, then we first advise you to try “FormatRecovery”, and if it does not help, you can only use “RawRecovery”, which will result in files sorted by type. The names are not restored in this case.
First, we will look at the recovery algorithm using “AdvancedRecovery”, since in this case we can choose any of the above recovery types.

“FormatRecovery” differs only in that in it the search for MFT is disabled initially, and in “DeletedRecovery” there are settings for searching files by mask, so there is no point in considering these types of recovery within the framework of this article.
In cases where the file system is significantly damaged, it is advisable to use the program EasyRecovery in the “RawRecovery” mode (search by signatures). The disadvantage of “RawRecovery” is that the result of recovery will be a set of files without names, sorted by type. However, using this method, it is possible to recover information in the most severe cases, when all other methods have failed.
To start this mode, select “RawRecovery”. From the list that appears, select the desired drive (the program shows the structure of the disks along with the partitions that were deleted).
Click the “Next” button. We watch the progress bar and wait for the result.
Working in this mode, the program collects files in parts based on existing signatures, a list of which can be seen by clicking the “File Types” button. Using the proposed tools, you can add your own signatures.
As a scan result, we get a list of files with names like FIL1.RAR, FIL2.RAR, etc., sorted according to types into various folders. In selecting objects for subsequent saving, the functions of searching, displaying in accordance with the filter and viewing the contents of the file, called up by pressing the “Find”, “Filter Options” and “View File” buttons, respectively, can help.
We mark the checkboxes next to the required files and folders, click “Next”, select a folder and save the recovery result into it. We can also save the session.
We wait for the saving process to complete and check the recovered data. If everything is in order, the recovery process is complete.
Manufacturers claim to work with unreadable sectors, but if there are a large number of them, the program may stop working. You can use a program for sector-by-sector copying to intermediate media and work with the copy, or contact specialists.
GetDataBack
About the program
The following file systems can be accessed in read mode:
- Microsoft Windows: FAT12, FAT16, FAT32 or NTFS.
System requirements:
- Windows 9x/ME/NT4.0/2000/XP/ 2003/Vista/Windows 7 on an Intel compatible platform.
- Minimum 32 MB of RAM, a mouse and sufficient disk space to save the required information (files, disk images, etc.).
- Administrator rights are required to install and run under WinNT/2000/XP/2003/Vista/Windows 7.
Main features:
- Recovering deleted files based on service records.
- Recovery by signatures.
- File system reconstruction.
- The ability to create an image file of a physical disk, partition or part thereof.
- Network recovery support.
- Ability to fine-tune recovery.
Interface
GetDataBack exists in two versions: for FAT12-32 file systems and for NTFS. They are sold separately.
There is no Russian-language interface or help. When you first start the program, it may start with the German interface language. The screenshot shows a menu item in which you can switch to English.

At the top of the window there is a control panel, on the left there is useful information and tips, the work area is an instruction for selecting the desired recovery option.

The interface of the main part of the program is presented as follows: in the upper part there is a control panel, in the left there is a panel for selecting a drive and its properties. On the right we see the selection of the scanning area and scanning settings.
Approximate recovery algorithm

The program can cope with a small number of unreadable sectors. If there are a large number of them, it is better to make a sector-by-sector copy to an intermediate medium and work with the copy.
GetDataBack is an easy to use program that gives good results. In general, it is quite convenient, there are important settings. A serious drawback, in our opinion, is the separation of versions for FAT and NTFS systems. The user may not always know which of these two systems he had.
Recuva
About the program
The following file systems can be accessed in read mode:
- Microsoft Windows: FAT12, FAT16, FAT32, NTFS.
System requirements:
- Windows 2000/XP/Vista/Windows 7 on an Intel compatible platform.
- Minimum 32 MB of RAM, a mouse and sufficient disk space to save the required information (files, disk images, etc.).
- Administrator rights are required to install and run under WinNT/2000/XP/2003/Vista/Windows 7.
Main features:
- Recovering deleted files based on service records.
- File system reconstruction.
- Convenient recovery wizard.
- "Secure file deletion" function.
- Ability to recover deleted messages and unsaved documents.
- Possibility of installation on a portable storage device.
Recuva gained popularity as it was one of the first free file recovery programs. Simple and clear, but inferior in capabilities to many applications on the market.
Interface
When you first launch the program, it immediately launches the recovery wizard, which, step by step, figures out what needs to be restored and how. Working with the recovery wizard is simple, but many users will find it more convenient to perform recovery from the main view of the program.

By clicking the “Cancel” button, you can disable the wizard; you can also check the checkbox so that the recovery wizard does not start when launched.
The main view of the program: at the top left is the drive selection menu, below is the scanning results panel, at the top right we see the search (and filter) panel, below it is information about the files (preview, summary, hexadecimal view), at the very bottom of the window is the status bar .
Approximate recovery algorithm

From Recuva You shouldn’t expect anything supernatural, but if you need to quickly and easily recover a just deleted file, you can try it. For more serious problems, we recommend turning to the above programs.
Read, review of data recovery program – R-Studio. As a result of formatting a computer's hard drive or external hard drive as a whole, and not just one of the partitions, all partitions created on it are deleted along with the saved files. Most data recovery programs can recover from such a disk, at best, only a set of files, often with an unsaved name, without preserving the folder structure and directory tree.
R-Studio has the ability to recover data from a lost partition while preserving the folder structure and file names; let's look at how to recover files using it.
Let's assume that our hard drive had four partitions with files: D:, I:, F:, E:. This disk was formatted during the reinstallation of the operating system, and one partition was created on it.
To restore one of the deleted partitions using R-Studio, launch the program and select the hard drive from which you want to restore the partition, click the button "Scan".

If necessary, make additional settings in the window that opens and click "Scanning".

We are waiting for the end of the scanning process. Scanning information is shown in a kind of window on the right, which resembles the disk defragmentation window, as in older versions of Windows. Also, during the scanning process, the program calculates its duration; pay attention to the status bar at the bottom of the program window.

The disk scanning process lasted about 4 hours. As a result, R-Studio displayed in the window on the left a list of detected partitions of the scanned hard drive: existing and previously deleted. If you look at the list of detected partitions and compare it with those that were deleted from the disk (screenshot 1), you will not be able to compare them all by size. Therefore, if it is necessary to restore a specific partition, it can be detected by checking each one.

Let's look at the contents of a partition whose volume matches the previously deleted Disk I:.

As a result, R-Studio displayed the contents of this section, in which no files were found that were deleted along with it. The same result was obtained when checking other recognized sections.

As a result of scanning the existing disk partition “New Volume”, which was created instead of the deleted four, the program still detected files from the deleted partitions.

Select the files and folders that need to be restored and click the icon "Restore" in the top menu of the program.

Specify the folder to restore files and click the button "Yes".


Files and folders have been restored.

In conclusion, we can say that the program coped well with the task. And in terms of data recovery quality, R-Studio is a direct competitor Hetman Partition Recovery: also recovers files from deleted or formatted disk partitions, creates disk images and restores data from them, has an adequate preview function for recovered files.
Where Hetman Partition Recovery surpasses its competitor is a simple, intuitive interface, much higher speed of operation (both scanning storage media and data recovery), ease of use, the latest update added to the program the function of recovering data from virtual disks and virtual machine disks.
With Hetman Partition Recovery, it is possible to restore data in two or three steps, which greatly simplifies the data recovery process and only has a positive effect on its result.
Hello dear visitors of my site. Analyzing requests in search engines, I noticed a large number of questions about recovering deleted files. Since this is a global problem and a large number of people are struggling with it, I decided to write methods for the most effective recovery, as well as useful practical tips.
A little background for a general idea of how it works. Any information on our media, hard drives, external pockets, USB flash drives, and other media is stored in clusters. The longer and more we rewrite, the shorter the service life of a particular device. With each rewrite, the media loses some of its properties and eventually breaks down completely. Some after a year, others after 5, depending on the manufacturer and operation.
The above factors are of great importance and influence on the quality and efficiency of file recovery. There are also important points to note regarding the following nuances. As soon as you have deleted something and realized your mistake, don’t even think about experimenting. Find the media you will be restoring to. Under no circumstances should you restore to the media that we are restoring. This will give a bad result. Download the recovery program, preferably to another disk or flash drive, and run it. Perform analysis and recovery.
I will also note that there is no better security for your files, like an excellent backup, both by the system itself and in some kind of cloud or external pocket.
Recava file recovery is fast, simple, but not always effective.
What can be said about Recava file recovery software? Well, firstly, it takes up very little space on your PC, and secondly, it is so easy to use that even a schoolchild can handle it. There are no fancy settings or complex filters during recovery. But there is also a significant drawback: it does not always achieve even a 30% positive result when recovering deleted information. Although no program can restore 100% of the information, and this is a fact.
Well, it's time to start practical guidance. Let's first just download the program itself to our computer, and it can either be installed or run in a version. We will download from my blog using this link. So you have a downloaded archive, which you have already unpacked and saw a folder for portable launch of the program, as well as an exe file for installing the program on your computer. How you do it is up to you, I use a portable launcher, why should I clog up my system once again?!
So we went to the folder for portable launch of the program and clicked on the application shortcut. The first window will ask us to go through the recovery procedure step by step using the recovery wizard; if we do not want to use the assistant service, simply click CANCEL. We can also put a checkmark at the bottom of the window and the next time you start the assistant will not launch, I do not recommend you do this, unless you are already a pro in working with this application. oh well, let's move on. We get a considerable list of files that the wizard offers to restore, among which there is an item and ALL FILES. Place a check mark next to the desired section and move on.
The next window asks us. Do we know where these files were before they were deleted? We are given 5 options to choose from:
- It is not known exactly
- On the memory card,
- In the "My Document" folder,
- In the basket,
- At the specified location.
Check the box and continue. Here we are asked to use an in-depth search for lost files, but the program warns that it will take much more time than with a regular search. At the end of the scan, you will be given the number of files found; I tested it on pictures that I recovered from a flash drive. I've been using it for over a year now and have removed a lot of things from it more than once. A full in-depth scan found about 1000 files. At the same time, I could view some in the form of previews, but some could not. I took 50 with pictures and 50 without and began restoration. The result is approximately 20 - 25% of the selected amount. Which is not cool or effective at all. I can’t guarantee that this is purely the program’s fault. Many factors are taken into account, firstly, how much time has passed since the files were deleted, secondly, whether we used the media after that, and thirdly, how long has it been for the media itself from which we recovered the files.
And now for some settings of the program itself and how to work with it. In the settings tab there are three tabs, in the first we specify the program language, enable or disable the recovery guide wizard. In the actions we indicate which files should be taken into account or ignored. It is also possible to perform recovery taking into account the folder structure. Well, the third tab is information about the program.
R-studio - high-quality recovery of deleted files.

Now let's talk about a more powerful program for recovering deleted files. Which is used even among banks. In practice, I only used it once, but the result is more effective than when working with Recava. I provide you with a link to download the program from my website. We unpack the archive and upon startup, create a portable version of the program by checking the appropriate box.

The program will create the necessary folders and files in the specified location for further portable launch. You need to run the program as an administrator, but sometimes it ignores a simple click on the shortcut.
So, in the left half of the program window we indicate our media from which the files were deleted. In the right window we will see information about this media. After selecting the media, we have two paths, two choices. First - show disk contents, and the second - scan. In the first case, the program will give us a folder structure, including hidden ones; in the second case, it will launch a cluster-by-cluster scan of the specified media. Usually I go the second way, in order to immediately visually see the condition of the media itself and the probable ratio of the possibility of file recovery.
When scanning, at the bottom of the program window there will be a scale of work completed, and on the right side of the window the cluster status of the media will be displayed. Waiting for the scan to finish...
The scanning is completed, we can hover over any of the colored clusters on the right side and view information about it. Now let's proceed directly to the restoration. Just below the top menu, near the toolbar tab, there is a tab with the name of our media disk. We move into it.

If when working with Recava we could specify what types of files we are looking for for recovery, then the wait is a little different. After scanning, the program already shows what it sees on our media. Moreover, what is marked with a cross, these folders and files do not exist, but they can be restored, although it is not a fact that it is effective. I marked Additional Files and clicked Recover at the top of the window. A window appears in which you can make some adjustments before the recovery process. We check or uncheck the boxes, carefully reading what it is and what it is for and indicating the path, click YES. That's all, the process has begun, all that remains is to wait for the result.
Hello.
Today, every computer user has a flash drive, and more than one. Many people carry information on flash drives that costs much more than the flash drive itself, and they don’t make backup copies (naively believing that if the flash drive is not dropped, flooded or hit, then everything will be fine with it)…
I thought so too, until one fine day Windows OS was unable to detect the flash drive, showing the RAW file system and offering to format it. I partially restored the data, and now I’m trying to duplicate important information...
What to do before restoration and what not to do?
1. If you find that there are no files on the flash drive - then don’t copy or delete anything from it at all! Just remove it from the USB port and don't work with it anymore. The good thing is that the flash drive is at least detected by Windows OS, that the OS sees the file system, etc. - which means the chances of recovering information are quite high.
2. If Windows OS shows that the file system is RAW and prompts you to format the flash drive- do not agree, remove the flash drive from the USB port and do not work with it until you restore the files.
5. If the flash drive is not detected by computers and they don’t see it at all, but you really need the information, contact the service center, I think you won’t be able to do it on your own...
6. And lastly... To recover data from a flash drive, we need one of the special programs. I recommend choosing R-Studio (we’ll talk about it later in the article). By the way, not so long ago there was an article on the blog about programs for data recovery (there are also links to official sites for all programs):
Recovering data from a flash drive in the R-STUDIO program (step by step)
Before you start When working with the R-StUDIO program, I recommend closing all third-party programs that can work with a flash drive: antiviruses, various Trojan scanners, etc. It is also better to close programs that heavily load the processor, for example: video editors, games, torrents, etc.
1. Now insert the flash drive into the USB port and launch the R-STUDIO utility.
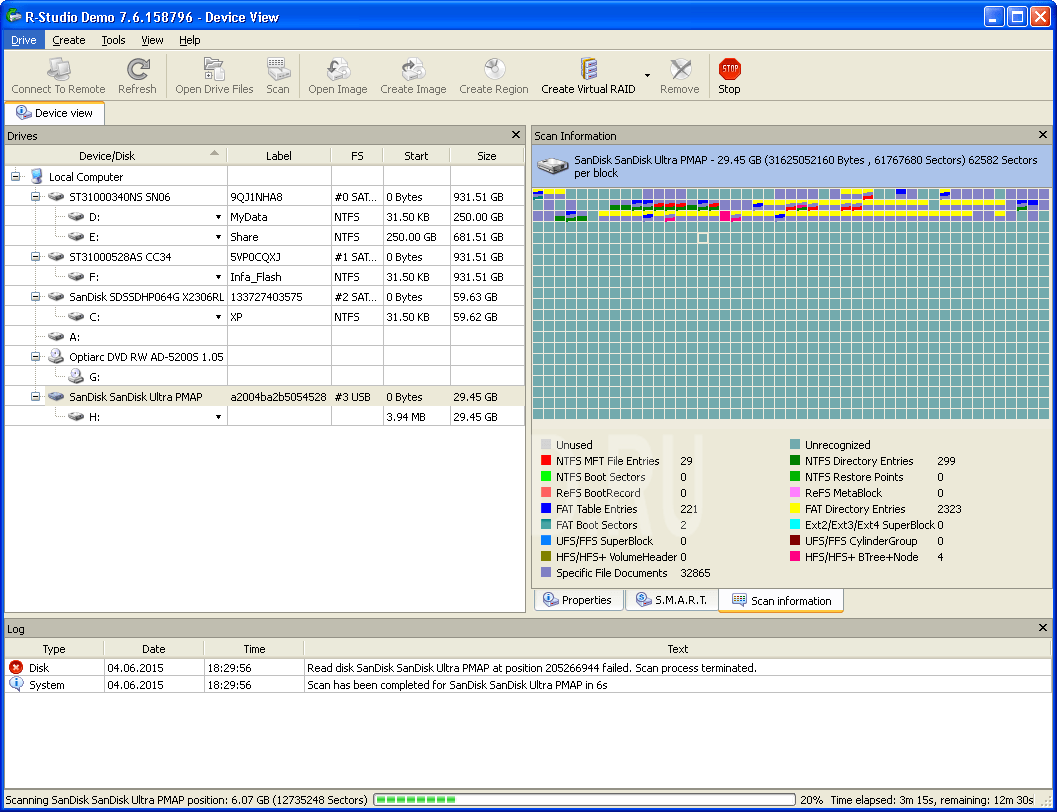
First you need to select the flash drive in the list of devices (see screenshot below, in my case it is the letter H). Then click on the “Scan” button
2. Should A window with flash drive scanning settings will appear. Several points are important here: firstly, we will scan completely, so it will start from 0, we do not change the size of the flash drive (my flash drive in the example is 3.73 GB).
By the way, the program supports quite a few file types: archives, images, tables, documents, multimedia, etc.
3. After this the scanning process will start. At this time, it is better not to interfere with the program, not to launch any third-party programs or utilities, and not to connect other devices to the USB ports.
Scanning, by the way, is very fast (compared to other utilities). For example, my 4 GB flash drive was completely scanned in about 4 minutes.
4. After completion scanning - select your flash drive in the list of devices (recognized files or additionally found files) - right-click on this item and select " Show disk contents«.
For example, select a photo or picture, right-click on it and select “preview”. If the file is needed, you can restore it: to do this, right-click on the file, just select “restore" ![]() .
.
6. Last step very important! Here you need to specify where to save the file. In principle, you can choose any disk or other flash drive - the only important thing is that you cannot select and save the recovered file to the same flash drive from which the recovery is taking place!
The point is that the recovered file can overwrite other files that have not yet been recovered, so you need to write it to another medium.
Actually, that's all. In the article, we looked at step by step how you can recover data from a flash drive using the wonderful R-STUDIO utility. I hope you won't have to use it often...
By the way, one of my friends said, in my opinion, the right thing: “as a rule, such a utility is used once, there is simply no second time - everyone makes backup copies of important data.”
All the best to everyone!