If programs take longer to load, and the computer slows down with each subsequent operation, you need to clean the system drive C from “garbage”. Unused software products, remnants of incorrectly deleted software and files, saving errors due to disk fragmentation are the main reasons for uncomfortable work with a PC. Let's figure out how to clean the system drive C from unnecessary files and programs?
Standard Windows Features
While working with a computer, the user installs and updates software. Some programs are used daily, others several times a month, and others are forgotten after 1-2 weeks. It is the latest software products that you should get rid of first, using any available methods. Namely:Manual
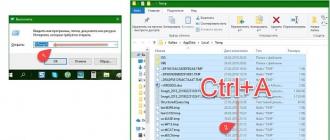
First of all, empty the “Trash”, “Downloads” and the “Temp” folder. These are three large storage areas for temporary and unnecessary files. You can get to the “Temp” folder using the search bar, pressing WIN+R. Then proceed like this:- On an empty line write “ %Temp%"(without quotes);
- Enter;
- In the window that appears, type the key combination from the keyboard Ctrl+A;
- Then the key combination Shift+Delete.
Important! Not all files in the folder will be deleted, but only those that are not used during program operation. A complete cleanup can be performed before turning off the PC, after closing all programs.
The “Temp” folder is located on system C, and can also be found manually. It is recommended to free up user folders and OS storage. All of them are located on the main disk. But when manually deleting objects, you need to be extremely careful, otherwise there is a high probability of erasing a system file, without which the OS will not boot.
Important! You should not remove objects with an unfamiliar extension in the windows.old folder - files for system recovery are stored here.
Using Disk Cleanup
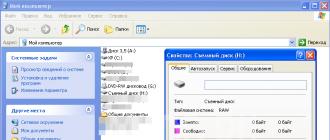
A safe and easy way to clean up your system C is to use the Properties tab. If the manual cleaning method is dangerous due to the possibility of erasing an object important to the OS, then using the built-in functions is absolutely safe. They do the following:- Find the folder " My computer"and open;
- Right-click on the disk C;
- From the vertical menu select " Properties»;
- « Clean disk", and in the new window tick all menu items;
- Click " OK" confirm deletion.

In the Disk Cleanup window, you can also destroy accumulated junk in system files. To do this, select the “Clean up system files” button. The procedure is safe, but may take from 1 to 15 minutes. This is fine.
Deep sedum
It is carried out using the command line, which is called through the search bar on the Start panel. Here you need to enter cmd symbols in English. Next do the following:- In the “black” window that opens, enter the term: “ %systemroot%\system32\cmd.exe /c cleanmgr/sageset:65535 & cleanmgr/sagerun:65535»;
- Press Enter;
- Waiting for the process to complete.

This command will open a window with a large list of files. So the process has begun. There is no need to close the command prompt until the procedure is complete.
Third-party resources for cleaning system and other disks
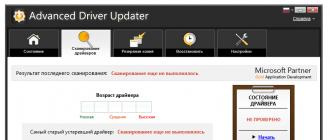
On the Internet you can find paid and shareware software products for optimizing free space. If you are servicing a home PC, the second type of utility is also perfect - less functionality, but free download. Reliable and easy to use include:- CCleaner and Advanced;
- PC Booster and Ashampoo WinOptimizer Free;
- SlimCleaner Free and Comodo System Utilities;
- Auslogics Boost Speed and Glary Utilities;
- Kaspersky Cleaner and Clean Master for PC.
- We wait until the utility automatically scans the disks;
- In the new window click " Clean Now»;
- We are waiting to receive the report;
- Close the program.

When regularly maintaining PC disks, you can safely use third-party resources. But if cleaning is carried out 1-3 times a year, it is better not to use non-native products for Windows 10. It is better to initially allow the system to analyze and correct errors in the registry and system files, and only then use powerful third-party services.
Disk Cleanup in Windows 8, how often should it be done and is it necessary to use only built-in operating system tools? Is it possible to use third-party programs? Why am I asking, I bought a laptop with pre-installed Windows 8 two months ago, at first I used the operating system on drive C: there was 100 GB of free space, and now there is only 70 GB left, I ran disk cleanup, but there was no result, still the same 70 GB. Maybe I'm doing something wrong?
Disk Cleanup in Windows 8.1
Hello friends! Cleaning your hard drive can be done once every two weeks and it is not at all necessary to use some exotic and sometimes paid program for this purpose. Windows 8 has a cool built-in tool, but you need to work with it correctly and it will quickly clear your disk of unnecessary temporary files. Read the article carefully and you can free up as much space on your hard drive as you need. We will also set up automatic disk cleaning using the task scheduler and the disk will be cleaned once a week, you will only need to select the disk and click OK. If the cleaning results do not suit you, at the end of the article I will show you a few more folders from which you can delete files. Launch the tool Disk Cleanup in Windows 8 There are two ways, I show both.First way. Right-click in the lower left corner of the desktop and select Run.
Enter the command cleanmgr in the input field and click OK,

The Disk Cleanup tool opens.
Second way. Move the mouse pointer to the lower right corner of the desktop and left-click on the Search button
And type in the Disk Cleanup field

And click Search, two tools appear at once that can help us, let's look at them in more detail.

Select the disk you want to clean. Let's first select the disk with the operating system (C:).

In the next window select Clean system files.

Select the drive (C:) again and click OK.

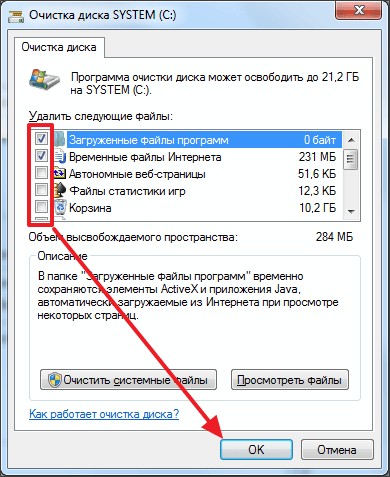
We are offered to remove incomparably little garbage, namely Downloaded program files, Temporary Internet files and thumbnails. You can safely check all the boxes, especially the Temporary files item, sometimes several GB accumulate in them. To begin the disk cleanup procedure in Windows 8, click OK. The process of cleaning the operating system from unnecessary files is underway.


Attentive users may notice the “Advanced” button in this window; click on it.

In the window that appears, you and I can clear disk space by removing unnecessary programs, click on the Clean button

And the “Delete or change a program” panel will open; here you can select a program that you have not used for a long time and delete it.

Just below there is another Clear button, if you click it, all recovery points except the last one will be deleted. I want to say that recovery points always take up a lot of disk space and this way you can free up quite a lot of free space on your hard drive. Click Clear, then OK.


Delete files. Personally, after these steps, I freed up 10 GB of free space on the C: drive, but there was only one recovery point left.
Note: Many processes belonging to Windows and other programs are constantly running in the operating system; as a result of their vital activity, temporary data files are periodically created, which are located in the Temp folders. If you delete these files yourself, you will get back another couple or three gigabytes. After completing the disk cleanup process, I recommend manually deleting everything from the temporary files folders.
C:\Windows\ Temp
C:\Users\Username\AppData\Local\ Temp
How to set up automatic disk cleanup in Windows 8
Right-click in the lower left corner of the desktop and select Run, enter the command mmc.exe taskschd.msc in the input field and click OK

The task scheduler starts. Select the action "Create a simple task"

Wizard for creating a simple task. Enter a custom name for the "Disk Cleanup" task

In the schedule for the task, indicate weekly.

Check the box for any day of the week. For example Saturday.
When working with a computer, a certain number of unnecessary files gradually accumulate on the disks. Many programs create temporary files, but not all delete them when they are finished. Of course, only you can say about most files whether they are needed or not, but during its operation, the Windows system itself creates many files that waste space on the disk. Program Disk Cleanup(Disk Cleanup), also belonging to the group of utility programs, is used to remove unnecessary files from the disk. The disk cleanup program can be launched either automatically or manually. Automatic startup occurs when there is less free space on the disk than the limit set in the system. In this case, a dialog appears warning about this (Fig. 1). Please note that the less free space remains on the disk, the more often this dialog will appear.
Fig 1.Dialogue warning about low free space
To run disk cleanup where there is little space left, click the button Disk Cleanup(Disk Cleanup) of this dialog. If you want to run the cleaning program yourself, then open the folder My computer(My Computer) in the Windows main menu. Right-click on the icon representing the disk you want to clean up and select the command from the secondary menu Properties(Options). In the dialog that appears, click on the shortcut Are common(General) to select the desired tab. On this tab, click the button Disk Cleanup(Disk Cleanup) to launch the appropriate program. The cleanup program searches the specified drive for files that can be deleted automatically. After viewing the disc, a dialog appears on the screen showing the results of this check (Fig. 2). The list in the center of the dialog shows groups of files that can be deleted and the disk space they occupy.

Fig 2.Disk cleanup settings dialog
While Windows is running, many files are created on the disk that are created for temporary purposes. When there is a lot of disk space, the number of these files does not matter much. When disk space runs out, deleting unnecessary files can help solve the problem.
When viewing a disk, several groups of files are considered to be deleted6
First of all, this is the contents of the folder Basket(Recycle Bin), which is where the files you delete go, since most of the files that go into it are intended for final destruction.
Next comes the folder Temporary Internet Files(Temporary Internet files), containing files that appeared on the computer while using the Internet. These files are needed to quickly re-view Web pages that you have already visited, and nothing bad will happen if they are deleted.
Many programs, during their operation, create temporary files to store some parts of the information being processed. Windows provides a special folder for such files. Sometimes these files are not destroyed when the programs that used them finish running. To delete such files, a special group is provided.
Several other groups of files are also offered for cleaning. To specify the deletion of groups of files, you should select the appropriate dialog boxes.
When you click the OK button of the dialog, the cleaning process will begin.
When asked whether you really want to delete files, you should answer in the affirmative by clicking the Yes button in the dialog that opens.
A dialog will appear with a progress indicator that illustrates the cleaning process (Fig. 3).


Fig3. Disk Cleanup Process
Sometimes deleting unnecessary files does not solve the problem of low disk space. In this case, the system may prompt you to remove some Windows components or installed programs.

You can do the same thing yourself if you select the tab Additionally(More Options) dialog Disk Cleanup(Disk Cleanup) (Fig. 4).

Figure 4. Additional cleaning options
This tab offers you three options for increasing free disk space by deleting some of the files used by the Windows system.
First group
Controls allows you to remove some Windows components that you don't currently use. To remove some Windows components, click Clear(Clean up). The first Windows Component Wizard dialog appears. This dialog presents a list of system components that you can remove. Selecting a list item displays a comment at the bottom of the dialog about what the selected component is, and the disk space occupied by this component is also displayed. To mark a component for removal, check the box next to the corresponding list item. Second group
makes it possible to remove previously installed programs. Button press Clear(Clean up) in this group of controls will cause a dialog to appear Installing/removing programs(Add/Remove Programs. This dialog also displays currently installed programs in the form of a list. By selecting a program to remove, you will see the disk space it occupies. To remove a program, click the button Delete(Delete). The Uninstall Program Wizard will launch.
Increasing the size of drives does not always avoid the question of how to clear drive C of unnecessary files.
You can solve the problem by installing and running a special utility CCleaner, downloaded from the website of the developer company. Its advantages:
- Search for data that other cleaning programs do not see;
- Intuitive interface;
- Possibility of free use.

CCleaner program
To clean temporary files that are not deleted by built-in Windows tools, you can also use applications like:
- Disk Cleaner utilities;
- TuneUp Utilities software package;
- RevoUninstaller Applications.
Additional cleaning methods
In cases where all of the above options did not help add space on the system disk, you should use additional methods, including:
- Increasing the volume of the system partition at the expense of the others (in this case, the combined local disk must be located on the same HDD).
There are a number of programs for this, although when using them it is better to make a copy of important information from the partitions being connected; - Moving folders with music and movies from drive C (including the desktop). On the desktop you should leave only shortcuts to directories that will be located in other sections of the HDD;
- Removing duplicate files, if there are any on your computer.
This can be done manually or using a special program downloaded free of charge from the manufacturer’s website Duplicate Killer, which detects and deletes completely identical images, videos or folders; - Cleaning the “Downloads” folder, which may also contain programs that have not been used for a long time;
- Reducing the amount of space allocated for information for restoring the operating system;
- Disabling hibernation, a mode that saves data from RAM on the hard drive and takes up approximately the same amount of space as the RAM itself.
The function is disabled in two ways: by entering Powercfg /Hibernate off on the command line or by setting the zero parameter in the additional power options (Start - Control Panel - Power Options).
Cleaning for Windows 10
All of the previously mentioned disk cleaning methods apply to any version of Windows. However, there are also those that can only be used in the latter.
In Windows 10, several additional utilities have appeared to gain additional space on the system disk by deleting unnecessary files and folders.
Storage
First of all, the user of this OS should try to clean up the C drive using the “Storage” settings available in the “All Settings” menu (called by clicking on the system notification icon or pressing the “Win” and “I” keys simultaneously) when selecting the “ System".

Windows 10 Storage Settings
This settings section allows you to view the amount of space occupied by programs, music, images, videos and documents.
Here you can install a disk on which the corresponding files will be automatically installed, which will help avoid filling up the system partition.

System disk memory usage
For example, from this list you can select temporary files that are no longer needed and should be deleted to free up space.
Among them is information from the system recycle bin and boot folders, which can be easily deleted directly from this menu.
Also, when viewing “Storage”, you can see the sizes of each of the system files, including the swap file, system restore and hibernation.
The last two can be deleted, although this may lead to data loss if there is a problem with the system.
The Applications and Games section contains information about the programs installed on the PC, including the amount of space they occupy. Some of them can only be deleted.
But those that were installed from the Windows 10 Store are also moved to other drives, freeing up space on the system drive.
Compress hibernation file and OS files
In the 10th version of the Windows operating system, a special Compact OS utility appeared, which compresses system files and reduces the space they occupy in the system partition.
According to the software manufacturer, running it on a fairly powerful computer does not affect its performance at all.
In this case, enable the compression function by launching the command line through “Start” and entering the command: compact /compactos:query Sometimes it allows you to free up to 2 GB.

The ability to compress the hibernation file has also been increased.
If in previous versions of Windows it was only turned off, freeing up space approximately equal to the PC's RAM, but also removing some of the functions for quick startup, now you can even reduce its size.
In this case, a quick start will be possible, but the hibernation file will take up less space.
Moving Applications
Windows 10 comes with several standard utilities and applications such as OneNote, mail, calendar and weather monitoring.
They are removed from the Start menu, but not always removed from the list of all applications.
And there is no delete option for them in the context menu. Yet programs are relatively easy to remove using PowerShell commands.

Launching PowerShell
Features of saving space
Another way to save space in the system partition is not to clutter it with unnecessary information, and especially with applications.
Moreover, other disks are usually intended for them - this is convenient not only for saving space, but also in case the need arises to reinstall the system.
In non-system partitions, files have a better chance of being saved if, for example, you have to install a new Windows.
By default, any program is installed on drive C, taking up space reserved for system applications.
Therefore, it is advisable to change its location at the very beginning of installation to a directory on another disk.
This is especially important for modern games, which sometimes take up as much space as all Windows system files.
How to clean drive C? Disk Cleanup in Windows 7
How to clean drive C from unnecessary files: Best ways
Users often complain that there is too little free space on the C drive and ask how to clean the C drive from junk on Windows 7. In this article, we will look at two simple, effective and safe ways to solve this problem.
Method number 1. Use the “Disk Cleanup” function.
The easiest and most reliable way to remove junk on Windows 7 is to use the Disk Cleanup function. To launch this function, open the “My Computer” window, right-click on the “C” drive icon and select “Properties”.
After this, a window with the properties of the selected disk will open. Here you just need to click on the “Disk Cleanup” button.


After the system analyzes your drive “C”, a list of garbage will appear that can be deleted. Check the boxes next to the files you want to delete and click the “Ok” button.

Now all that remains is to wait until the Windows 7 operating system is free of garbage. This usually takes a few minutes.

Method No. 2. Delete or transfer user files to another disk.
If you have done Disk Cleanup, but there is still too little free space on the C drive, then you can move the user files to the D drive. To find all the user files, open the C:\Users\Username folder and examine the contents of all the folders that are there. Pay special attention to such folders as:
- C:\Users\Username\Downloads;
- C:\Users\Username\Desktop;
- C:\Users\Username\Documents (My Documents);
Typically these folders contain the most user files. For example, in the screenshot (below) you can see how more than 20 gigabytes of files are stored in the “Downloads” folder.
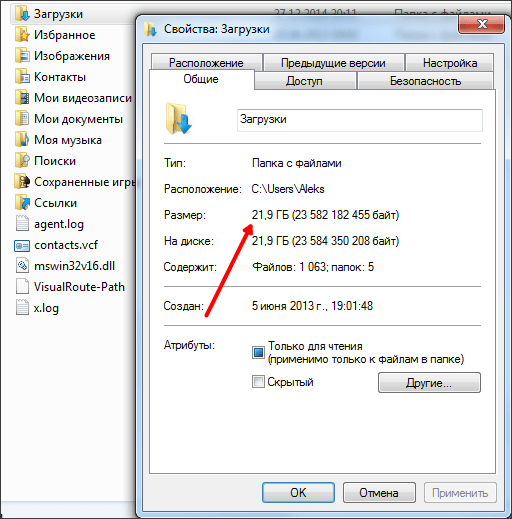
These files can be easily deleted or transferred to another drive, thus freeing drive “C” from unnecessary garbage.