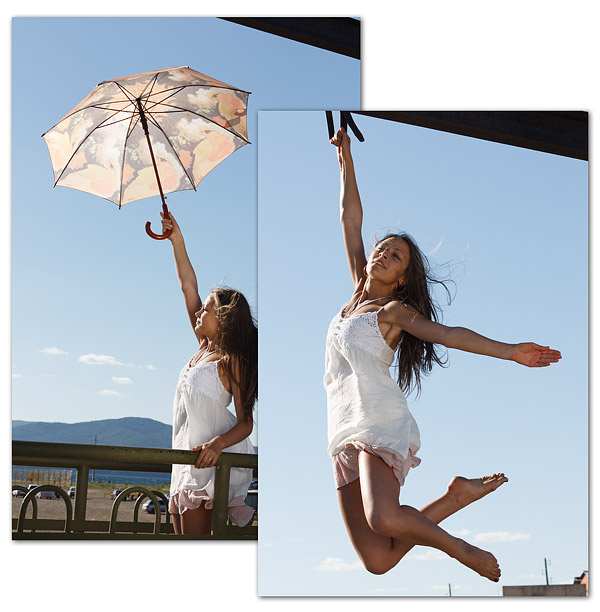
In the fifth part of our guide there will be a bit of magic. With the help of masks in Photoshop we will send the girl on a careless flight)
To do this, we will use a couple of photos that we took with the wonderful girl Vika back in 2010. 
Open photos of the girl and a picture of the sky in Photoshop. We will need to cut out the figure of Wiki from one photo, a hand with an umbrella from another, transfer them to a picture of the sky and combine them.
Part one. The figure of a girl.
Sometimes it’s easiest to select an object with a tool Quick selection (Quick Selection). This brush selects the pixels beneath it and spreads the selection to similar areas. Each brush stroke adds a new area to the current selection or subtracts it, depending on the mode, which is switched by the buttons on the top panel.

But it’s even more convenient to use a keyboard. By default, the brush works in plus mode when the selection is added. To remove excess selection, just hold down the Alt key, and to switch from “minus” to “plus”, press and hold Shift.
Check mark Amplify automatically improves the contours of the selection, based on the algorithms of the tool "Refine the edge", which makes the contours of the selected area smoother.
Display the photo in full screen and using Quick highlight select the background, because it’s easier. After that, invert the selection Ctrl + Shift + I, now we have a girl selected.

Enlarge the photo and, reducing the brush, carefully go around the edges of the figure, achieving the most accurate selection.
When refining the edges of the object, the brush should draw on the object, but not go beyond it, since everything that falls into the circle of the brush in the plus mode will be added to the selection, after which the selection will spread to similar areas. With a little training, you will understand how it works.
You can quickly change the brush size using the square brackets keys] - increases the size of the brush, [- reduces.

Let's go around the girl’s contour, specifying the edges of the selection, with the exception of hair. After that, in the layers palette, click Add mask.

By pressing it, the selection will turn into a mask, and the background will become transparent, which is what we needed. To make the result more visible, create a new layer, fill it with black and put it under the girl’s layer. Evaluate the accuracy of background removal, more convenient on a contrasting substrate.

Now we need to refine the mask so that the contours of the body and hair are cleaner. To do this, we will use the tool that we considered in - Refine Edge masks.
Double-click on the mask thumbnail in the layers palette, and in the panel that opens The properties press the button Mask edge.

In the window that appears, use the tool Edge detection. For clear contours, you need to choose a small radius of 1 - 4 pixels, for soft, fluffy or translucent edges you need to choose a large radius, up to a maximum of 250 pixels. Check mark Smart Radius forces the tool to determine the width of the border within the specified radius.
In order to improve the contours of the girl’s body and dress, set a radius of 2 pixels. View mode select On layers, and using the checkmark Show original evaluate the work of the tool.

Clear edges should look pretty good. It remains to work out the hair. To do this, use the button Brush and draw the areas where you need to further clarify the edges of the mask, that is, the hair. And so that you can see where to draw, select the view mode Show layer.

Pointing the area of \u200b\u200bthe hair with a brush, try not to climb without needing to clear outlines (body, dress) so that the edges of the mask in those places remain clear.
To evaluate the result, switch back to mode On layersWhen the refinement of the hair contours is completed, click OK at the bottom of this window.
Now let's look at the layer mask again, for which press the Alt key and click on the mask thumbnail in the layers palette. You should have something like this:

As you can see, some areas of glare on the face and on the hair became translucent (light gray areas on the mask). Therefore, we take a white brush and carefully draw those places that should be opaque.

It turned out not bad, but there was a piece of sky behind the girl's back.

To get rid of it, we use the following trick. Copy our layer with the girl (Ctrl + J). Delete the mask (in the layer palette, drag its thumbnail onto the trash button). Take a brush Quick selection and select a stretch of sky behind the girl’s back.

There is a button on the top toolbar of the selection Refine Edgeclick it. We select the edge detection radius, experiment with the setting Smart radius and get this result.

Click OK. Now we have a plot of sky behind the girl’s back. We no longer need the top layer, and it can be removed. We pass to our mask. To display it in black and white, press Alt and click on the mask thumbnail in the layers palette. The area (sky) we need is highlighted, so just fill it with black (press D and Ctrl + Backspace). Done!

A similar technique for finalizing the Masks can be used repeatedly, working out individual sections.
Now the girl we have is neatly separated from the background and needs to be transferred to a photograph of the sky. To do this, take the tool Moving (black arrow) and, clicking on the image, dragging it to the tab of the image with the sky, the photo of the sky will be displayed on the screen, after which we will drag the girl into this photo and only then release the mouse button.

Part two. Umbrella.
First, we crop the photo, since we need a hand, we crop the image at about the level of the elbow joint. To separate the umbrella from the sky, use the Color Range tool. Go to the menu: Highlight - Color Range and get a pretty simple tool.

This tool allows you to select details based on their color. The choice of color is most conveniently done using three buttons: Pipette - selects a color, Eyedropper + adds a new color Eyedropper - subtracts the new color. Use also the engine Scatter to adjust the range of highlighted colors. In point View you can select “Grayscale”, so instead of the image a black and white mask will be shown, which is quite convenient.
Thus, it is very easy to select an umbrella. Click Dropper Click on the sky in the image or preview area. Then click Eyedropper + and make a few more clicks at different corners of the sky. Then configure the engine Scatterso that the umbrella is completely black and the background is completely white. Checkmark Invert and click OK.
Thus, we get the exact selection of the umbrella. In the layers palette, click Add mask, and the background becomes transparent. If part of the hair has got into the mask, then simply paint over this area with a black brush.

After that, drag the umbrella onto the photo of the sky in the same way as we did with the girl.
Part three. Assembly.
To begin with, we need to adjust the sizes of all plot details and combine them with each other. To do this, use the command Free transformation. In the layers palette select the layer with the girl and press Ctrl + T. At the same time, a frame with nodules - transformation markers will appear along the edges of the layer.

Pull the corner marker and reduce the size of the girl, fitting her into the sky. To save the proportions, press and hold the Shift key. Another option is to preserve image proportions - on the top toolbar Free transformation press the button chain, which links the height and width of the image.

After you have selected the size for the girl, press the key Enter or button Check mark on the top toolbar. Then repeat the same for the layer with hand and umbrella.
In the case of an umbrella, we need to not only adjust the image size, but also rotate it. To do this, position the cursor outside the frame and, when it turns into a curved arrow, rotate the image. Sometimes it’s convenient to change the center of rotation, for example, move it to the beginning of the arm near the elbow joint. To do this, move the center marker to a new location, now the picture will rotate around the point you specify.

After all the transformations, a translucent outline may appear at the edges of the images.

To get rid of it, you need to display the mask (Alt + click on the mask icon) and paint the edges of the mask with black.

Now it remains to join the hand! Turning on and off the visibility of the umbrella layer, determine where you want to make the transition of one layer to another. Then use a soft black brush to erase the beginning and end of the hand in two layers in the mask. You should get something like this.


Part Four Brightness and contrast.
The thing is almost done, it remains only to adjust the brightness and contrast of all details. Create a Curves adjustment layer above the girl’s layer and use it to “lock” it onto the bottom layer. In this case, the curve will affect only the girl without affecting the sky.
Congratulations, now you are a little magician!)
To summarize:
- Tool Quick selection great for cutting objects and creating masks.
- Team Refine Edge allows you to quickly and accurately modify the mask of the object.
- Tool Color range - A simple way to highlight an object by its color, for example, to cut objects according to the "chromakey" principle.
The amazing Photoshop program gives the user unlimited possibilities for working with photos and images. Almost all of the graphic display on the Internet, books and other sources was done using this wonderful software. But, as everyone knows, these graphic elements are prepared by special people who are fluent in Photoshop. Very often people ask these very people for help in basic things that even an ordinary user can do.
Using graphical editor tools
At first glance, Adobe software may seem a little complicated for a beginner: a huge number of tools, various panels, tabs, and other interface elements. But over time, you will be able to understand the principle of their display and, therefore, you will be able to predict where this or that instrument might be. Since without experience nothing will just come to you, you can start performing simple actions using the tutorials (instructions) from our website. And today we will learn how to cut an object in Photoshop. But first, we need to learn how to insert a photograph or drawing into the program itself. If you already know how to do this, you can skip this paragraph.

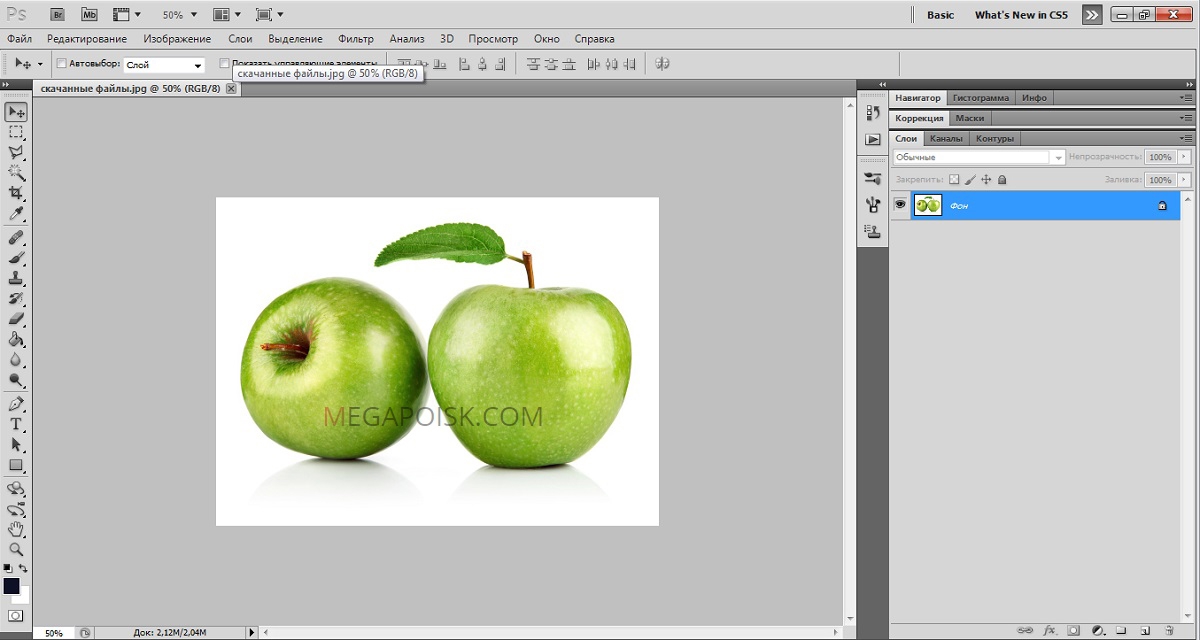
Take Photoshop CS6 as an example
How to open an image in Photoshop
For starters, we certainly need the Adobe Photoshop program itself. If your computer does not have this software, then you can purchase it on the official Adobe website. Like any high-quality product, Photoshop is provided to users for a fee. But Adobe also gives you the opportunity to test your product for free within 30 days from the date of installation. That is, you can first try out Photoshop a bit before buying it.
If you installed our magic program on your computer and can open it, then we will try to open any image file there. Let's start:
- Open Adobe Photoshop from the shortcut on the desktop;
- On the very top panel, select the “File” tab, then click “Open”;
- In the window that appears, as in the Windows Explorer menu, look for the required file and double-click on it with the left mouse button.

Press the "Open" button or double-click
If you perform these steps correctly, you will see that the image has opened in our program. In addition to this method, there is an alternative option:
- We search for the file necessary for opening and click on it with the right mouse button. In the menu that appears, select "Open with ...".
- Now in the list of applications, find Adobe Photoshop. If it is not, then click on the "Browse" button in the right corner and select the Photoshop file (format.exe) in the folder with the installed program. As a rule, after proper installation, such manipulations are not needed.
- Now left-click once on the Photoshop icon in the list of programs and click OK. But first, check to see if the checkbox next to the item in the lower left corner is “Use for all files of this type”. It should not be there, otherwise all your images will later open in Photoshop.
Cut objects in Photoshop
- Open the necessary file with a photo or picture in the program.
- Select the selection from the toolbar. There are several types of them, so let's take a look at everything.
- Dashed rectangle icon. By right-clicking on it, you will see the selection of a rectangular shape, oval area, horizontal and vertical lines.
- Below is the lasso icon. Here are the lasso (you choose the exact area with your mouse): a rectangular lasso (selection using broken lines), a magnetic lasso (similar to a regular lasso, only it is attached to the points in the image like a magnet).
- The next tool, immediately below the lasso, is a quick selection and a magic wand. Explain their principle of operation is not necessary, you should just try them in action.
- Now, using one of the listed tools, select the area you want to cut.
- Then click on the top tool of the left panel "Move" (arrow with icon) and move the cut-out object to the desired location.
- If you want to completely delete the object, then press the delete key and then OK. Now a white spot has formed in our area that you can fill with anything.

The choice of tool depends on the intended use.
In the same way, you can cut absolutely any object (for example, cut hair in Photoshop). The main thing is to carefully select the required area with tools.
Cut Object Processing

In our case, we insert the logo on the photo with the car
But what if you need to cut out an object and make it a separate drawing? Then you need to do the following:
- Open in the additional tab another image on which you want to overlay the cut out object.
- Go to our first drawing and select the area, as in the previous instruction. Now, with the "Move" tool, we transfer this part of the picture by holding the left mouse button to another tab and after moving to the next image, release the mouse button.
- You have now received a combination of two images. If it seems to you that the photo is too curved or ugly, then you can smooth the image along the contour. You can do this using the Eraser tool in the left pane. Gently erase corners and edges to get quality. By right-clicking on the image with the Eraser tool, you can adjust its size and stiffness (erasure strength). The lower it is, the lower is the radius of its erasure, around which there will be a blur effect. Make sure that the edges of the cut out object are of normal quality (you just need to smooth out all parts of the figure).
- After processing the file, save its finished image: “File”, then “Save as ...” and OK.

Small results
Today we have replenished our knowledge base by the fact that we have learned to cut absolutely any objects and figures from a photograph. We also learned how to process a cut area so that its edges and corners do not look ugly. Now you can easily see which hairstyle might suit you. Make a funny cut out of photos and pictures and share with us in the comments. Let's have fun together! Good and fruitful work, friends.
How often did you need to crop an object from a photo in Photoshop to overlay it on another or simply remove the current background? In this article, I’ll talk about 4 methods of selection, each of which will be better suited to its type of image.
In Photoshop, a lot of attention is paid to selection tools, some of them work quite simply, others have more complex settings and it is more difficult for a novice user to understand how they work.
For example, an object that is on a white background can be cut with just a few clicks of the mouse. And how to accurately cut complex elements on a dark background or curly hair of a person? The standard lasso tool will not work here ...
Of course, there are many more ways to cut an object from a photograph than the 4 I have described. In my opinion, these are the most convenient, each of the methods differs by the principle of selection, and therefore, before processing the photo, you can understand which one will be better suited for this type of photo.
If the object is on a white background, you can try the selection " magic wand". This tool automatically recognizes spots of the same color and selects them.
If the selection did not capture part of the background, then holding down the SHIFT key can add a piece to the selected area. The greater the sensitivity of the magic wand, the more it “grabs”.
If the background is not homogeneous and there are many other details on it, but a clear border is visible between the subject and the background, then you can use the tool " magnetic lasso". The line of this lasso sticks or magnetizes to the edge of the object, you just need to move the cursor along the contour.

For this method, grab a black brush and go into quick mask mode. By painting with a black brush, the object is painted red. Not shaded will become highlighted when you click on the quick mask mode again.
The main advantage of this method is the ability not only to paint over, but also to erase the red area (with a white brush). And by changing the parameters of the brush, you can get a selection with hard and soft borders.
It is convenient to use if the object has clear edges in places, blurred contours in places.

3. Wipe the background with an eraser
Turning the background into a layer with the " eraser"Erase everything that you don’t need. This method is useful when mounting on a different background, when it is not clear what should remain and what should not.
The eraser tool also has additional benefits. For example, have different transparency and different softness of the brush. But unlike the previous method, it does not allow to return the erased.
Therefore, if you need insurance, use the quick mask tool, or better yet.

It is very difficult to cut hair from the background by hand, especially such curly curls as in the photo. First create a duplicate of the layer to be converted. By increasing the contrast between the background and the subject with levels (CTRL + L), it becomes easier to select them automatically.
The hair is darker and the background is lighter. But the face remained bright, it is better to paint over it with a black brush too, to highlight only the background.

Click - Highlight / Color Range ... Now adjust the sensitivity as shown in the figure below. Click OK. The selection has loaded.
Duplicate layer is no longer needed, delete it.

This is the last and most interesting way to highlight. To qualitatively cut an object in Photoshop, you can use all the described selection methods, and sometimes you need to skillfully combine them for a good result.
VIDEO LESSON. Learn more about the four ways to crop an object in Photoshop:
(Visited 100 893 times, 116 visits today)
Remove mirror image on a glass object in Photoshop
Separation of objects from the background is now becoming more and more popular: various photo collages are often made from cut out images, and they are used to create clip art and website design. Read on - and learn several ways to cut an object in Photoshop.
Magic wand tool
The first method will be the fastest and easiest, but it will only work if the object you need to cut is initially placed on a white background.
Open the original photo in Photoshop. Transfer it to a layer by double-clicking on it in the layers panel and calling the function to create a new layer.

On the toolbar to the left of the working field in Photoshop, select the Magic Wand tool. Set the brush sensitivity to small, about 5. Once with this tool, click on the white background of the photo and a selection will appear on it. It may happen that the background is not completely covered - to do this, click on the problem area again.

Now it remains to cut the object from the background without removing the selection by pressing the “Backspace” key on the keyboard.

Lasso in Photoshop
The next method involves the use of a tool such as Lasso. It is also better suited for cutting objects on a white or other uniform and light background.

Find Lasso in the toolbar and start creating a selection. To do this, place the cursor somewhere on the edge of your object and begin to draw a line along the contour. You will see how a solid line stretches behind the cursor - continue to lead it, tracing the entire object along the contour. For geometric shapes, it is more convenient to use the "Straight Lasso".

If during the stroke your line is not turned where you want, press the “Backspace” key on the keyboard - the previous segment will be deleted, and you can repeat the stroke of this section again.

When you have circled the entire object and connected the last segment with the first, a selection will appear on the photo. Now invert the selection by right-clicking on the selection.

When the selection is inverted, as before, press “Backspace” to cut the object.

How to cut an object using a quick mask
Another tool that will solve the problem of how to cut a picture in Photoshop is a quick mask. Unlike the Magic Wand, which may not work in photographs with a heterogeneous, colorful or dark background, the selection with the help of a quick mask is also suitable for such tasks, because in this case you create and control the selection area.
Select the Brush tool and set the active color to black (color code - # 000000). After that, select the “Quick mask” mode - click on the corresponding icon at the bottom of the panel. Now, as with a regular brush, start painting over the area of \u200b\u200bthe object you are interested in.

When painting small parts, select a smaller brush diameter, and when filling large areas with color, you can use a large brush. Also set the stiffness of the brush as desired, most importantly, remember: the harder the brush, the sharper the edges of the selection will be, and the soft brush will smooth them.

If you painted over the excess area, make the active color white (color code - #FFFFFF) - such a brush will act on areas filled with a quick mask like an eraser.

After you have finished painting the selected area, press the quick mask button again, and then a selection will appear around the filled area. To separate an object from the background, use Backspace.

Delete background with an eraser
The third way is to use a tool like the Eraser. In fact, this is not creating a selection, but removing the background. Select this tool in the left panel and start erasing everything that is not relevant to your object from the workspace.

Of course, the most important and crucial part is erasing the background at the border with the object. There is no need to rush here, because it is important not to leave pieces of an un-erased background or vice versa - not to inadvertently erase the necessary parts of the object. Set a small size of the eraser - so the work will go on longer, but more accurately; zoom in, which allows you to closely monitor the boundaries of the object.

If you have erased something important while working with the eraser, use the undo function of the previous action: “Edit” menu - “Undo action” or hold down the key combination Ctrl + Z. This combination works only for the last action, therefore, to undo several previous actions in sequence , apply the combination Alt + Ctrl + Z as many times as necessary.

Instead of an eraser, you can remove the background in Photoshop using a brush and a layer mask (do not confuse it with a quick mask). In the "Layers" panel, click on the icon of the layer mask and erase excess areas by drawing a black brush on the mask. And vice versa, to restore the area, change the color of the brush to white.
Cutting complex objects
Many people are particularly interested in the question of how to cut out a face and hair, a fluffy animal or a branchy tree in Photoshop - that is, complex objects with heterogeneous edges that look interesting when creating photo collages. There is a quick way to do this, which can be applied to photographs with a plain light background.

Duplicate the layer with the original photo (right-click on the layer - “Duplicate the layer”) and make it black and white (Menu “Image” - “Correction” - “Desaturate”).

Apply the “Levels” correction to the duplicate from the “Image” - “Correction” menu. On the histogram that appears, pull the sliders that are responsible for the shadows and for the light, so as to create a sharp, maximum contrast between black and white, that is, between the girl’s hair and the background.

Having achieved the desired contrast, with a black brush, completely paint over the entire silhouette - face, highlights, so that there are no gaps. Go to the "Selection" menu and select "Color Range". In the window that appears, set the sensitivity of the selection to about 50 and click OK.

Right-click on the selection and apply Feather to it with a radius of 2 pixels. In the Layers panel, remove visibility from the black and white layer. Now only the color source, with the selection created above, will be visible. However, this selection refers to the silhouette of the girl and her hair, and we need to remove the background, not the object. Therefore, you should go to the "Selection" menu and select "Invert".

To separate the girl from the background, make the layer with the original image active and click "Backspace". Now you know how to cut a person in Photoshop from a photograph.

The above methods are not universal and may not give an ideal result, but with them processing photos in Photoshop is faster, so even if you are a complete beginner, cutting objects will not be difficult for you. Cropped images can also be used when editing video to create colorful previews, as well as in the preparation of stickers or postcards.
And if it’s easier for you to see once than to read a hundred times, we suggest watching the following video, which shows various ways of how to cut photos in Photoshop:
Take it to yourself, tell your friends!
Read also on our website:
show more