The OQ website presents designer / generator of seals and stamps online, its use is free for our customers.
Create stamp in online constructor it is possible without the services of a designer and a visit to the copy center. At the same time, it is important to take into account the requirements for the shape, font sizes and cliches, the presence or absence of a coat of arms, the legality of indicating the OGRN, etc. Experienced copy center employees will advise on this issue and clarify the list of required papers for ordering a product.
Create a layout for free using the online stamp generator. Such a layout is suitable for individual entrepreneurs whose cliché design is less limited, as well as LLCs that are allowed to place their own logo, emblem and contact information on the cliché.
Do not forget about the design of souvenir products with an inscription in a comic form, which are decorated without standards. Such a thing will be an original gift for a holiday, the main thing is to show your imagination.
Constructor / generator of round seals and stamps online
Constructor / generator round seals and stamps online will be useful by the presence of the necessary external and internal borders, texts and standard sizes of the print diameter. It will be required for products that are made according to GOST and with protection against counterfeiting.
Round products: stamp, which is used only by government organizations; notary; LLC, CJSC and OAO. Standard sizes - for a doctor, impression diameter 30 mm, certifying 40-45 mm.
How to make a print layout online?
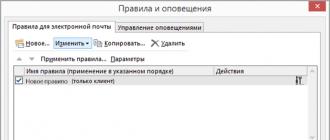
Anyone can make a print layout online without leaving home or office. To create, use templates and sketches of logos on the copy center website or upload a personal one. The location and dimensions of the image are edited in the editor and you will definitely be able to draw the necessary sketch. In the menu on the left, use the fields to fill out necessary information... After confirmation, the order will appear in the shopping cart. Choose the method of receipt - pickup or delivery. Additional information place in the order comments field.
Hello everyone!
In this tutorial, I will teach you how to draw a stamp for documents in Photoshop. What is it for? First, if you are in real life need a print, then you can independently design your own print for documents. Second, if you release your own eBooks, then you can mark them with your sign - a seal, which you will make yourself (funny? a trifle? but nice!).
As you can see, there is no third point, because I am not engaged in the manufacture of seals for forging documents, which I do not recommend to you either!
So let's get started.
1. Create a new document in Photoshop. To do this, click "FILE" \u003d\u003e "CREATE" or press the keyboard keys (Ctrl + N). Set the dimensions to 170 x 176 px.
2. Select the Pencil tool or press the (B) key and set the brush to 2 px
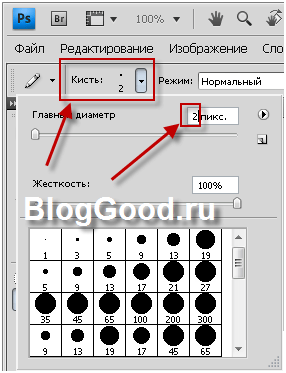
Set the color to # 4170d6
3. Now, create new layer and select the tool, set the outline mode.
Hold down the Shift key and draw a circle

4. Select the Path Selection tool or press (A). Move the arrow over the outline of the circle and left-click on the circle.
Additional functions will open, in which select "Stroke the path ..."
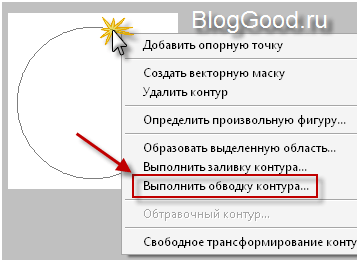
Select and click "OK"

You will have a blue outline.
Click on the bird at the top left side and the outline of the construction line will disappear

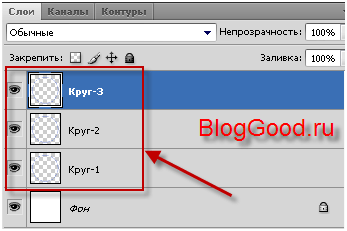
5. You need to make three such circles. Right-click on the blue circle layer, and in the menu that appears, click Duplicate Layer ...... I named the layer "Circle-1", don't pay attention to that, you will call it "Layer-1"

As a result, you will have three layers with the same circle.
6. Select the last layer and click on (Ctrl + T) or "Editing" \u003d\u003e... Hold down the Shift key and drag the corner to evenly shrink or enlarge the circle.

Do the same trick with the second layer. If the circles are off-center, you can align them by clicking the Move tool or (V) and using the Right / Left / Up / Down cursor to center them.
This is how you should get something like this:

7. Now you need to make the text on the round stamp.
To do this, turn off all layers by clicking on the "eye" near the layer, and selecting the "Ellipse Shape" tool, set the outline mode. Hold down the Shift key and draw a circle like mine:
Select the Type tool and set the size to 18pt, font Calibri, color # 4170d6. Hover over the line of circles and click
Now you can write text along the contour of the circle. Write any word, for example "Photoshop tutorials"
Now, turn on all the layers by clicking on the "eye" next to each layer. Select the layer with the text "Photoshop Tutorials". Click on the buttons (Ctrl + T) or "Edit" \u003d\u003e "Free Transform Contour" and while holding down the Shift key, drag a corner to evenly shrink or enlarge the text along the path.
18.11.2014 27.01.2018
In this tutorial, you will learn how to draw a seal or stamp in Photoshop. The print will be round, although triangular can be made. You will learn how to print yourself, with your data for the organization. Read the instructions below.
Note: This tutorial is not intended or intended as a tutorial on creating fake stamps for documents. The lesson teaches you how to create comic stamps for postcards or just to decorate any images that are not documents. In no case violate the laws of the Russian Federation.
How to create a circle for printing
The first thing to do is with a transparent color inside, but with a 3px blue stroke. Best blue colour for print - # 013fcd
To create a circle with an empty fill, but with a color stroke - use the tool Ellipse:

Tool settings in top panel look like this - the foreground color is transparent, the stroke color # 013fcd
.jpg)
Now that the circle settings are set, draw a circle.
To do this, hold down SHIFT and Left Mouse Button... Then drag the cursor to the side, creating a circle. Thus, you will get a perfectly even circle.

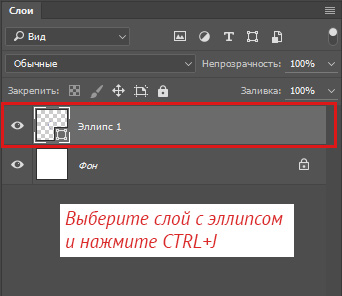
Duplicate the circle
Make a copy of the circle layer. To do this, select this layer and click CTRL + J.
A copy of the circle layer appears. We will continue to work with him.
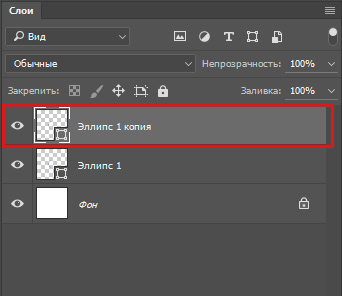
Resize the new circle's stroke to 1 pixel.
Click CTRL + T to scale and reduce the circle by holding SHIFT + ALT(so that the circle shrinks in proportion to the center).
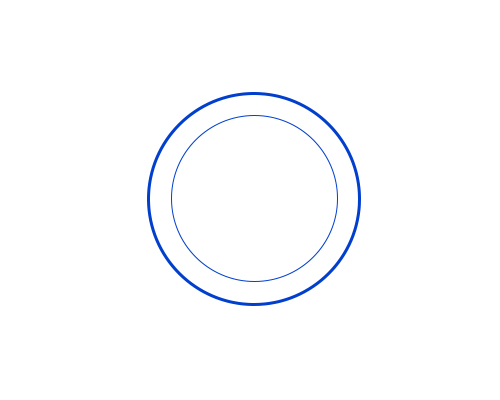
Fine! We have prepared a frame for printing and a place for an inscription.
Adding an inscription for printing
Duplicate the last circle with a thin stroke and make this copy of the circle a transparent stroke - in fact, the circle will not be visible, but it will be on top of the original. Next, activate the tool Text Toolto add a label.

Move the cursor over this circle (and you will see how the cursor changes, suggesting you add an inscription along the contour of the circle), press left button mouse and start writing.
Add any inscription you want, you can play with the size of the inscription so that it turns out exactly on the whole circle.

It remains to add the title block in the center.

Actually, a simple print is ready. You can complicate and experiment however you want, you get the technique.
You can add a paper background for the effect. It will be more beautiful and realistic if you twist the seal.