Hello!
In this tutorial, I will teach you how to draw a print for documents in Photoshop. What is it for? Firstly, if you need printing in real life, then you can independently design your own print design for documents. Secondly, if you publish your own e-books, you can mark them with your sign - a seal that you make (a joke? A trifle? It's nice!).
As you see, there is no third point, because I am not involved in the manufacture of stamps for counterfeiting documents, which I do not recommend to you either!
So let's get started.
1. Create a new document in Photoshop. To do this, click FILE \u003d\u003e CREATE or press the keyboard keys (Ctrl + N). Set the dimensions to 170 x 176 pixels.
2. Select the Pencil tool or press the key (B) and set the brush to 2 pixels

Set color # 4170d6
3. Now, create a new layer and select the tool, set the path mode.
Hold the Shift key and draw a circle.

4. Select the Contour Selection tool or press (A). Point the arrow at the outline of the circle and left-click on the circle.
Additional features will open, in which select "Stroke the path ..."

Select and click OK

You will have a blue outline.
Click on the bird in the upper left side and the outline of the auxiliary line disappears

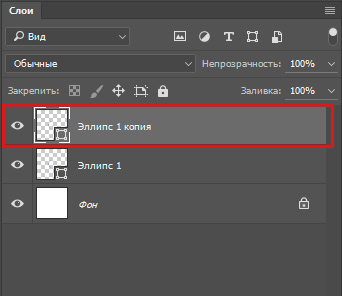
5. You need to make three such circles. Right-click on the layer with the blue circle, and in the menu that appears, click "Duplicate the layer ...". I called the layer "Circle-1", do not pay attention to it, you will have it called "Layer-1"
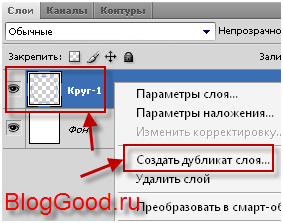
As a result, you will have three layers with the same circle

6. Select the last layer and press (Ctrl + T) or "Editing" \u003d\u003e. While holding the Shift key, drag the corner to evenly reduce or enlarge the circle.
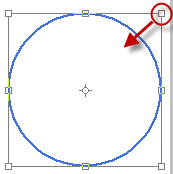
Do the same trick with the second layer. If the circles have shifted from the center, you can align them by clicking the Move tool or (V) and the cursor right / left / top / down, line them in the center.
This is how it should work out for you:

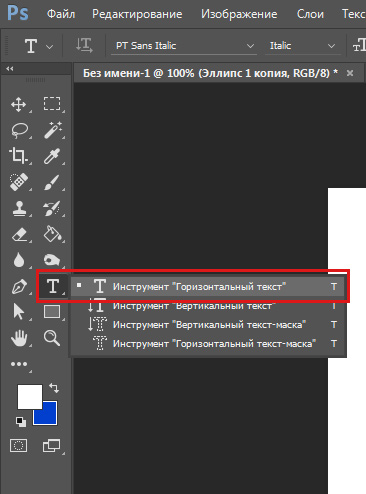
7. Now you need to make the text on the round stamp.
To do this, turn off all layers by clicking on the “eye” near the layer and selecting the “Ellipse Shape” tool, set the outline mode. Hold down the “Shift” key and draw a circle something like mine:
Select the Text tool and set the size to 18pt., The font to Calibri, color # 4170d6. Point to the line of circles and click
Now you can write text along the contour of the circle. Write any word, for example "Photoshop lessons"
Now, turn on all the layers by clicking on the “eye” next to each layer. Select the layer with the text "Photoshop Tutorials." Press the buttons (Ctrl + T) or “Editing” \u003d\u003e “Free contour transformation” and while holding the “Shift” button, drag the corner to evenly reduce or enlarge the text along the outline.
What You "ll Be Creating
In this tutorial, I'll show you step by step how to create a photorealistic print layout using Adobe Photoshop. The process starts from scratch, so do not forget to take your camera (the smartphone will do the same) and connect it to the printer, and then open Photoshop (CS6 or higher), as your exciting journey is about to begin!
Source materials
The following source materials were used to create this lesson.
1. Create the Right Perspective
First, we need the right perspective, which will become the basis for creating all the elements of the scene.
What we are going to do in this part of the lesson is to draw a solid object on a two-dimensional surface, such as a Photoshop canvas, and then print and take a picture from different angles to create the correct impression of the height, width, depth and position of the object in relation to to each other when viewing from a certain point.
Fortunately, I have already completed this work for you, so you can simply download the created perspective.
However, if you want, then you can create your own perspective. Just repeat the following steps:
Step 1
Create a new document in the program Photoshopwith the following sizes 1240 x 1754 px.
Choose tool Rectangle
Hover over the canvas, and then click on the canvas. Next, a small dialog box will appear that allows you to enter the exact dimensions for your new shape. Enter the following sizes 350 x 350 px and press the ‘button Ok’. A new shape appears to the right of the point where you clicked.
Step 2
Go to the panel Properties (Properties). If you do not see the indicated panel, then go to the menu Window - Properties (Window\u003e Properties).
Set Shape Fill Color (Shape Fill Type) to black, Shape Stroke Fill (Shape Stroke Fill) to transparent, and also specify the coordinates for the position of the rectangle: 443 px for x axis and 700 px for y axis:
Now, the black rectangle should be in the center of the canvas.
Step 3
Connect to your printer, and then print the document. Place the printed sheet of paper on the floor near a light source, such as a window or lamp.
Step 4
Take your camera (the smartphone will do the same), and then take a few shots of the black rectangle. With the camera in hand, try to lower yourself a bit and get closer to the corner of the rectangle to get a more pronounced perspective. Take a few shots from different angles and positions and choose the one that suits you. You should get the same perspective as in the screenshot below:
From now on, I will use my perspective that I created for this lesson, although the following steps will also work for you, even if you decide to use your own perspective.
2. Add Rubber Texture to the Scene
Step 1
Open the source image with the perspective in Photoshop, or if you use your own perspective that you created in the previous part of the lesson, then move it to a new working document with the following sizes 2500 x 1600 px. If you use an image with your own perspective, then try to maintain the proportions between the black rectangle and the white background, as in my image:
Go to the panel Layers (Layers). If you do not see the indicated panel, then go to the menu Window - Layers (Window\u003e Layers).
pay attention to Background layer(Background). It can be locked (a small lock located to the right of the layer thumbnail indicates a layer lock):
To unlock this layer, go Layer - New - From the background (Layer\u003e New\u003e Layer from Background), press the ‘button Ok’.
Rename the unlocked background layer, for this double-click on the name of the layer in the layer panel to change the name to Perspective(Perspective).
Step 2
Step 1
Open the .ai vector file in the program Adobe illustrator. When you open the file, a warning window may appear that the source file uses fonts that are currently not available on your computer. Do not worry about this - all fonts are free to use, and you can find a text file with installation instructions inside the folder with all the source files and links that are included in the download file for each font.
For the purposes of this tutorial, I have replaced two commercial fonts with the following free fonts:
Step 2
Once you're done with fonts, select the tool Selection(Selection Tool (V).
Now select the icon Sea breeze (Seabreeze) (or any other icon you like). Copy the icon, for this we go Editing - Copy (Edit\u003e Copy) or press the keys (Ctrl + C).
Create a new document 350 x 350 px in a programme Adobe illustrator. Now paste the icon you just copied and then go Editing - Paste (Edit\u003e Paste) or press the ( Ctrl + V).
Step 3
Using tool Selection(Selection Tool (V), move the icon onto a gray background with a white canvas.
Before moving the icon to our working document in Photoshop, we need to convert the appearance of the icon, as well as convert all the text to vector shapes and remove the white areas that appeared on the icon when we moved it to a gray background.
If the layer with the icon is not selected, then select it with the tool Selection(Selection Tool (V).
Go to the top menu and select Object - Convert Appearance (Object\u003e Expand Appearance).
Choose again Object- Expand (Object\u003e Expand). In the window that appears, check the boxes An object(Object) and Pouring(Fill) and press the ‘button Ok’:
Step 4
Open panel Contouring (Pathfinder). If you do not see the indicated panel, go to the menu Window - Pathfinding (Window\u003e Pathfinder).
Choose an option Pruning(Trim). The Trim action will delete parts of the object that overlap or are hidden.
Step 5
Now that the icon is 100% vector shapes, we can remove the white areas.
Choose tool Magic wand
Hover over a white area, click on it to select all white areas on the icon:
If necessary, zoom in using the tool Scale (Zoom Tool (Z).
Now that all the white areas on the image of the icon are highlighted, delete them with the help of editing, for this, Editing - Editing (Edit\u003e Cut).
Now our icon is ready to be added to our scene in Photoshop!
5. Add Icon to Our Stage
Step 1
We are still in the workspace Adobe illustrator. If the icon is not selected, then select it with the tool Selection(Selection Tool (V). Copy the icon, for this, go Editing - Copy (Edit\u003e Copy) or press the ( Ctrl + C).
Step 2
Back to the program Photoshop, select Smart Object in the Layers panel, and then double-click the thumbnail of the Smart Object.
When will you edit smart object source content opens in a new Photoshop window. Here you can make any changes at your discretion, and as soon as you are satisfied with the result, all you need to do is save the file, and Photoshop will update the smart object when you return to the working document.
Turn off the visibility of the blue square layer:
Now paste the icon that you just copied, for this we go Editing - Paste (Edit\u003e Paste) or press the ( Ctrl + V).
In the window that appears, select the option Smart object (Smart Object), then press the ‘button Ok’.
In the top control panel, set the icon size to 562 x 562 pxincluding his position on 440% in the fields for Widths (Width) and Heights (Height). When you complete. Press the key ( Enter):
Step 3
Layer styles (Layer Style). Add a new layer style. Color Overlay (Color Overlay), change the blend mode to Normal (Normal) Opacity (Opacity) layer 100% , and also set the overlay color, for this, click on the color thumbnail to specify the overlay color: # 000000.
Step 4
Save the document, for this we go File - Save(File\u003e Save) or press the ( Ctrl + S).
We return to our working document, and you will notice that the smart object has been updated taking into account the latest changes. The icon, in fact, has taken the perspective of a smart object.
6. Engrave Logo on Rubber Surface
It's time to add effects to the icon to create a 3D feel to match the scene.
Step 1
Double-click on a layer or thumbnail of a layer in the layer panel to open the window Layer styles(Layer Style).
Add layer style Embossing (Bevel & Embossed). In the settings window of this style, set Style (Style) on External bevel (Outer Bevel), Method (Technique) on Smooth (Smooth) Depth (Depth) on 100% , Direction (Direction) on Up (Up) The size (Size) by 4 px, and Softening (Soften) at 0 px.
At the bottom of the window Shading (Shading), set Angle (Angle) on -153 °, Height (Altitude) on 32 °, Gloss contour(Gloss Contour) on Linear (Linear), Backlight mode (Highlight Mode) on Lightening (Screen) including backlight color white color #ffffff and Opacity (Opacity) backlight 0% and finally Shadow Mode (Shadow Mode) on Multiplication (Multiply) with black color # 000000 and Opacity (Opacity) 50% .
Step 2
Add layer style Inner shadow (Inner Shadow). At the top of the settings window Structure Multiplication (Multiply) with black shadow # 000000 and Opacity (Opacity) 75%
,
Angle (Angle) 45 °, Bias (Distance) 5 px, Contraction (Choke) 0%, and The size (Size) 3 px. In conclusion, at the bottom of the window Quality (Quality), install Circuit (Contour) on Linear (Linear) and Noise (Noise) on 5%
.
Step 3
Add layer style Inner glow (Inner Glow style). At the top of the settings window Structure Normal (Normal) Opacity (Opacity) 35% , Noise (Noise) 0% , and also set the glow color to # 000000.
In the middle of the window Items (Elements), install Method (Technique) on Soft (Softer), Source (Source) at the edges (Edge) Contraction (Choke) on 0% , and The size (Size) on 3 px.
In conclusion, at the bottom of the window Quality (Quality), install Circuit (Contour) on Linear (Linear), Range (Range) on 50% , and Wobble (Jitter) on 0% .
Step 4
Add layer style Gradient overlay Multiplication (Multiply), Opacity (Opacity) on 100% , Style (Style) Linear (Linear), Angle (Angle) at 12 °, and Scale (Scale) 100%.
100% and also add 4
- First color breakpoint: color # 040203, position 1%
- Second color breakpoint: # 26272a, position 36%
- Third color breakpoint: # 5b5e66, position 54%
- Fourth color breakpoint: # e3e4e9, position 100%
Press the ‘button Ok
Step 5
Add layer style Pattern overlay(Pattern Overlay). Set the blending mode to Normal(Normal) Opacity(Opacity) on 100% , Scale(Scale) on 100% , and then click on the small thumbnail squares patterns:
Next, a small window with a set of patterns will appear. Click on the small gear icon to open a dialog box, then select an option Gray paper(Grayscale Paper). Press the ‘button Ok’To replace current patterns with patterns from a set Gray paper (Grayscale Paper).
Choose a pattern Fiber 1 from a set of patterns:
Step 6
Add layer style External glow (Outer Glow). At the top of the settings window Structure(Structure), change the blending mode to Lightening(Screen), Opacity(Opacity) 8% , Noise(Noise) 0% , and set white as the glow color #ffffff.
In the middle of the window Items(Elements), install Method(Technique) on Soft(Softer), Scope(Spread) on 0% , but The size (Size) on 10 px.
At the bottom of the window Quality(Quality), install Circuit (Contour) on Linear(Linear), Range(Range) on 100% , but Wobble(Jitter) on 0% .
Step 7
Add layer style Shadow(Drop Shadow). In settings Structures (Structure), set the blending mode to Normal(Normal) with a black shadow # 000000, Opacity(Opacity) 75% , Angle(Angle) -135 °, Bias(Distance) 1 px, Scope (Spread) 0% , and The size(Size) 1 px.
In settings Quality(Quality), install Circuit(Contour) on Linear(Linear) and Noise(Noise) on 3% .
In the next step, I will show you how to add a smart filter with a mask to the icon.
Step 8
Choose tool Ellipse(Ellipse Tool), and then click somewhere on the canvas. In the window that appears, specify the following sizes 1053 x 684 px. Now go to the panel Properties (Properties) to set the position value to 705 px for X-axis and 494 for Y-axis.
Rename the layer with the drawn ellipse, for this, double-click on the name of the layer in the layer panel to change the name to Blur(Blur).
Blur(Blur) and in the window that appears. Choose an option Rasterize Layer (Rasterize layer).
Turn off layer visibility Blur(Blur) by clicking on the eye next to the layer thumbnail.
Now, holding down the ( Ctrl), click on the thumbnail of the layer to load the active selection around the ellipse.
Go to layer Smart Object Filter - Blur - Gaussian Blur (Filter\u003e Blur\u003e Gaussian Blur), install Radius(radius) blur on 4 px.
You will notice a small thumbnail of the smart filter that we just added. Select the thumbnail of the smart filter, for this click on it:
7. Add Light Flare Effect to Icon
Step 1
In the layer panel, select the layer Smart Object (Smart object) and then go Layers - New - Copy to a new layer(Layer\u003e New\u003e Layer Via Copy) to duplicate the layer.
Rename the created duplicate layer, for this, double-click on the name of the layer in the layer panel to change the name to Light glare(Highlights).
Right click on the layer Light glare(Highlights) and in the window that appears, select the option Clear Layer Style (Clear Layer Style).
Step 2
Add layer style Embossing(Bevel & Embossed). In settings Structures(Structure), set Style(Style) on Inner bevel(Inner Bevel), Method(Technique) on Smooth(Smooth) Depth(Depth) on 100% , Direction(Direction) Up(Up), Size (Size) 5 px, and Softening(Soften) 0 px.
In settings Blackout(Shading), set Angle (Angle) on 20 °, Height(Altitude) on 70 °, Gloss contour (Gloss Contour) on Linear(Linear), P hedgehog backlight(Highlight Mode) on Overlap (Overlay) with white #ffffff and Opacity(Opacity) 75% , and in the end, set Shadow mode(Shadow Mode) on Multiplication(Multiply) with black shadow # 000000 and Opacity(Opacity) 0% .
Step 3
Add layer style Inner shadow(Inner Shadow). In settings Structure(Structure), set the blending mode to Multiplication(Multiply), shadow color black # 000000, Opacity (Opacity) 95% , Angle(Angle) 90 °, Bias(Distance) 4 px, Contraction(Choke) 0%, and Size 2 px.
In conclusion, in the settings Quality(Quality), install Circuit(Contour) on Linear(Linear), and Noise(Noise) on 5%
.
Step 4
Add layer style Shadow(Drop Shadow). In settings Structure(Structure), set the blending mode to Overlap(Overlay), color black # 000000, Opacity(Opacity) 75% , Angle(Angle) 45 °, Bias(Distance) 3 px, Scope(Spread) 0% , and The size(Size) 4 px.
In settings Quality(Quality), install Circuit(Contour) on Linear(Linear) and Noise(Noise) 7% .
8. Add a Glossy Effect to the Icon
Step 1
Create a new layer on top of the layer Light glare (Highlights), for this, let's go Layer - New - Layer (Layer\u003e New\u003e Layer), name this layer Gradient (Gradient), and then press the ‘button Ok’.
Choose tool Pouring(Paint Bucket Tool), press ‘ D’To set the foreground color to black.
Click on the canvas somewhere to fill the layer with black. In the layer palette window, decrease the value Fillings(Fill) layer to 0% .
Step 2
Double-click on a layer or thumbnail of a layer in the layer panel to open the window Layer styles (Layer Style).
Add layer style Gradient overlay (Gradient Overlay). Set the blending mode to Normal (Normal) Opacity(Opacity) on 100%
, Style Linear (Linear), Angle (Angle) on 25 °, but Scale(Scale) by 80%.
Now click on the gradient scale to set the colors of the gradient.
Set two opacity breakpoints to 100% and also add 2 control points of color. Set the following color control points from left to right:
- 50%
- 64%
Press the ‘button Ok’To confirm the changes:
Step 3
In the layer panel, hover over the layer Gradient(Gradient), then right-click on the layer and in the window that appears, select the option Convert to Smart Object (Convert to Smart Object).
Once again, right-click on the layer and in the window that appears, select the option Create Clipping Mask (Create Clipping Mask) so that the icon appears and apply the effect.
Go to the top menu Filter - Filter Gallery (Filter\u003e Filter Gallery). Next, a window will appear. Filter gallery (Filter Gallery).
The folder contains filters for each category. Each filter has a thumbnail that illustrates the effect of the filter. Choose filter Glass(Glass), install Distortion(Distortion) on 4 , Softening(Smoothness) on 1 , Texture(Texture) on Hoarfrost (Frosted) and Scale(Scaling) on 112% .
Finally, press the ‘button Ok’To confirm the changes and apply the effect.
9. Add the Main Light Source to the Stage
In the layer panel, select the layer Rubber Texture(Rubber Texture), and then double-click on this layer or on the thumbnail of the layer to open the window Layer styles(Layer Style).
Add layer style Gradient overlay (Gradient Overlay). Set the blending mode to Overlap(Overlay), Opacity(Opacity) on 60% , Style(Style) Linear (Linear), Angle(Angle) at 40 °, and Scale(Scale) 100%.
Now click on the gradient scale to set the colors of the gradient.
Set two opacity breakpoints to 100% and also add 2 control points of color. Set the following color control points from left to right:
- First color breakpoint: color # 000000, position 1%
- Second color breakpoint: #ffffff, position 100%
Press the ‘button Ok’To confirm the changes:
Congratulations! We have completed the lesson!
In this tutorial, you learned how to create a realistic rubber stamp template from scratch using Adobe Photoshop!
I hope you enjoyed this tutorial and learned something new today. Please do not hesitate to leave your comments, suggestions, as well as post your work.
Have a nice time with Photoshop!
18.11.2014 27.01.2018
In this lesson, you will learn how to draw a seal or stamp in Photoshop. The print will be round, although you can make a triangular. You will learn how to print yourself, with your data for the organization. Read the instructions below.
Note: This lesson is not intended and is not a guide for creating fake stamps for documents. The lesson teaches you how to create comic prints for postcards or just to decorate any images with non-documents. In no case do not violate the laws of the Russian Federation.
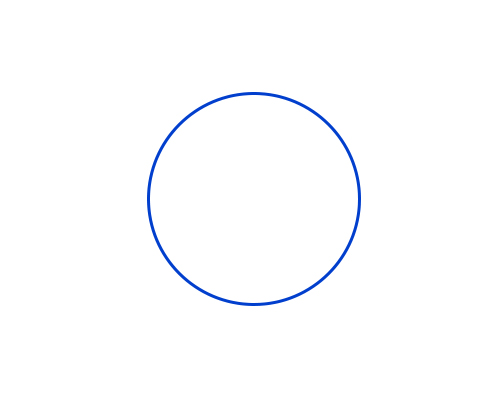
Create a circle for printing.
The first thing to do is with a transparent color inside, but with a blue stroke of 3 pixels. The best blue color for printing is # 013fcd
To create a circle with an empty fill, but with a color stroke - use the tool Ellipse:

The tool settings in the upper panel look like this - the main color is transparent, the color of the stroke # 013fcd
.jpg)
Now that the circle settings are set, draw a circle.
To do this, hold Shift and Left Mouse Button. Next, drag the cursor to the side, creating a circle. Thus, you get a perfectly smooth circle.
Duplicate the circle
Make a copy of the circle layer. To do this, select this layer and click CTRL + J.

A copy of the circle layer appears. We will continue to work with him.
Change the stroke size of the new circle to 1 pixel.
Click CTRL + T to scale and reduce the circle holding SHIFT + ALT(so that the circle decreases in proportion to the center).

Fine! We have prepared a frame for printing and a place for inscription.
Add a label for printing
Copy the last circle with a thin stroke and make this copy transparent around the circle - in fact the circle will not be visible, but it will be on top of the original one. Next, activate the tool Text toolto add an inscription.
Hover over this circle (and you will see how the cursor changes, suggesting you to add an inscription along the outline of the circle), click the left mouse button and start writing.
Add the inscription as you want, you can play with the size of the inscription so that it turns out exactly on the whole circle.
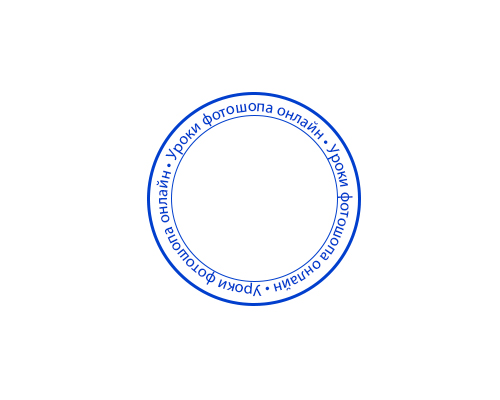
It remains to add the main inscription in the center.

Actually, a simple print is ready. You can complicate and experiment as you like, you understand the technique.
You can add a paper background for the effect. It will be prettier and more realistic if you spin the print.
On the website of the company OQ is presented constructor / generator of seals and stamps onlineIts use is free for our customers.
You can create a print in an online designer without the services of a designer and visiting a copy center. In this case, it is important to take into account the requirements for the form, font size and cliche, the presence or absence of the coat of arms, the legality of indicating the PSRN, etc. Experienced employees of the Copicenter will advise in this matter and clarify the list of necessary papers for ordering the product.
Using the online stamp generator, create a layout for free. Such a layout is suitable for individual entrepreneurs whose cliché design is less limited, as well as LLCs that are allowed to place their own logo, emblem and contact information on the cliché.
Do not forget about the design of souvenirs with the inscription in a comic form, which make out without standards. Such a thing will be an original gift for the holiday, the main thing is to show imagination.
Constructor / generator of round seals and stamps online
The designer / generator of round seals and stamps online will be useful by having the necessary external and internal edging, texts and standard sizes of the diameter of the print. It will be required for products that are made in accordance with GOST and with protection against fakes.
Round products: stamp, which is used only by state organizations; notary public; LLC, CJSC and OAO. Standard sizes - for the doctor, the diameter of the impression is 30 mm, and the certification is 40-45 mm.
How to make a print layout online?
Everyone can make a print layout online without leaving their home or office. To create, use templates and thumbnails of logos on the copy center site or upload a personal one. The location and size of the image are edited in the editor and you will definitely be able to draw the necessary sketch. In the menu on the left, use the fields to fill in the necessary information. After confirmation, the order will appear in the product basket. Choose the method of receipt - pickup or delivery. Place additional information in the comment field for the order.