Good day.
The speed of the entire computer depends on the speed of the disk! And, surprisingly, many users underestimate this moment ... But the speed of loading Windows OS, the speed of copying files to / from the disk, the speed of launching (loading) programs, etc. - everything depends on the disk speed.
Now in PCs (laptops) there are two types of disks: HDD (hard disk drives - familiar hard drives) and SSD (solid-state drive - newfangled solid-state drive). Sometimes their speed differs significantly (for example, Windows 8 on my computer with an SSD starts in 7-8 seconds, versus 40 seconds with an HDD - the difference is enormous!).
And now about what utilities and how you can check the speed of the disk.
One of the best utilities for checking and testing disk speed (the utility supports both HDD and SSD drives). Works in all popular Windows OS: XP, 7, 8, 10 (32/64 bits). Supports Russian (although the utility is quite simple and easy to understand without knowing English).
Figure: 1. The main window of the CrystalDiskMark program
To test your disk in CrystalDiskMark you need:
- select the number of write and read cycles (in Fig. 2 this number is 5, the best option);
- 1 GiB - file size for testing (best option);
- "C: \\" is the drive letter for testing;
- to start the test, simply press the “All” button. By the way, in most cases they are always guided by the line "SeqQ32T1" - i.e. sequential write / read - therefore, you can simply select a test of this particular option (you need to press the button of the same name).
The first speed (the Read column, from the English "read") is the speed of reading information from the disk, the second column is writing to the disk. By the way, in fig. 2 SSD disk (Silicon Power Slim S70) was tested: read speed 242.5 Mb / s - not a good indicator. For modern SSDs, the optimal speed is considered to be at least ~ 400 Mb / s, provided that it is connected via SATA3 * (although 250 Mb / s is more than the speed of a conventional HDD and the increase in speed is visible to the naked eye).
* How to determine the operating mode of a SATA hard drive?
From the link above, in addition to CrystalDiskMark, you can also download another utility - CrystalDiskInfo. This utility will show you the SMART disk, its temperature, and other parameters (in general, an excellent utility for obtaining information about the device).
After starting it, pay attention to the line "Transfer mode" (see Fig. 3). If this line displays SATA / 600 (up to 600 MB / s) - then the disk is operating in SATA 3 mode (if the line displays SATA / 300 - i.e. the maximum bandwidth of 300 MB / s is SATA 2) ...
AS SSD Benchmark
Author`s site: http://www.alex-is.de/ (download link at the very bottom of the page)
Another very interesting utility. Allows you to easily and quickly test the hard drive of your computer (laptop): quickly find out the speed of reading and writing. It does not need installation, use it as standard (as with the previous utility).
If you decide to purchase a solid state SSD drive, there may be several reasons for this:
- You are not satisfied with the speed of your HDD.
- You need fast work of windows and certain types of applications, games.
However, it is not enough to install the SSD in a computer or laptop and then fill it with information. You also need to optimize it to work with your OC.
Let's look at the main methods for optimizing an SSD drive.
AHCI SATA
A technology that allows the TRIM function to be used with a variety of solid state drives. It is enabled at the BIOS level of your PC or laptop.
Enabling AHCI SATA:
- Open the command line with the win + R key combination.
- Enter the command: "regedit" (access to the registry).
- Go to the following path: HKEY_LOCAL_MACHINE → SYSTEM → CurrentControlSet → Services → storahci.
- Change the value of the ErrorControl subsection to 0 (default 3) by invoking the context menu and clicking the Modify option.
- Go to the branch named "StartOverride" and change its value to 0 (default is 3).
- Reboot your PC (laptop), go to BIOS / UEFI (how to enter BIOS, see separately for your laptop model or PC motherboard). In the "storage configuration" section, and in the "SATA port" subsection, set AHCI or in the "SATA RAID / AHCI Mode" section, set AHCI (For different BIOS versions, your own sections and subsections).
- Check the functionality of the function in Windows. Navigate to the following path: Control Panel → Device Manager → IDE ATA / ATAPI controllers. A device should appear in the last subsection: "Standard SATA AHCI Controller".
TRIM function
By default, this function is enabled on windows 7 and higher, however, it is better to manually check if this function works. The meaning of TRIM is that after deleting files, windows transfers the information to the SSD drive that a certain area of \u200b\u200bthe disk is not used and can be cleared for writing. (the data remains in the HDD and the recording is made "over" the existing one). Over time, if the function is disabled, the drive performance will degrade.
TRIM check on Windows:
- Start Command Prompt by pressing the key combination win + R.
- Enter the command: "fsutil behavior query disabledeletenotify".
- If after entering the message is displayed: "DisableDeleteNotify \u003d 0", then the TRIM function is enabled, if "DisableDeleteNotify \u003d 1", then TRIM does not work. If TRIM does not work, enter the command: "fsutil behavior set DisableDeleteNotify 0", then repeat steps 2 and 3.
Defragmentation
This feature helps to optimize and speed up HDD performance, but for SSDs, it has a detrimental effect. For SSDs, "auto defragmentation" is disabled by default. To check if it works you need:
- Press the combination win + R.
- In the command prompt window, enter the command: "dfrgui" and click "OK".
- In the window that opens, select your SSD and look at the "Scheduled Optimization" item. For our solid state drive, it must be disabled.
Indexing
Windows function that helps to quickly search for files on the disk with large amounts of information, however, increases the write load on the SSD. To disable it:
- Go to the section "This computer", "My computer", "Computer" (different for each OS).
- Select your SSD and select "Properties" in the context menu.
- In the window that opens, uncheck the box next to the option: "Allow indexing of the contents of files on this disk in addition to file properties."
Search service
Its function creates a file index, which makes finding a variety of files and folders faster. However, the speed of the SSD is quite enough to refuse it. To disable it, you must:
- Go to the following address: Control Panel → System and Security → Administrative Tools → Computer Management.
- Go to the tab: "Services".
- Find the "Windows search" service and select "Disabled" in the "Startup type" tab.
Hibernation
A mode that allows you to save the contents of RAM on the hard disk, so that when you turn it on again, information and open applications from the previous session are saved.
When using the SSD, the meaning of this function is lost, since the drive starts up so quickly. Hibernation, by creating write-overwrite cycles, reduces the lifespan of the SSD.
Disable hibernation:
- Run cmd.exe again with the win + R keyboard shortcut.
- Enter the command: "powercfg -h off".
Write caching
This feature enhances the performance of your SSD. When enabled, NCQ write and read technology is used. NCQ - Accepts multiple requests at the same time, and then organizes their execution order in such a way as to maximize performance.
To connect you need:
- Call the command line with the win + R combination
- Enter the command: "devmgmt.msc".
- Open "Disk drives", select SSD and select "Properties" from the context menu.
- Go to the "Policy" tab.
- Check the box next to the parameter: "Allow caching of records for this device."
Prefetch and Superfetch
Prefetch - a technology by which frequently used programs are loaded into memory in advance, thereby accelerating their subsequent launch. In this case, a file of the same name is created on disk space.
Superfetch - technology similar to Prefetch with the difference that the PC predicts which applications will be launched, loading them into memory in advance.
Both functions are not useful when using an SSD. Therefore, it is best to disable them. For this:
- We call the command line with the win + R keyboard shortcut.
- We execute the command: "regedit" (go to the registry).
- Follow the path: HKEY_LOCAL_MACHINE → SYSTEM → CurrentControlSet → Control → Session Manager → Memory Management → PrefetchParameters.
- Find several parameters in the registry subkey: "EnablePrefetcher" and "EnableSuperfetch", set their value to 0 (3 by default).
SSD Mini Tweaker Utility
All of the above actions can be performed manually, but the hands of programmers have created programs - tweakers, the purpose of which is to customize the windows OS, as well as its individual components with a few clicks. One of these programs is SSD Mini Tweaker.
SSD Mini Tweaker - a program, a kind of tweaker that allows you to effortlessly optimize your SSD.
Benefits:
- Full Russification.
- Works on all OS starting from Windows 7.
- Free.
- Intuitive interface.
- No installation required.
other methods
Manipulations such as transferring browser cache, paging files, Windows temporary folders, system backup from SSD to HDD (or disabling this feature) are useless, since although they increase the lifespan of the SSD, they limit the potential for its use.
Thus, by performing the above simple manipulations with your OS, you can extend the life of your drive, as well as tune it to the maximum performance mode.
During the operation of any drive, various kinds of errors may appear over time. While some can simply interfere with work, others can completely disable the disk. That is why it is recommended to periodically scan your disks. This will allow you not only to identify and fix problems, but also to copy the necessary data to a reliable medium in time.
So, today we will talk about how to check your SSD for errors. Since we cannot physically do this, we will use special utilities that will diagnose the drive.
Method 1: using the CrystalDiskInfo utility
To test the disk for errors, we will use a free program. It is quite easy to use and at the same time fully displays information about the status of all disks in the system. It is enough just to launch the application, and we will immediately receive all the necessary data.

In addition to collecting information about the drive, the application will conduct S.M.A.R.T analysis, the results of which can be used to judge the health of the SSD. In total, this analysis contains about two dozen indicators. CrystalDiskInfo displays the current value, worst case and threshold of each metric. In this case, the latter means the minimum value of the attribute (or indicator) at which the disk can be considered faulty. For example, take an indicator such as "Remaining SSD resource"... In our case, the current and worst value is 99 units, and its threshold is 10. Accordingly, when the threshold value is reached, it is time to look for a replacement for your solid-state drive.

If, when analyzing the disk, CrystalDiskInfo has detected erasure errors, program errors, or crashes, in this case it is also worth considering the reliability of your SSD.

Based on the test results, the utility also estimates the technical condition of the disk. In this case, the assessment is expressed both in percentage and quality. So, if CrystalDiskInfo rated your drive as "Good"then there is nothing to worry about, but if you see the score "Anxiety", which means that soon we should expect the SSD to fail.

Method 2: using the SSDLife utility
SSDLife is another tool that will allow you to assess the health of the disk, the presence of errors, as well as perform S.M.A.R.T analysis. The program has a simple interface, thanks to which even a beginner can figure it out.
Like the previous utility, SSDLife will perform an express check of the disk immediately after launching and display all the basic data. Thus, to check the drive for errors, you just need to run the application.
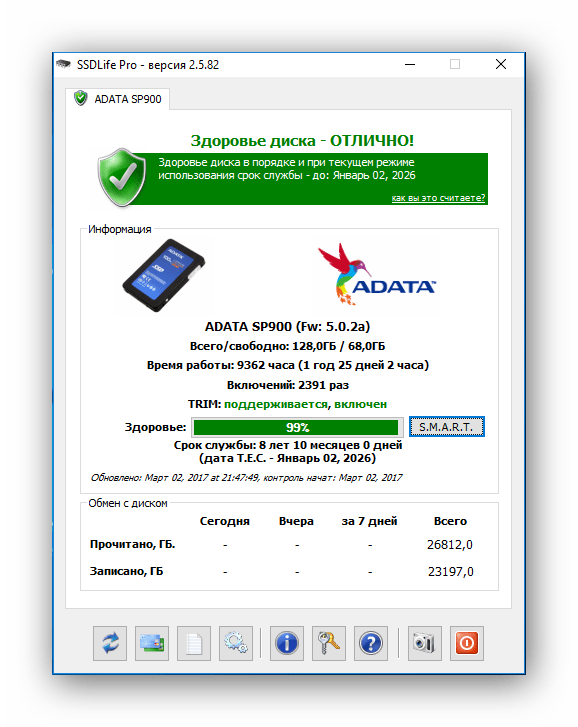
The program window can be conditionally divided into four areas. First of all, we will be interested in the upper area, which displays the assessment of the condition of the disk, as well as the approximate service life.

The second area contains information about the disc, as well as an estimate of the status of the disc as a percentage.

If you want to get more detailed information about the state of the drive, then press the button "S.M.A.R.T." and get the analysis results.

The third area is disk swap information. Here you can see how much data has been written or read. These data are for informational purposes only.
Finally, the fourth area is the application control panel. Through this panel, you can access settings, help information, and restart the scan.

Method 3: using the Data Lifeguard Diagnostic utility
Another testing utility is a Western Digital development called Data Lifeguard Diagnostic. This tool supports not only WD drives, but also third-party drives.
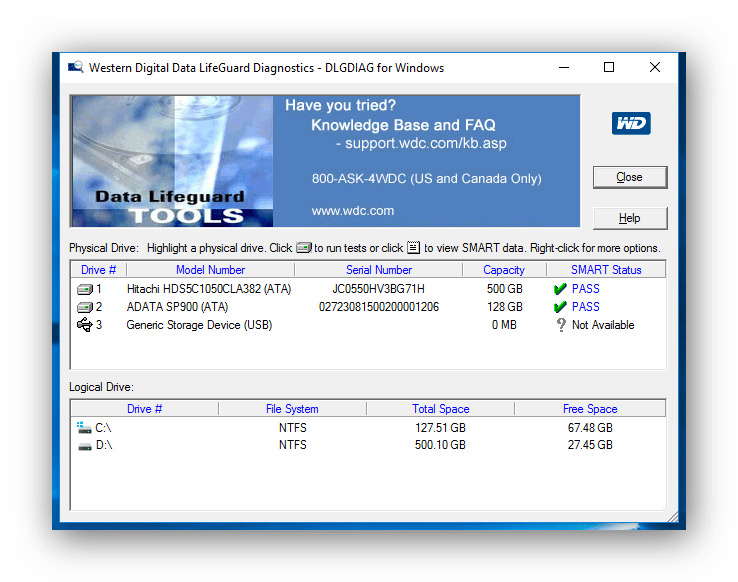
Immediately after launch, does the application diagnose all disks that are in the system? and outputs the result to a small table. Unlike the above tools, this one only displays the status assessment.
For a more detailed scan, just double-click the left mouse button on the line with the required disk, select the required test (quick or detailed) and wait until the end.

Then by clicking on the button "VIEW TEST RESULT"? you can see the results, which will display brief information about the device and an assessment of the condition.

Conclusion
Thus, if you decide to diagnose your SSD drive, then there are quite a few tools at your service. In addition to those discussed here, there are and who will be able to analyze the drive and report any errors.
Solid state drives (SSDs) have become part of our lives. While granting the user many advantages over traditional HDDs (higher speed of reading and writing information, quiet operation, low power consumption and high resistance to mechanical damage), they, nevertheless, are not without a number of disadvantages (for example, shorter operating time compared to from HDD). Accordingly, their condition must be monitored from time to time in order to track negative changes in their functionality in time. In this article I will tell you how to check an SSD drive for errors, how the tools will help us find out the operability and how to use them.

Limited SSD resource
If you are wondering about checking an SSD drive for errors and operability, then a situation could arise in which your SSD stopped functioning normally. This is primarily due to the fact that SSD ( Solid State Drive - solid state drive) allows you to record information on itself a limited number of times (the resource of competitors SSD - HDD disks is not limited in this regard). Manufacturers usually give a 3-year warranty on their SSDs (or 35 terabytes of data written, which is roughly 20 gigabytes per day). Those who actively use their SSD drive (on various round-the-clock servers, and so on) may face a faster failure of SSD devices.

Well, those users who work with their PC in a normal, "home" mode, can enjoy the fast work of their SSDs for 5 years or more. In the last article, I described in detail setting up an SSD under Windows 10, for whom I recommend setting up a disk for this OS.
How to check an SSD drive for errors and performance - list of programs
If you do not need to know the performance of an SSD disk, then you should use the functionality of the corresponding programs that will allow you to perform an ssd test for errors. Below I will list these programs, and give their respective characteristics:
CrystalDiskInfo program
It is a free utility that checks the read / write speed of your disk, displays its general health, temperature, supports S.M.A.R.T (hard disk health assessment technology) and much more. This program CrystalDiskInfo has two main versions (installable and portable), and in the case of the installed version, you can monitor the status of your disks in real time using the program icon in the system tray. If there is a pressing question about how to check ssd for bad sectors, then the CrystalDiskInfo program will effectively help you with this.

- To use the program, download it, install and run it.
- The program will scan your hard drive to assess its status, errors, and so on, and then give you the result.
- All the main actions are concentrated in the "Service" tab of the main menu (in particular, if necessary, you can set the function of disk rescanning there).
SSD Life Program
To determine the health and errors of an SSD, the SSD Life program can also help us. This shareware utility is written specifically for working with SSD disks, allowing you to track in advance the decline in their performance. As in the case of CrystalDiskInfo, this program has two versions - portable (it gives a report on the state of the disk immediately upon launch, without additional installation), and installation, which displays the status of the disk in real time so that the user can track the situation in advance.
The working window of the program is extremely simple, on it you will see the projected operating time of your disk, an assessment of its condition, how long it has already worked, and so on. To update the report data, use the corresponding buttons below.
SSDReady program
SSD diagnostics can also be performed using SSDReady, a program designed specifically to monitor the health of your SSD, estimate its potential uptime, and other relevant statistics. It keeps track of the amount of data written and read daily from the disk, requires its permanent work in the background and is a good option in checking the SSD disk for errors and general performance.

DiskCheckup program
In testing the SSD hard drive for speed and performance, the DiscCheckup utility can also help us, which allows us to monitor the S.M.A.R.T attributes of an individual hard drive. As in the case of the above programs, this application shows the statistics of the hard drive, allowing you to track the health status of the latter. The functionality of this product, in fact, does not differ from the programs described above.

SSD is a storage (recording) device based on various microcircuits and a controller. Such devices are widely used in many modern devices: laptops, smartphones, tablets, and so on. What is it? Improved hard drive! Hearing the term SSD, many imagine something complicated. However, this is just a recording device that is present, as already mentioned, in many devices.
What is the difference between an SSD and a hard drive?
If it is a recording device, then why are hard drives needed and what is the difference between them? The main difference is the principle of operation. The hard disk is based on magnetic disks (platters), from which there is constant reading and writing by magnetizing the cells. An SSD, on the other hand, works on microcircuits, representing an oversized flash card.
SSD drives have many advantages, in particular: high operating speed, low noise, low weight. There are also disadvantages, for example: high cost, inability to recover lost data.
One way or another, SSD drives are firmly entrenched in our lives. When working with them, there is often a need for diagnostics, testing, optimization. There are special programs for this. Let's analyze them in more detail.
Programs for tweaking and optimizing ssd
SSD Mini Tweaker
Let's start simple and easy. This program is designed to quickly and efficiently configure your SSD drive. It has the simplest interface and takes up very little space on the computer (about 3 mb).
After starting the program, one single window appears in front of us:
In it, we can select various parameters, the implementation of which is rather difficult with our own hands. We put a check mark on what we need and click "Apply Changes". That's all, nothing else is needed. Not bad for a program that takes up so little space.
SSD Life
Also a very lightweight and affordable program for working with SSDs. It diagnoses the selected disk, displaying the percentage of its health:

The amount of memory that has been recorded and read for the entire time is available for viewing. Results can be saved, although this is not very useful. A much more essential feature: automatic check every 4 hours. If the state has changed since the previous check, the program will let you know.
SSD Fresh
Quite a large program with rich functionality. After installation, you will be prompted to register the free version. To do this, just enter your data:

After starting the program, we see the main window with three tabs: overview, optimization and settings.

The overview tab provides general information: size, free and used space, file system. Of course, it is possible to view S.M.A.R.T data. For those who are not in the know: smart is a special technology for evaluating hard drive performance. It is a collection of fields and values.
But the main function of SSD Fresh is disk optimization. Here it is implemented with the highest quality and user-friendly:

Each optimization section clearly shows the status and only two buttons: Optimize and Restore from backup. After clicking on the first one, optimization is performed automatically. You can also optimize all parameters by clicking on the button in the upper right corner.
Tweak SSD
A program as easy to use as SSD Life. If the task of the latter is to diagnose the device, then Tweak SSD optimizes disk performance after pressing a single button.

We have reviewed the main programs for diagnosing and optimizing SSD drives. Undoubtedly, drives of this type will not lose their relevance for a very long time due to the speed of operation and the absence of unnecessary noise.