Our selection reviewed a list of the most popular text scanning programs. An important factor for programs in this category is the ability to decipher the text of documents, as well as the quality of scanning - it is necessary that the information is completely readable, and the image scanner clearly transfers every line of the picture into the document.
Some applications have a Russian-language design, which can be another significant factor when choosing the best scanning program. So let's take another quick look at the programs below that can properly recognize text and scan a document into a file:
The ABBYY FineReader 10 Home computer program is one of the most common tools for scanning documents. Can quickly and efficiently find blocks and translate text written in different languages. The advantage of ABBYY FineReader is the presence of an impressive language base. Don't forget about the availability of a Professional version with advanced features.
OCR CuneiForm stands out among its competitors with good grabbing performance for photographed text. It is noteworthy that a photograph can be taken even with a 2MP camera of any rather outdated mobile device. The program boasts a dictionary checking function, which guarantees a high degree of information quality of the finished material.
Scanitto Pro will do an excellent job with more specific work. The application will recognize the text very quickly and will be able to save it in the required document format. It is noteworthy that the program can find a given area of paper and improve the appearance of the material before saving it to the storage medium. There is a function for scanning with one click of a key.
VueScan has a strong database of comparable scanner devices. Among analogues, the program demonstrates the highest connection speed to the scanner. Among the additional pleasant options, it is worth noting the convenience of manually adjusting color rendering.
When choosing free document scanning programs, you should pay attention to PaperScan Free. The utility is quite simple in terms of functionality, on the other hand, it performs all the necessary scanning options, in addition, you will be pleased with the unique compression technology, which can significantly reduce the file size, leaving the original display quality. If you like the Free version, you can always purchase the extended Professional modification with more impressive functionality.
RiDoc is another fairly powerful scanning tool. It is worth noting that Ridoc includes a specialized tool for reducing file sizes without noticeably degrading the display appearance. The information remains readable. If necessary, the RiDoc document scanner will help you export document formats to graphic extensions. The program can install watermarks on finished material and send the document by mail.
Note that we did not consider standard tools - software from manufacturers, for example HP Scan, as well as applications whose main functions are aimed at solving other problems: Adobe Reader scanner, Nitro Pro. There is also BlindScanner, created to organize access to scanning devices over a network from different laptop computers.
Also, the portable utility Winscan2pdf Portable was not included in the rating. It works without installation into the operating system, but lacks many necessary functions, in particular, it does not allow you to change formatting, does not print, and does not recognize words. But the ease of use is okay here. Just run it, select a folder in the dialog box and click on the "Scan" button. However, for this to work, you need to ensure that the virtual printer is not disabled in the OS!
Please note that we only considered solutions for PCs - Android applications were not included in the review. You can choose and download from Google Play whatever you like. Their operating algorithm is approximately the same. And all they allow you to do is digitize a sheet of paper into PDF format using the camera of a smartphone or tablet. To start scanning, you just need to take a photo. It will not be possible to fully process it or translate it into text. Some programs, of course, have a mode for converting digital photographs into text format, but desktop solutions do this much better.
“Scanning” documents and photos on your phone is a useful feature. Luckily, there are very simple ways to scan documents.
Of course, a dedicated scanner will still be better if you often need to scan a large number of documents, but using your phone as a scanner will also work if you only need to scan a few documents. Here's what we recommend for Android.
Best Way to Scan Documents on Android: Google Drive
If you are using an Android device, then the best way to scan documents is the Google Drive app, which is installed on almost every Android device.
You can scan documents directly from Google Drive by clicking the "+" button in the bottom right corner of the main screen.
From the pop-up menu, select Scan.

He may ask for permission to access the phone's camera. Click Allow.

When you are ready to scan a document, position the document so that it takes up as much of the screen as possible and press the blue button. You can also use the flash by tapping the flash icon next to the capture button if your device has a flash installed. If your device does not have a flash, this option will not appear.

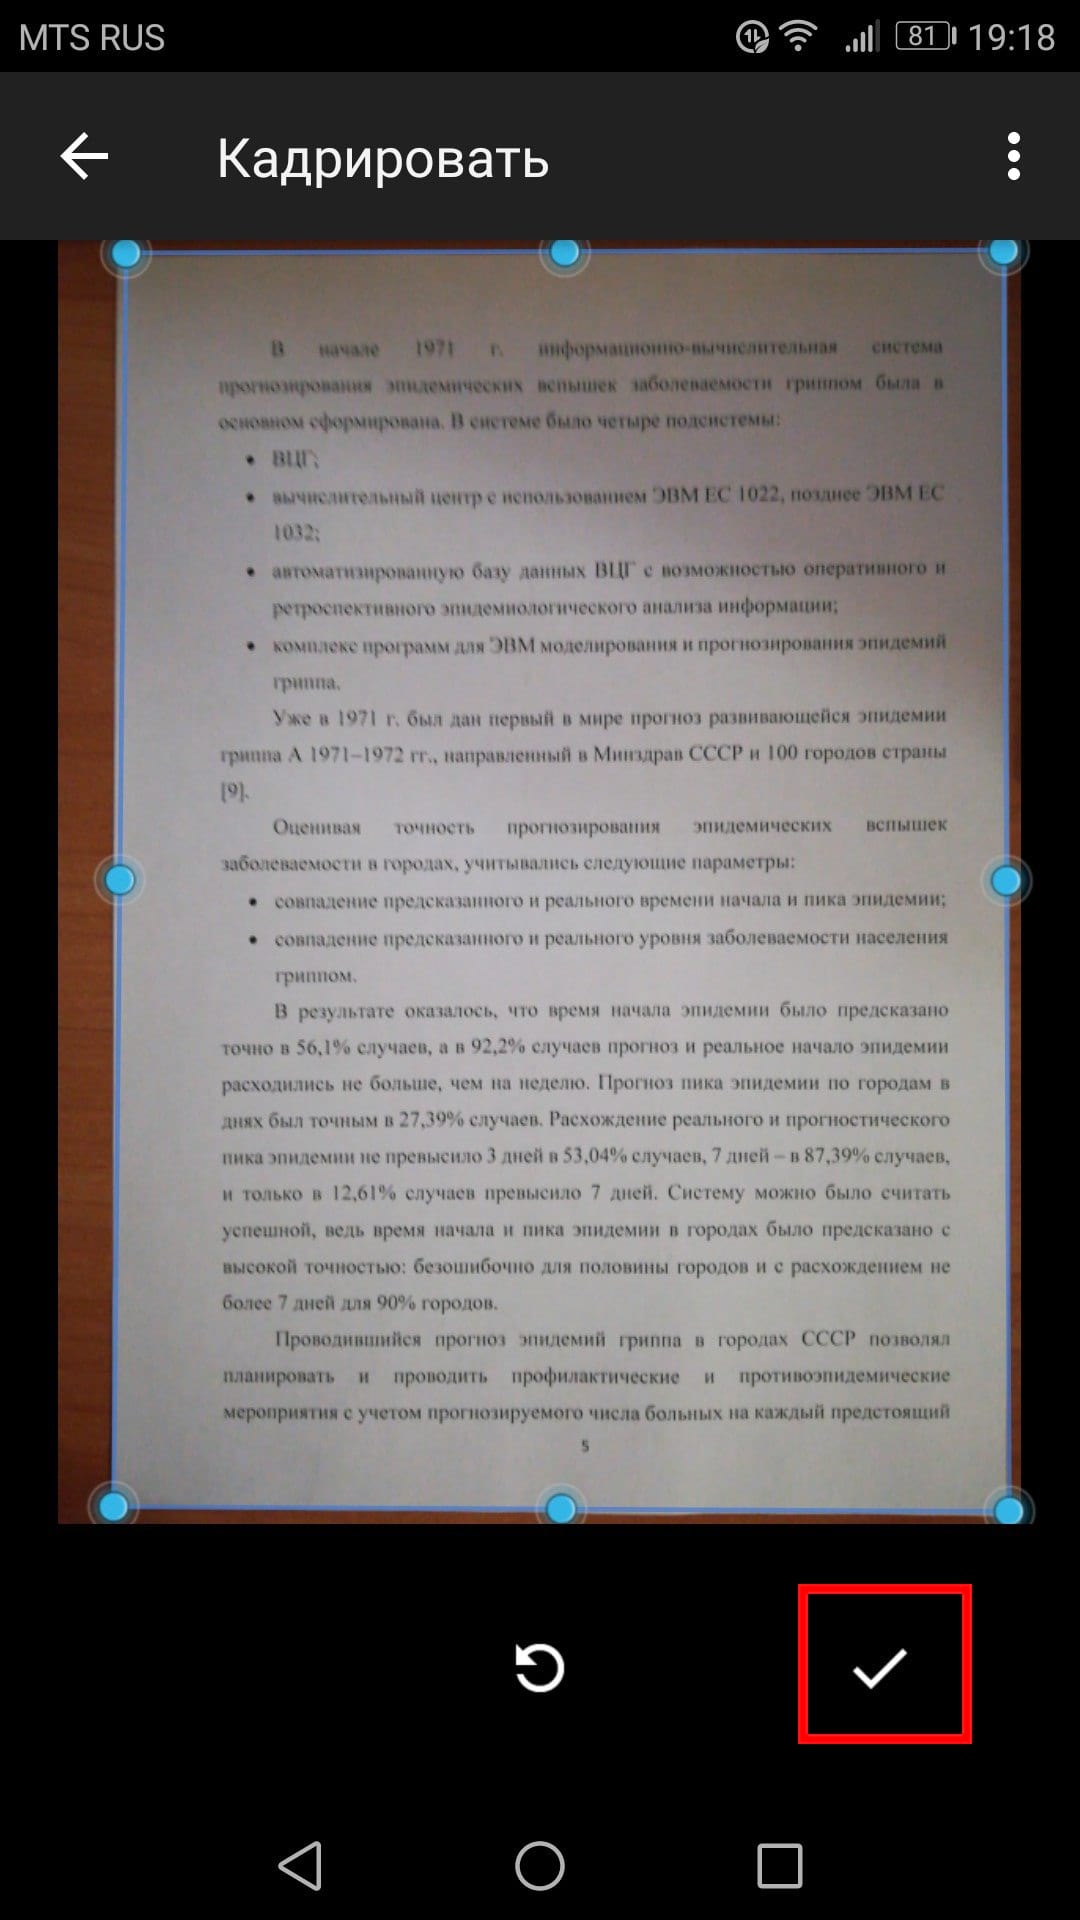
After scanning the document, a preview will appear immediately. Don't worry if most of the document is cut off when you view it. Click on the corresponding icon to select the area you want to save.
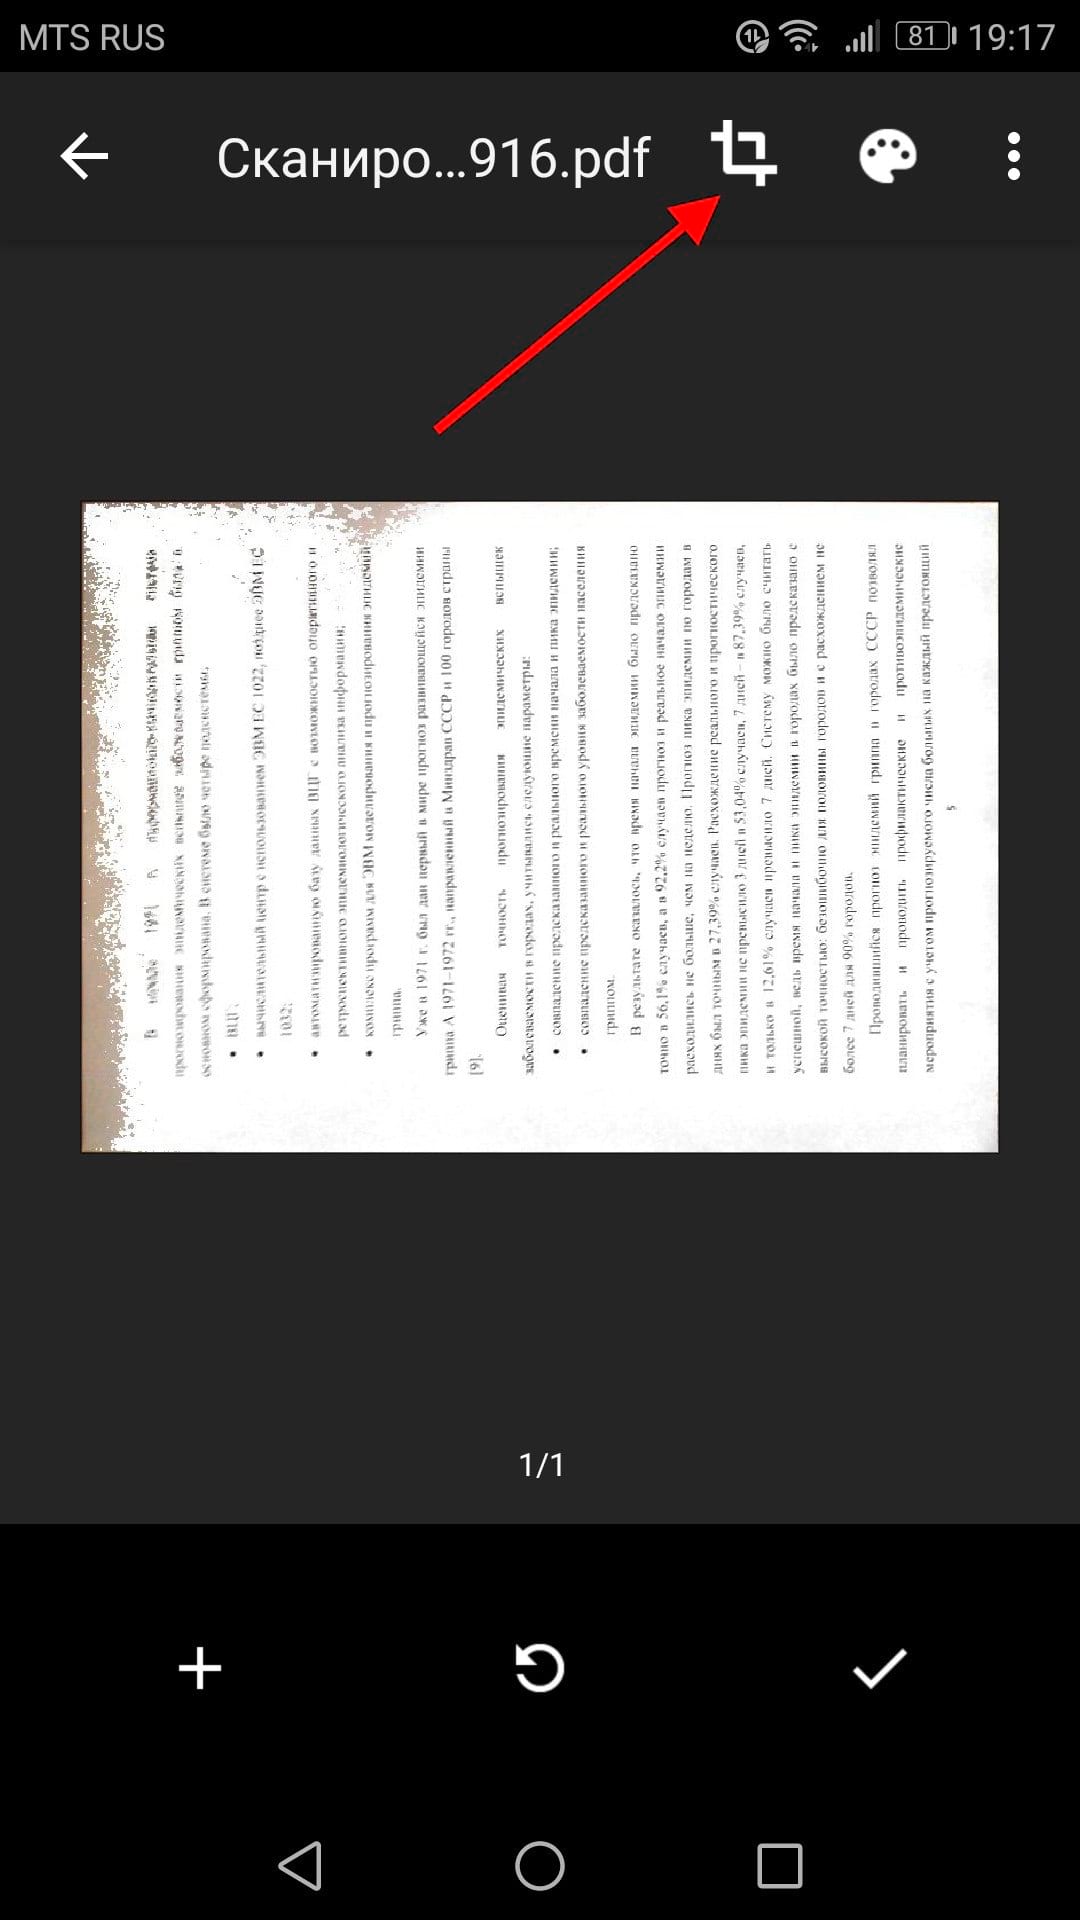
Touch, hold and drag the dots to change the area that is scanned.
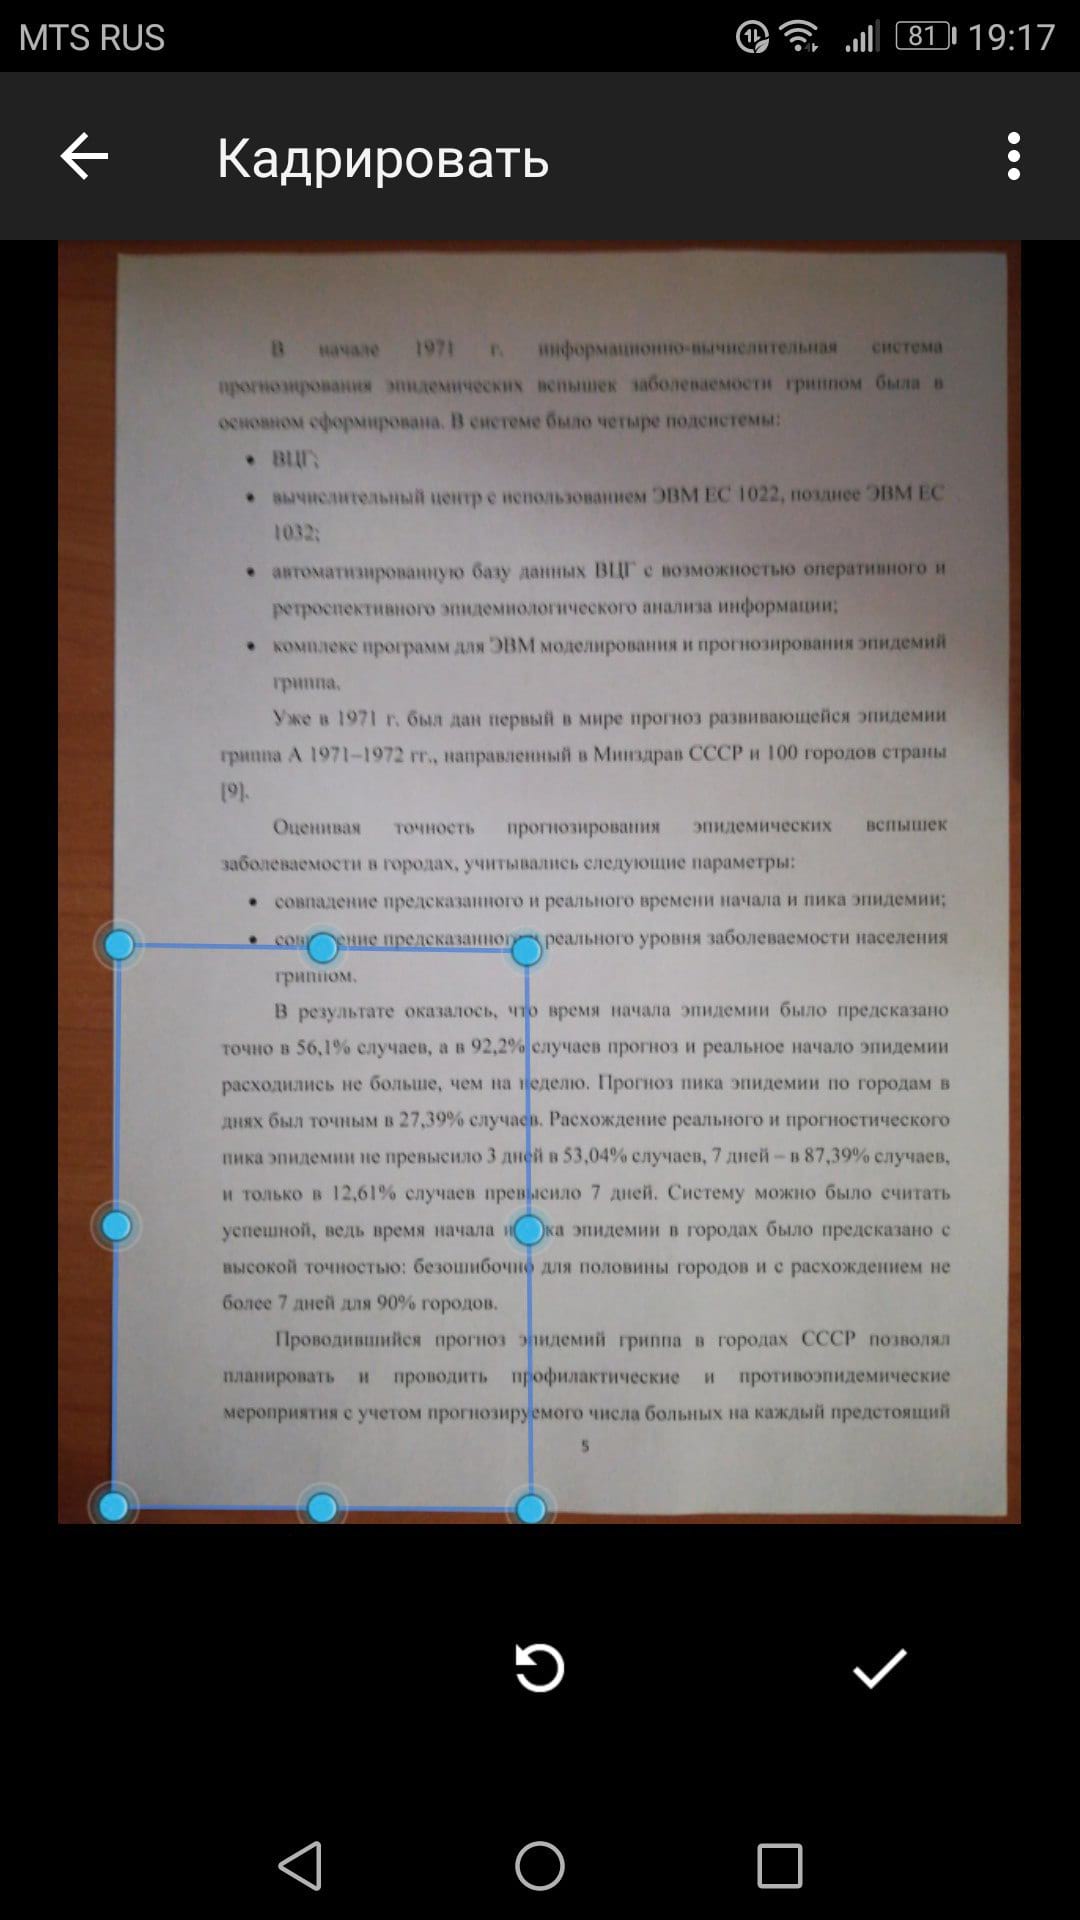
When finished, click on the checkmark in the lower right corner of the screen.
You have three options immediately after scanning:
- Click the plus sign to add more pages to your document.
- To scan again, tap the circular arrow in the middle.
- Click the check mark icon to complete and upload the document to Google Drive.
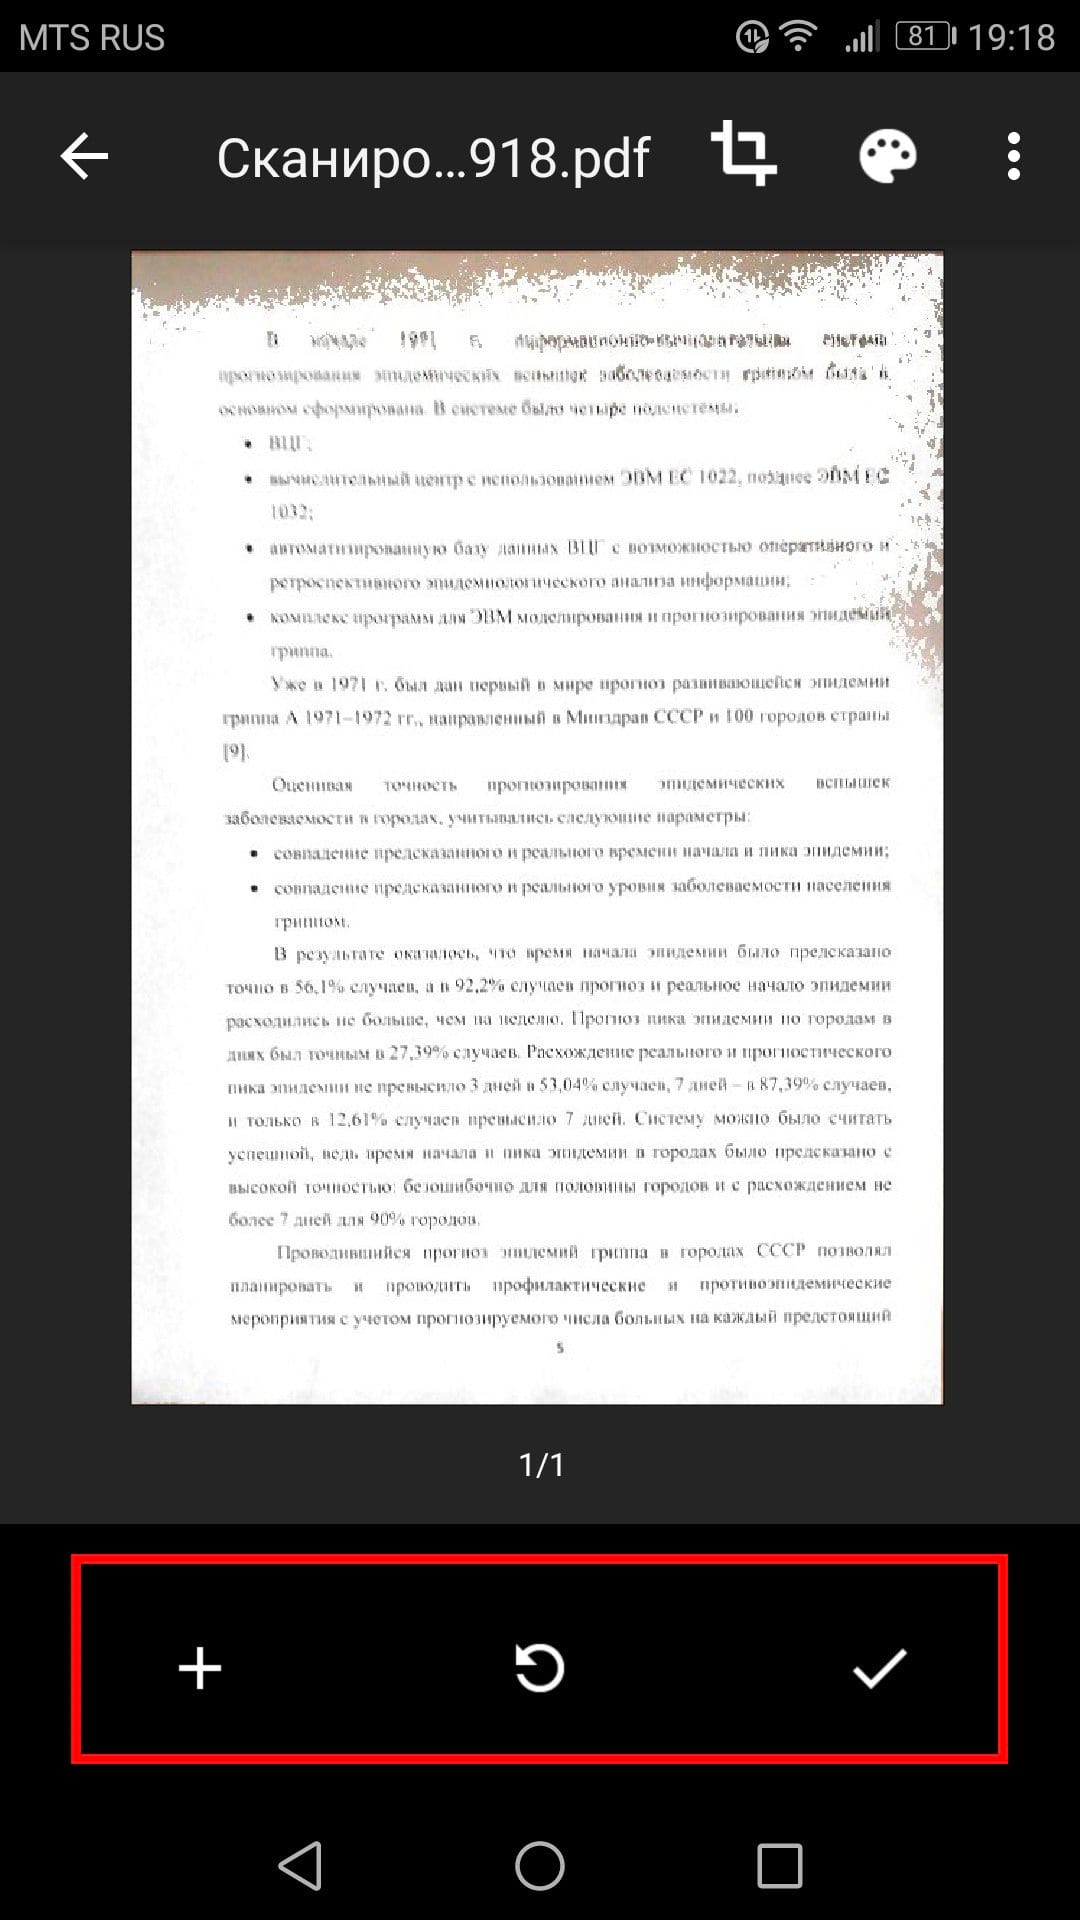
You can also make minor adjustments after scanning. For example, clicking on the palette in the upper right corner will allow you to change the scan color selection and match it to a specific document type. By default, the scanner automatically selects the one it thinks is best.

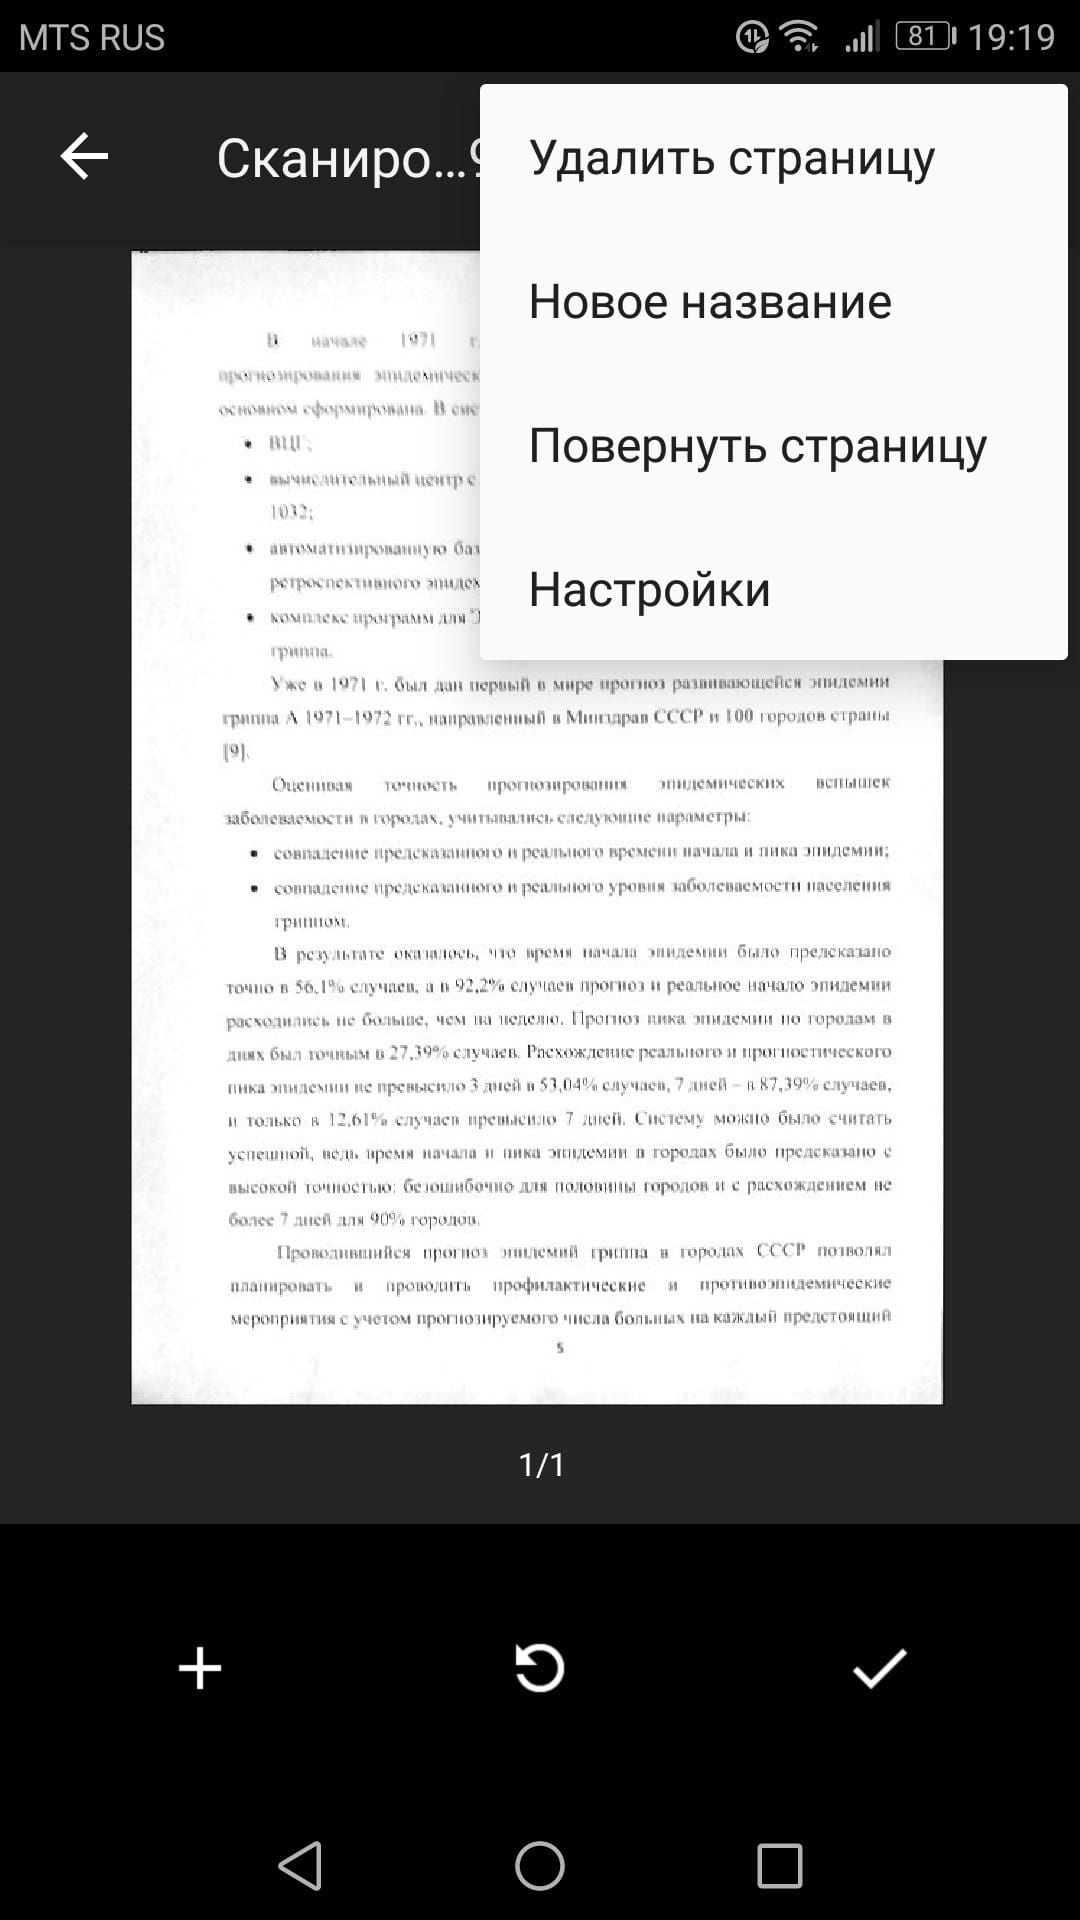
Finally, the three dots in the top right corner will allow you to delete, rename, and rotate the scanned document if necessary.
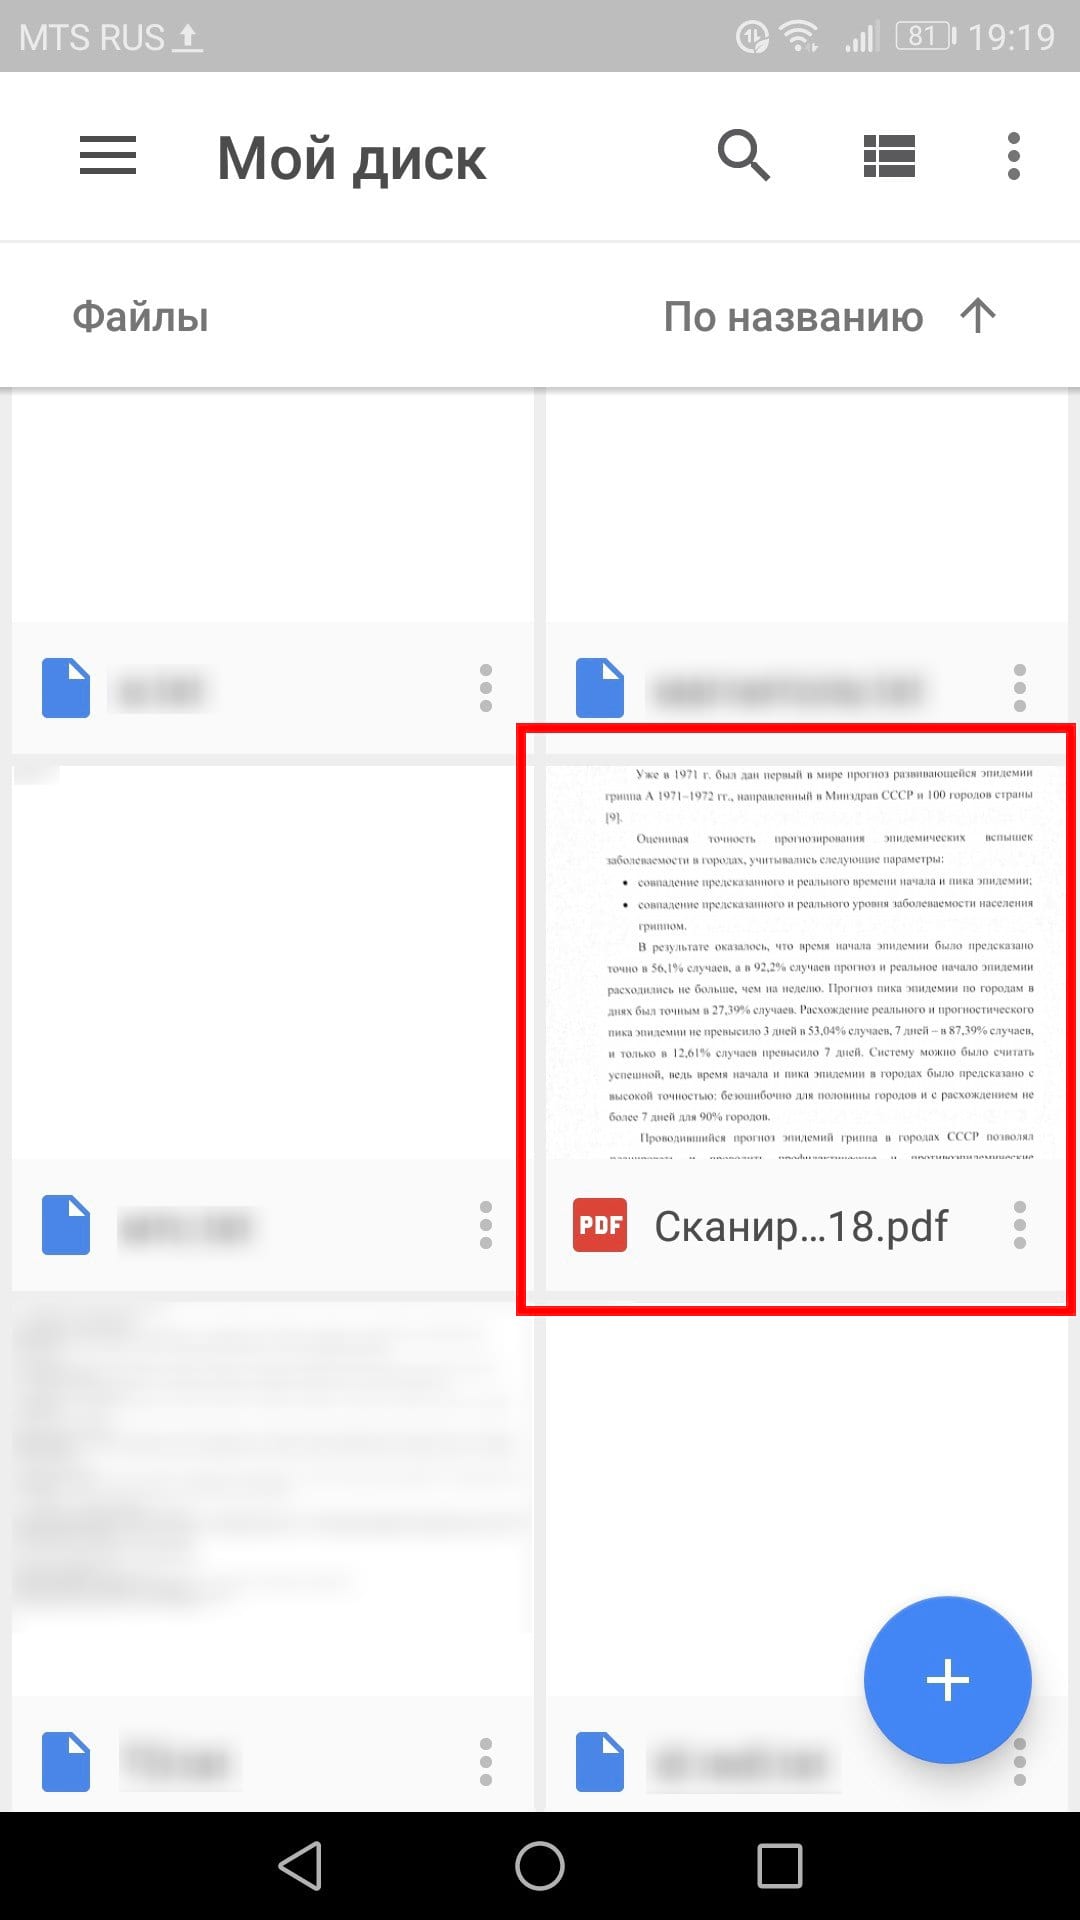
Scanned documents are added to Google Drive in PDF format, and names are added along with the word "Scanned" followed by the date and time. You can move, rename or delete any of the scanned documents by clicking the three dots next to the file name.

You will then convert this scanned PDF into a document, which you can then edit or export to Microsoft Word.
A Canon multifunction printer, as a rule, can not only print, but also scan and copy. The Canon company has many models that allow you to scan the necessary documents not only to your computer but also to any other gadget.
If you want to know how to scan with a Canon printer, you first need to install the printer on your computer in order to be able to save the information we have already scanned in the required format and then, if necessary, transfer it to another device. How to turn on the scanner on the printer.
It’s quite easy to scan your documents and photos from the printer to your computer. To do this procedure, all you need is.
1. Install the drivers necessary for your printer to operate. There are two options for installing them: either you can install them from the disk that you bought with the printer, but you can also install them without a disk.
In the first option, if you have a disk on hand, issued at the time of purchase as a kit with the printer, you can safely use it. First, turn off the printer, place the disk in the desired location, and wait a few seconds. When the folder with files opens, find the file there with the extension [.exe] and run it (usually this file is easier to find, it is called Setup.exe). During installation, simply follow the steps with the wizard's prompts, reading everything carefully to avoid mistakes. 
2. Place the document on the scanner glass. In the vast majority of cases, you should place the printed side down, but for HP ENVY multifunction printers, it should be placed face up.
3. Turn on the printer and wait 30 seconds until it is detected in the system.
4. Scan. There are various ways to scan photos to your computer using a Canon printer: Go to Control Panel\Hardware and Sound\Devices and Printers.

Right-click on the printer icon and select “Start Scanning”. In the window that opens, set the necessary parameters, click “View” and if everything suits us, click “Scan.” The 3rd video on the left shows this option using a Canon MFP as an example. Open special scanning software that is installed on your computer with a driver for your MFP. Usually there is a shortcut for it on the desktop. There you can open the settings and set the ones you need. Paint. This utility comes bundled with Windows OS. You can launch it by opening the Start menu - All Programs - Accessories - Paint. Expand the File menu (or click on the down arrow button in Windows 7). You can also easily learn how to scan from a printer to a Canon computer. Select “From a scanner or camera”. In the window that opens, you can select the type of image to be scanned. Many users also have a question about how to photocopy a document on a Canon printer. If you don’t have time and need to quickly scan something, immediately select the desired type and click “Scan. If you have time, you can select “Adjust the quality of the scanned image and set more suitable settings. 5. Save. After the scanned image appears in the program, open the menu File - Save As - Image in JPEG format. Select a directory or folder to save the document on your computer, set the file name and click “Save. Let's see if.
How to scan on a Canon printer, turn on, configure and use the scanner
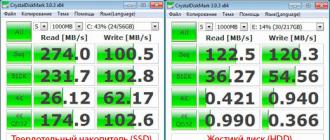
DPI - resolution or dots per inch. The larger the image, the higher the image quality, the higher its resolution (the number of pixels in length and width) and the more the file will weigh and take up space on your computer’s disk. The higher you set the resolution, the longer the printer will take to process or scan the document.
100-200 dpi - if you need it quickly and you won’t recognize documents.
300-400 dpi - suitable if you need to recognize text.
500-600 dpi - if you need the smallest details of the document. 
With a resolution of 600 dpi, the father scans old family photographs that he manages to get his hands on. There you need maximum resolution because the quality of photos from the 20s, 30s, and 40s is “not very good.”
I find it convenient to scan at 300 dpi. The photo quality is good and the text can be recognized if necessary.
There is one more nuance here. You can always reduce the resolution of the scanned file in the same graphic editor Paint. But you won’t be able to increase the resolution. You'll have to scan again.
If you can't find where you saved the scanned document, try looking in the Scanned Documents folder. When you install printer software, it may create a Scanned Documents folder on your computer.
Visit our website to read your printer's manual if you can't find the brochure at home, and instructions on how to use your Canon scanner. Find your printer model on the website and read the Device Review and its Technical Specifications. If you want, you can download the necessary information to your computer.
You can also use other applications on your computer to understand how to scan a document to your computer using a Canon scanner. Try graphic editing programs or Preview on Mac. Select the “Import from scanner” action and then follow the sequence of actions described above.
There is a very simple and accessible way for everyone to scan documents or photos onto a computer without the help of any special programs for your scanner.
To my surprise, few people know about this method. Usually, separate programs are installed to scan documents, which do not always work correctly. Just recently we dealt with this problem with a student.
There is a universal program that can easily cope with any scanner and this program is called Paint! This drawing program is included in the standard Windows software package of any version. In addition to drawing, Paint perfectly solves the problem of scanning.
So, if you have a scanner or MFP, then here is a step-by-step diagram for scanning documents or photos using the Paint program.
1. Press the START button - the lower left corner of the Desktop.
2. Find the Paint program in the list of programs. In Windows 7, for a quick search, you can write the name in the search bar. Paint is usually located in the STANDARDS folder. Those. the path is: START - ALL PROGRAMS - STANDARD - Paint


 3. Make sure that the scanner is turned on and connected to the computer. It is important! First we connect the scanner or MFP and only then the next item.
4. Launch Paint and click on the blue rectangle in the upper left corner (menu in Windows 7).
 Or select the FILE menu at the top (for Windows XP).
5. Select the item “From a scanner or camera”. If this menu item is not active, it means the scanner is not ready yet or is not connected.
 6. Select the desired scanning mode and press the SCAN button
 7. The picture has been scanned. If necessary, you can edit it with the Paint tools, for example, highlight something with color, circle, etc.
8. Save the resulting image to your computer. To do this, in the upper left corner, click on the blue rectangle (Windows 7 menu) or on the FILE menu (in Windows XP) and select “Save as...”. I recommend saving in .JPEG format
 9. Select the path to save on your computer, name the document and click the “Save” button.
 That's it, a scanned copy of the document or photograph is on your computer.
If you have a scanner or MFP, try this method and share the results in the comments.
There are times when you need to scan a document or picture onto your computer. Let's find out how to use the scanner and what to do if standard applications do not help.
How to open a scanner on different versions of Windows
There are many free applications on the Internet that help you transfer both documents and photos. They have a lot of processing capabilities and a user-friendly interface. Programs can be either paid or free.
Most often, the applications and transfer algorithm are the same for different versions of Windows. We'll look at Windows 8 as an example.
Using ControlCenter4
This application is designed specifically for this purpose, processing and transmitting document via fax.
Faxes and scanning
We do the following:
- We put the document into the printer.
- Open "Start".
- In the application window, look for the image of a white downward arrow in a circle. Let's choose it.
- If there is no icon, just right-click on the window and select All Apps.
- We are looking for the “Windows Fax and Scan” section.
- Our window will light up. In the upper left corner of this window, click “New Scan”.
- We select the device we need (if there are several on the computer).
- Click
- In a new window, configure the parameters.
- Click “Scan”.
- The scanned image appears on the screen.
- Let's save it.

There is another simple method that is present in all types of Windows systems. We do the following:
- We go to “Start”.
- Select the “Devices and Printers” section.
- We are looking for a device connected to the computer.
- Right-click on it and select “Start scanning”.
- A window with image settings should appear. You can experiment with contrast and brightness by moving the sliders in different directions.
- Now click “Scan”.
- A window displays the progress of the procedure. We wait until the bar fills up.
- After the process is completed, there is no need to close anything. We will be automatically transferred to the window where we will save the document. Enter its name. That's it, the work is finished.
Via Paint
We do the following:
- We put the document into the device.
- We go to “Start”. Select "Paint". If you can’t find it, enter it in the search bar.
- Select "File".
- Click “From scanner or camera”.
- Select the device we need (if there are several of them).
- Making scanning settings.
- Click “Scan”.
- The transferred image should appear on the screen.
- Let's save it.
Reference! Any version of Windows should have the last two methods (via Paint or Fax and Scan). The algorithm for working with programs is identical.
How to scan a document to a computer through a scanner: step by step
Before you start, make sure that the printer is multifunctional, that is, capable of performing the functions of a device. If the device is just for typing, nothing will work. First we need to connect the printer to the computer. It has two wires: power (plugs into the socket) and USB (plugs into the USB connector of the computer).
Attention! After connecting, you need to install drivers. To do this, we use the disk included with the device.

Standard method
We do the following:
- Place the document in the printer field.
- On the printer itself, press the “Scan” button. It may be in different places and look different, depending on the device model. But in most cases there is a “scan” inscription next to it or it can be identified by the printer icon.
- The Settings Wizard starts automatically. We only need to select what exactly we want to transfer (for example, a color image or black and white text) and click “Next”.
- An electronic copy must be saved on your computer or sent by email. The document is ready.
There is another way - if the setup wizard does not start automatically. We launch it manually. For this:
- Open "Start".
- In the search bar, enter “Faxes and Scanning”.
- We continue to work.
How to properly scan photos through a scanner: step by step
The Paint resource is more suitable for transferring photos. We need to do the following:
- Open menu.
- Select the “From a scanner or camera” section.
- A window appears where we need to select the parameters of the transferred image (as when scanning documents, step 3). Choose a color or black and white image.
- We save photos in any format convenient for us.

What to do if the scanner does not scan
The problem why the device may not work most likely lies in the fact that the standard applications are not enough. For example, you need text recognition, special quality settings, or save in a format that is not in the list. For such cases, there are applications for this process:
- ABBYY FineReader. Can recognize pictures and text. The program is paid, but there is a free trial period.
- It will do, I need to transfer several documents.
- OCR CuneiForm. Also for recognition. Supports several foreign languages. The application is free.
- Allows you to process photos transferred to your computer. The program is free.
- Allows you to save transferred documents in PDF format. Free.
- It can save transferred objects in different formats and create entire galleries from them.
- The program is suitable for processing. Can read images from the tablet screen. Supports more than 100 languages.
- Can connect to many digital devices and multiple devices at the same time.
Most programs have a similar operating algorithm, only the interface differs. Let's look at how VueScan works:
- We put the document into the device.
- Launch "VueScan".
- Checking the quality settings.
- Now we process the settings of the resulting image.
- Let's scan.
- We save it on the computer.
- We process if necessary.

The problem may also appear in the following cases:
- Faulty equipment. The insulation or plug of one of the cables is damaged, the contacts are stuck, or the USB connector is broken. In such cases, it is better to contact the service center.
- There are no drivers or they are installed incorrectly. Reinstall them. Don't forget to restart your computer after installation.
- The settings may be incorrect. If you have multiple devices connected to your computer, make sure you select exactly what you need.