So, you decided to call from the website using our website service, but for some reason the call cannot be made. Perhaps the problem is quite simple - your microphone is not connected to the computer or is not enabled in the browser from which you are trying to make a call.
Don't despair, this problem can be easily solved! Follow the steps below and you can easily make calls through your browser.
How to turn it onmicrophone in Google Chrome browser?
If the microphone is turned off in Google Chrome, then to turn it on, do the following:
1. Click on the crossed out camera icon.
2. Select “Always share https://site with my microphone” and click “Done”:
3. Click on the “Call” button and wait for the operator to respond.
How to enable microphone in Mozilla Firefox browser?
In order to make calls over the Internet using the Mozilla Firefox browser, you need to follow these simple steps:
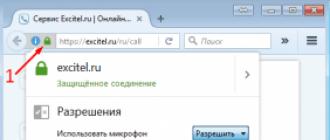
1. Click on the lock icon to the left of the address bar.
2. Select "Allow" next to the text from the drop-down menu Use microphone:

3. Click anywhere on the page to close the menu.
4. Click on the “Call” button on the call page again. After pressing the button, the call will start. Now you can make calls again!
How to enable microphone in browser Opera?
In order to turn on the microphone and make a call in this browser, you will need to do the following:
The easiest way:
1. Click on the microphone icon to the left of your browser's address bar.
2. Click on the “Clear settings and update” button:

3. Allow access to the microphone by clicking on the "Allow" button:

More complicated way:
1. In the main menu of the browser, select the “Settings” menu item and go to the corresponding tab:

2. Go to the “Sites” tab:

3. On this tab, in the “Microphone” section, click on the “Manage exceptions” button:

4. In the window that appears, select a site and click on the cross:

Then click on the “Done” button
5. Refresh the call page and allow microphone access.
After this you can make calls freely!
For many, the social network VKontakte is, first of all, a messenger. Each person has a lot of contacts in it - friends, acquaintances, business buddies, colleagues, and so on. From time to time, you may need to enter into correspondence with each of them, both personal and group.
The functionality of VKontakte messages has been growing since the launch of the social network. At first it was possible to send only just text, then stickers and emoticons were added, and one of the latest innovations was voice messages. In this article, we will look at why they are needed, as well as how to send them.
Table of contents:Why do you need voice messages on VKontakte?
VKontakte voice messages are a convenient way of communication between users. Essentially, the user records his voice, sends it, and the interlocutor listens to this message at any convenient time.
This method of communication has several clear advantages. Firstly, a person can hear the voice of the interlocutor, which is important. Secondly, sending a voice message is often much easier than writing a text, for example, if you are driving or walking along the road.

Voice messages also have some disadvantages. Listening to them requires more Internet traffic, which can be critical for users, for example, if they are connected to a mobile network. In addition, voice messages are not always convenient to listen to. If a conversation between people is on intimate topics, it will be difficult to listen to such messages on the street or in another public place; for this you will have to use headphones.
How to send a voice message on VKontakte
The mobile social network VKontakte is popular both on computers and mobile devices. Let's look at how you can send vote messages to VK through a browser or through the official mobile application for Android and iOS.
Please note: Below we will talk specifically about the official VKontakte mobile application. But at the same time, many third-party programs for using the social network also have similar functionality.
How to send a voice message to VKontakte from a computer

Please note: Before sending a message, you can listen to it. If necessary, the message can be deleted.
How to send a voice message to VKontakte from your phone
The official VKontakte mobile application supports the ability to send a voice message. To do this:

Please note: If you decide to cancel a voice message while recording a voice message, swipe left.
In this way, you can send messages not only to users personally, but also to group messages.
How to send a voice message to VK via a computer? I think you have come across such a request on the Internet, and today we will talk about it in detail. It would be a sin not to use such a function. Sending an audio message is quite simple and convenient, you will save a lot of time.
Audio message in VK
Hello, friends! A couple of years ago, it became possible to transmit a voice message to VKontakte from a computer and mobile devices. But not all users know about this feature, especially beginners. The fact is that if a microphone is not connected to your computer, then you will not be able to see even the microphone icon. Therefore, in this article we will figure out how to send a voice message to VKontakte and what actions need to be performed.
It is convenient to send an audio message on VKontakte for ordinary communication between people. Let's say you are very busy, but you can find 1-2 minutes, dictate a message and, with the click of one button, send it to your friend. If you are engaged in making money via the Internet, then you can send important and mandatory messages at any time and from anywhere. You don't need to waste time typing, you just need to say a few phrases into the microphone.
How to send a voice message to VK via computer
So, let's take a practical look at how to send a voice message to VK via a computer. Sending an audio message from mobile devices is essentially the same, but you need to be able to control the microphone. You need to either lift it up or hold it pressed with your finger and speak at the same time.
Let's look at two options for sending a voice message. First, let's consider the option when you already have a microphone connected to your computer. This could be a webcam that you use on Skype, or a separate microphone. In this case, when you go to a private message, you will see a microphone icon (see screenshot).
How to set the microphone toWWindows 7
If a microphone is not connected, its icon may not appear. In this case, you need to connect and configure the microphone. This is done simply. You can go to your computer's Control Panel and select Sound. After clicking on the “Sound” button, a small window will appear where you need to select “Recording”, select the microphone you need and click the “Properties” button. Next, you need to turn on the microphone, adjust the sound level, click the “Apply” and “OK” buttons.
You can access the settings easier, I use this method. In the very bottom right corner there is a loudspeaker icon. Right-click on it and select “Recording devices” in the pop-up window. A small window appears, as in the first case. Now we make similar settings.

How to send a voice message to VK from a computer
How to send a voice message to VK via a computer is shown in the video attached below, but I will describe a few words in the text. To begin, select a friend on VKontakte to send him a message; a microphone icon should be shown below (see screenshot). We left-click on the microphone and a request appears at the top of the window to allow the connection of the desired microphone. Click the “Allow” button. If there is no request, refresh the page.
After this, you begin recording your voice message. In the message field you will see the changing sound level of your speech. After finishing your voice message, you need to stop recording by clicking on the red square inside the field - the “Stop” button.

Now you can listen to the recorded signal and decide whether to send it or not. If you recorded a message unsuccessfully, you can delete it with a cross; if the message is normal, then click the “Send” button. To the right of the entry you will see the duration of the message. It's simple!
There are cases in which writing a text message is extremely inconvenient, but you need to notify a person about something important. Especially for such situations, the VKontakte service recently introduced a new “Voice Message” tool. All you need to do is record a short audio file and send it to your interlocutor. Such audio correspondence will be a convenient replacement for text messages. Learn how to send these types of files in four easy steps.
Go to the “Messages” tab.
Select your interlocutor from the list of your chat histories. Click on it.

You will see a correspondence with the selected person. In the message input field, notice that to the right of it you will see a small blue microphone icon. Click on it and the message recording will begin immediately. Don't let go of the icon until you've written down everything you wanted.
As soon as you remove your finger from the microphone button, the message will be recorded and sent immediately.

You can listen to the audio file that appears. It will be visible in correspondence with the interlocutor.

You can see all sent audio files in correspondence with a specific person in the “Show attachments” tab. Be careful, the file is sent as soon as you recorded it. You will not be able to cancel the action.
For a clearer example, watch the video below:
sovetclub.ru
How to download a voice message on VKontakte
How to download a VK voice message
There is no standard button or application that will allow you to download messages on VK and there will not be, at least in the near future. What to do if you really want to. The method is quite complicated and not everyone can succeed the first time, but the method is 100% working at the time of writing.
How to save a VK voice message
To make it more clear to you, we will clearly demonstrate how you can download and save voice messages from VK. All actions in these instructions were performed on the Google Chrome browser, in principle, everything should be the same in any other browsers, but there may be slight differences.
Here's a little instruction on how to do it

Now you have learned how to download and save VK voice messages to your PC, if you have any questions, we will be glad to hear your comments
mir-vkontakte.ru
How to send a voice message to VK on your phone
Instructions
To send a voice message to VK on your phone, you need to start a dialogue with the user you need. This action is performed only through the official VKontakte application or website, so you must first log in to the social network (to perform these and further actions you will need a working Internet connection). Just go to the person's page and select the "Send message" action, or go to the "Dialogues" menu and start a dialogue with the corresponding user.
In the message box, you will see a microphone icon in the lower right corner. Click on it and activate access to your phone's microphone. Next, press the icon again and do not release your finger from it. Say what you want to convey to the other user, then immediately stop clicking. It is better to keep the phone close to your mouth, with its microphone facing you, so that the device can make out the spoken sentences as best as possible.
The precision of words and the overall quality of the message can be quite clear and clear, or not so clear. This largely depends on the phone model and the design of its microphone, as well as environmental conditions. For example, strong wind or noise may degrade the quality of the voice recording. In addition, before sending a voice message to VK on your phone, carefully consider its text in order to pronounce it as quickly and clearly as possible, and also to avoid speech errors. Once everything is ready, click "Submit".
The ability to send voice messages on VKontakte was developed to make communication more accessible, simple and convenient. For example, this function has already been appreciated by drivers, workers, students and other people who do not always have the opportunity to urgently contact someone using their hands. The person you sent the voice message to will receive it as an audio file. You can immediately listen to this file, and then send the same voice response. According to the creators of the function, such communication becomes more realistic and similar to everyday life than text correspondence.
www.kakprosto.ru
How to send a voice message to VK via phone
This article will tell you three ways to send a voice message on the VKontakte social network via phone.
Finally, an update was released, in which not only money transfers and graffiti appeared, but also voice messages requiring “the people.” I hope in the future there will be more interesting and useful updates related to voice messages, since this topic in social networks is one of the most important in our modern world. So, closer to the topic of how to do this. 
Sending through the official Vk App
- This application can be installed through the App Store or Google Play Store. If you have Vk App installed, check whether it is updated to the latest version.
- We go into the application, open a dialogue with your interlocutor, looking in the lower right corner you will find a microphone icon. The first time you press it, you will be asked to allow the use of a microphone; we confirm it of course. When you tap on the microphone icon in the same corner, an indicator of the time of your message and a red recording circle will appear (this means the recording has started and you need to start speaking). And be careful, as soon as you release your finger from the screen, the message is automatically sent to your friend, so release your finger if you are sure that you have finished recording your message.
- If you are not satisfied with the text of your message, without releasing your finger while writing, simply swipe left and the message will be deleted.
Advantages of this method:
- A practical way to send.
- Simple and more convenient interface.
Sending via the Kate Mobile app
This application can be downloaded from the Google Play Store from the App Store, if you are unable to download from these sources due to technical problems with your phone’s device, try downloading this file from the official website of this application from a browser, just do not forget to check the box in the settings along the way: |Settings|->|Security|->|Unknown sources|. We also go to our VKontakte account and open a dialogue with the interlocutor.
In the lower left corner you can see the plus sign, click on it. Next, you will be presented with a list, select “Voice message”, the recording begins immediately and you should start speaking. In order to stop the recording, you need to “tap” on the “Stop” sign (blue square) and the recording will be ready, you will be returned back to the dialogue and in the same corner you can find that a number has appeared above the “plus sign” (the number of recorded voice messages ), then simply send your message to your friend.
If you didn’t like what you wrote down, also click on “plus”, then select “List of attachments”, then select this entry you didn’t like, hold it down, the “Delete?” prompt will pop up, confirm and the entry is deleted.
Advantages of this method:
When entering this application, you will be in “invisible” mode, that is, it will not be displayed to other users that you are “online”, only the time of your last visit from any other application or browser will be displayed.
Sending via browser
Go to any browser (Google Chrome, US Browser, Opera mini, etc.), enter the VK website in the search bar, write your account information, log in to your account. Next, select the full version of VKontakte.
We select a dialogue with the interlocutor, in the lower right corner you will find a microphone pointer in the form of an icon, click on  him. If you press for the first time, you will be asked for permission to use speakers, of course we confirm, then a second request to use a speaker or headset will appear, select what satisfies you (depending on the phone and the browser), and the recording begins, therefore, you need to speak. If you want to stop recording, click on “Stop” in the lower left corner, opposite the “microphone”.
If you think about it and you don’t like the contents of your voice message, just click on the “cross” next to the “stop” icon and the recording will be deleted.
Advantages of this method:
- Before sending, you can listen to the voice message you want to send.
- A familiar interface for those who often use the social network under discussion via a computer.
Benefits of Voice Messaging
- An excellent means of negotiation for those who are too lazy to type large texts or have their hands busy with something important.
- You can exchange such messages without additional programs (which cost both time and money).
- Quick communication between several people.
- An atmosphere of live communication.
What to do if the voice message was not sent
First, check your Internet connection; to communicate in this form, it must be stable.
Secondly, you need to be sure that the speaker is in perfect order, this can be understood by the equalizer message; if the strip is straight and even, it means it is damaged or broken (it is better to take it for repair and not try to fix it yourself if you don’t understand), otherwise In this case, your speaker is normal.
If the reason for the unsuccessful sending of the message has not been identified, then it is better to write to Technical Support for Users.
Quite often, when using online video-audio chats and messengers or various extensions and applications such as Skype, a problem arises with debugging the microphone. That is, it simply does not work. Users are starting to try to delve into the deep settings of the operating system, but everything is much simpler. The problem lies in your browser settings. At least in 99% of cases. Next, you will learn how to enable the microphone in the browser.
Instructions for turning on the microphone will be given using the Google Chrome browser as an example. But it is also ideal for Yandex browser and Chromium. If you have Opera or Mozilla Firefox, just look for similar settings there.
Microphone settings
1. To go to the microphone settings, press the button " Menu" and go to the item " Settings«. 2. Now let's go down and press " Show advanced settings" looking for the item " Personal data" and go to " Content Settings«.