Password is the most important tool that protects user data from viewing and use by third parties. However, an unlearned password can turn against the user himself. And if, for example, there is no problem recovering the password from the account of any website, then questions may already arise with gaining access to the Windows account. But there is a solution, and this is the Windows Password Recovery utility.

In fact, quite a few users find themselves in a situation such as losing a password from an account to log into Windows. In most cases, users resort to a complete reinstallation of the operating system, which can be avoided by using the Windows Password Recovery utility to recover the password.
Windows Password Recovery is an effective tool that allows you to recover or completely reset your password, as well as create a new administrator account or completely delete an existing one. The utility successfully recovers the password for Windows 10 and lower versions of this operating system.
Password recovery progress with the Windows Password Recovery utility:
1. First of all, the utility will need to be installed on any other working computer in order to create bootable media.
2. By running the utility, you will be prompted to create a boot disk or flash drive. Please note that the trial version of the program can only create a bootable CD, and to create a bootable USB flash drive, you will need to purchase the full version of the program.
3. Go to the tab Advanced Recovery , where you will need to choose the version of Windows for the computer on which the password will be restored.
4. Return to the first tab. You will see that the third item appears on the screen, allowing you to save the ISO image with the utility to the computer. Subsequently, you can create a boot disk or flash drive using any other program that is convenient for you.
5. If you create a boot disk (in the free version) through the Windows Password Recovery program, you just have to click the button "Next" , and then "Burn" so that the program starts creating bootable media.
6. The process begins, which is noticeable for several minutes.
7. As soon as the process of recording bootable media is completed, a window will be displayed on the screen, informing about the success of the procedure.

8. Now, armed with bootable media, you will need to connect it to a computer on which password recovery will be performed, and then enter the BIOS and install the disk or USB flash drive as the main boot device.
9. If everything was done correctly, a window of the following form will be displayed on the screen:
10. After waiting for the utility to finish loading, you will need to select the Windows disk on the screen, on which the password will be reset.
11. Select the account in which the password will be reset, and a little lower select the appropriate action: delete the password, change the password, delete the administrator account, create a new administrator account.
12. In our example, we change the old password to a new one, therefore, accordingly, in the next window of the program we will need to enter the new password twice.
13. After completing the procedure, you just have to restart your computer in normal mode. Done!
Features of Windows Password Recovery:
- The utility has a free version, but there is one caveat: it works purely in trial mode, not allowing you to delete and reset the password for Windows 8 and other versions of this OS, as well as delete the administrator account or create a new one. To complete these steps, you will need to purchase a paid version;
- The utility works with operating systems Windows XP and higher;
- The utility successfully resets and recovers the administrator password for Windows 10 and earlier versions of this OS;
- Allows you to delete an existing administrator account or create a new one.
Windows Password Recovery is an effective tool for both ordinary users and professionals who are engaged in computer repair. Despite the lack of support for the Russian language, the utility is extremely easy to use, and therefore it can be recommended to everyone for quick access to a locked computer.
Today the situation when the user forgets his password and the only way out of the situation is to reset the Windows 7 password, which is quite classic.
If you encounter such a problem, it does not matter.
To solve it, you only need a flash drive to reset this password.
This means that on a regular flash drive or even a CD-ROM there will be an image of a program that is designed specifically to reset passwords in Windows.
Password reset using a flash drive
Most likely, a program called Online NT Password & Registry Editor will be recorded on the USB flash drive.
In fact, it is almost the only public program designed to reset a password and other manipulations with the system.
Using it is pretty easy. Everything is done as follows:
- First you need to make sure that when the system boots, it first checks to see if there is anything in the drive and USB ports, and then it loads Windows itself from the hard drive. This is done in BIOS. To do this, do the following:
- when the boot screen appears (an example of this is shown in Figure 1), click Delete;
Note: Depending on the model of the system, entering the BIOS can be done by pressing a variety of buttons. You need to look at what is written on the boot screen. In most cases, this is the buttonDeletemore rarelyF2.
Figure 1 just underlines - in the boot screen it says that to enter the BIOS you need to click Delete.
- We insert the flash drive;
- We go to the item called "Advanced BIOS Features";
Note: This only applies toAward BIOS,is there some moreAMIandPhoenix award. There you need to look for menu items where the name appearsBoot».

- Go to the item "Boot Sequence";

- In the window that appears, we see a list of all available media from which the download can take place (of course, “USB” will appear in the name of the flash drive, this is indicated by the arrow in Figure 4), and so, click on the first item, that is, “1st Boot Device »And in the window that appears, select our USB-drive, as shown in figure No. 5;


- Now you need to press F10 to save all the changes.
Again, keep in mind that not all versions will look like the one shown above. In any case, the meaning of everything should be clear. And you always need to look for the item associated with "Boot".
If the wizard for resetting a forgotten password called Online NT Password & Registry Editor is written not to a USB flash drive, but to a disk, accordingly, in the last paragraph you need to select the item associated with the CD / DVD.
Figure 5 shows this with green arrows.
- To restart a computer. Here we will already see that the download is from a flash drive.
If Online NT Password & Registry Editor is really installed on it (and, most likely, it is, because there are no other such public programs), the interface will appear, which is shown in Figure 6. There is nothing to do here, except to just press Enter on the keyboard.

- In figure No. 7 we can see a list of all available sections that you can work with (highlighted in green). You need to know which one is running Windows. In the example shown, he is only one. Most likely you will have the same.
In any case, you need to write the number of the section with which we will work, as shown in the red frame in the same figure.

- In Figure 8, the modem will see a list of available actions (highlighted in green). We are interested in resetting the password, that is, “Password reset”. This is the first item, therefore, it is necessary to indicate exactly its number, which is shown in the red frame.

- And again, in figure 9, we can see the list of actions in a green frame. Here we are interested in resetting the password, that is, the first item. We select it, as shown in the red frame.

- In Figure 10, we can see a list of users in a green frame. You will have the same, only with users of your computer. Each of them has its own unique code, that is, the RID that will need to be entered.
In the example shown, select the user "Administrator" and enter his RID, which is shown in a red frame.

- In figure 11 you can again see the list of available actions in the green frame. We are interested in clearing the password, that is, the first paragraph. We select it, as shown in the red frame.

- If everything worked out, we see the corresponding message (in figure 12 it is highlighted by arrows). And again, the list of actions in the green frame is available. We are interested in the output, so we enter “q”, which is shown by a red frame.

As you can see, everything was completed successfully and now you can remove the USB flash drive and log into the system without any passwords.
A huge plus is that to perform all of the above steps you do not need to set administrator rights, you do not need to do anything through the command line, etc.
Where can I get a password reset program?
What if none of my friends have Online NT Password & Registry Editor? All the same, everything needs to be done through a USB flash drive.
In this case, you need to ask a friend to provide his computer for use, take an empty flash drive with him and go to him.
A blank CD is also suitable if a friend has the appropriate drive. On his computer, do the following:
- Go to the official page of the program - http://pogostick.net/~pnh/ntpasswd/bootdisk.html.
- We find the "Download" section there. If we want to make a disk with the program, we select the first option (underlined by a red line in Figure 13), and if we write to a USB flash drive, then the second (underlined by a green line).

- Unpack the downloaded archive onto a USB flash drive or disk. If it is a disc, then standard CD and DVD burners will come into play.
In general, everything happens very simply - in the open archive, click the “Eject” button (shown in red in Figure 14) and select a removable drive (shown in green) or a drive. Click the OK button and you're done!

That's all. Now the flash drive is ready, it remains only to put it in first place in the boot priority via BIOS and perform all the above actions.
This guide will tell you what to do if you forgot your Windows XP password and how to solve this problem without reinstalling the operating system. In addition, we will consider other possible problems with passwords. Windows 10 and Windows 7 have enhanced security features compared to earlier Windows XP / 2000 systems.
By the way, perhaps one of the frequently used passwords is installed on your PC, see the full list of popular passwords.
In the latest versions of windows, a more effective password system is used, designed for business use, so that no one can access information on your computer without the necessary permissions. This is a double edged sword. Most users forget at least once some important password. And then the user / information owner becomes the “enemy without access rights” for his computer.
Naturally, for each protection method there is a way around it, especially if you have physical access to the computer.
In this article, we will look at various methods to protect your computer with a password and ways to get around them. We will start not with user account passwords, but with no less important passwords, such as BIOS passwords.
How to bypass BIOS password?
BIOS password - One of the oldest ways to protect your computer from unauthorized access and one of the most common. Why? This is one of the most effective means if the user does not have access to the system unit. Otherwise, it’s the same as locking the house with many locks and leaving the window open.
The default BIOS settings on all motherboards do not store password information. So all you need to do to remove the BIOS password is simply reset the current settings, restoring the default configuration. But remember that resetting the current BIOS settings will destroy not only the password, but also all those settings that you set yourself.
There are two ways to reset BIOS settings. Most motherboards have a special jumper to clear CMOS (the memory in which BIOS settings are stored). Usually this jumper is located near the battery on the system board, but for complete certainty it is advisable to refer to the instructions from the motherboard. On some motherboards, instead of a jumper, there are just two contacts that you need to close with a metal object, for example, a screwdriver, to reset the CMOS.
If your board has a jumper, then turn off the computer to clear CMOS, set the jumper so that it closes the jumper contacts, and press the power button on the computer. Your computer will not start to boot, but the settings in CMOS will be reset. Remove the jumper and turn on the computer again. Most likely, you will see on the screen a request to press F1 to set the BIOS parameters. If you are satisfied with the default settings, press F1 and select ‘Save and exit’ from the BIOS menu. After that, the computer will boot as usual, with the exception of the BIOS password.

If you don’t know where your jumper is located on your board or if it doesn’t exist at all, that is quite possible, you will have to go the other way. Each system board has a battery, which is the power source for the CMOS memory, allowing you to store information. This is usually a standard CR2032 battery.
To clear the CMOS, turn off the computer and remove the battery (you may need a thin screwdriver). After 5-10 minutes, replace the battery and turn on the computer. The default settings will be set in the BIOS, but there will be no password. To continue the download, you will need to press the F1 key, and if you are satisfied with the default settings, select ‘Save and exit’ in the BIOS menu that appears.
As you have seen, all this is very simple on a desktop computer, but with a laptop, the BIOS password can be a serious problem. Due to the frequent thefts of laptop computers, manufacturers made sure that access without a password was almost impossible. So, if you forgot the BIOS password on your laptop, most likely you will have to contact the manufacturer’s service center.
What to do if you forgot your Windows password?
If circumstances developed in such a way that you forgot your Windows password, then we recommend that you reset it using the built-in account called Administrator. This is done in safe mode, while loading or rebooting your PC.
To restore access to your computer, you just need to press F8 and in the menu that opens, in which you will be presented with some additional options for loading your operating system, you will have to select the aforementioned “Safe Mode”. Next, you will need to select a built-in account, which, by the way, by default, cannot be protected by any password.
 If you did everything right, since you precisely followed the above sequence of actions while still on the desktop, you should be knocked out a window with a message that Windows is running in the “Safe Mode” you need, which is as simplified as possible. You will need to click “Yes” and go to the Control Panel - User Accounts, where is the icon of the account whose password you want to reset yourself. On the left you should select the item “Change Password” and enter and confirm the new password in the corresponding window. Ultimately, for the above changes to take effect, you will need to restart the PC.
How to crack a Windows password on a computer or laptop?
In order to do this, you will have to follow the following sequence of actions:
- Prepare a CD, or a USB flash drive, on which a special set of resuscitation programs intended to restore Windows should be recorded. You will need to insert it into the drive or into the appropriate port during the subsequent reboot of the computer. This package of resuscitation programs can be prepared independently by downloading programs intended for sharing, saving and restoring data, or you can already download some RBCD 10.0, for example;
- During PC startup, in order to enter the BIOS, press the “DELETE” button. There we will need to change the installation priority and assign a computer boot from the CD-ROM. After that, we visit our boot disk in the drive and reboot the PC;
- Entering me the resuscitation disk, which should appear after the resuscitation package has been downloaded, we must select an editable copy of Windows and switch to the "System Restore" mode - the section that will be located at your very bottom of the page;
- We search for the command line and enter “regedit” there (we look for it in the dialog settings of the same window). We find, and then select the HKEY_LOCAL_MACHINE section, in which we need to select File, and then Load hive;
- Open the “SAM” file and select the section - HKEY_LOCAL_MACHINE \\ bush_name \\ SAM \\ Domains \\ Account \\ Users \\ 000001F4. Double-click on the F key located there and go to the very first value located in the line, which we will need to replace with the number 10;
- In the same section, select “File”, and then “Load Hive”. Click "Yes" in order to confirm the unloading of the bush. Close the registry editor, end the installation process in this way, remove the USB flash drive or disk and reboot the computer.
How to find out the password from the computer?
Question: how to crack a password on a computer remains relevant until now. Unfortunately, it’s really possible to find out the password from the computer, it seems possible only by correctly selecting it manually. Therefore, if you are not ready to spend several hours of your free time on this process, we strongly recommend that you simply reset it and come up with some new one.
 Again, it’s much easier to just reset the password and come up with a new one afterwards. Nevertheless, if you need to find out the password, we recommend that you use the program for this purpose, as they say, from the image of which you will need to make a boot disk. Having correctly configured the BIOS boot from the drive and installing this program, immediately upon entering the desktop, a window will open in which you can see the names of users, including the Administrator, as well as passwords from their accounts.
Asking the question: what to do if you forgot the password from your own PC, it is absolutely not necessary to use the above methods of recovering it. Password reset in the Windows 7 operating system can also be done using the Net User command. To do this, during the reboot of the PC you will need to press F8. Thus, you can open a Menu that allows you to implement additional boot options for this operating system, in which you will need to choose not just "Safe Mode", but one that would also support the command line. Being in it, you will need to select the built-in Administrator account and in the window of the Interpreter of commands, immediately after that, a system prompt will appear where you will need to enter net user “username” “password”.

We assume that you yourself understand that instead of “username” you will need to enter the name of your local user account, and instead of “password” you will need a new password. If you did everything correctly, then in order to close the window, you will need to register on the command line: exit and restart the PC.
How to reset password on Windows 8?
In the case of this operating system, things are much simpler! Password reset on Windows 8 can be done as follows:
- On the login screen, you will need to click on the special power icon, which is located in the lower right corner of your screen;
- Next, you need to press the Shift key and click "Restart";
- Click "Troubleshoot";
- Click “Reset PC”;
- Click "Next" and the system will automatically reboot in order to start preparing for a password reset.
How to reset a password on Windows 10?
It is not so difficult to reset the password for Windows 10 users, of course, provided that they have access to e-mail, or to the phone to which their account was linked. Otherwise, you will have to reset the password from the flash drive, as described above.
How to reset Windows 7 admin password?
It is best to reset the Windows 7 administrator password through the Windows Command Interpreter. Follow these steps:
- First, run it. You can do this by adhering to the following path: Start - Run - Run the program - cmd. In the menu of the Command Interpreter that opens, you will need to enter: control userpasswords, after which you will see a window called "User Accounts";
- Select that account the password from which you want to reset and do not forget to uncheck the box for their item “Require username and password”;
- In the window that opens, you will be required to enter and then confirm the new password. Next, in the command boot window, you will need to enter Exit and restart the PC, as usual.
View passwords stored by Windows
In addition to access passwords for various users, Windows stores a number of other equally important passwords: an Internet connection password, mailbox passwords or access to web sites. As a rule, there are a lot of them, so it is quite natural that they are forgotten over time.
The operating system offers an “autocomplete” function for passwords and other frequently entered information in browsers (Google Chrome, Yandex.Browser, Opera (Blink), Firefox, Explorer 11, etc.). So it’s not uncommon for a user to enter a password once, but after a few months, of course, cannot remember it. Everyone understands that important passwords need to be recorded, but not all do it. And if you don’t remember the password, how to find it out, because it is displayed as a series of asterisks: ******?
The solution is offered by programs from different manufacturers that can get a password from this string of stars. There are quite a lot of freeware programs for decrypting Windows passwords or hidden passwords from input lines in various browsers.
We will use the program from Passware. This is an easy-to-use freeware program that analyzes passwords hidden by asterisks and reports them to you. It is very easy to work with her. Just select the password line and press the ‘recover’ button.
Of course, there are commercial versions of programs, which, as a rule, have a large set of functions. For example, Password Recovery Toolbox scans the system and determines the saved passwords, data saved for automatic completion, Outlook Express passwords, passwords for connecting to the Internet, etc. This information is then presented in a convenient form. A few more alternatives to the programs described above:, or Password Viewer.
Windows XP user passwords
Windows XP stores user passwords in a modified form. For example, the password “password” will be stored as a string like this: ‘HT5E-23AE-8F98-NAQ9-83D4-9R89-MU4K’. This information is stored in a file named SAM in the folder C: \\ windows \\ system32 \\ config.
This part of the SAM file is encrypted with the syskey system utility to improve password security. The data necessary to decrypt the information after syskey is stored in the system file in the same folder. But this folder is not accessible to any of the users. Only the operating system itself has access to it during its operation. You can access SAM and system files only under the control of another operating system or by connecting the drive to another Windows computer.
All versions of Windows XP have an administrator account. This name gives the user full access to the system and the ability to reset the passwords of all other users. This can save you if for some reason you cannot log in with your normal user password. The specifics of using the administrator password depends on the version of Windows XP: XP Professional.
The administrator password is set during the installation of the operating system. If you wrote it down or simply hit enter, leaving it blank, then you can easily log in as an administrator and reset user passwords. To enter the system in administrator mode, on the screen with the system welcome, press CTRL + ALT + DEL twice, a window for entering the administrator password will appear.
When the computer boots up, go to ‘start \\ control panel \\ user accounts’ (start \\ control panel \\ user accounts) and change the required password. If you are already here, this is a good opportunity to correct your mistake if you left the administrator password blank. In addition, it is advisable to change the account name ‘adminisrator’. This name is known to all, and it is used first to access your computer. To change the name of the account, right-click on ‘my computer’ (my computer) and select ‘manage’. Expand ‘local users and groups’ and open the ‘users’ folder. Right-click on the ‘administrator’ entry and change it.
XP Home.
This system will not let you just access your computer in administrator mode. First you need to boot the computer in crash protection mode. To do this: restart the computer; immediately after testing the BIOS, press F8 several times; in the menu that appears, select ‘start Windows XP in safe mode’ (load Windows XP in crash protection mode). When the computer boots up, log in with the username ‘administrator’. There is no default password. Now you can change user passwords by going to ‘start \\ control panel \\ user accounts’ (start \\ control panel \\ user accounts). When you're done, restart your computer in the usual way.
Create a password reset disk
Windows XP allows you to write to a regular diskette information that provides the ability to reset the password. Naturally, if you have already forgotten the password and can’t access the system, you won’t be able to create any disk, but it’s worth it to set up such a diskette in advance to protect yourself from such accidents.
To create a diskette: go to ‘start \\ control panel \\ user accounts’ (start \\ control panel \\ user accounts); select the name under which you are logged in; In the menu of related tasks, select ‘prevent a forgotten password’; follow the instructions of the starting wizard.
To reset passwords using a floppy disk: if you enter the password when entering the system incorrectly, the system will ask or you did not forget it; At this point, you can use your floppy disk following the step-by-step instructions of the operating system.
Be careful: if you used the built-in capabilities of Windows to encrypt files and folders, but did not install the operating system update (service pack 1), deleting the password will lead to the loss of encrypted information.
Utilities for changing passwords Windows XP / 7/8/10
There are special utilities that allow you to edit or reset user passwords for Windows XP / 7/8/10. The principle of operation of most of them is to download the minimum version of an alternative operating system, such as DOS or Linux, under which you can access files with passwords.
An example of such a utility can be found at this address: http://home.eunet.no/~pnordahl/ntpasswd/ Operating instructions, as well as files for creating a bootable Linux disk, are available on the same site.
Please note that if you used the functions of the operating system to encrypt files and folders by changing the password using any program, you will lose access to encrypted data. In this case, the following method may help, allowing you not to replace the forgotten password with a new one, but to find out the old one.
Password cracking and decryption
If nothing else helps, but you have physical access to the computer, then not everything is lost. You can rewrite the config and SAM files and try to decrypt the passwords that are stored in them using special third-party utilities. As we already said, for this you will have to use an alternative operating system, such as DOS or Linux. And when the files are at your disposal, you can use one of the programs to decrypt passwords, for example, LC4 or.
You will need:
- Access to another computer.
- At least two empty floppy disks.
- An archiver designed to work with the command line, for example, RAR.
- A DOS or Windows 98 boot disk (the image of the required disk can be obtained at http://www.bootdisk.com/) or the minimum version of Linux (for example, Knoppix). There is no need for bootable disks if you can simply connect your hard drive to another computer. If you use a DOS boot disk, and partitions on your hard disk use the NTFS file system, then to access them you need a program that allows you to view partitions in NTFS format, for example, NTFSDOS, under DOS.
- A program for obtaining passwords. We recommend using it, since the beta version of this program is free, and the free version of LC4 is very limited.
Using a bootable flash drive:
- If your hard drive has NTFS partitions, copy the NTFSDOS file to your bootable USB flash drive.
- Copy the archiver (RAR) to the bootable USB flash drive.
- Boot the computer from this flash drive. If there are partitions with NTFS, type the NTFSDOS command, this program will show which letter is assigned to your system disk, and you will need to use it instead of the letter C in the next paragraph.
- Archive system files with passwords. For example, if you use the rar32 archiver, the corresponding command will look like this: Rar32 a -va: \\ systemandsam c: \\ windows \\ system32 \\ config \\ system c: \\ windows \\ system32 \\ config \\ sam If the files do not fit on one USB flash drive, the archiver will ask you to insert the second.
Password cracking
Each of the programs you have selected will list the accounts found in the SAM file. Select the ones you need to identify passwords for. If you are using, select Atack type: Brute-force. If you used only numbers in the password, check the box ‘all digits (0-9)’. Start the process of password selection using the command from the Recovery menu.
Password guessing can last from 10 minutes to several hours, or even several days, and may fail. Especially if the password uses letters in different registers, numbers and special characters.
This is a good way to check the strength of your passwords. If you just want to verify your password, follow the steps above and see how long it takes to find it.
Windows password cracking software
There are a lot of software tools that can help you crack a password in Windows. In addition to the above program, there is also a Windows Admin Password Hack. But, unfortunately, it cannot be called relevant anymore, since it only works in Windows 2000 / XP. Its closest replacement is the MultiBoot 2k10, which, in fact, is a rich boot disk.
findings
In any case, if someone from your loved ones forgot the password for Windows 7, or if you yourself were forced to come across this - do not despair, there are plenty of solutions to this problem. Well, in order to questions: how to crack the password on the laptop - you no longer have, we strongly recommend that you save them somewhere, in notes inside your own smartphone, for example.
We hope that you do not have to resort to the methods described by us. To avoid such a need, remember that all important passwords must be recorded. And if there is a real need to protect information on your computer, then use passwords from characters in both registers and numbers and do not use ordinary words. In this case, your passwords will be very difficult to crack.
3 more useful articles:
A program that checks the password strength of system users. This utility is used by network administrators to calculate users with ...
A simple utility that allows you to display passwords hidden with asterisks. Compatible with all browsers, including ...
Windows Repair is a rare type of program that can save your personal computer from almost all ...
We remind you that attempts to repeat the author’s actions may lead to a loss of warranty on the equipment and even to failure. Material is for informational purposes only. If you are going to reproduce the actions described below, we strongly recommend that you carefully read the article to the end at least once. The editors of 3DNews do not bear any responsibility for any possible consequences.
Windows has long used SAM to store and manage all users' passwords. All the information in it is well protected, so in order to find out the password, you will have to spend a lot of time and resources, especially if it is quite complicated. Most often, however, it is not at all necessary to find out the password - just reset it or change it. For this, several utilities have been developed, one of which we will use. Another important point - it is obvious that when the OS is running, it will not allow you to just get into the password store. Therefore, you need to make sure that the computer supports booting from a CD / DVD or USB drive to run the necessary utilities.
The most famous of them is Offline NT Password and Registry editor, which can work with passwords and registry of Windows XP / Vista / 7. Download the USB or CD version of the utility, burn the downloaded image to disk, or use our tips for creating a multi-boot flash drive. The utility does not have a graphical interface, but you should not be afraid of it - everything in it is quite simple and understandable. In addition, often the desired option is offered by default, so you only need to press Enter.

Boot from removable media Offline NT Password and Registry editor. You are unlikely to need additional boot options, but in some cases you will have to experimentally select those that will help the utility start. In the next step, you need to select the partition number on which Windows is installed. You will have to navigate first of all by its size. In principle, until the very last moment, the program does not make any changes to Windows, so in case of an error, you can simply start the password reset procedure again.


Then the utility will ask you to specify the path to the folder where the SAM files are located (in fact, this is a registry hive). By default it is X: / Windows / System32 / config, it also offers the first program. Then you need to select the first item (Password reset), since we are going to reset the password.


Then everything is simple. Select the first item (Edit user data and password) and enter the user name or its identifier in the format 0xabcdwhere abcd Is the RID indicated in the first column. RID comes in handy if the username is not displayed correctly or cannot be entered. For example, when using the Cyrillic alphabet.


It remains to specify item 1 (password reset) or 2 (password change) for the selected user. We exit the password editing mode by entering an exclamation point and pressing Enter.


Everything is almost done. We introduce q, press Enter, and then agree to the changes by typing y and pressing Enter again. We refuse further work in Offline NT Password and Registry editor ( n), remove the USB flash drive or CD-ROM and press the cherished combination Alt + Ctrl + Del to reboot. Done - password reset!


It was an easy way to reset the Windows 7 password. There shouldn't be any difficulties with it. You just need to be careful and accurate. Problems can only occur if the necessary drivers for working with the hard drive are not available. Then you have to throw them on a diskette (if, of course, you find a living representative of this almost extinct species and a working drive for it) or on a USB flash drive and select fetch additional drivers in the first step.
For the second and third methods, you only need the Windows 7 installation disc and nothing else. A more complex option involves the inclusion of an initially hidden “Administrator” account by editing the registry from the Windows 7 installation environment. In the future, you can log in to this system and edit any other account in the OS. By default, the "Administrator" does not have a password, which only plays into our hands.


So, we boot from the installation disk and press Shift + F10 to call the command line, where we drive regedit and press Enter to start the registry editor.


Select the section HKEY_LOCAL_MACHINE, and in the menu choose “File” → “Load Hive ...” (File → Load hive ...). We need to open the SAM file, which is located in the folder \\ Windows \\ System32 \\ config on the section where Windows 7 is installed. When opened, you will be prompted to enter the name of the bush you are loading - drive in any.

Now you need to select the section HKEY_LOCAL_MACHINE \\ bush_name \\ SAM \\ Domains \\ Account \\ Users \\ 000001F4 and double click on the key F. An editor will open in which you need to go to the first number on line 038 - this is 11. It must be changed to 10. Be careful and make no mistake - you only need to change it without adding or removing other numbers!


Now we need to select our bush HKEY_LOCAL_MACHINE \\ hood_name \\ and select "File" → "Unload hive ..." from the menu (File → Unload hive ...), and then confirm unloading the bush.


Everything, you can reboot by pulling out the pre-installation disk, and log in under the administrator account. In the Windows control panel in the user management section, you can change the settings of another account. Including change the password.

The last method remained, the wrong one. Why is it wrong? Because we will deal with the substitution of system files, and this is a base business. What is the main idea? It's simple - the OS includes the function of detecting sticky keys by default. You probably came across it at least once, and if not, then just quickly press Shift at least 5 times, and you will see such a wonderful window:

This window belongs to a small helper program sethc.exe, which lies in the Windows system directory. Moreover, it starts even on the welcome screen, when you are prompted to select a user and enter a password. But you can replace it with something useful. For instance, cmd.exe. Naturally, not directly in the running OS, but by booting from the Windows 7 installation disc and pressing Shift + F10.

You need to start by defining the drive letter on which Windows is installed. The easiest way is to simply view the contents of the section root with the command dir. C: will most likely be visible as D :, but not necessarily.

Having decided on the volume letter, we execute two simple commands - one copy the original file just in case sethc.exe to the root of the disk or wherever you want, and the second we change it to cmd.exe.
Copy d: \\ windows \\ system32 \\ sethc.exe d: \\ copy d: \\ windows \\ system32 \\ cmd.exe d: \\ windows \\ system32 \\ sethc.exe
We reboot, quickly press the Shift key (or Ctrl, or Alt) several times and we observe a window with a command line. It is necessary to enter another command in it, substituting the name of the desired user and the new password, respectively. Other parameters of this command can be found in the official help.
Net user username new_password

If you want to return everything to normal, then you need to boot from the installation disk again, open the console and run the command:
Copy d: \\ sethc.exe d: \\ windows \\ system32 \\ sethc.exe
However, you can not restore anything, but leave such a small trick in the system just in case. In addition to the methods listed above, there are many other methods for resetting or recovering a password in Windows, but now we will not consider them. Once again, we urge our readers to be careful and accurate when working with OS internals, and even better not to bring the situation to "surgical" intervention in SAM. Good luck regaining access to your accounts!
At the request of readers, I decided to write detailed and simple instructions, how to reset the password for a user account in any version of Windows: 10, 8.1, 8, 7, XP.
So, you turned on the computer, and the system asks for a password to enter. You enter the user password, but it does not fit: an “invalid password” error occurs. What to do if no password is suitable and you need to log in? There is a solution - the password can be reset using a special program recorded on a bootable USB flash drive. Now I’ll tell you how to create such a flash drive. 
You will need to take advantage of any to other by computer. To do this, you can contact a relative, friend, neighbor, maybe there is a computer at work - I think this is not a problem right now.
So, we sit down at another computer or laptop. We insert any flash drive into it:
Download a free program for resetting Windows passwords. You can download it from the official site (or from my Yandex.Disk): 
Run the downloaded file lsrmphdsetup.exe: Install the program as usual: i.e. we agree with everything and in all windows click the “ Next" In the last installation window, click the “ Finish”- the program will start automatically and its shortcut will be created on the desktop: 
In the start window, click Burn Bootable CD / USB Disk Now! (“Burn a bootable CD / USB drive now”): 
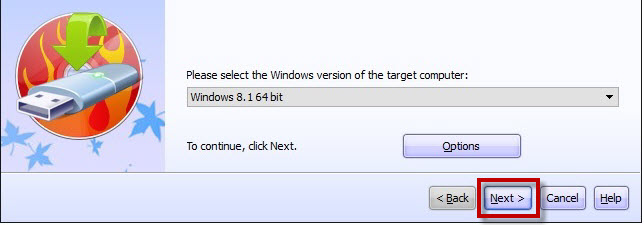
In the next window select version of windows, which is installed on the computer where we will then reset the password. Not listed Windows 10but it’s not scary: if you have a dozen, then choose here Windows 8.1 with your capacity.
By the way, on one of the forums I saw a message that you can create a bootable USB flash drive with Windows 8.1 64-bit, and it is suitable for password reset on any version of Windows (I checked on Windows 10 64-bit and on Windows 7 64-bit - like this and there is): 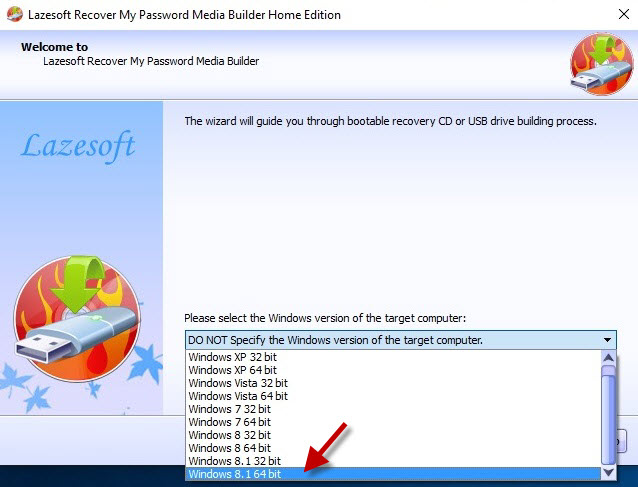
After you have chosen the right version of Windows - click the “ Next”:
In the next window, put a marker on USB flash and select the letter of our flash drive (it is already inserted into the computer). In my case, the flash drive letter is: F.
Then click the “ Start”: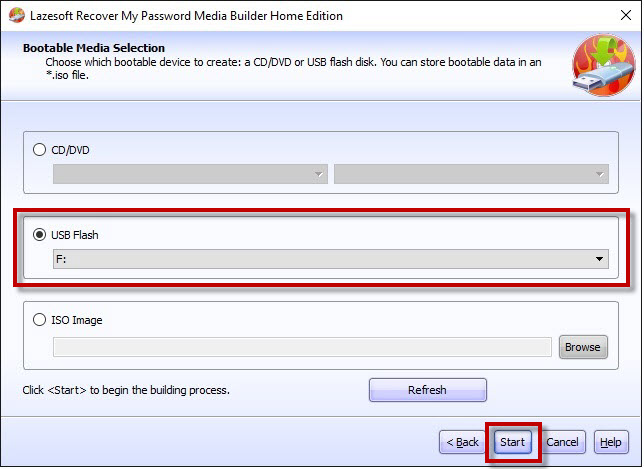
The program will download the necessary components from the Microsoft website for some time:

After that, the program will ask: “ Format USB drive now?”All files, if they are on the flash drive, will be deleted. Click the “ Yes”:
Now we wait until the bootable flash drive is created:


At the end of the process - click the “ Finish”:
 All! A bootable flash drive with a password reset program is ready. We take it out and carry it to our computer.
Insert the bootable USB flash drive into your computer. And now comes the most important, and at the same time the most difficult moment for those who will do this for the first time. We need configure computer boot from our flash drive .
Those who can boot a computer from a USB flash drive can skip right to the end of this article. For those who do not know how to boot from a flash drive, I will try to explain as clearly as possible:
============================================================================================
In order to “force” the computer to boot not as usual (that is, from the hard drive), but from the device we need (in our case, from a USB flash drive), you need to enable a certain setting in Bios a computer.
To get into this very Bios, we must immediately after turning on the computer press a certain key on the keyboard (and press more than once, but many, many times until we see the BIOS on the screen).
On different computers and laptops, this key is different:
- The most commonly used key is Delete (or Del ).
- You can also often call up BIOS with the key F2 (and on some laptops Fn + f2 ).
- Less commonly used keys Esc, F1, F6 and others.
In general, immediately after you press the Power button on your computer or laptop, don’t wait until Windows starts loading, but immediately start pressing the key many times Delete on keyboard. After a few seconds (5-10), the screen should appear Bios.
If nothing of this kind appeared, and your Windows started loading as usual, then we don’t expect anything else: we restart our computer again (you can directly with the Reset button) and try to press another key many times - F2.
If you didn’t get into BIOS again, restart the computer again and try to press the next key - Esc. Then F6 etc. But I hope you don’t have to experiment for so long: in the vast majority of cases, either the Delete key or F2 is triggered.
By the way, a hint about which key to load BIOS usually flashes on the bottom of the screen immediately after turning on the computer. But for some reason no one is looking at her, or does not have time to consider it.
On different computers Bios different, and it looks different for everyone.
On my computer it is, for example, like this: 
On another computer, it will be like this: 
On the third computer, this:  That is, I am saying that writing a separate instruction for each BIOS is almost impossible.
The main thing that anyone who needs to configure boot from a flash drive should know: in BIOS (no matter how you look at it) you need to find a section where the word is present Boot (from the English “Download”). By using the arrows on the keyboard in this section, we put in first place in the list of boot devices a flash drive.
In BIOS, a flash drive can be displayed with its own name (for example, Transcend), or as USB HDD; there are other options. One thing is important: it must be selected as the first device from which the computer will boot.
Usually a flash drive is “lifted” to the first place using the arrows on the keyboard, or with the keys +/- either F5 / F6.
Having set up the desired setting in Bios, we must leave it, not forgetting to save the changes made. To do this, go to the section Exit (he is usually the last one) - and there select “ Save and Exit”(“ Save and Quit ”). And then confirm again that we exit by clicking “ Yes”.
That's all: if you did everything right, the computer will reboot and the download will go from the USB flash drive (press the Delete key again, or F2, or something else - no need!).
Many do not even want to mess with creating a bootable flash drive with any software, because they are afraid that they will still not be able to configure the computer to boot from it. I tried to describe the whole process of downloading from a flash drive as detailed as possible. If you have mastered this text, I hope it has become at least a little clearer and now it remains only to practice.
===============================================================================================================
So, I created on a different computer a bootable USB flash drive with a password reset program. I insert this USB flash drive into my computer and turn it on.
Immediately press the key many, many times Delete on keyboard. After a few seconds, I get into Bios.
I go to the section using the arrows on the keyboard Boot (although in my BIOS it is possible to work with the mouse as well - in older versions of BIOS this will not work).
Here, my first device now stands hDD (ACHI PO: WDC WD50 ...): 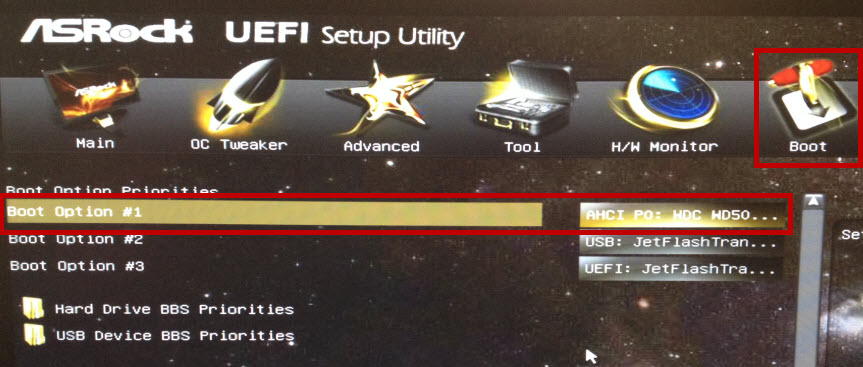 I select this line with the arrow on the keyboard and press the key Enter. A list of devices from which you can boot opens. In my case, this is a hard drive and my flash drive (it is listed here already twice). Raise to first place in the list - a flash drive (if there is a choice: USB or UEFI, then select UEFI). We do this using the arrows on the keyboard, or the keys +/-
either F5 / F6:
I select this line with the arrow on the keyboard and press the key Enter. A list of devices from which you can boot opens. In my case, this is a hard drive and my flash drive (it is listed here already twice). Raise to first place in the list - a flash drive (if there is a choice: USB or UEFI, then select UEFI). We do this using the arrows on the keyboard, or the keys +/-
either F5 / F6: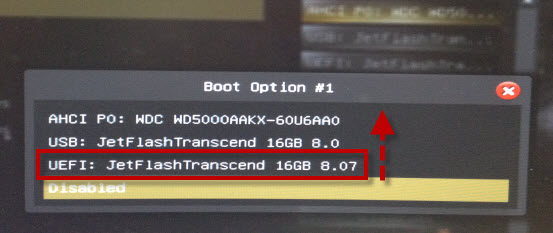
Now the flash drive is in first place in the list of boot devices: 
Now we exit from here, saving the changes. To do this, move the arrow on the keyboard to the last section Exit. Select line Save Changes and Exit - press the key Enter:
Then choose Yes:
After some time, a menu opens in which Enter we select the item Lazesoft Live CD:
We wait while loading is in progress: 
In the next window, check that the item was selected Reset Windows Password (“Reset Windows password”) and press the button Next:
A window pops up with a message about non-commercial use of the program - click Yes:
Click again Next:
In the next window select usernamewhose password will be reset and click Next:
Click on the button RESET / UNLOCK:
Password reset successfully - click OK. Then Finish:
Go to “ Start”And click Reboot computer ("To restart a computer"): 
Push OK:
After the computer restarts, we can log in to Windows without a password!