It would seem that the NAS market has existed for several years, but manufacturers are still trying to come up with something new and expand the boundaries of the capabilities of familiar things. Western Digital entered the home storage segment somewhat later than its less famous competitors, but this did not lead to a wave of criticism, but rather the opposite. It so happened that the American company produces all the necessary equipment for the production of NAS, which made it possible to create full-fledged “boxes” with installed hard drives. After all, how do things usually go with us? You buy a very expensive and correct NAS (Synology etc.) and are faced with the need to buy a HDD. Is it normal? Actually yes, this is normal if you are an expert and know what you are doing. And if not? If you just need a NAS for photography? For such a case, WD has an impressive family of network storage devices with installed hard drives.
Finally, a truly eminent brand has entered the highly specialized segment “for the elite” - the professional NAS market. And this is good, since the arrival of such a large player means that, firstly, users will be offered a wider range of solutions, including solutions that are completely ready to work “out of the box.” Secondly, the product itself will be adapted for a wider range of customers (ease of setup and use). Thirdly, this means popularizing the network storage segment (including for photos) to a wider audience, that is, the development of the professional NAS market.
We will talk about one of these devices today.
My Cloud EX2 Ultra. Description, scope of delivery, technical specifications
Front side of MyCloud EX2 Ultra
The package contains only the essentials. This is documentation, a 12V 3A power supply with two adapters (Type G and Type F according to international classification).

Power unit. Twisted pair patch cord for connecting NAS to 1Gbit LAN.

RJ45 network cable
My Cloud EX2 Ultra itself is delivered in a fully assembled state and the consumer only needs to connect it to an outlet and a computer network, after which you can start setting it up, but more on that later. Now let's talk about the appearance of My Cloud EX2 Ultra and its features.
In fact, WD did not skimp on details and preferred to make a complete solution in every sense of the word. The laconic design of the device gives hope that there are still companies in the world that know how to organize the work of various departments and get decent results that do not cause rejection among both specialists and ordinary users. My Cloud EX2 Ultra does not have a single polished part or other type of surface (such as anodized aluminum approx.). The color of the case is not jet black, but a little lighter, and thanks to this, the drive looks great in the interior of any apartment (unless, of course, you have a Victorian castle). The case ventilation operates on the principle of forced circulation, which means that in addition to the hard drives, a fan is spinning inside this network drive.
On the front panel of the device there are three LEDs informing the user about the status of the drive. Everything is very simple here - power supply and indication of the status of hard drives.

LEDs on the front panel
Hard drives are installed under the top cover.

Under the cover you can see two hard drives
In our case, this is WD Red with a capacity of 2TB, which is positioned by WD as a product for NAS. In general, you can take a NAS for photography both without disks (at the same time, the solution is more than competitive in price and capabilities) and with WD Red disks pre-installed at the factory, recognized as the best for NAS systems. If you choose the option without disks, all you need to do is install the disks. The operating system is preinstalled on a separate flash memory and after a quick setup and formatting of the disks, the NAS is ready for use.

WD Red are positioned as HDDs for storage
On the back of the My Cloud EX2 Ultra drive there is a power connector, a LAN port and two USB 3.0 sockets. In addition, there is a noticeable hole for attaching a Kensigton lock, which can be useful in an unfriendly environment.

WD MyCloud EX2 Ultra Patch Kit
Compared to its appearance, the specifications of the My Cloud EX2 Ultra are not that impressive. The circuitry is implemented on the basis of a Marvell Armada 385 processor with a clock frequency of 1.3 GHz, the amount of RAM is 1 GB and most likely this is a non-expandable option. A separate memory block is allocated for firmware and updates, so system files will not appear on the HDD.
Operation and TestingW.D. MyCloud EX2 Ultra
We have already written above that to put the device into operation, you just need to connect power and a cable from the computer network to it, but this is a little cunning. In fact, there are several more points that will be useful to a potential user. At the very beginning of the furious tearing of the packaging films, you can easily lose the sticker on which the three main stages of connecting and setting up My Cloud EX2 Ultra are described.

Clear instructions for installing the device
So, after you plug in the NAS and connect it to the LAN, it's time to go to mycloud.com/setup and enjoy the simple life. But the author of this text was not used to easy ways and looked for the device’s IP address in the network activity properties of home router clients (he found it there). But for everyone else, the official path is recommended, through mycloud.com/setup, there is only one button, and everything is very clear.

Main interface window
When you launch the web interface, another interesting point becomes clear - My Cloud EX2 Ultra comes already configured and you do not need to do any incredible manipulations like setting up RAID before the first launch.
However, it is necessary to set routes to folders on the NAS and assign appropriate rights to users. This can be done in the “Resources” tab.

Setting up remote access to NAS folders
It is not for nothing that the product name contains a mention of “cloud”, since the user is offered an impressive set of extensions to increase storage fault tolerance. Various “cloud” backup methods are offered to the user from the first steps of initial setup, and if you look at it, My Cloud EX2 Ultra offers a smart service for saving the most valuable data.

Cloud settings
In general, during the testing of My Cloud EX2 Ultra, the idea was firmly ingrained that this device does not claim to be the best NAS in the world, but in terms of the convenience of backup, including automatic and scheduled data transfer, it will readily compete with the market leaders. This is especially true if we consider it specifically as a network storage for photos. So, to copy photos from a camera, you just need to connect the latter to a USB port and the hardware itself will download the results of the photographer’s work. There was a feeling that all actions with the NAS maximally reveal the philosophy of the lost concept of Plug and Play, when the consumer does not think about the detailed configuration of the drive and immediately gets the desired result.
And to view files on any connected device, there is a WD Sync function. With its help, all data is constantly synchronized on a phone, laptop, tablet, PC - all devices based on Android or iOS.
If you have a TV with DLNA support at home, then My Cloud EX2 Ultra can be used as a broadcast multimedia server, for which the user only needs to enable the corresponding option in the NAS settings and understand a little about how it all works. But the advantages are obvious: data streaming and information reading speeds of up to 100 Mbit/sec will allow you to watch movies and TV series in high definition without stopping to download.

Network multimedia broadcast settings
Well, for Apple fans, the option to work with iTunes is available.
The disk subsystem of the drive is implemented on the basis of the two WD Red 2TB mentioned above. The preset 1st level of the RAID array determines the mirror mode of operation of the disk subsystem. RAID level one of two drives is considered the most reliable, since in this case data is written simultaneously to two drives. However, you can use RAID level "zero" (data summarization), but we will not recommend this because... if one of the HDDs is damaged, you will lose all the data and photos in the array. The JBOD structure is also available, but this is more likely for professionals. So RAID 1 is good, and we do not recommend touching the basic settings unless absolutely necessary.

NAS disk subsystem settings and management
Operation of My Cloud EX2 Ultra occurred without the slightest problem, although at the beginning of testing there was difficulty reconfiguring the RAID array. However, after updating the firmware, the annoying bug disappeared and we were able to check the operation of the controller.

Updating the WD MyCloud EX2 Ultra Firmware
Among the minor but noticeable points, we note a slight noise when the built-in fan operates, so do not place the device on the bedside table. However, the NAS cooling system is predictable and rarely activates. In this regard, a big thank you should be given to WD Red drives, which can safely operate at temperatures up to 65 degrees Celsius.
TestingW.D. MyCloud EX2 Ultra
To test professional disk solutions, a huge and detailed test protocol is usually used, but for home storage it is not synthetic tests that are important, but convenience here and now. Therefore, we, of course, “drove” My Cloud EX2 Ultra through CrystalMark, but still buyers take NAS for convenient storage and access to information. And see the test results just below - a screenshot is attached. By the way, we took several files ranging in size from 1 to 10GB as a basis and tracked the speed and time of their recording on My Cloud EX2 Ultra.
Data transfer rate (min., max).
- 82Mbps
- 99Mbps
- 117Mbps
- 105Mbps
- 104Mbps
The results of testing NAS loading with 1GB test packages are presented in the form of a screenshot.

Testing NAS transfer speed in network folder mode
Let's just say - faster than other flash drives and external HDDs.
Having dealt with the “synthetics”, let’s move on to real cases of using NAS. For example, you are a photographer who needs constant access to files and photos from any device. You look for inspiration, including by watching movies and TV series and photographs of famous masters, and you also have accumulated a lot of documents and folders that take up extra space on your home PC, laptop or mobile device. But here’s the problem: you can’t delete this information.
Let's start with the standard one. What does a photographer look at when choosing a home “cloud”? Of course, for the amount of memory, so as not to compress the photos. You will also need an option to sort files into folders with the ability to share them (for example, this way you can show a potential customer a portfolio of photos without having to take a laptop and/or flash drive with you). Synchronization occurs thanks to WD Sync, which can be configured on Google clouds, Dropbox, OneDrive or other devices. And from a smartphone, tablet or laptop, storage is opened thanks to the My Cloud application.
For movie buffs and TV series lovers, My Cloud EX2 Ultra is suitable as a full-fledged multimedia server thanks to support for Plex Media Server. With the help of a NAS, you can make preparing for the coming winter evenings as easy as possible. You buy food, download the latest season of Game of Thrones, connect My Cloud EX2 Ultra to your TV via Wi-Fi - and enjoy the fact that Jon Snow is alive. In general, to expand the functionality of network storage, you can add other third-party applications, for example, Transmission - that is, the NAS itself will be able to download “Game of Thrones” for viewing in Plex. At the same time, there is no need to delve into embedded Linux: applications are added in the same My Cloud EX2 Ultra configuration web interface.
Using this network drive as a storage for photos, documents and folders is simple and convenient thanks to constant synchronization, backup and additional information protection in RAID 1 mode. Let us remind you that this option duplicates files between drives: if one suddenly fails, the materials will still be the same will be with you.
conclusions
My Cloud EX2 Ultra is a network storage solution for home and semi-professional use, recommended for those who take a responsible approach to the issue of file storage. This is truly the first network drive in which the price is correlated with the functionality: what stands out here is the simple setup before use. In addition, My Cloud EX2 Ultra works great as a multimedia server and backup station for large amounts of data, and tests have confirmed the truth of the stated port speed of 1 Gbps. So the device turned out to be successful and is strictly recommended for possible purchase by professional photographers.
06.09.2016
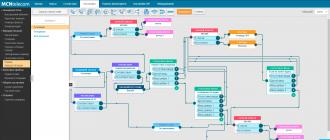
Is it possible to build a video surveillance system based on NAS? What if you also use storage for personal data in parallel? My Cloud EX2 Ultra from WD with NAS+NVR capabilities and Milestone Arcus CCTV software will allow you to conduct high-quality video surveillance with the connection of up to 16 cameras and store files in parallel. My Cloud EX2 Ultra comes in four configurations based on preset capacity. The maximum volume is 16 TB (2 disks of 8 TB each), and OS files are stored on a separate memory card and do not take up HDD space. For more details, read on.
There are different approaches to building video surveillance systems, and most often the sequence of actions is as follows:
- analog video cameras are selected and their installation locations are determined;
- installed cameras are connected to a DVR for recording or directly to a PC via a BNC port;
- the system is supplemented with monitors and other necessary equipment, after which it is put into operation.
The described scheme is popular, but not without drawbacks. Thus, the image quality may not be as high as the system customer would like. At some point, the capacity of the disk array may not be enough, and there will be no opportunity to increase the memory. A system built according to the scheme described above is difficult to scale, and its implementation on a large and/or complex facility can be a challenge.
You can significantly improve image quality by switching to “digital rails” and building a system based on IP cameras. But let’s imagine a situation where the system control center is located at a great distance from the objects on which the cameras are installed. How to be in this case? There is a modern solution - the implementation of video surveillance architecture based on a NAS server. A good example of implementation is the use of cloud storage My Cloud EX2 Ultra from WD, which allows you to store files and monitor using one device.
NAS: new horizons for video surveillance
The abbreviation NAS stands for Network Attached Storage, which literally means “storage connected to the network.” In video surveillance systems with NAS architecture, the drive plays the role of an “advanced” video recorder with many useful functions.
The NAS server is included in the company’s network, and IP cameras installed at the site are connected to it. From now on, access to the server (read: video surveillance system) can be done via the Internet, that is, from anywhere on the planet. System administrators and operators have the opportunity to:
- control cameras - for example, use PTZ functions and monitor moving objects;
- record to the disk array of the NAS server - continuously and at certain time intervals;
- analyze video content using special software;
- connect additional IP cameras and/or increase disk storage capacity.
We emphasize that you can perform the listed actions from any of your devices, being where there is Internet.
Modern solution from WD
A great example of realizing the potential of NAS video surveillance architecture - cloud storage My Cloud EX2 Ultra. It is produced by a well-known manufacturer of high-quality hard drives - Western Digital.

My Cloud EX2 Ultra is a personal network disk array with a processor and memory, that is, the same NAS server discussed above. It is universal and can be used to solve various problems: centralized storage of corporate data, backup, creation of a multimedia server and others.
Content on My Cloud EX2 Ultra can be accessed from anywhere there is an Internet connection. To do this, open your browser and go to MyCloud.com. To access from a smartphone, install the MyCloud application, available in the AppStore and Google Play.
My Cloud EX2 Ultra network storage is ideal for building a video surveillance system with NAS architecture. The reason for this is several important functionalities of this device, which will be discussed below.
Video surveillance capabilities based on the WD solution
After deploying a video surveillance system at the base My Cloud EX2 Ultra the owner of the storage facility downloads proprietary Milestone Arcus software from the manufacturer’s server. After installation, a number of simple settings are performed in order to configure the system as required. After this, the owner of the cloud storage has at his disposal a modern video surveillance system based on a NAS server, which allows:
- conduct direct surveillance through IP cameras connected to the network at the facility;
- save video in storage, that is, use the latter as a network video recorder (recording can be carried out according to any schedule drawn up by the system operator);
- view saved video clips from anywhere in the world;
- use intelligent motion detection function;
- receive notifications automatically sent by the video surveillance system;
- store any data on the same device, using it as a NAS;
- other useful features.
Several advantages at once
The role of the “brain” of the My Cloud EX2 Ultra storage is played by the modern dual-core Marvell ARMADA 385 processor with a clock frequency of 1.3 GHz. The device has 1 GB of DDR3 RAM. This equipment allows:
- record and playback video in HD format;
- At the same time, save files, documents, photos or download them without stopping recording.
My Cloud EX2 Ultra network storage is compatible with many models of IP cameras that allow you to receive images in HD resolution. The number of devices included in the video surveillance system can be easily increased by purchasing additional licenses. Initially, the user can connect 2 cameras, but until December 31, 2016, the number of paired devices can be increased to 16 for free.
WD Red & WD Purple
To build a disk array, My Cloud EX2 Ultra is equipped with reliable hard drives WD Red. You can also purchase storage without HDD and choose the drives yourself. WD Red are relevant if the MC EX2 Ultra is used as a NAS during the day and is turned on for video surveillance only at night, when no one is left in the office or on site. If the device is used in parallel both as a NAS and for round-the-clock recording from cameras, it will be more reliable to install devices designed for round-the-clock operation. WD Purple.
The latest high-capacity WD drives are manufactured using helium (which is injected instead of air). Thanks to the presence of helium, it was possible to increase the HDD capacity to 8 TB using a standard 3.5-inch case.
Designed for video surveillance, WD Purple models feature AllFrame technology for uninterrupted recording from up to 16 CCTV cameras onto a single drive. Thanks to AllFrame, the problem of reading data under constant load on the drive has been solved, because now the risk of frame loss and the appearance of artifacts is reduced.
By default, the hard drives in the My Cloud EX2 Ultra storage are combined using a RAID 1 scheme, which implies parallel recording for maximum data safety. If desired, the storage can be easily configured using a RAID 0 scheme, obtaining maximum read and write performance, or use a JBOD structure if RAID arrays are not needed.
The CCTV operator can easily give access to the storage to anyone by simply sharing a link to the file. This feature allows you to organize joint work with the video surveillance system of several operators.
My Cloud EX2 Ultra can be used both to create a video surveillance system with NAS architecture, and to solve other problems: organizing an FTP server, broadcasting multimedia content to TVs and game consoles, creating a server for P2P downloads, and many others.
In conclusion
Exploring storage options My Cloud EX2 Ultra allows us to confidently conclude: it is ideal for building a functional, efficient, scalable and easy-to-manage video surveillance system. Using My Cloud EX2 Ultra is effective when it is important to have one device for data storage (NAS) and recording from CCTV cameras. Additional reliability is guaranteed by WD Red and WD Purple hard drives specially designed for specific applications.
WD products, including network attached storage and hard drives, are available from Western Digital partners:
Number of impressions: 4302
It's no secret that many people are now switching from desktop PCs to laptops, where SSD drives rule the roost. And such storage devices as HDDs are remembered less and less often. WD is known primarily for its hard drives. And she, of course, doesn’t want to lose you and me as customers. Therefore, cloud storage for storing and viewing the video and photographic material you have shot is exactly what we will need, one way or another, for a very long time. In this review, we will look at the WD My Cloud EX2 Ultra two-disk secure cloud storage, with which you can not only securely store all the necessary information, but also have access to it from literally any corner of the planet and from any device.
Video review of WD My Cloud EX2 Ultra
Design and filling
Externally, EX2 Ultra looks stylish and at the same time minimalistic. It will fit well into the interior of both the office and home. On the front there are only indicators for the status of the system and hard drives. At the back you can find a gigabit network connector with indicators, two USB 3.0 ports for connecting expansion drives, a reset hole and a power supply input.
EX2 Ultra can be purchased both without disks and in different versions up to a total capacity of 16 TB from two 8 TB WD RED server series hard drives.
For example, if you are switching from a desktop PC to a laptop, then you can buy the basic version of EX2 Ultra without screws, insert your own from the PC, and later, when needed, buy first one for 8 TB, and then a second one. But for reliable operation 24/7, it is better to use hard drives that were originally designed for this, that is, WD Red.

The HDD replacement process is very simple - open the top cover, unscrew the pressure plate and pull the sticker. The discs are easy to take out and just as easy to put back in.
Between them is a board on which a dual-core 1.3-GHz Marvell® ARMADA® 385 processor, 1 GB of DDR3 RAM and 256 MB of flash memory are soldered.
Power consumption is stated at 5 W. You don’t have to worry about it at all by turning it off, for example, during vacation.

Interface
When you turn it on for the first time, you need to connect the power and LAN cable. After turning on the device, enter mycloud.com/setup in the browser. The automatic setup process creates a mycloud.com account and a set of folders on the EX2 Ultra.

In the main window you can immediately see how much free space is left on the disk(s), what kind of content is occupied by the disk space, readings from hardware sensors, you can also check firmware updates, the current load on the network, processor and RAM.


In the next window, we configure the access of users and user groups to our disk and their access rights. This way you can assign special access rules, for example, for your wife/girlfriend/husband/boyfriend/brother/mom/dad and, most importantly, for your child.

In the third point of the interface, you can see the folders on the disk, indicate which of them should be made public and which hidden, plus a number of additional parameters.

One of the items is responsible for setting up remote access to our storage. After completing the basic settings, you will be able to work with media data on the EX2 Ultra from anywhere in the world via the network, both through a browser and the proprietary MyCloud application, available on tablets and smartphones supporting iOS and Android OS.


From your phone you can watch videos, listen to music, work with other files, and also backup your entire media library with photos and videos. For those who take a lot of photographs and videos, but the built-in memory of the smartphone is not enough, this is a great opportunity to quickly free up space in just one click.


Initially, the mirror mode is selected in the settings, that is, RAID 1. But you can also select other RAID 0, JBOD, or even two separate disks. I checked - even in mirror mode, the speed indicators of hard drives are limited by the throughput of a gigabit connection. Therefore, I don’t see much point in making RAID 0 for speed even for video editing or processing heavy RAW files. Moreover, if one of the disks fails, you can say goodbye to all the information. If you store really valuable photo/video materials, then it’s worth sacrificing half of the disk space in favor of a RAID 0 mirror. In which case, we buy a new disk, insert the defective one together and continue working.


S.M.A.R.T technology is used to monitor the disk status. This way you can be warned in advance about an impending problem with one of the HDDs.

There are 4 modules pre-installed in the application section, but you can download others from the catalog. Thanks to the modules, the capabilities of WD EX2 Ultra can be significantly expanded to suit your personal needs.

One of the applications allows you to download torrents directly to network storage. I downloaded dozens of gigabytes of movies and they quietly downloaded in the background without loading my main work laptop.

The settings->network section contains a lot of all kinds of access protocols, ports and everything that a discerning user might need.


Here you can also configure the DLNA media server and the iTunes server.

You can watch movies on most smart TVs with the built-in DLNA media server. But it’s much more pleasant to do this using the pre-installed Plex media server. This is a service that structures your entire library of films and TV series and automatically downloads the correct title, description and covers from the network, even if you just downloaded one file from a torrent. A browser is enough to work on a PC, and corresponding applications are available on TVs.

In the settings section, you can select the language, time zone, change the password and much more.

Naturally, you have access to a number of desktop applications, of which the most important to highlight is WD SmartWare, with which you can back up information from certain partitions on your PC, or even a separate folder. And all this can be configured to work automatically at a given time.

In WD My Cloud EX2 Ultra tests, throughput will be limited by the gigabit port, not by the speed of the hard drives. It doesn’t matter whether you connect to it through a router or directly. Regarding Wi-Fi, here, of course, everything depends on the router, the Wi-Fi module in the laptop or PC, and other individual parameters.
I was able to copy and simultaneously write information to the hard drive at separate speeds of 80-90 MB/sec while actively torrenting several films. In my opinion, this is an excellent indicator of a productive device.
The noise from the disks and fan is practically inaudible even under maximum load, and the temperature also did not go beyond the norm during testing.
Results

For reliable storage of information, a regular two-disk storage unit, which you will connect via USB 3.0 to a PC, is sufficient. But if you want to be sure that all this information will be available to you 24/7, and even from anywhere in the world and from any device, then WD My Cloud EX2 Ultra is practically the only option.
You can find out detailed technical specifications and buy WD My Cloud EX2 Ultra on our partner’s page:

Transcript
1 My Cloud EX2 Ultra Personal Cloud Storage User Manual
2 Repair and support for WD products If a product malfunctions, please do not rush to return it. We are always ready to help you troubleshoot problems yourself. Most technical questions can be answered by consulting our knowledge base or by contacting our email support on the website. If you do not find an answer to your question or prefer to speak with support by phone, please call the number below that is most convenient for you . The product you purchase is eligible for 30 days of free telephone technical support during the warranty period. This 30-day period begins the first time you contact WD technical support by telephone. Technical support by email is provided free of charge during the warranty period, and our extensive knowledge base is available 24 hours a day, 24 hours a day. If you would like to hear from us about new features and services, register your product at Online Support Resources Visit our product support site at where you can access the following: Files. Download drivers, software, and updates for WD products. Registration. Register your WD product to receive the latest updates and special offers. Warranty service and RMA. Get information about warranty, returned product (RMA), RMA status, and data recovery. Knowledge Base Search by keywords or answer number. Installation. Get online help to install your WD product or software. WD Community. Chat and exchange opinions with other WD users. Training Center. Learn how to get the most out of your personal cloud storage here (How to Contact WD Technical Support When you contact WD for technical support, you will need to provide your WD product serial number, computer configuration, and operating system version. North America Asia Pacific Australia USA & Canada, English USA, Spanish China / Mexico Hong Kong India / Europe ASK4 WDEU Indonesia (toll free)* () Japan, Europe Malaysia Middle East Philippines / Africa Singapore Russia Taiwan / Thailand * Toll free numbers available in the following countries: Austria, Belgium, UK, Germany, Denmark, Ireland, Spain, Italy, Netherlands, Norway, France, Switzerland, Sweden WD Product Registration Register your WD product purchase to receive the latest updates and special offers. You can easily register your drive online or using the My Cloud EX2 Ultra personal cloud storage program.
3 Contents Repair and Support for WD Products ii Registering Your WD Product ii 1 Important User Information Important Safety Instructions Recording WD Product Information Product Overview About the System About the Virtual Learning Center What's Included Before Installation Handling with Care Product Components Where to Start Installing disks in a diskless model Connecting a device Getting started with an online installer Getting started without an online installer Uploading content Remotely accessing your cloud drive How to enable cloud access on your My Cloud EX2 Ultra device How to set up cloud access for a user How to share files from mobile devices using iOS and Android mobile apps Manage users, groups, and shared folders User information Group information Shared folder information Dashboard essentials Open the dashboard Dashboard home page How to get support Standard tasks i
4 7 Backing up and restoring files About backup Working with USB devices and backup via USB Remote backup Internal backup Cloud backup Working with storage in the My Cloud EX2 Ultra device Types of disk systems RAID array Disk status Working using the iscsi protocol Volume virtualization Working with programs on the My Cloud EX2 Ultra device About applications Working with programs Playing and streaming movies, photos, and music Media servers Storing media files How to enable DLNA and iTunes servers Accessing your personal cloud using media players Accessing your personal cloud using iTunes Setting up settings Basics Network Media Utilities Notifications Firmware Update How to Replace a Drive How to Identify a Failed Drive Replacing a Drive Returning a WD Hard Drive Warranty and Regulatory Information Regulatory Information Warranty Information (All regions except Australia and New Zealand) Information Warranties (Australia and New Zealand only) ii
5 14 Appendices Appendix A. Quick start guide for My Cloud EX2 Ultra Appendix B. Installation guide for Joomla! Appendix C: PHPBB System Installation Guide Appendix D: Supported RAID Modes Appendix E: Migrating RAID Arrays Appendix F: Safe Mode Firmware Upgrade Procedure Appendix G: Specifications Index iii
6 IMPORTANT USER INFORMATION 1 Important User Information Important Safety Instructions Recording WD Product Information Important Safety Instructions This device is designed and manufactured to ensure your personal safety. Improper use may result in electric shock or fire. The safety features included in this product will ensure your safety if you follow the installation, operation and maintenance procedures described below. Follow all directions and warnings marked on the product. Before cleaning, unplug the product from the electrical outlet. Do not use liquid or aerosol cleaners. Use a damp cloth for cleaning. Do not use the product near any liquids. Do not place the product on unstable objects. The product may fall and be seriously damaged. Do not drop the product. Do not block the slots and openings on the top and bottom ends of the chassis. To ensure proper ventilation and reliable operation of the product and to protect it from overheating, these openings should not be blocked or obscured. In addition, to avoid overheating of the drive, you must ensure that it is in a vertical position. Connect the product only to power sources whose parameters correspond to its marking. If you are unsure of your electrical settings, check with your retailer or your local power company. Do not place any objects on the power cord. Do not locate the product where the power cord will be walked on. If using an extension cord, ensure that the combined ampere rating of all appliances connected to the extension cord does not exceed the ampere rating of the extension cord itself. Also make sure that the combined amperage rating of all appliances plugged into the electrical outlet does not exceed the fuse rating. Do not push objects of any kind into this product through slots on the product as they may touch dangerous voltage points or short out parts that could result in electric shock or fire. Unplug this product and refer servicing to a qualified service technician if: - The power cord or plug is damaged or frayed. - Liquid has been spilled on the product. - The product has been exposed to rain or moisture. 1
7 IMPORTANT USER INFORMATION - The product will not operate properly if the operating instructions are followed. Only adjust the controls mentioned in the instruction manual. Improperly adjusting the product may damage the product and may require extensive work by a qualified technician to restore normal operation. - The product has been dropped or its housing is damaged. - If product performance changes significantly, contact WD Customer Support at WARNING! The device uses a CR2032 lithium battery. There is a danger of explosion if this battery is incorrectly replaced. Replace only with the same or an equivalent battery of the type recommended by the manufacturer. Used batteries should be disposed of according to the manufacturer's instructions. Recording WD Product Information To set up your device and receive technical support, record the following WD product information. WD product information is located on the label located on the back of the product. - Serial number - Model number - Date of purchase - Operating system and programs 2
8 PRODUCT OVERVIEW 2 Product Overview About the System Features About the Virtual Training Center What's Included Before Installation Careful Handling Product Components About the System My Cloud EX2 Ultra is a fast, two-bay NAS device designed for the home or small office. Like other WD products, it is of high quality and reliability. Store all your files centrally and protect them with RAID 1, as well as local network or cloud backup. Cast large files to any screen and expand the functionality of your NAS with a full suite of software. My Cloud EX2 Ultra personal cloud storage is a fast system that, when connected to a wireless router, provides secure wireless access to your media and other files from any computer, tablet or smartphone. This guide provides step-by-step installation instructions and other important information about the WD product you purchased. Updated versions of this guide and other language versions can be downloaded from our website. For more information and news about this product, visit our website. Features Wide range of options You can choose a NAS without drives, and then install the drives you choose into it. You can also choose a pre-packaged model equipped with WD Red drives, which provide maximum reliability when working in the unique conditions of 24/7 NAS systems. Disk Configuration You can choose from several disk configuration options: RAID 0, RAID 1, JBOD or union. Top-notch file protection You have several ways to protect your files from loss. Choose the file protection option that suits you best: RAID 1, USB backup, LAN, WAN or cloud backup. Easy to operate The multi-functional dashboard allows you to keep your system under control at all times. You can monitor the health of drives, manage user accounts, and configure energy-saving features. Email and phone notifications keep you up to date on the status of your My Cloud EX2 Ultra device. Various programs to customize your NAS amule, Icecast, Joomla!, phpbb, phpmyadmin, Transmission, SqueezeCenter, etc. Current versions of programs can be downloaded from website 3
9 GENERAL PRODUCT INFORMATION Several built-in servers File server, FTP server, backup server and download server for the BitTorrent file-sharing network. Stream media to network devices Movies and photos can be streamed to network TVs, media players, game consoles and other DLNA/UPnP-enabled devices. Built-in Twonky media server, DLNA certified. And with the built-in iTunes server, you can easily stream music from your collection. Backup the way you want Protect your files by backing up remotely to another My Cloud device, cloud backup, or backing up over a local or global network. With WD SmartWare Pro, PC users can choose when, where and how to back up files from up to 10 different computers. Mac users can take full advantage of Apple's Time Machine backup software to protect their data. Increase Capacity Simply connect a compatible USB drive to your My Cloud EX2 Ultra device and instantly increase your system's capacity. There are two USB 3.0 expansion ports. Built-in energy-saving functions Stopping disks and turning on and off the drive according to a schedule allows you to save electricity. Your personal cloud, unlike public cloud systems, on the My Cloud EX2 Ultra device you can centrally and securely store all your materials on your home or office network, and not on someone else’s server. No sending your files to anyone knows where. No subscription fee. No restrictions. Additional Features iscsi targets, full FTP functionality, jumbo frame support, IPv6 ready, UPS support (USB and LAN), real-time resource monitor, volume encryption with boot password check, SNMP and virtual volumes About the Virtual Learning Center The WD Virtual Learning Center provides the latest information, guidance, and programs to help you get the most out of your personal cloud storage. This online manual provides step-by-step instructions for setting up remote access, backing up files, checking device status, and more. This is an interactive resource that clearly describes all the stages of installing and using My Cloud EX2 Ultra devices. With the help of the virtual Learning Center, you can: Learn about the features of the purchased personal cloud drive. Download the latest software for your product. Find comprehensive information about all the features of your product, presented in an interactive form. Update your product when new functionality becomes available. Use a constantly functioning Internet resource without a user manual or CD. 4
10 GENERAL PRODUCT INFORMATION Package contents Personal cloud storage My Cloud EX2 Ultra Ethernet cable Network power supply Installation and configuration instructions Installation kit (only for the model without disks) Personal cloud storage My Cloud EX2 Ultra Network power supply* Ethernet cable Installation and configuration instructions setup For additional accessories for this product, visit US Canada Europe All others or or Contact WD Technical Support in your region. Technical support contact information can be found in the Knowledge Base on Answer ID Operating system Windows Mac OS X Windows 10 Windows 8 or 8.1 Windows 7 Windows Vista El Capitan (Mac OS X 10.11) Yosemite (Mac OS X 10.10) Maverick (Mac OS 10.9 ) Mountain Lion* (Mac OS X 10.8) Lion* (Mac OS X 10.7) Note: Compatibility is affected by your computer's hardware configuration and operating system version. 5
11 GENERAL PRODUCT INFORMATION Browsers Internet Explorer from version 10 Safari from version 6.0 on supported computers running Mac OS Firefox from version 30 on supported computers running Windows and Mac OS Google Chrome from version 31 on supported computers running Windows and Mac OS Local network Router or a switch (a model with Gigabit Ethernet support is recommended for maximum performance). Internet For initial setup and downloading of programs, as well as for remote access and work with mobile devices, a high-speed Internet connection is required. Before you begin Installation Before you begin installing the device, select the optimal location for the device. Place it in a location that meets the following requirements: Near a grounded electrical outlet Clean and not dusty On a stable object not subject to vibration Well ventilated, away from heat sources, the slots and openings on the top and bottom of the device are not obstructed Away from electromagnetic fields generated by electrical appliances such as air conditioners, radios and televisions. Careful Handling WD products are precision devices and should be handled with care during unpacking and installation. Rough handling, shock and vibration may damage the discs in the device. Please take the following precautions when unpacking and installing your external drive: Do not push or drop the device. Do not move the device while its power is on. Do not use this product as a portable device. Do not remove both data discs at the same time. In this case, the device will stop responding to your actions. 6
12 GENERAL PRODUCT INFORMATION Product components Front view Indicator Indicators 7
13 PRODUCT OVERVIEW Rear view Reset button USB ports Ethernet port Kensington lock slot Lock slot External power jack (DC jack) Component Icon Description Ethernet port USB 3.0 port Connects the device to a local network. For connecting an additional USB storage device. Reset button Power socket Kensington lock slot () To restore factory settings, such as the device administrator name and password. To connect the device to a power source plugged into an electrical outlet. To protect against theft, the device has a hole that accepts a standard Kensington lock on a steel cable. Details on website 8
14 PRODUCT GENERAL INFORMATION Indicators Front Panel Power LED The table below describes the possible states of the front panel LED. Status Color Appearance Description of status Power off Black (off) Device in standby or sleep mode Powering on Blue Blinking Device is turning on or performing a firmware update. Power On Blue Solid The device is powered on. Power on (degraded) Action required Red Blinking The device is powered on, but the volume has degraded. Yellow Flashing An event (such as a network cable being disconnected) that requires action on your part. Note. If you install incompatible drives, the power indicator blinks amber when you turn on the device. Front Panel Drive LEDs The following table describes the possible states of the front panel drive LEDs. Function Color Appearance Description of function No disk Black (off) No disk. Disk present, no access Blue Continuous Disk present, but no activity. Disk is working Blue Flashing The disk is present and active. NAS disk failure Blinking The disk is present, but is temporarily faulty or has failed. Note. If incompatible drives are installed, the drive indicators flash red quickly when the device is turned on. 9
15 PRODUCT OVERVIEW Rear Panel Network (Ethernet) LEDs The table below describes the possible states of the network LEDs. Note. If you look at the port, the top one on the left is an operation indicator, and the top one on the right is a connection indicator. Status Indicator Type Description of status Connection broken Connection established 10/100 Mb/s Connection established 10/100/1000 Mb/s Connection inactive Connection Off One end of the cable is not connected or the connection is faulty. Link Yellow The cable is connected and data is being exchanged between the two sides of the link. Network connection 10/100. Link Green The cable is connected and data is being exchanged between the two sides of the link. Network connection 10/100/1000. Action Continuous No active communication is taking place. Channel busy Action Green, flashing Active communication is in progress. 10
16 GETTING STARTED 3 Getting Started Installing disks in a diskless model Connecting the device Getting started with an online installer Getting started without an online installer Download content Setting up your My Cloud EX2 Ultra personal cloud storage is easy. Simply unpack and plug it in, then wait until the power indicator on the front panel turns solid blue. Then download the quick installer from the site and run it. Note. To learn how to safely shut down and disconnect your device, see Utilities on page 96. Warning! To protect against electrostatic discharge, ground yourself by touching a metal object before using the device. Installing Discs in a Non-Disk Model Warning! The following instructions provide instructions for installing drives on a My Cloud EX2 Ultra device model that does not come with drives. It is allowed to use drives from both WD and other manufacturers. For a list of compatible drives, see the website Warning! Make sure that there is no power to the device and that it is not connected to the local network. To avoid electrostatic discharge problems, touch a solid metal object (i.e., use it as a ground) before handling the device. Note. For further instructions on how to remove and replace a failed drive, or prepare and install a drive from another manufacturer, see the How to Replace a Drive section on page
17 WHERE TO START Note: To perform these steps, you will need a Phillips screwdriver. Before performing these steps, unplug the power and LAN cables. 1. Press the recessed door button on the top of the unit to open it. 2. Remove the bracket holding the drives. 3. Using the screw from the bag, attach the plastic tab to the top hole on the side of the drive (to the right, as viewed from the green board). 4. Insert the screw into the corresponding hole on the other side of the drive. 5. Place label 1 or 2 on the top of the disc. Label 1 is on the left and Label 2 is on the right when looking at the device from top to bottom. The corresponding numbers are printed on the transverse fastening label. 6. With the front of the device facing you and the drive connector facing down and into the device, carefully slide the drive into the bay. 7. Make sure the tab protrudes over the disc at the back of the unit. 12
18 WHERE TO START 8. Repeat steps 3 7 with the other drive. 9. Secure the bracket over the disks with a screw. 10. Close the door and press firmly until it is securely in place. 11. Go to Connecting your device on page 13. Connecting your device To connect your My Cloud EX2 Ultra personal cloud storage device to your local network in your home or small office, follow these steps. Warning! To avoid overheating of the device, install it vertically, as shown in the figure above, so that the slots and holes on the top and bottom ends of the device are not blocked. If overheated, the device will shut down safely. All ongoing operations will be interrupted. This may result in data loss. Warning! To ensure maximum performance, we recommend that you use the included Ethernet cable. 1. Connect one end of the included Ethernet cable to the Ethernet port on the back of the device. 2. Connect the other end of the Ethernet cable to a port on your router or switch. 3. Connect the power supply cord to the appropriate connector on the back of the device. 13
19 WHERE TO START 4. Plug in the power source. The device will power on automatically. Warning! Before setting up your My Cloud EX2 Ultra device, wait until it is fully turned on (this process takes approximately three minutes). The device is ready to use when the power indicator stops blinking and turns blue. 5. When the device's power light turns solid blue, go to "Getting Started with the Online Installer" on page 14. Getting Started with the Online Installer The Online Installer will help you easily connect this device to your home network or in a small office. Follow these steps to download and run the installer from the Internet, discover your device, and start using it. You can download the installer from the WD Virtual Learning Center at Download and install the installer from the Internet Once your device is connected: 1. In your web browser, go to the Welcome page at 2. On the Welcome page, click Get Started. The installer will begin searching for your My Cloud device. Once the device is detected, a screen appears with details about the device, including the device's IP and MAC addresses. 3. Follow the onscreen instructions to set up your device and install the WD Sync software. 14
20 WHERE TO START 4. Once you've completed setting up and installing WD Sync, a window will appear listing the most frequently used folders on your computer. Select the folders on your computer that you want to sync with your My Cloud device and click Next. 5. WD Sync setup is complete. Click Close to close the WD Sync setup screen. Note. The WD Sync shortcut may be located in the Show hidden icons section of the taskbar. Getting started without an online installer When you get started without an online installer, you can: Use your My Cloud EX2 Ultra personal cloud drive as an external drive, easily sharing files with it. Configure your device using the My Cloud EX2 Ultra dashboard. (See “Dashboard Home Page” on page 35.) Perform internal, remote, cloud, and USB backups (see “Backup and restore files” on page 47). Download content The Public folder on your My Cloud EX2 Ultra device contains subfolders Shared Music, Shared Pictures, and Shared Videos. These folders contain files you copied to your device and backup files you saved from your computer or connected USB drive. Note. In this guide, the terms folders and shared folders mean the same thing. Once you've connected your My Cloud EX2 Ultra device (see Connecting your device on page 13), follow these steps to access its content. IF your operating system is Windows 10, Windows 8 or Windows Then On the Windows 8 start page, type Computer 2. Select Computer. 3. In the left pane, select Network. 4. Double-click the MyCloudEX2Ultra icon and navigate to the Public folder on this device. 5. Double-click the Public folder icon. Icons for the Shared Music, Shared Pictures, and Shared Videos subfolders appear. You can now work with media files in the appropriate folders using Windows Explorer. 15
21 WHERE TO START IF your operating system is Windows XP, Windows Vista, Windows 7 Mac OS X (Snow Leopard, Lion, Mountain Lion, Mavericks) Then Select or Start > Computer > Network > MyCloudEX2Ultra and, if necessary, enter your network (router) credentials ). The device's public and private folders are displayed. 2. Double-click the Public folder icon. Icons for the Shared Music, Shared Pictures, and Shared Videos subfolders appear. You can now work with media files in the appropriate folders using Windows Explorer. 1. Under Sharing in the Finder sidebar, select MyCloudEX2Ultra. 2. If the authorization window appears, select As a guest and click Connect. The Public shared folder will open: 3. Double-click the Public folder icon. Its subfolders will be displayed: Shared Music, Shared Pictures, Shared Videos and Software. You can now drag and drop files into shared folders using the Finder: 4. If you want the shared drive icon to be permanently visible on your desktop, create an alias for it. This can be done in one of two ways: Note. Before you create an alias, go to Finder > Preferences > General Settings and select the Connected servers checkbox. - Click on the item you want to create an alias for (for example, Shared Music) and hold down the mouse button. Now, while holding down the Cmd and Option keys, drag the selected object to where you want to place its alias. As a result, instead of moving the object to a new location, its alias will be created. -OR- Right-click the item you want to create an alias for (for example, Shared Music), and then select File > New Alias. How to assign a drive letter to the Public folder (on Windows) To assign a drive letter to the Public folder on your My Cloud EX2 Ultra device for easy access, follow these steps: 1. In the Network section of Windows Explorer, select MyCloudEX2Ultra. 2. Right-click the Public folder and select Map network drive from the menu that appears. 3. Select the required letter from the Drive drop-down list. 4. Select the Recover at logon checkbox. 5. Click Finish. The Public shared folder is now mapped as a network drive. 16
22 REMOTE ACCESS TO YOUR CLOUD STORAGE 84 Remote access to your cloud storage How to enable cloud access to the My Cloud EX2 Ultra device How to set up cloud access for a user How to provide access to files from mobile devices using programs for mobile devices with ios and Android Personal A cloud system is where your files are stored securely under your control in your home. Unlike public cloud systems, a personal cloud system gives you the ability to centrally and securely store all your data on your home network. Share files, stream media, and access your content from PCs, Macs, and mobile devices, wherever you are. No subscription fee. Without sending your files, you don’t know where. Securely store your movies, music, photos and other files at home and always have them at hand. This chapter explains how to set up remote access to your My Cloud EX2 Ultra device. It also provides examples of how to use some of the device's many features. How to enable cloud access on your My Cloud EX2 Ultra device Before you can use cloud access on your My Cloud EX2 Ultra device, you must enable this feature. To enable remote access to your My Cloud device and check the connection status for remote access, see Cloud Access on page 84. To set up cloud access for a user After you enable cloud access to your My Cloud EX2 Ultra device, Follow the steps below to set up remote access for users of this device. 1. On the navigation bar, click the Cloud Access icon. 2. In the left pane, select the user for whom you want to configure cloud access. 17
23 REMOTE ACCESS TO YOUR CLOUD STORAGE 3. In the “User MyCloud.com Account” field<имя_пользователя>» Click the Specify or change address icon. Click this icon if you have not yet specified an email address for this account or if you need to change this address. 4. Enter this user's email address. Confirmation requests and instructions for setting and activating a password for cloud access will be sent to this address. 5. Click Save. 6. If you have not yet provided an email address, this icon will be grayed out. Provide your email address and then click this icon to submit the information required for cloud access. To create an activation code for a user's mobile device: Warning! Codes are valid for 48 hours from the moment they are created and can only be used once. 1. Click Get Code at the bottom of the screen. You will need to create one code for each of the devices you want to activate. The dialog box will display the activation code and the expiration date and time. Note. Be sure to write down the activation codes you generate. 2. Click OK. Once you use these codes, the Set Up Access page will display the cloud devices that this user is now allowed to access, along with the corresponding activation codes. 18
24 REMOTE ACCESS TO YOUR CLOUD STORAGE How to share files from mobile devices using mobile apps for iOS and Android With My Cloud for mobile and My Cloud for desktop, you can access all the contents of your personal cloud system from any device. My Cloud for Mobile Devices With this program, you will always have access to your personal cloud system. Free up precious space on your mobile device by sending photos and videos directly to your personal cloud storage, then accessing and sharing them securely. My Cloud for mobile makes it easy to share files between your personal cloud, Dropbox, and other public cloud services. With the My Cloud mobile app, you can do the following: Open and view important files stored on your My Cloud EX2 Ultra device anywhere without copying them to your mobile device. Show off photos stored on your My Cloud EX2 Ultra device. Connect from a tablet or smartphone to other cloud services: for example, Dropbox. Stream and play music and movies stored on your My Cloud EX2 Ultra device. Note. The quality of video broadcast is higher when connected via a local network or Wi-Fi. Broadcasting over the WAN is affected by the subscriber data rate limit set by your home Internet provider. Show presentations from tablets running iOS and Android. My Cloud supports most popular file formats, such as Microsoft Word documents, Microsoft Excel spreadsheets, and PowerPoint presentations. For more information about the software's features and how to use it, see the Help on the Help Me page and the Helpful Hints section in WD Photos, and on the Note website. The My Cloud program allows you to transfer files from your My Cloud EX2 Ultra device to a tablet, smartphone or other portable device running Google Android or Apple iOS. My Cloud displays a convenient list of files stored on your My Cloud EX2 Ultra device and allows you to play and view them using the programs of your choice. To find out what file formats your mobile device supports, read its instruction manual. 19
25 REMOTE ACCESS TO YOUR CLOUD STORAGE Requirements My Cloud EX2 Ultra personal cloud storage device with the latest firmware, connected to the Internet. To access cloud services, you must have My Cloud for mobile devices and a valid Dropbox, Google Drive, or OneDrive account. An iPhone or iPad device running iOS 7.0 or later. Smartphone or tablet running Android 4.0 or later. Installing the My Cloud app for mobile devices Download the My Cloud app from the Apple App Store or Google Play and install it on your mobile device. 20
26 MANAGING USERS, GROUPS, AND SHARED FOLDERS 5 Managing users, groups, and shared folders User information Group information Public folder information User information The administrator, typically the owner of the device, is responsible for configuring it. Since you are the owner of the My Cloud EX2 Ultra device, you have a special user account with administrator rights. Using these rights, you can customize your device to suit your needs and add other users to your personal cloud. You can also control which users have access to the device. By default, no password is required for the administrator (admin). You can create one at any time (see How to change a user password on page 25). Note. Simultaneous login to the web interface of the device by several users with administrator credentials is not allowed. Therefore, be sure to log out of the web interface of your My Cloud EX2 Ultra device when you are finished using it. This will allow other users who have administrator credentials to log into the web interface. For information about how to set the program to automatically exit after a specified time, see “Energy Saving Web Access Timeout” in the Energy Saving chapter on page 86. The Users screen displays a list of users. Here the administrator can view information about each user, create new users, create groups, and grant users and groups access rights to public folders. View a list of users 1. From the navigation bar, select the Users icon. The User Settings screen opens. 2. To view a user's details, select their name in the left pane. Information about the user and their folder permissions are displayed. A user can have the following access rights to a folder: read only, read and write, access denied. Note. Folder permissions in the Public Folder Access section cannot be changed because these folders are public. Once a folder is made private, it will appear in this list and its access rights can be changed. (See Making a shared folder private on page 31.) 21
27 MANAGING USERS, GROUPS, AND SHARED FOLDERS How to add a single user The administrator creates user accounts and configures the settings for the shared folders that each user can access. To create one user account, follow these steps: 1. To add a user, click on the icon in the lower left corner of the screen. 2. In the appropriate fields for the account you are creating, enter your username, first name, last name, and email address (optional), and then click Next. 3. To set a password, turn on the switch, enter that user's password, and then enter it again. Click "Next. 4. To place the new user in one of the groups, check the box next to the desired group and click Next. 5. Specify the quota size or leave this field blank to avoid limiting the amount of disk space available to the user, and then click Apply. (For information about quotas, see See Quota Rules on page 25.) The new account appears in the left pane of the User Settings screen. 22
28 MANAGING USERS, GROUPS, AND SHARED FOLDERS How to add multiple users To create multiple user accounts, follow these steps. 1. To add multiple users, click Add Multiple Users in the lower left corner of the screen. 2. Select how you want to enter user information, and then click Next. Create multiple users: Enter user information manually. See Creating multiple users on page 23 Importing users: Import a list of users into the device. Go to How to Import Multiple Users on page 24. Create Multiple Users 1. On the Create Multiple Users screen, provide the following information, and then click Next: Username Prefix: Specify the username prefix. It will be added to the account prefix when creating the username. (Example: HR) Account Prefix: Specify the digital account prefix. It will be added to the username prefix when creating the username. (Example: 143) Number of Users: Specify the number of user accounts to be created. The maximum number of new users allowed is displayed on the right. 23
29 MANAGING USERS, GROUPS AND SHARED FOLDERS Password: Provide a password for these accounts. Confirm Password: Re-enter the password for these accounts. Overwrite Duplicate Accounts (optional): Select this checkbox if you want to replace duplicate accounts already on the device. 2. To place new users into one of the groups, check the box next to the desired group and click Next. 3. Specify a quota size or leave this field blank to avoid limiting the amount of disk space available to the user, and then click Next. (For information about quotas, see See Quota Rules on page 25.) 4. The new user accounts appear. To save them to your device, click Apply. To import multiple users 1. Click Upload to upload a text file specifying the format to use to create the user data file to import. 2. Create and save a file with user data. The import file must have the following format: User data file format for import: #username/user password/user group/shared folder(h+z)/shared folder(h)/shared folder(nd)/user quota Example: #user/pw/g1:g2/folder1:folder2/folder3:folder4/folder5:folder6/0:0:0:0 3. Click Import user list and select the file you created to import. 4. Click Next. 24
30 MANAGING USERS, GROUPS AND SHARED FOLDERS 5. Select the programs for which you want to grant access rights to new accounts and click Next. 6. Click Apply. New user accounts will be saved to the device. Editing User Settings 1. On the User Settings screen, select the user whose information you want to edit. The User Information and Public Folder Access panels appear. 2. Change the required and optional settings as desired. 3. If you have created a private folder on the Shared Folder screen, it will appear in the Shared Folder Access panel on the User Settings screen. You can assign access rights to it for each user. (For information on how to create a private folder, see How to Make a Shared Folder Personal on page 31.) How to Change a User's Password When viewing user information, the administrator can set or change the user's password (the factory default is no password). To change your user password, follow these steps: 1. On the User Settings screen, select a user from the list on the left. 2. Click the switch if a password has not been previously set. 3. Click Configure to the right of the radio button. The Change Password screen appears: 4. Enter a new password in the New Password and Confirm Password fields. 5. Click Apply. How to place a user in a group To place a user in a group, follow these steps. 1. On the User Settings screen, select the desired user in the left pane. 2. In the Group Membership field, click Configure. 3. Select the checkbox next to the group in which you want to place this user and click Apply. Quota Rules The quota system allows you to precisely control the amount of disk space allocated to a particular user or group. There are a number of rules that determine the priority of quota allocation. The user quota must not be greater than the group quota. For example, if the group quota is 20 GB and you try to set the user quota to 30 GB, you will see a message stating that the user quota must be no greater than the group quota. If a user quota is not set, the user will be given a group quota. 25
31 MANAGING USERS, GROUPS AND SHARED FOLDERS If a user's quota is set before the user is moved to a group that has a quota set: - If the user's quota is greater than the group's quota, the user's quota will be automatically reduced to the size of the group's quota. - If the user's quota does not exceed the group's quota, the user's quota size will not be changed. How to allocate quotas to a user To allocate a quota to a user, follow these steps. A quota is the amount of disk space allocated to a user on the My Cloud EX2 Ultra device. 1. On the User Setup screen, select the desired user in the left pane. 2. In the Quotas field, click Configure. 3. Specify the amount of disk space allocated to the user on the My Cloud EX2 Ultra device. To allocate unlimited volume, leave the Quota field blank. 4. Click Apply. Removing a User To remove any users from your My Cloud EX2 Ultra device, follow these steps: Note. The administrator account cannot be deleted. 1. On the User Setup screen, select the user you want to delete from the left pane. 2. Click the Remove user icon. 3. When prompted for confirmation, click OK. The selected user's account will be deleted from the device and will no longer appear in the list of accounts. About groups Groups make it easier to work with large numbers of users. The rights granted to a group determine what actions its members can perform. 26
32 MANAGING USERS, GROUPS, AND SHARED FOLDERS Viewing groups 1. From the navigation bar, select the Users icon. The User Settings screen opens. 2. Select the Groups tab on the User Setup page. 3. To view details about a group, select its name in the left panel. The group details are displayed. Adding Groups 1. To add a group, click the icon in the lower left corner of the Group Settings screen. 2. Enter a Group Name. 3. Select the check boxes next to the names of the users you want to place in this group and click Next. 4. Specify the quota size or leave this field blank to avoid limiting the amount of disk space available to the user, and then click Apply. The new group account appears in the left pane of the Group Setup screen. Changing Group Settings 1. On the Group Settings screen, select the group whose information you want to change. The Group Information and Public Folder Access panels appear. 2. Change the required and optional settings as desired. To learn how to change a group's access rights to folders, see How to grant groups access rights to shared folders on page 27. How to grant groups access rights to shared folders Once you create an account, you can grant the group access rights to folders on the My Cloud EX2 device Ultra by following the steps below. 1. On the Set Up Groups screen, select the group to which you want to grant permissions to the folder. 2. In the Shared Folder Access section, select the type of access you want to grant to the selected user: Read/Write: Select this option to grant the group read and write access to the selected folder. Group members will be able to both view and change the contents of this folder. Read Only: Select this option to give the group read access to the selected folder. Members of this group will only be able to view, but not change, the contents of this folder. Deny access: This group does not have access to this shared folder. The group account will retain the permissions you grant to the folders. 27
WD My Cloud Mirror Personal Cloud Storage User Manual WD Product Repair and Support If you experience any problems with your product, please do not rush to return it. We
Seagate Dashboard User Guide Model: Click to go to the current online version of this document. This version features high-resolution illustrations and easier navigation.
WD My Cloud Personal Cloud Storage User Manual WD Product Repair and Support If you experience any problems with your product, please do not rush to return it. We always
DIR-615 Wireless router with built-in 4-port switch PRELIMINARY PREPARATION Delivery set Wireless router DIR-615, DC power adapter 12V/0.5A, straight
WD My Cloud EX4 Personal Cloud Storage User Manual WD Product Repair and Support If you experience any problems with your product, please do not rush to return it. We always
WD My Cloud EX2 Personal Cloud Storage User Manual WD Product Repair and Support If you experience any problems with your product, please do not rush to return it. We always
Seagate Access for Personal Cloud Manual 2015 Seagate Technology LLC. All rights reserved. Seagate, Seagate Technology, the Wave logo, and FreeAgent are either trademarks or registered trademarks of
PRELIMINARY PREPARATION Contents: Wireless router DIR 300, DC power adapter 12V/0.5A, Ethernet cable (CAT 5E), “Quick Installation Guide” document (booklet).
DAP-1155 Wireless access point/router N150 PRELIMINARY PREPARATION Contents Access point DAP-1155, DC power adapter 12V/0.5A, Ethernet cable, removable antenna,
My Cloud Pro Series Instruction Manual My Cloud PR2100 My Cloud PR4100 WD Product Repair and Support If you experience any problems with your product, please do not rush to return it. We
My Book Live Duo Personal Cloud Storage User Manual WD Product Repair and Support If you experience any problems with your product, please do not rush to return it.
SL3650-LB2. Quick Installation Guide Appearance and Package Contents Front View Rear View 1 2 1 2 3 Hard Drive 1 Hard Drive 2 3 4 5 7 6 1 Power 2 Failure 3 Hard Drive Activity 1 Off
DAP-1150 Wireless access point supporting router mode PRELIMINARY PREPARATION Contents Access point DAP-1150, power adapter, straight Ethernet cable (CAT 5E), CD
DSL-2540U ADSL/Ethernet router with built-in switch PRELIMINARY PREPARATION Delivery set DSL-2540U router, DC power adapter 12V/0.5A, telephone cable with connector
DSL-2520U ADSL2/2+ router with USB and Ethernet ports PRELIMINARY PREPARATION Delivery set DSL-2520U router, DC power adapter 5V/1A, telephone cable with RJ-11 connector,
Wireless router N150 PRELIMINARY PREPARATION Delivery set Wireless router, DC power adapter 12V/0.5A, Ethernet cable (CAT 5E), document (booklet). If included
ADSL/Ethernet router with built-in switch PRELIMINARY PREPARATION Package contents Router, power adapter, telephone cable with RJ-11 connector, straight Ethernet cable (CAT 5E),
DSL-2640U Wireless ADSL2+ modem/router with support for 802.11n (up to 150 Mbps) PRELIMINARY PREPARATION Contents Wireless router DSL-2640U, DC power adapter
My Book Live Personal Cloud Storage User Manual WD Product Repair and Support If you experience any problems with your product, please do not rush to return it. We always
Travelair N Wireless Storage User Manual R11181 Reviewed Edition V2 January 2016 Copyright 2016 ASUSTeK Computer Inc. All rights reserved. Any part of this manual, including equipment
DAP-1360 Wireless access point and router with support for 802.11n (up to 300 Mbps) PRELIMINARY PREPARATION Contents Access point DAP-1360, DC 12V power adapter, Ethernet cable
My Cloud User Manual WD My Cloud Personal Cloud Storage User Manual Designed for My Cloud devices with firmware version 02.xx.xx Product Repair and Support
DSL-2500U ADSL2/2+ Router PRELIMINARY PREPARATION Delivery kit DSL-2500U router, DC power adapter 5B/1A, telephone cable with RJ-11 connector, Ethernet cable (CAT 5E),
DSL-2500U ADSL/Ethernet router PRELIMINARY PREPARATION Delivery kit DSL-2500U router, power adapter, telephone cable with RJ-11 connector, straight Ethernet cable (CAT 5E), splitter,
DAP-1360U Wireless access point/router N300 PRELIMINARY PREPARATION Contents Access point DAP-1360U, DC power adapter 12V/0.5A, Ethernet cable, two removable antennas,
DEPARTMENT OF EDUCATION OF THE CITY OF MOSCOW State budgetary educational institution "Moscow Center for Technological Modernization of Education" Cloud data storage. Google Drive service Methodological
SOFTWARE INSTALLATION GUIDE USER GUIDE Page CONTENTS 1 ABOUT THE SOFTWARE 2 BEFORE INSTALLING 2 INSTALLING THE SOFTWARE 3 CONNECTING TO A COMPUTER
DIR-620 Universal wireless router with support for WiMAX, 3G GSM and CDMA networks and a built-in switch PRELIMINARY PREPARATION Delivery set Wireless router DIR-620, adapter
User Guide Disk #CloudMTS Service for exchanging and storing files https://cloud.mts.ru Version dated January 16, 2018. Getting started Activating your account After the administrator has created
Universal wireless router with support for GSM, CDMA, WiMAX networks and a built-in 4-port switch PRELIMINARY PREPARATION Contents Compact wireless router, adapter
Installation Steps of DNS-1200-05 Quick Installation Guide This installation guide will help you connect the DNS-1200-05 to your network. For more information about using ShareCenter, please
DIR-815 Wireless dual-band router N600 PRELIMINARY PREPARATION Contents Wireless router DIR-815, DC power adapter 12V/0.5A, Ethernet cable (CAT
My Book Live User Manual Desktop External Drives WD Product Repair and Support If you experience problems with your product, please do not rush to return it. We always
My Book Owner's Manual My Book Owner's Manual Desktop External Drives WD Product Repair and Support If you experience problems with your product, please take your time.
Instructions for setting up D-Link DIR-615NRU B7 using the PPPoE protocol. Contents Connecting to the router via an Ethernet cable (LAN).... 2 Connecting to the router via a wireless network (Wi-Fi)....
Hardware and software encryption complex Continent Version 3.9 Administrator's Guide User authentication client RU.88338853.501430.022 90 8 Security Code Company, 2018. All rights reserved.
Wireless router supporting 802.11n (up to 300 Mbps) PRELIMINARY PREPARATION Contents Wireless router, DC power adapter 5V/1A, Ethernet cable (CAT 5E),
Boot Camp Installation and Setup Guide Contents 3 Introduction 3 What you need 4 Installation 4 Step 1. Check for updates 4 Step 2. Prepare your Mac for Windows installation 4 Step 3.
My Passport Portable Drive Owner's Manual My Passport Owner's Manual External Portable WD Product Repair and Support If you experience problems with your product,
Boot Camp Installation and Setup Guide Contents 3 Introduction 4 What you need 5 Installation 5 Step 1. Check for updates 5 Step 2. Prepare your Mac for Windows installation 5 Step 3.
Getting started Hewlett-Packard Development Company, L.P., 2013 Windows is a registered trademark of Microsoft Corporation, registered in the United States. The information contained in this document may be
DSL-2600U/NRU ADSL/Ethernet router with Wi-Fi PRELIMINARY PREPARATION Delivery set Wireless router DSL-2600U/NRU, DC power adapter 12V/0.5A, telephone cable with connector
Avigilon Control Center Server User Guide Version 5.0 PDF-SERVER5-A-Rev1_EN 2013 Avigilon. All rights reserved. The information provided is subject to change without notice. Copying,
Wi-Fi router DIR-825/AC/E1 Quick user guide Appearance. Front view LED indicator Mode Meaning Power Steady (green) Off Power is on. Power is off.
A7, A5 English 1 How and when can I use the Bowers & Wilkins AirPlay Setup App? The Bowers & Wilkins AirPlay Setup App is a simple and convenient way to control everything wirelessly
All original accessories for your equipment on one page Wireless multifunctional router with support for 802.11ac (up to 750 Mbps) PRELIMINARY PREPARATION Delivery set Wireless
DIR-300NRU Wireless router with built-in 4-port switch PRELIMINARY PREPARATION Delivery set Wireless router DIR-300NRU, DC power adapter 5V/1A, Ethernet cable
DIR-615S Wireless router N300 PRELIMINARY PREPARATION Delivery set DIR-615S router, DC power adapter 12V/0.5A, Ethernet cable (CAT 5), document (booklet). If
DSL-2640U Wireless ADSL2+ router with support for Ethernet WAN PRELIMINARY PREPARATION Contents DSL-2640U router, DC power adapter 12V/0.5A, telephone cable
Setup Guide for DSL-2640/NRU (ADSL/Ethernet router with Wi-Fi and built-in 4-port switch (Arkhangelsk branch of OJSC Rostelecom) 1. Appearance 2. Connecting the router. Turn off
Hardware and software encryption complex Continent Version 3.7 User authentication RU.88338853.501430.006 96 4 1 Security Code Company, 2017. All rights reserved. All copyrights to the exploitation
NTI CORPORATION NTI Backup Now EZ 5 NTI Backup Now EZ 5 User Guide B Introduction to Backup Now EZ 5 3 Enabling/Disabling a Backup Job 9 Running a Backup Job
My Passport Portable Storage User Manual????????????????????????? My Passport External Portable WD Product Repair and Support If you experience problems with your product, please contact
My Passport Portable Storage Wireless i User Manual WD Product Repair and Support If you experience problems with your product, please do not rush to return it. We always
I must say that I don’t really like to deal with network settings, so the illustrated three-step instructions inspired optimism.
It's really simple:
- connect the power source,
- We connect the network cable to the device and to a free port of the home router (router),
- go to the My Cloud Setup website (it is listed in the memo), and then the system automatically detects the device,
- create an account,
- We come up with a login and password for ourselves and everyone we want to give access to the “cloud”.
In the future, if necessary, you can and should use the My Cloud Setup link for settings.
The device is ready to use! This is what the web interface looks like:

You can visit the manufacturer's device training center website, WD Learning Center. There are instructions for use, useful tips, and a description of all the characteristics.

Software for more efficient use of cloud capabilities:

For example, WD Setup Software automatically connects the device as a network drive to your computer, no need to fiddle with settings.

Possibilities
Specialists will be pleased with the wide possibilities for setting up and using the device. I’ll look at the main ones from the perspective of an ordinary user.
The main purpose of My Cloud EX2 Ultra is secure storage of information with secure access to it via the Internet. You can access your files and configure your drive from anywhere in the world through MyCloud.com or the My Cloud smartphone app. Of course, the storage itself must be connected to the Internet and network at this time.
The device can automatically synchronize selected files from different computers using the WD Sync function and on the My Cloud, as well as perform backups. On the personal computer to which the device is connected, you can directly upload files to a shared folder through Explorer.


The My Cloud mobile application is available for free download on the AppStore and Google Play, but, unfortunately, it is not available to owners of smartphones running Windows Phone OS.


Synchronization between the “cloud” and gadgets on which the application is installed occurs almost instantly. So the latest versions of files will always be at hand.
There is also shared access for collaboration via the cloud: just add a user by specifying their details (name and email), or create user groups (for example, home, work, vacation).


We indicate the desired folder with access rights and send the link. It doesn't matter what's inside: photographs or documents. In general, you can either allow users to edit, delete and add documents, or give only viewing rights. You can also share a folder with one specific person without the ability to forward a link.
Unlike online services, there are no file size restrictions. There is no need to split the archive with photos, just upload it to your “cloud” and send the link. All!
I liked the fact that you can upload photos and videos directly to your computer in an archive or individually through the My Cloud website. This is convenient, for example, if you use iOS devices. Simply synchronize photos from your smartphone with the cloud, and then easily upload photos back and forth.