From settings screen resolution the clarity of text and images depends. Typically, the larger the monitor diagonal, the higher the screen resolution () it supports. However, the video adapter (video card) also affects the ability to increase the screen resolution.
As stated above, for more high screen resolutions details look sharper. This is especially noticeable on LCD monitors of stationary computers and laptops. On such monitors, the clearest picture is obtained when setting the so-called own or Native screen resolution... In this case, one pixel (point) on the screen corresponds to one physical pixel on the monitor.
With CRT monitors, the picture is somewhat different. There the screen resolution is lower (often it is 1024 x 768 pixels) and the setting of the “non-native” screen resolution is not so noticeable due to the peculiarities of the image display technology.
Reference: The "native" screen resolution is always listed in the documentation for your display. Nearly all modern monitors display a message indicating optimal ("native") settings in case the system is configured to output in a different mode. Also, sometimes the native resolution is specified in the settings available through the monitor's OSD menu.
What is the actual situation with the image adjustment?
Beginning with Windows 7, the system immediately after the end of the installation itself tries to configure the most optimal screen parameters (screen resolution, refresh rate and color depth). These parameters can be very different, both for different types of monitors (LCD monitor or CRT display), and for different models of even the same screen manufacturer.
Install some additional drivers for video cards and especially monitors at the first stages (immediately after installing the operating system) is not necessary. Unfortunately, this is not always the case.
There are times when automatic setting crashes. The OS runs with a screen resolution of 1024 x 768 (and sometimes 800 x 600) pixels. In this case, you can try to configure all the parameters manually.
Manual screen resolution setting
To change parameters displaying the image on the screen you need to do the following:

Reference: If you select a screen resolution that is not supported by your monitor, the screen may black out. In this case, you need to wait a few seconds, after which the original screen resolution will be restored.
Manual monitor adjustment did not help. What to do?
Usually you need to install drivers for the video card from the manufacturer... They can be found either on the disk, if there was one when buying a video card, or downloaded from the Internet. It is better to give preference to the website of the manufacturer of your video adapter. It is very easy to download some malicious program from other sites instead of a driver.
Install the driver, reboot. Nothing changed? Then we try to repeat all 6 points that were described above.
The video card drivers are installed, but the picture is not clear
If after all the manipulations nothing helped, then you, most likely, in the parameter “ Screen"Indicated" Generic monitor (non) PnP". The OS just doesn't know what resolution your display supports.
In this case, some computer forums and sites recommend trying to install a driver for the monitor. Maybe it helped someone. But more often than not, these drivers simply don't exist. Especially it concerns Windows 7 or newer Windows 8 or Windows 10 - for these operating systems, monitor drivers are simply not needed (especially for older monitors).
Simple and quick solution to the problem of screen adjustment
The fix is \u200b\u200balmost always very, very simple. See:

After completing each of these six steps, you need to reboot and repeat the manual resolution setting again, if this did not happen automatically.
In 8 out of 10 cases, it is enough not to waste time fiddling with drivers right after installing the OS, but to make sure that the whole point is that the OS could not automatically determine the monitor model (installed " Generic PnP Monitor" or even " Generic non-PnP monitor») And complete the last 4 points.
Usually the operating system itself determines the resolution for a particular monitor model. However, the automatically selected parameters do not always suit the user. For example, on a 21-inch monitor, I could not get used to small icons for a long time, so at first I independently changed the resolution to a slightly lower one, but it suits me. Today I will tell and show you how to do it correctly using the example of the Windows 7 operating system.
There are three ways to solve this issue at once, but not everyone can use one of them. I'm talking about changing the parameters using a proprietary utility for, which can be installed along with the drivers. However, many users simply refuse to install it, so this method is not relevant for them.
Method one
For example, let's take the Ati Radeon video card, along with which the proprietary Catalyst Control Center utility is installed, through which you can change various parameters. We launch the program (usually it is in the tray), select the "Desktop Management" section, the "Desktop Properties" subsection. Here you will see the current desktop settings, including the screen resolution, which you can change to the one you want.

Second way
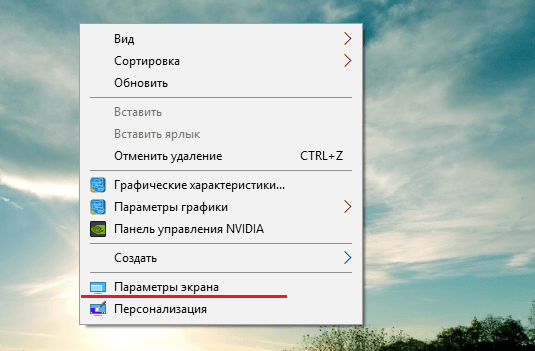
The next option is even simpler than the first. We go to the desktop, click on the right mouse button, after which a menu appears, in it we select the item "Screen resolution".

A window will open.

Here we "play" with the screen resolution - select and click OK.

Third way
Finally, all the same can be done through the control panel.
Press the "Start" button and find the item "Control Panel". Here we select the "Screen" section.

A window will open with the option to enlarge the icons on the desktop. On the left side of the screen there is an item "Screen resolution setting", by clicking on which you can change the resolution.

As you can see, this process is very easy and simple even for a beginner. But what you shouldn't do is change the refresh rate - it is optimal for the monitor and if you set a mode that it does not support, then the device may fail. Fortunately, this rarely happens in practice and applies mainly to CRT monitors, which are currently practically out of circulation.
On Windows 7. To be honest, this is a very broad question that covers almost every element of computer graphics. There are computer games, pictures with photographs, and displaying web pages, and system settings. In general, there are a lot of objects subject to scaling. And that's why we will discuss each moment with you separately.
Images
So, the first thing we can only discuss with you regarding how to adjust the screen resolution on Windows 7 is changing the scale of the image displayed on the monitor. Everything is very clear and simple here.
The first step is to open the graphic file. Now just roll the mouse wheel. In the direction "towards yourself" - the scale will decrease, "away from yourself" - it will increase. In this case, the resolution in the system settings will not change.
In addition, you can increase the size of the picture. To do this, you will need to resort to the help of some third-party program. For example, "Picture Manager". Open a picture for her, choose "edit" - "resize". Set the necessary numbers and save the changes. That's all the problem. However, changing the screen resolution applies to Windows 7 in a slightly different sense. And now we will see with you what else we can talk about.

For games
For example, we can talk about displaying graphics in a game. After all, this is where many users think about how to adjust the screen resolution on Windows 7 without affecting the system settings. This is very inconvenient. Especially when you have a lot of different shortcuts on your desktop.
Special game settings come to the rescue. They allow you to figure out how to create your own screen resolution in Windows 7 and set it only for the duration of the game in this or that application. Run the program and then select "options" or "settings" there. Next, you will have to visit the graphics settings. There you will find the item we need. It's called that - screen resolution. Set the appropriate values \u200b\u200bin it, and then save all the changes. That's all.
However, there is another trick about games. He will help you answer how to adjust the screen resolution on Windows 7, but one that is not in the toy's settings. Start windowed mode, and then just drag our game "around the corners" of the window. When you achieve the desired result, simply go to the game mode. Nothing difficult or special. But you can set the resolution that is convenient for you. But there are at least two more meanings applied to the question: "How to change the screen resolution in Windows 7?" And now we will get to know them.

Browser
Sometimes this question may come from users. After all, they want to change the scale of displaying pages on the Internet. This is sometimes very useful. So let's try to figure out how this is done.
There are several options for the development of events. To begin with, you can try to open the "scale" there, and then set the desired display numbers. They will be shown as a percentage. 100% is the norm, values \u200b\u200blower - zoom out, and higher - increase. Save changes and all problems are resolved.
You can also press Ctrl and then the "+" or "-" located on the right numeric keypad of the keyboard. This combination serves to enlarge the image and reduce it, respectively. In addition, you can cope with the question posed using the mouse. To do this, hold down Ctrl, and then turn the mouse wheel. "Towards oneself" - decreases the resolution, "from oneself" - increases. Nothing difficult, right? Only now we have reached the most important point for a computer. Namely, we will try to figure out how to adjust the screen resolution on Windows 7 in relation to system settings.

For the system
True, this question will not take much of your time. After all, the operating system is simplified to the maximum. If suddenly you need to change the screen resolution of your monitor, then just click with the mouse on the free space on the desktop. Do this with the right button.
You will be presented with a long list of available functions. Find "screen resolution" in it and select this item. In the window that appears, you should find the parameter of the same name, and then simply move the slider up or down, depending on the desired result. Want to reduce the size of your icons? Then you have to move the slider up. Enlarge? Downward movement will do. Save changes, confirm them - and all problems are resolved. Now you know how the scale changes on Windows 7 in every sense.
As a rule, the maximum resolution of modern monitors exceeds the standard 1920x1080, if they have a large screen diagonal (25 "and more). Monitors with a small or medium screen diagonal of the older generation can support the standards 1600x1024, 1140x900, 1366x768, 1280x1024. monitor or laptop display in terms of its resolution, you need to know in order to avoid problems with setting an unsupported value.The maximum possible screen resolution is indicated in the instructions of monitors and laptops.Usually, after installing the video driver, the required screen resolution is automatically adjusted and in the system settings of the Windows screen is listed as recommended ...
But the video driver does not always automatically select the optimal screen resolution. In such cases, manual intervention to set the desired resolution in the system settings or using the video driver manager - usually either Catalyst Control Center or Nvidia Control Panel - is indispensable.
1. Correct and Incorrect Ways to Adjust Screen Resolution
The screen resolution can be configured by means of the operating system by calling the context menu on the desktop and selecting the "Screen resolution" item in the case of Windows 7 and 8.1.

In the case of Windows 10, in the context menu, you need to select "Display Settings", then - "Advanced Display Settings".


Here, in the context menu on the desktop, as a rule, there is also a command to launch the video driver manager. In its window, you need to look for the setting tab to set the screen resolution.

It is advisable to change the screen resolution only in the system settings or inside the video driver manager. And not with the help of various third-party programs that provide such an opportunity. Whereas the Windows display settings and those in the video driver manager are protected from the use of a screen resolution that is not supported by the monitor (the new resolution is first tested for a few seconds with the preset option to reset to the original value),

third-party programs and games can apply the new resolution immediately, without prior testing. And sometimes even without user demand. And if a resolution that is not supported by the monitor or laptop display is applied - too high or, conversely, too low, as a result, we get a dark screen with the inscription "Out of Range", "Out Of Range", "Input Not Supported" or with another message, but that same essence. By experimenting with the screen resolution in the Windows settings or in the video driver manager, such a nuisance can be avoided: if an unsupported resolution is mistakenly set and the screen turns off, after a few seconds it will return to the previous screen resolution and turn on again.

Setting an unsupported resolution can also be the result of viruses entering your computer.
So how do you solve the problem if a screen resolution that is not supported by the monitor has been applied?
2. Participation of the second display
To solve the problem in the simplest way is possible only if at least two monitors or a monitor and a TV are connected to the computer. The same applies to a periodically connected (respectively, previously configured in the system) monitor or TV to a laptop. The problem is solved very easily even if the resolution of the primary display is not supported by the secondary display. And even though the image on the second screen is not duplicated, but expanded. What should be done? On the empty desktop of the second screen, we call the context menu and select the item "Display settings" for Windows 10 and "Screen resolution" for versions of the system 7 and 8.1.

Most likely, the system screen settings window will open on the main monitor with impenetrable darkness. In this case, blindly press the + Shift + right / left arrow keys to move the window to another screen. And set the supported resolution for the main monitor.
If only one monitor is connected to the system unit, but there is another monitor or TV in the room, possibly supporting the set screen resolution, you can try to solve the problem using the latter. All that needs to be done is to connect another, temporary display instead of the current monitor. And with its help, already set the desired screen resolution. It is very possible that a modern TV will be able to cope with a resolution that was too high for the main monitor. And, conversely, there is a possibility that CRT TVs connected using an S-Video cable (for old video cards) or through a special adapter for a VGA cable (of course, if there is one), will be able to display an image with a low resolution of 640x480 or 800x600.
If there is no other display-savior, or one also does not support the problematic screen resolution, to cope with the task, alas, you will have to resort to "dancing with a tambourine." Especially in the case of Windows 8.1 and 10 installed on the computer.
3. Removing the video driver in Windows Safe Mode
To revert back to the screen resolution supported by the monitor, you must boot Windows in Safe Mode, where the system is running at the base screen resolution, without starting the video driver. In safe mode, the video card driver will have to be removed. Then, having started already in the normal operating mode of the system, the video driver will need to be installed again.
3.1. Safe Mode for Windows 7
In the case of Windows 7, this process will be easier due to the ease of entering Safe Mode. You need to reboot the hardware using the Hard Reset button and press the F8 key when starting the computer. Once in the menu of additional boot options, you need to select the "Safe Mode" option.

3.2. Safe Mode for Windows 8.1 and 10 featuring their installation media
For Windows 8.1 and 10, the F8 key does not work, as in most cases its counterpart - the Shift + F8 combination - does not work due to the reduced system startup time. To get into safe mode in these versions of the system, without seeing anything in front of you, you can use the installation media of any of these versions - even Windows 8.1, even Windows 10. Reboot the system using the Hard Reset button, go into the BIOS and set the boot priority from DVD -disk or flash drive. At the first stage of Windows installation, press Shift + F10 to launch the command line. In its window, enter:
We press Enter. And we are waiting for the notification of the successful completion of the operation.

Close the command line window. In the Windows installation start window, click "Next".

We click "System Restore".

Then select "Continue".

After restarting your computer, Windows will boot into Safe Mode.
3.3. Safe Mode for Windows 8.1 and 10 featuring a recovery drive
If you have previously created a Windows recovery disc, you can use it in the same way as an installation disc or USB flash drive. After booting from the recovery disk and choosing a keyboard layout,

you need to select "Troubleshooting" (this menu option may also be called "Diagnostics"),

then - "Additional parameters",

and then run the command line.

In its window, enter the above command and press Enter.


3.4. Safe Mode for Windows 8.1 and 10 Blind
If there is no installation media with Windows 8.1 or 10, no recovery disc, if there is no second computer with which any of them could be organized, or just too lazy to mess with all this, you can try to enter safe mode from a working but invisible system blindly. But in this case, you need to carefully enter the values, know exactly what language the keyboard layout was in before experimenting with the screen resolution, and also be in the Windows environment, and not inside the 3D application (not all games can be minimized by pressing the + D keys ). So what should be done blindly?
Step 1: if the layout was not in English, switch to it with the + space bar.
Step 2: run the command line as administrator by pressing the keys + Q, cmd, Ctrl + Shift + Enter.
Step 3: if the speakers are working, we will hear the familiar UAC system sound; press the left arrow, then Enter.
Step 4: enter the command line command mentioned above
bcdedit / set (default) safeboot minimal
Press Enter and wait a couple of seconds.
Modern systems, starting with Windows 7, can independently choose the optimal value for the screen, so basically you should not worry about this. It turns out that there are people, most likely beginners, asking the question, how to change screen resolution, and it doesn't matter what operating system is and what computer. The instruction will be individual for everyone and, I hope, will help you.
There are a couple more points that I will touch on here. Let's say you have a monitor with a resolution of 1920 x 1080 or higher. It is known that you cannot set a value of 800x600 for it. Why? But because you will see screen distortion, as the values \u200b\u200bdo not correspond to the physical values \u200b\u200bfor the screen.
Let's start from the depths, namely the seven. Using this particular operating system, you do not have to worry that the value will not be chosen accurately. Although sometimes the value is set lower than necessary, so knowledge that can be gleaned from this manual comes to the rescue.
There were moments on the topic in the article, and the article itself is quite useful. If interested, you can read.
To manually adjust the screen resolution, right-click on an empty space on the desktop. A menu will appear where we select the option "Screen resolution".
One of the subsections of the control panel, called "Screen Settings", opens. Here we see three parameters:
- Screen;
- Resolution;
- Orientation;
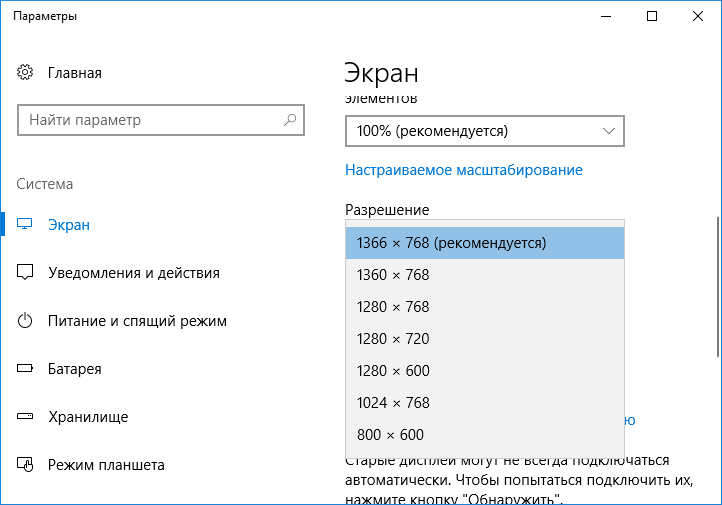
Naturally, we are concerned about the second point. The former is responsible for choosing an additional monitor, and the latter is already clear. Open the options tab "Resolution" and choose the maximum. In my case - 1366 by 768. Most likely, the corresponding word will stand opposite the maximum resolution - Recommended.

The note: it is worth paying attention to the moment when you cannot change the value of the screen. The fact is that you must install the drivers for the graphics adapter. As a result, you can change the screen value not only from the control panel, but also in the video card settings. Below I will explain how to use these settings. (Drivers are usually installed automatically).
How to change the screen resolution in Windows 10
The specified operating system has the same parameters from the control panel, but it still needs to be found. We will not bother, but see how to do this from the options menu.
As in the first case, we press the right mouse button on the desktop and select the option Screen Options.
A window opens with a subsection "System". There are many tabs, but we are interested in "Screen". On the right side of the window, we see several parameters:
- Night light mode - best for reading in the dark;
- Scale and layout - what we need;
- Multiple displays - we can connect additional monitors.
Find the parameter "Resolution" and change to the maximum value, it will be marked with "Recommended".
In addition, you can specify the size of the text in applications. The default is 100%, but the value can be changed to 125%.
Unfortunately, this method is the only one in the top ten. The "Screen" section has been removed from the control panel, and you can change the desired settings only through the "Parameters" menu. That's how bad they are, these Microsoft people.
Using the graphics adapter utility
I'll show it using an example of an NVIDIA video card, since I don't have AMD.
When we click on the desktop with the mouse to call the context menu, we can see the following items:
- Graphics Specifications (Intel HD Graphics);
- NVIDIA Control Panel.

Both of these sections have many settings, but only the first includes screen resolution options. Let's take an example Intel HD. If you have this software, then launch it.
The HD graphics control panel opens. Go to the section "Display".
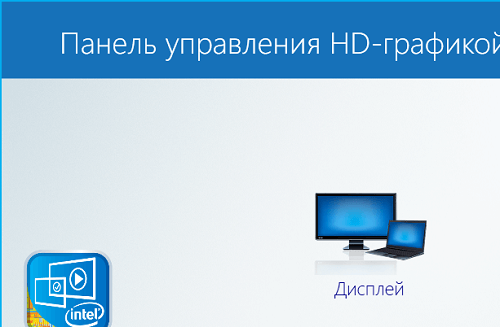
In the main settings of this miracle, we see all the options that we need. Now you know how to change screen resolution using HD graphics.

Well that's all, now you know everything. In the game, this procedure is done in the settings. And I will not say anything about Windows 8, since there are the same parameters, why say a hundred times about the same thing. Hope this little tutorial helps you.


