Are you on fire to stream your favorite game you play on Twitch? Let's see how to do it.
System requirements for Twitch streams.
Keep in mind that this the minimum Recommended system requirements and a more powerful computer will obviously work better. Also do not forget about your Internet connection. Twitch’s Broadcasting Guide says you will need to transmit from 4,500 to 6,000 kilobits per second, with 1080p resolution at 60 frames per second and from 3,500 kbps to 5,000 kbps for 1080p at 30 frames per second.
Often new computers are bought for streams; read about how to connect a computer yourself in
Getting Started with OBS Studio
To start broadcasting on Twitch, you will need OBS Studio (Open Broadcaster Software Studio), which is easy to configure and works well with Twitch.
Consider a client program for Windows, but versions for Mac and Linux are also available.
So, download and install the program.
We start.

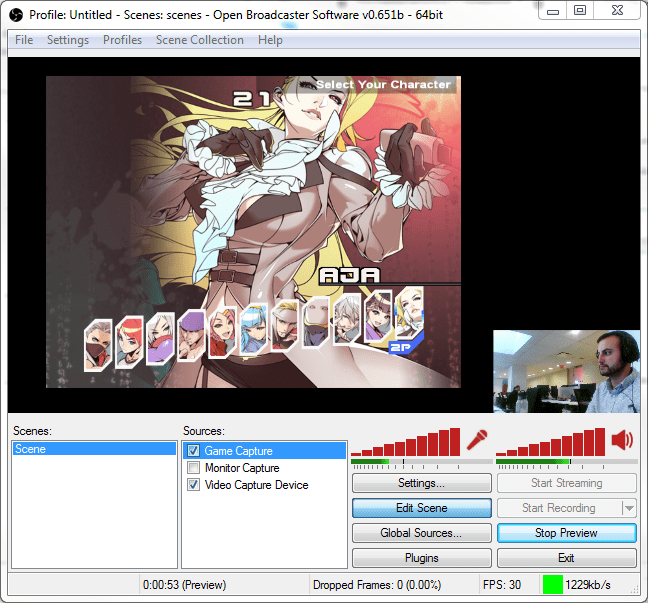
You will see a window with a blank screen and a set of functions at the bottom. Here you will create a “scene” and indicate the sources for your broadcast. The scene in OBS Studio is the final product that you will show on Twitch, and the sources are all the various elements that make up your scene.
Most Twitch game streams are not just a screencast of the game itself. Usually these are several sources, for example, the image of a webcam image in a picture, a watermark, and sometimes animated overlays of the screen. Animation is beyond the scope of this tutorial for beginners. We will use four main sources: the game itself, the webcam, sound, and the watermark.
How to set up translation in OBS
Let's start by adding the most important element to the scene: broadcasting the game window.

However, before we do this, let's rename our scene to something more appropriate. Right click item « Scene" on the very left panel at the bottom of the OBS window. Select « Rename" and come up with a name. In my example, I'm going to stream The witcher 3 so I called my scene the name of the game.
Now add the game feed. Launch the game, and after launching it, click Alt + Tab, to return to the OBS window. It does not matter if the game is in full screen or window mode.
TIP. Users with multiple monitors, for convenience, can place OBS Studio on a second monitor during the setup process.
Choose “ Game capture » in the sources window.

Then add a new source. Click sign "a plus" on the panel « Sources and in the menu that appears, select « Game capture » . This will open a second window, just click on it. OK, to open the thirdwindow.

Geralt patiently waits while we set up OBS Studio.
This is a properties window and adding a game. At the top of the screen, click the drop-down menu next to and select "Zgrab a specific window ». and select the.exe file of your game. In my case it is witcher3.exe.
After you have selected the EXE file, you should see the display of your stream in the window. There are also several options that you can configure here: experiment with them. Now click « OK", to return to the main OBS Studio window.

Because OBS Studio is very flexible, Game Capture is not the only broadcast option. You can also transfer your entire desktop, not just one program.
How to set up a webcam for a stream
Adding a webcam stream gives your gameplay a personal touch. For Twitch streamers, webcam image transfer is standard practice. If your PC does not have a webcam,Logitech C922 is the best option, which is very popular among streamers.
To configure the camera, click the plus sign in the field « Sources again, and in the context menu select « Video Capture Device . Once again, a small window appears that you can ignore. Just click Ok, to go to the properties window.

OBS Studio automatically selects your webcam. However, if you have two or more options, just select the one suitable for your broadcast. You can use the settings in this window, but as long as your webcam is selected from the drop-down list at the very top, it should work fine.
It is very important to determine the shooting angle for your camera. Do you want the viewer to see you from above, directly or from below, or maybe something else?
In order to choose where to put the camera, just look at other streamers and choose what you liked for yourself.
If you want that your home background was not visible on the stream, whether it be a wardrobe or a mountain of clothes on a chair, then you need to use Chroma key (color key). Those. the same green screen against which films are shot.
To play with the color color settings in OBS Studio, right-click on Video capture device on the panel « Sources and select « Filters "\u003e" Effect Filters "\u003e" Chroma Key ".
 Once your webcam is selected as the source, you can choose where it will be located on the broadcast screen. By default, the upper left corner is used, but you can customize it by dragging the window.
How to set up sound in OBS
If you do not have a high-quality microphone, you can go in two ways. The first is to use a headset microphone, as some gamers do.
The best choice, in our opinion, would be HyperX Cloud Alpha ($ 100), and our favorite budget option is the Astro A10 ($ 60). However, most tape drives use a desktop microphone such as the Blue Yeti ($ 130).

By default, OBS adds a microphone stream to you, but if you have several inputs, such as a built-in microphone, a webcam microphone, a headset microphone, and a desktop microphone, you must specify which one you want to use.

In section « Mixer (highlighted in red)find entry Mic / aux and press the button cog in the right corner. Drop down menu "U construction " select your microphone and press « OK".
Now you can mix different sounds to get the right settings for your stream. Many people lower the volume of game sounds and raise the microphone volume so that viewers can hear the streamer better.
How to add a watermark (channel logo)
To give the stream extra weight of professionalism, you can add a watermark - a small logo of your channel that appears in the corner of television programs.

Click the plus sign again in the box "Sources"select « Picture" and press « OK", to go to the third window. Select a PC image and then click Ok yet time.
Returning to the main window, click on the watermark image and it will be highlighted in red. Now adjust the location and size. If you want to make the image transparent, right-click on the image and select « Filters » > « Chroma Key ». Then select a numerical value (from 0 to 100) in the option Opacity, to make transparency. You can also play with various sliders to get the desired effect.

Now that we have the watermark, view the full stream by starting the game. Good looking? It remains to let the stream directly to the Twitch channel.
How to set up broadcast from OBS to Twitch channel

Twitch is easy to set up. Just go to the site and create a user account. Click the username in the upper right corner, then select « Control Panel".
You can view your stream from the dashboard, but it will not appear until you connect your OBS client to your Twitch account. To do this, click « Settings » in the left column of the dashboard. On the next page you should see an option in the main part of the window called Stream Key. Select it and on the next page click on “ Show key » . Copy the code to the clipboard.

Then open OBS and go to « Settings » in the lower right corner. Next select « Flow". In section "T ip flow " select « Streaming Services ", then in the section « Service" select "Twitch» .
At this point, OBS Studio can run a test to find the best Twitch server suitable for your location. If the server is not selected near you, you can select it manually from the drop-down menu "FROMserver » . Finally, copy the stream key to the box marked Stream Key. Click « Apply » and « OK" and you're done.
Now go back and preview your broadcast in OBS Studio for the last time.
Before you start streaming, go back to your Twitch toolbar and click « Live » in the left column. Under the heading « Stream Information » enter a name for your stream and the name of the game, then click « Update information" .

Return to the desktop, click « Start Broadcast » in the main window of OBS. You will see that the stream has gone. Congratulations!
Direct stream
Successful streamers understand how to balance the attention of viewers. When you broadcast, you not only play, but also talk with your audience, chatting with the audience and sometimes checking the OBS window to make sure that the stream is working.
For all this, you will definitely want to use a second monitor, since your game will occupy the entire space of your main monitor - if you are not so crazy as to play the game in windowed mode. If you only have one monitor, you can use your phone () (), tablet or laptop to follow the chat.
If your computer is not very powerful then it can help you
It will also be useful to figure out if you will use it anyway.
Also, I personally faced the problem of freezing for half a second of games, even having a very powerful computer is to blame
If you have any questions, ask in the comments and success on Twitch!
We previously wrote about streaming on YouTube using OBS Studio. To start streaming on Twitch.tv, each player will need the same program and an active account on this service. Further, the settings for broadcasting will be similar, as in YouTube. However, some nuances are still inherent. Let's consider them in more detail.
Set up a Twitch.tv account to stream
In order to organize broadcasting on the Twitch.tv channel, it is worth making several changes to the settings of your own account.
We go to the site and log in with your username and password. Select "Settings". There will be several tabs in this section. In the “Profile” tab, it is worth setting a profile photo. Image loading is standard.
In the “Turbo Access” tab, you can familiarize yourself with the benefits of a paid subscription. It costs $ 8.99 a month.

In the “Channel and video” tab, you need to make the following settings. Download the banner of the video player, which will be displayed at the moment when the broadcast has not yet begun or has already ended.

The service is prohibited from broadcasting material +18. However, if you think that your stream is not worth watching for children, it is worth checking the corresponding box.

The item "Archiving broadcasts" is responsible for saving the footage on the channel. If you set the “Broadcast Delay” checkbox, then messages from viewers will come much faster and they will be able to monitor your reaction without a time delay.

IMPORTANT! Do not ignore this point, as there are a lot of inadequate people who can spoil the stream with their comments.

We save changes in this tab. The rest of the settings are left by default.

You can also add viewers here who can watch your stream.

In the "Security and Privacy" tab, you can block messages from unfamiliar users or gamers that you are not subscribed to.

In the “Notifications” tab, you can configure the distribution of notifications by e-mail or phone with information about subscriptions, comments, channel ratings.

In the “Connection” tab, you can bind a channel from Steam or YouTube.


Here you need to specify the name of the broadcast and write what game you are playing.


All other tabs are necessary if you have already broadcasted. They will display the statistics of video views, the number of posts and likes.
Features of setting up OBS Studio for streaming on Twitch.tv
We start the program and click "Settings".

The settings in the “Basic” tab are set the same as in the method for organizing broadcasts for YouTube. In the Broadcasting tab, select the Twitch service and the Amsterdam server. Paste the copied key from the site.

In the "Output" tab, set a simple output mode, determine the video bitrate using Speedtest (an indicator of transmission, not receipt of data). The audio bitrate is set automatically. Recording quality, select "Same as broadcast." The video format is better to set FLV.

In the “Audio” tab, set the frequency to 44 KHz and select the sources for recording sound.

In the tab “Video” we set the extension taking into account the technical characteristics of the PC. If you have a powerful processor and video card, then the extension can be set high. The scaling filter is always set to “Lanczos Method”. FPS mainly expose 30.

Hot keys can be set as desired. In the "Advanced" settings it is worth setting the priority to high or medium and fill in the "Video" section, as in the screenshot.

Now create the "Scene" by clicking on the cross. Give the scene a name.

We pass to the source. Click "Add" and select "Capture the game."

We put the mark "Make the source visible."

A new window will open. Select "Capture any full-screen application." We put the mark "Show cursor."

Click "Start Broadcast."

We go to Twitch and see that the broadcast has also already begun.

Thus, streaming on a tweet is quite simple. It is enough to set the necessary settings in the account and make changes to the settings of the OBS Studio program.
To learn more about streaming on tweets, see the video:
Want to make your stream on Youtube? We will try to tell in detail how to do this.
YouTube used to allow you to do online broadcasts, only you had to specifically request access to this function, and not everyone received it. But with the release of the Youtube Gaming platform, everything has changed for the better. Now, to start the broadcast, it is enough to complete 4 simple steps once, and then it will be enough just to click on one button.
And if you don’t know why to do streams at all, then article for you:
How to stream through YouTube?
In the sidebar, go to the tab "Live Broadcasts".


The first thing you need to configure is a video encoder - a program for streaming. To do this, follow the link in the section and on the page that opens there is a description of the most common programs and detailed instructions for setting them up. Even a child can handle this.
After that, under the broadcast window on the page, fill out information about our stream. This name, description, select a category.

On the settings tab, you can change various settings. All of them are intuitively clear, but by default everything is pretty well configured there, so if you don’t want to bother, you can not touch it.
And for those who want to climb in the settings - we’ll tell you what’s what.

The included tape recorder option will allow your viewers to rewind the broadcast live. If, for example, someone missed something, then you can easily go back a bit and review it. The function is very useful and can be useful to most streamers. And given that you can rewind a whole 4 hours ago, then almost any broadcast will be available to the viewer, who is even a little late for the start, but wants to watch from the very start.
The option “Make a record available by reference” hides it from the public domain. The stream will be available only through a direct link, which you can throw off only to your friends or, for example, only to subscribers. With this option you can make some kind of private stream. True, there is no guarantee that no one else will share this link with everyone.
Delay on the stream is needed when there is a broadcast of some tournament, and so that the opponents do not spy on the actions of the opponent live and a delay was invented. True, now the maximum delay is only 60 seconds.
If you are not a tournament player and just stream something fun, then it is better to select the “Lead the air with the least delay” option. This will allow you to almost live chat with the audience. Although there will still be a slight delay of a couple of seconds, you need to come to terms with this.

The help menu allows you to display various useful information about the stream for the audience on the stream. It could be anything. Links to other channels and videos, information on how to leave a donation or some polls.
The thing is very useful and, most importantly, you do not need to bother with third-party services and widgets, as you have to do it on streams on Twitch.
This completes the settings. Now to start the broadcast you just need to turn on the Video encoder and the broadcast will start automatically. After turning off the video encoder, the broadcast will stop, and its recording will be saved on your channel.
As you can see, making a stream on YouTube from a computer screen is very simple. And if you still have questions: ask them in the comments - we will answer all!
Hello!
I decided to publish a fairly comprehensive guide for those who are interested in streaming, and do not know how to start.
It will cover a wide variety of topics, with a large number of suggestions based on my personal observations and the advice of experienced streamers.
This guide is made for those who plan to use OBS, Xsplit or another program, but are not familiar with them.
Therefore, before you begin, we advise you to fasten your seat belt, put on a helmet, get a cup of tea and understand the reason for traveling on this article.
Create your channel
Coming up with the name of the channel, as for any product, you want something catchy and easy to remember. In addition, for those who want to play with him, you must have a theme.
Your name is just as important because it makes you different from others, it’s like the brand of your channel.
Some people, when creating a channel, use unattractive and not original names, for example ‘ZZfukkyStReAM’, although you can come up with a more memorable type like ‘Fuk.ky’ or something like that.
You are likely to try to gain a foothold in some place in the ranking of this highly competitive market, so think carefully about the name of the channel, as this will be the basis for many future decisions.
Catch phrases
At first glance, this may seem silly, but catchphrases can do a lot in this industry. They create branding, a sense of familiarity for fans / viewers, allowing you to find your channel among others. CohhCarnage, for example, has its own - “Good Show !!” when it receives a level for Ezekien_III, it also has a unique fist punch that takes place to get a new level.
Coming from your own catch phrase, it can make people worry on your channel, they will look forward to your catch phrase, and what they say, watch it yourself when talking to the audience.
Schedule
Before you start the broadcast, plan a schedule.
This is very important in order to indicate the specific time of the stream for the audience, preparation for the implementation of your goal and to inform the time of your stay on the Internet. This is important for retaining viewers.
Stable broadcasts are needed to attract regular viewers, because they can come, and there is nothing to watch! On the other hand, you don’t need to broadcast too often, because you will be exhausted too quickly and the streams will not have new content.
Make the right schedule so that it stabilizes the views of your channel, attracts new viewers and the subsequent increase in your popularity.
Hardware
This is the most talked-about part of streaming broadcasts, each build is unique, and it's hard to say if there is a perfect installation. What I'm going to do is explain the purpose of each component, and how important they are for the broadcast and your viewers.
CPU
CPU (processor) is usually the most important aspect regarding the technical side of streaming video.
If you use 1 PC, it not only launches the game, but also encodes the video and broadcasts to the channel.
What is coding? Coding is the process of converting the media content that you record and converting it to a standard that will be twitch.
Coding is a resource-intensive process, and that means you need a pretty powerful processor.
I recommend processors with resources, more than those that you will use to provide sufficient calculated power, as well as durability.
When buying a processor, you need to determine the time frame at which it can be used, not paying attention to the system requirements of the games.
AMD / Intel processors will allow you to get the maximum for your money, even if you spend $ 100, the processor will be considered powerful for another 2 years before it needs to be updated.
GPU
GPU (video card) is essential in the gameplay.
The two main competitors are AMD and nVidia.
The better your video card, the better the game will look, and you will get a higher quality broadcast.
If you use nVidia's nvenc encoder, the GPU will not be so critical of the broadcast, mostly just the game.
RAM
RAM (random access memory) is short-term memory. I would recommend 8 GB, but I highly recommend 16 GB or more, since open world games and survival games use a lot to store data from servers.
RAM significantly improves multitasking when you run several applications, while broadcasting the game.
HDD / SSD
You probably use HDD (Hard Drive Disk) or SSD (Solid State Drive).
SSDs are ideal for storing all of your main programs and the operating system that runs and runs from it.
The HDD uses mechanical components to run, which allows you to store your data on it.
SSDs use flash memory (just like flash drives, and this allows them to be faster and more reliable, since the likelihood of mechanical damage is zero).
If you want to save the broadcast content on your computer, make sure that you have enough memory on the HDD.
So you can record your broadcast!
Monitor
The monitor will become your best friend when your broadcast becomes more popular.
I am currently using 3 monitors
“Why so much?” You ask.
The central monitor is the main one - I play games on it.
The left monitor is for OBS, for displaying notifications and so on.
Finally we got to the right monitor. I use it for chatbot (I use Ankhbot, but more on that later).
Webcam
If you decide to use a webcam, then you should take a decent, high-quality Logitech worth about $ 100, which will last you for several years of use (of course, technically).
Microphone
Choosing a microphone is a more complicated decision.
Each person has their own, proven way to broadcast audio to their viewers.
Many people use a simple headset, and ultimately switch to something else when they are fixed in the ranking of streaming broadcasts.
Others immediately use high-quality microphones like the Razer Seiren or Yeti Mic.
And not an unimportant aspect - will you use a regular audio input, or will you buy a digital one, maybe you will use a studio microphone to broadcast professional-quality sound with a lot of options and effects, for which you will need a scissors shaped stand.
Network
It is important that you have more than 5 Mbps download speed. This will allow you to upload your encoder to a bitrate of ~ 2000 Kbps.
Video capture
For those who want to broadcast console games, an external video capture card may be required.
There are many capture cards for older connections and HDMI.
You have the opportunity to use internal capture devices, but external ones will reduce the load on your computer, since the processor will be used only for games, as on consoles.
Finding a capture card is also quite costly, an activity in terms of time and money.
Periphery
Peripherals. This is a mouse, keyboard, various gamepads.
This does not put a strain on the stream, you just get what you like - you make the gameplay more convenient for yourself.
Configure OBS
1. You need to download OBS. This is an open source application. It is absolutely free, which does not limit the user to the broadcasts.
2.Download the CLR Browser, which will be needed to provide the channel with warnings and other notifications.
3. Follow the instructions to install the downloaded OBS and CLR browser plugin.
4. Register an account on twitch.tv. Go to the channel and in the right cutting panel in the information panel find the Stream Key and click “Show Key”. This is important for OBS, as it uses it to broadcast to your channel. Stream Key will need to be inserted into the field called Stream Key Play Path, and when the LIVE mode is turned on, the video will begin to be broadcast on your channel.
5. Set the encoding bitrate. The golden rule of the streamer is that the bitrate is about 2000 Kbps for your Internet. Make sure to use the CBR encoder, I personally use the X264 encoder.
6. Set the video options. The golden rule is the resolution of 1280x720 (720p) and 30 fps (frames per second).
7.Set the sound options as you prefer. You can leave the default microphone settings. I personally use a stereo microphone with high sound quality, but tuned to mono.
8.Create scenes and sources. Sources are combined into scenes. For example: you want to make an introductory video before the start of the broadcast or before the start of the game, or during the download of the game / match. It also adds a webcam, text notifications.
9. Make a trial run of the broadcast. This is important for evaluating the original video stream that viewers can see.
Branding
1.Logotype. It must be something unique. When creating a logo, make sure that it catches your eye. The viewer should immediately understand that this logo represents exactly your channel.
2.Lining. Whether you buy them on the Internet, or do it yourself - overlays should improve your channel, increase attractiveness. But do not get carried away, because you may not notice how the entire screen of the stream becomes clogged. You can provide information about yourself, donations or new subscribers.
3.Information panels. On your channel at the bottom (just below the video) there is an information panel. Use it as you wish. Here you can leave links to your pages from social networks, to sites and just write about yourself. When creating panels, consider the theme of your channel, this is very important.
4. Social networks. Associate the name of your channel with your pages on social networks. This gives rise to some kind of advertising and distribution on several sites: Reddit, Facebook, Twitter, Youtube and so on.
Stream! The good part!
These will be general tips to help you in the online broadcast industry, which always has room for improvement. Even the best serpentine and entertainer have room for improvement.
Do not be neutral about what is happening in the chat. Address the audience, talk to yourself, comment on your actions, the same music. this will not only make your video the content of the dialogs, but also attract new viewers, for which, in fact, you are playing. In addition, you will train your vocal chords so that you can talk for a long time.
Minimization of the flow shutdown time. Try to reduce the amount of time you are away to solve personal problems. If you are young, then explain to parents or other family members the essence of the broadcast and why you need it. Explain the time that you plan to spend on broadcasting - I hope they understand you. After all, agree - there is nothing worse than a mother talking about scattered underwear in the bathroom.
Do not play oversaturated games unless you are a good player. Try to avoid what I call “TOP 4”: League of Legends, Defense of the Ancients, Counter-Strike: Global Offensive and Hearthstone if you don't know how to play them. These games are too competitive, and you will look like a small midge among the streams of tournaments or professional players. Try starting with games with 300-500 viewers, unless this is the only broadcast channel.
Do not shout at the "Dudosers." “Dudosery” are those who will try to spam, advertise your channel or just insult you. Most viewers will simply leave watching your game. Better turn on some bot. Some people may want you to just sit back.
Do not ask for a donation. That makes you seem too pathetic. Usually funds donate to teams. Therefore indicate what you are striving for.
Be sure that viewers are comfortable watching you.
Network. Network. Network. Do not clutter the network. Limit the resources of your broadcast. After all, some viewers do not have the Internet like yours.
Create contests! Although rare, it can attract more viewers. This can make you a more promising member of the streaming community.
Bots
Now I am going to list three main bots.
1.AnkhBot. This is my favorite bot, because it has quite flexible settings. It is completely free and all information and actions will be stored on Google Docs, with which it can integrate. He has requests for songs, prizes and so on. It also has the ability to block / delete links, block / delete languages \u200b\u200b(for example - you want viewers to communicate only in English, then messages in other languages \u200b\u200bwill simply be deleted).
2.NightBot. A free, web-based bot that provides features such as: moderation, song requests, as well as user teams.
3.MooBot. Like NightBot in that it is also cloud based. Includes song requests and more.
Security
1. Create a separate mail that does not contain your name, nickname or channel name. This will create a gap between you and your Internet person.
2. When creating PayPal, go to the business accounts section and make sure that all information is hidden by the privacy settings. Your address will be displayed when buying things, but information will be hidden when you get paid. I recommend using the name “Channel’s Twitch Channel”.
3.Do not use skype with the audience! If you trust 100% random viewers, do not even use TeamSpeak. Discord is a new application that prevents your viewer from getting your ip address.
4.Don't give too many details about your location! I do not recommend inviting family / acquaintances to streams, as they can talk about your name or location. Get a PO Box to send things to viewers without worrying about anyone getting your personal details.
5. Make sure that you change the mail of your steam profile. If you sent someone a game, the recipient will see your email address. Change it.
Who wants to sit and play games all day? As it turns out, millions of people. Twitch, an online streaming site, is one of the largest video game platforms. How to stream on tweak? How to organize streaming correctly?
Every month, more than one hundred million players visit it in order to watch professional games, talk shows about games or solo streams, which are offered here more than two thousand.
The most popular Twitch streamers have already turned into real Internet celebrities and have gained thousands of legions of loyal fans who are ready for days to watch how they dominate opponents in the League of Legends or squeal funny while passing choruses. Many of these people have a lot of sponsors and thousands of followers on social networks - two attributes that are more common among athletes than those who make games for a living.
But, although only a few can break through into the NBA or NHL, anyone with a more or less modern PC or console can become a Twitch streamer. If you want to try yourself in this field, that's all you need to know: from the simplest characteristics of hardware to the tricks that real pros use.
How to stream on tweak: a set of necessary tools
Good computer
Although there are a few exceptions, which I will discuss a little later, most likely you will stream from your PC. Speaking of specs, Twitch recommends an Intel Core i5-4670 processor (or its equivalent from AMD), 8 GB of RAM, and Windows 7 or later. (Don’t worry, you can stream from Mac too.)
If you stream PC games, you need a graphics card that is powerful enough to run what you are about to play. Ideally, it supports Direct X 10 or later. The faster your Internet connection, the better - you need to have a download speed of at least 3 Megabits per second, that is, any home Internet or even mobile rates from some operators.
Despite the fact that the requirements of the Twitch application itself are very low, simultaneous game and streaming can significantly load your PC. Some popular streamers even use two computers - one for playing and one for broadcasting. If this seems too complicated for you, then look at a PC like CyberPower’s Pro Streamer, which holds two different computers in one system unit.
Twitch Account
You can visit Twitch and register for free. After that, you will need to set up a profile: add an avatar, banner and description so that viewers can learn more about you. If you want all your broadcasts to be recorded and available even after a year, go to Settings - Channels and Videos - Broadcast Archive.
How to stream via tweak: software
The most important part of any streamer toolkit is live streaming software that lets you demonstrate how you play around the world. The two most popular programs are Open Broadcasting Software (OBS), absolutely free, and XSplit, which offers an incredibly simple and intuitive interface, but requires the purchase of a paid subscription, which provides access to its main features.
Regardless of which software you choose, setting up your stream will include the following steps: selecting your sources (monitor, directly the game and webcam), arranging all these layers in such a way that the audience is as comfortable as possible, and, finally, synchronizing with your Twitch account and start broadcasting.
Microphone and camera
Although you can continue to use your regular gaming headset, it is best to purchase a separate microphone so that your viewers can hear you clearly. For $ 129, you can take Blue Yeti, which is one of my favorite USB microphones due to high-quality noise reduction and the ability to configure various modes. If your budget is limited, pay attention to the Samson Go Mic, its portable counterpart can safely be called the Razer Seiren X.
If you don’t have a camera yet, but want to show your face, Logitech HD Pro C920 will be the best option, due to its broadcast quality (full 1080p) and wide field of view. Logitech C922 offers the same, but also has the function of automatically removing the background, which allows you to show the maximum of the game itself, losing the need to purchase and install a chromakey. Razer Kiyo also has good resolution and technology to avoid over-illuminating your face.
How to stream on tweak from the console?
If you have a PS4 or Xbox One, you can stream directly from the console, without any additional applications or equipment. On Xbox One, you just need to install the Twitch application, on PS4 you can start the broadcast directly from the main menu. In cases where you do not want to delve into the intricacies of stream settings, as you would have to do on a PC, consoles are an excellent option.
If you want to stream from Nintendo Switch or any other console (or just get more control over your broadcast), you need to get equipment that transfers your stream to a PC.
The most popular option is Elgato Game Capture HD, which records 1080p video from the Xbox One / 360, PS4 / PS3, Wii U and surpasses all other equipment with an HDMI output. It also has a built-in component adapter in case you decide to stream from dusty retro consoles. If you want a smoother broadcast at 60 FPS, you should pay attention to the Elgato HD60.
How to start streaming on tweets?
We have prepared for you a concise and maximally universal step-by-step guide:
- Register your own account on Twitch, including confirming your email address.
- Install selected software. We recommend that you familiarize yourself with the OBS and XSplit functions in more detail, as well as test each of them in a practical way. These programs will become your daily helpers, so treat the procedure with full responsibility.
- XSplit is much more popular, and it is used by most of the top streamers, so we will consider its settings in more detail. Immediately after starting, you need to select the scenes that are displayed during the broadcast. Usually this is the game itself and the image from the webcam. This procedure is very intuitive.
- Now we pass to the choice of permission. It is important to pay attention to the capabilities of your own video card - not all of them will be able to withstand the load. As you might have guessed, the lower the quality, the higher the performance.
- The choice of FPS, on which the image quality directly depends. In the free version of XSplit, the maximum value is 25 frames per second. This is enough for beginner streamers, and when you start making money, purchase a license and broadcast at 60 FPS.
- Connect your previously registered Twitch account to XSplit. You can do this in the broadcast settings. The optimal parameters depend on the performance of your PC, the only universal advice is that the buffer should be twice as large as the bit rate.
- We are already close to launching the stream, now we need to select the area of \u200b\u200bthe screen that viewers will see. We recommend that you play with the settings, as well as create some preliminary scenes - so you can easily chat with friends on social networks, despite the fact that viewers will continue to see the game.
- We return to the broadcast tab and launch the channel whose name matches the name of your channel on Twitch. You are gorgeous!
Audience engagement

Twitch has become a real home for those who play the whole day and earn their living from it - but not because they play fresh games or have powerful equipment. Top streamers really know how to entertain: someone became famous for their incredible headshots in Call of Duty, while others are famous for playing all Zelda games in 20 minutes. But, more importantly, they are all true professionals.
“(Our top streamers) are modest, friendly, incredibly entertaining, and they treat people in the chat as if the viewers were real stars in this show,” says Chase, Twitch’s PR manager.
If you need good examples of how to attract an audience, the video of the popular HearthStone player Jeffrey “Trump” Shih, called Streaming 101, is perfect. Shih has compiled the key qualities required by the streamer in the acronym OPTICS (Opportunities, Presence, Technology, Interaction, Persistence and Skills). Focusing on any of these aspects will increase the number of your viewers.
When you become quite popular, they can offer you a partnership agreement that allows you to get a share of the profit from streams and provide your viewers with special opportunities for purchasing a monthly subscription. Regardless of what level of popularity you are counting on, we have collected tips for you from the best streamers that tell you how to start streaming on tweaks and do it as efficiently as possible.
Find your niche
How do you stand out among the two million streamers on Twitch? All Burke Black needed was a pirate hat and a lot of patience. Over two years of continuous streaming, he turned into a streamer partner with 23 thousand subscribers who were looking forward to his evening show to see his favorite jokes and antics again.

Launch any of Black’s streams and you will see him in a brown pirate costume with an epic beard and bandana with skulls on it. Despite the fact that he is 36 years old, he combines his amusing manner of passing any game, from pirated to GTA V, with constant communication with the audience.
“I think this is a real show, and not just another guy streaming games,” Black says. “People come here because they like the atmosphere of a place where they can come and have a good time amid all kinds of pirate stuff.”
Turning into a pirate is not the only way to stand out on Twitch. You may have enormous platforming skills, or you may have a cute dog that you can put in front of the camera while shooting enemies in Counter-Strike. Find what makes you special.
Be consistent
Consistency is vital - people turn on TV to watch their favorite show every night, and they are sure that it is on schedule. You need to do the same with your channel. It doesn’t matter whether you stream for lunch, or early in the morning, follow your schedule and make sure that the message about the start of the broadcast is posted on all your social networks.
The more viewers feel as if they are comfortable sitting on the couch watching your game, the more loyal followers you will have.
“You’ll never reach an audience if you stream at random times when you want to,” says That’s Cat, a 26-year-old professional streamer specializing in survival games with over 30,000 followers.
Make friends
Sonja "OMGitsfirefoxx" Reid is one of the most famous Twitch stars, it has 631 thousand subscribers and its own store with paraphernalia. Although most of her success is due to a direct and unconventional sense of humor, as well as continuous interaction with the audience, her breakthrough came just at the time when she began to collaborate with other streamers.
“We started the daily Minecraft stream, just wanting to play with friends and relax a bit” - Reid talks about Mianite, a series of streams in which she and other popular Minecraft streamers poison their jokes by spending time in one of the best crafting games of our time. "It made a splash, and the third season of the show will begin very soon."

That’s Cat also made a name for herself by playing with other streamers. In fact, she already had 500 subscribers on the channel before she launched the first broadcast, as she often played with other popular streamers before that.
“There were only 80 people on my first stream since I was in the community of other streamers.” Three months later, she was already offered a partnership agreement.
Interact with viewers
The main difference between Twitch streams from other shows is that the audience is a key success factor. All broadcasts have a chat window that allows streamers to interact with those who support them. The more viewers feel as if they are comfortable sitting on the couch watching your game, the more loyal followers you will have.
Reid affectionately calls his fans the foxx family. Even after receiving thousands of subscribers, she continues to treat them with awe.

“I learn as much as possible about my subscribers, remember what happens in their lives and discuss this with them during the stream. Having a community that is a true family is what matters to me, ”she says.
Interaction with the audience is the number one priority for Black, which carefully monitors the chat while it is playing. Black also distributes quite often, which, in his opinion, encourages fans to come back every night.
That’s Cat’s has such a loyal audience that viewers come to her channel even when she launches really terrible games.
“I damn played Barbie’s Dreamhouse, but the community supported me anyway,” she says.
Do not worry about your equipment (At least for the first time)
Does your favorite streamer have a super-clear webcam and a cute green background and stream from two computers at the same time? This does not mean that you should do the same, at least at the very beginning. Twitch system requirements are quite acceptable, so first focus on increasing the audience, and only then turn your bedroom into a full-fledged studio.
“I started streaming on an old HP laptop, which burned my hands constantly overheating, and also sat on an ordinary cheap Walmart armchair,” says Reid, who managed to get much better equipment after her audience grew.
Be patient and don't forget to have fun!
Black’s patience is now paying off: he has almost 24 thousand subscribers, and Twitter is full of photos of loyal fans wearing T-shirts with his image. Now Black is working as a photographer, and he plans to concentrate completely on streaming at the moment when he receives 500 paid subscribers.
Reid emphasizes the importance of each viewer, despite the fact that there will be only a few at the beginning of the journey: “Even if you have three, thirty or three hundred viewers, these people chose your channel in order to relax in their free time”
In the end, it’s very important to remember that we play games. It doesn’t matter: is it a hobby, or a bridgehead for building a career, you should have fun - the more pleasure you get, the more those who watch you will receive it.