Logging into your Gmail email service account is pretty easy. But first you need to create your account on this service. Now you will learn how to easily and correctly enter mail, and also learn the basic settings of this mail service, understand how to change mail settings, and also learn how to edit existing contacts.
If you have not previously registered with Gmail, then do it now, because the procedure is elementary, and does not require special skills or knowledge.
registration
Register an account, because It’s the same for all Google services. we go by. 
Click the "Create Account" button. fill out the form.  In the process, you must specify your data - initials and the desired email address. You can specify any name and surname, since the resource allows you to create a different number of mailboxes. And we get ...
When registration is completed, the system will automatically redirect you to a personal account via a link, that is, you will find yourself in your personal account, where you can already begin to fully work and use the capabilities of the Gmail system. But keep in mind that each time you re-enter, you will need to enter the login information - this is the email address and password, so save the information in a safe place.
Some novice Gmail users experience some difficulties when logging in, but they can be avoided by entering the correct data and agreeing to the browser saving the password. Thus, in the future you will not need to enter your password and Gmail address on the keyboard, since they will be automatically entered when you enter your account.
How to log in to Gmail:

Fill in the data that we talked about above - login, password (the login address is your mailbox);
After entering the data, click the "Login" button; 
How do I sign out of my gmail.com account?
To sign out of your current Gmail account to change your profile or in other circumstances, you need to select the "Sign out" option on your profile picture. 
Gmail Settings
Mail works without any settings, but an inquiring mind may want to fine-tune everything for itself. Basic settings are hidden under the gear icon. 
After mastering the basic functions of Gmail, you will want to change the mail configuration or change the template. To do this, in the left menu, find the “Gears” tab and click. A drop-down column of functions will open, among which select the Themes function. Or click on “Settings” - a context menu will open in which you select everything you want.
Create contacts
In the Gmail service, you can create and delete contacts, as well as perform group actions with existing ones. It is possible to enter additional information about the contact: phone numbers, addresses, birthday.
To add a new contact, select the "Contacts" section.  A window will appear where you need to enter data about the created contact. Changes will be saved automatically.
To change Gmail contacts, you need to select the contact you want to edit, click on it, and now you can edit all of its data.
In the process of using Gmail, you will gradually master all its functions, and will be able to do everything at your discretion in the future.
Gmail (Google mail) is a free email service provided by the US company Google. I can’t say exactly what year gmail.com mail registration became available to all users. However, for more than ten years I have been using google account, and never regretted it. At the time of registration, when there were computers with installed hard drives with a volume of 40-60 Gigabytes, gmail.com mail provided its users 2 gigabytes of free space, which they could dispose of in their own interests. It was a record lot at the time. Now, of course, you won’t surprise anyone with this, but the fact remains. Currently, creating a Google account is necessary for all users of android-devices in order to reveal all the capabilities of smartphones and tablets.
You won’t need to register with the Google Play Market service and many other popular services if you have already created a gmail.com account. To make it more clear, I’ll explain - free registration of a Google account provides you with:
- Automatic gmail.com mail registration;
- Automatic sign up for Google Play Marketused on android devices as a store of applications and games;
- Automatic data synchronization (contacts, reminders and others) on tablets and smartphones running the Android operating system;
- Using gmail account for authorization in many games;
- Using a Google drive to store data on the Internet;
- Authorization in the popular service Youtube.com;
- Use of Google maps for navigation;
- Using the Google Plus service and many others.
How to register mail at gmail.com
I suggest going directly to creating a Google account. You should start by launching any browser in which you need to go to gmail.com. On the page that opens, left-click on the Create Account button. 
Google will ask you to fill out the registration form that opens. And you need to start by entering your name and surname. I recommend writing your real data so that in the future there are no issues with authentication. Now come up with the name and address of your future mailbox and enter it in Latin letters. For example, if your name is Svetlana Chaika, you can enter “svetachayka” or, perhaps, your nickname, which has been preserved since school. Gmail.com may also be required for work or a corporate site. Then use the name of your company or the domain name of your site. For example, skompom. Now enter your date of birth, then create a password to log into your gmail.com account. Password must be at least eight characters long and contain latin letters and numbers. The password must be entered twice to confirm. I recommend immediately writing it to a notebook so as not to forget. Then indicate your gender, everything is simple here. 
Free registration with Google It will continue with filling in the phone number for quick password recovery if you still lose or forget it. This, of course, must be a mobile phone number, which must be indicated with the country and operator code. If you already have a mailbox on another service, you can specify it in the "Spare email address" column. But this is optional. In the next step gmail account registration you must enter the characters that you see in the image. This is the so-called captcha, the input of which is necessary to identify the facts of robotic registration. After that, indicate the country of your permanent residence and confirm acceptance of the terms of use of the account by checking the corresponding item. Gmail registration almost over. To continue, you must click the "Next" button. 
The next step will be to create a profile in the project of the social network Google+, like Odnoklassniki, VKontakte and others. If you do not need to create a profile, click the No button. Otherwise, click the Create Profile button. 
Automatically after clicking the button, you will be taken to a page where you will be informed that gmail account created and will display your new email address. If you still haven't recorded it, do it now. In the upper right corner you will see a bell with the number "3". This is how the Google+ project notification system works. 
By clicking on the bell, all new service alerts will open. Click it again to hide the alerts. 
To set up your Google account, add a profile photo, click on your profile icon with a little man displayed. 
In order to open the contents of the mail itself, you must click the "Go to Gmail service" button. 
A welcome window will appear in the gmail service, from which you will learn that you can use it on any device and much more. To close the welcome window, click on the cross in the upper right corner or click the “Forward” button to familiarize yourself until you get to gmail. 
This is how your mailbox looks, the appearance of which can be customized. You will already have new letters from Google with congratulations and other information. 
As you can see, create google account very simple. It does not take much time and does not require any supernatural skills and knowledge. Now you have gmail accountwhich you can use on your tablet or smartphone. You can register gmail several times if there is such a need. For example, if you bought android devices to other members of your family. I will be happy to answer any questions you may have that can be asked using the comment form for the article. Be with the computer on "you."
How to create mail on Gmail.com - a free service from Google? There is nothing easier. In this case you will receive the most functional and secure email service. But that’s not all, along with e-mail you will receive google account, and with it access to numerous free services from google. Google provides Gmail.com email for free.
1. What services from Google will be available with Gmail?
- Google drive - cloud storage (15 GB),
- Youtube - access to create your channel on a popular video hosting service,
- Google+ - this is a social network, if you have your own website, then for promotion in Google I recommend publishing here announcements of articles,
- Google play - a huge portal for downloading games, programs, books,
- Google Docs - presentations, tables (free xls alternative), drawings,
- Blogger - free hosting for hosting sites,
- Google keep - to save the necessary information in one click,
- Google calendar - to plan meetings and affairs,
- Google hangouts - online chat and video and voice communication (alternative to Skype),
- Google photo- storage, editing, publication of photos. Photos are stored on disk,
- Google Translate- translation of sites and texts.
More recently, Google’s Gmail service has moved into first place in the world in terms of user numbers, overtaking the popular Outlook.com service.
2. What are the benefits of Gmail.com?
- functionality that is many times greater than other mail services,
- access from any device that is connected to the Internet,
- the ability to connect the forwarding of letters from your other mailboxes,
- security, protection against hacking (work through the https protocol protected by encryption),
- automatic sorting of incoming emails,
- spam protection, one of the best spam cutters.
3. How to choose a name for an email address?
If you need mail for online business, I recommend using your real name or the name of your site, this will cause the maximum trust of your partners and customers.
Since Google is very popular, getting the desired name for the email address is quite problematic. Keep in mind that you can use dots to create it.
IMPORTANT! Before proceeding with the registration instructions, I think you should tell you such useful information. Do not confuse the Gmail.com service with Gmail.ru. The latter has nothing to do with Google. Gmail.ru is a paid email service.
4. How to create mail on gmail.com?
To create an email on Gmail.com, go to:
Register Gmail.com \u003e\u003e\u003e
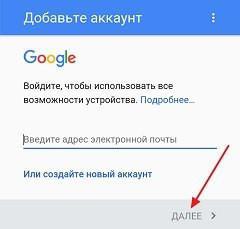
Enter your data, including the phone number for password recovery if necessary, enter the country, click "Next".

On the next screen, confirm your acceptance of the Gmail Privacy Policy and Terms of Use by clicking the Accept button.


5. How to configure secure login to your mail, protect mail from hacking?
At this step, I highly recommend you configure security and login.If you want to protect your mail from hacking, set up 2-step authentication Logging in to Gmail: with a password and sending a code to your phone. Moreover, when it is activated, you can define your computer as reliable, then when you log in from it you will not have to enter the code sent to the phone each time. Settings can be made at this link:

Here's an explanatory video on Google’s dual authentication:
6. How to log in to Gmail.com?
You can always enter your mail, or typing "gmail.com" in the search bareither from any page of any of the Google services, clicked on the buttonlocated in the upper right corner of the screen. Then click to the Gmail mail icon and voila - you are in your mail!

So here the interface of your new Gmail.com mail. The first welcome email from Google has arrived.
7. How to make basic settings?
There are a lot of settings and useful functions. A separate article would be needed to describe them. To use mail, it will be enough to complete a few settings, which I will discuss now.
- Button "Install the Gmail application." To have access to mail from your phone, install the Gmail application on your mobile phone by clicking on this button and follow the simple instructions.
- Button "How to use Gmail". Be sure to check out, there is a lot of useful information.
- The “Select Subject” button provides a background selection for mail.
- The “Change profile photo” button allows you to set a profile photo by selecting and downloading a photo from your computer. The photo will be displayed in the upper right corner of the screen.
- The button “Import addresses and mail” allows you to configure the forwarding of letters from all your other mailboxes to see all the letters in one application. You will be able to receive letters and send on behalf of any of your mailing addresses.
8. Gmail.com inbox - how to set up?
It should be noted that Google mail has one of the best spam cutters in the world, while other mail services generally do not fight spam.
Further, if all the letters fall into the same Inbox folder, then you will soon have thousands of unread messages accumulating. Therefore, it is better to set up automatic sorting of letters. In particular, mailings from which you cannot unsubscribe annoy me. So, you can make settings for sending them to a separate folder (create a shortcut for it) with simultaneous deletion.
Gmail sets up automatic sorting of incoming emails in mail using this useful video:
So, now you know how to create mail on gmail.com, how to configure secure login and protect your mail from hacking, how to perform basic mail settings, including the very important automatic sorting of incoming messages.
I wish you inspiration for all your plans and projects!
Write your questions in the comments.
One of the services that allow you to register an electronic mail box for free is Gmail. Its creator is Google (Google). The mail system was launched on April 1, 2004, but it was possible to register a mailbox only by invitation. Today, registration is available to everyone.
Using Gmail, the user can very quickly create, send, receive, delete, sort letters. In addition, this service provides 10 GB of storage space for letters. When registering in this service, the user receives an email address of the form [email protected]. In 2012, Gmail became the most popular email service in the world, ahead of its rival Hotmail (Microsoft's email service).
Key features of Gmail:
- 10 GB mailbox
- built-in chat, which allows you to send and receive instant messages from other users, it is also possible to see the interlocutor (the chat supports voice and video communication);
- quick search for the necessary messages;
- protection against unwanted correspondence (spam);
- high level of mailbox security (encryption is used);
- the use of labels, notes and filters makes working with letters very comfortable;
- it is possible to work with the mailbox through any mobile device by installing a special application;
- free use of all the features of an electronic mail box;
- advanced setting of the contact list, allowing you to add information for each of the interlocutors (phone, address, photo);
- built-in spellcheck, which includes the display of spelling options and automatic detection of the language of the message;
- regularly saving editable messages in a draft every minute so that data is not lost in case of any malfunctions.
Sign up for Gmail
To start working with Gmail, you need to create a Google account (account). First, go to the Proceed to registration address, then enter your data. In the first two fields you need to write your name and surname (these fields are required), then you need to come up with the name of the mailbox. When inventing a name, it is important to create a unique one that is not registered in the service, and is easy to remember. If the name is already taken, the service will warn about this, offering to use a similar one or come up with a new one. When inventing the name of a mailbox, you can use from 6 to 30 characters, but not less than 6. In the case when the user wants to use more than eight characters consisting of numbers, the system will not accept such a name, proposing to add at least one Latin letter to the numbers.
Next, you need to select a password consisting of at least eight characters. The registration service warns you that you should not use simple passwords, which are very easy to pick up for attackers. In the next field, the user will need to confirm the password. After you must specify the date of birth and gender. These fields are also required. Next, you need to specify either a mobile phone number or a spare email address. Both the telephone and the secondary address are used by the system to recover a password forgotten or lost by the user.
The next field is confirmation that the user is not a robot. You need to enter the two words indicated in the picture. If the words are not clear, you can click the Refresh button and get a new picture with other words. It is also possible to skip this check, but if you check the box next to the words “Skip this check. Maybe ... ”, it is necessary to indicate the mobile phone number, since with its help it will be necessary to continue registration. The “Country” field is determined automatically by the registration service, but if the system made a mistake, you should choose your country of residence from the drop-down list.
A prerequisite for continuing registration is to check the box next to the words "I accept the Terms of Use and ...". If this is not done, the registration process will not continue. Regarding the words "I want to see what they recommend ...", it is not necessary to put a tick in front of them. Next, click the blue “Continue” button.

If all the data is entered correctly, the system will open the next page, which will prompt the user to add his photo (there are two options for adding a photo: from the hard drive, from a web camera). Adding a photo is not a prerequisite, you can simply click the "Next" button.

In the new page that loads, there will be congratulations on the completion of registration, as well as the email address that is best kept. To save in a safe place you need not only the address of the received box, but also the password so that in the future there will be no problems with entry. This completes your Google account registration.

Work with a mailbox
To go to the mailbox, you must either click on the blue button "Go to Gmail service" or click on the inscription "Mail", which is located in the very top panel of the page. The user will see a page with incoming letters, and a window will appear asking you to transfer messages from your old mailbox. In order to do this, you need to click the "Import Mail and Contacts" button, and in the page that opens, enter the address of the old mailbox and password from it. This data will not be used by Google, it is necessary exclusively for transferring all correspondence from one mailbox to Gmail.

Create and send message
The first button on the left panel of the mailbox is “Write”. Using it, you can create and send a letter. When you click on this button, a pop-up window will appear in the bottom right, in which you need to specify the recipient's mailing address in the first field, then write the subject and the text of the letter. On the bottom panel (to the right of the blue "Submit" button) there is a button "Formatting Options". By clicking this button, you can select the size, color of the text, its alignment, etc.
To the right of this button is the “Attach Files” button. By clicking on it, you can see the auxiliary strip that appeared, with which, using the "Browse" button, you can select any file from the computer’s hard drive and attach it as an attachment to the letter. When the message is created, and the necessary files are added, you can click the blue "Send" button. After a few moments, the letter will be delivered to the recipient.

Work with Inbox
In order to view the incoming letter, you just need to left-click on the line with the letter. A message will open immediately. Working with an open message is quite simple. Just use the horizontal strip with buttons, which is located immediately above the header of an open letter. These buttons make it possible to add a message to the archive for further work with it, send a message to spam (junk mail storage), delete it, move it to another folder, mark it as important or read, etc.

Mailbox left pane overview
To return to the list of incoming letters, just use the "Back to Inbox" button or just click on the tab in the left panel "Inbox". By clicking on the triangle to the right of the Inbox button, the user is given the opportunity to change the style of the folder. You can choose the most convenient arrangement of letters in the folder: “Important first”, “First marked”, etc. If the user marked some letters, they can be found in the next two folders in the left panel (“Marked” and “Important”). All sent messages are automatically saved by the system in the “Sent” folder, and just below it is the “Drafts” folder containing messages that were not saved by the user.
Using the “More” button located below, the user gets access to the “All mail”, “Spam” and “Trash” folders. By clicking on "All mail", you can see a list of all letters (received, sent, drafts, spam, etc.), by going to the "Spam" folder, the user will get acquainted with the letters that the system considers to be of no value (advertising, mailing lists with notifications about stocks). The “basket” contains all correspondence deleted by the user. If the user does not need all or some of the letters in the "Recycle Bin", he can easily delete them and, if necessary, restore deleted messages.
Gmail is easy to work with. Too many users use it as their primary. With a significant number of functions, Google’s email inbox makes it easy to perform all the necessary operations with letters. It is also important that there is no need to take care of the safety of the box, and to understand its work is simply not even a very experienced user.
Useful video
Justbank TV talks about all the possible ways to withdraw funds from an electronic wallet. Subscribe to our Youtube channel so as not to miss the new useful video about personal and business finances.
Today, email is an integral part of any communication. It is very convenient to use, because you can instantly send an interlocutor a file of almost any format or accept an incoming one. It is very important that you create an email address and that it is easy to use and reliable. Therefore, this article will help you learn about gmail.com mail.
Using this mailbox is easy. In order to enter the server, you must register your own account with Google. In this article, we describe how to log in to your mailbox. In addition, we’ll show you how to configure and edit it in the future, as well as how to secure gmail.
In the event that you have not yet created your own account on the Google server, proceed to register it. Then return to this page to be aware of how to log in and set up your gmail email address.
Reasons for testing difficulties entering the mail
After creating your own account, the server will automatically authorize you. That is, you will immediately enter the saved gmail inbox. However, in order to use it successfully, each time you will have to enter and exit your own mailbox in order to secure your correspondence. It is especially important to log in and out of the "mail" if you did not log into it from your computer (from a working one, for example).
Since there are people who are faced with the problem of entering the Google mailbox, we are interested in what it is connected with. We tried a variety of computer equipment, and also worked with completely different software. But we did not have to find out any difficulties: we entered the mail from any device in the standard way. Given this experience, we concluded that perhaps some steps are not reproducing correctly.
Sometimes inbound users do not share gmail.com and gmail.ru emails. The first is from Google, the second is from a completely different server. Therefore, you need to make sure that you are trying to enter it in the saved box from Google. In addition, the mailbox interface sometimes changes, which also causes some difficulties when trying to log in. But in fact, you need to abstract from the appearance of the service, since everything happens in a standard way, despite the updated interface.
Gmail inbox: how to log in and out?
If you want to use mail and log in to gmail, do the following:


If you need to exit gmail, look at the upper right corner of the page. You will see your own photo there. Click on it and click on the “Exit” menu that appears.

Google Email Settings
Today there are very convenient functions in the mail (interface, way of working), which you will definitely want to change at your discretion. For example, you have the opportunity to create a permanent signature, change the appearance of labels or choose a different topic for the appearance of mail.
In order to change gmail settings, you need to do the following: pay attention to the upper right corner of the page. There you will see the gear icon. Click on it and click on "Settings". It is here that you have the opportunity to transform and change the category you want.


Join contacts
Mail from the Google server contains a very convenient feature. It makes it possible to create, save and enter the necessary contacts in the address book specially created for this. This feature gives you the opportunity not to clog your head with all the email addresses of your interlocutors. In addition, it is possible to come in and make contact with additional information. For example, mobile number, date of birth, address of residence.
If you decide to add a contact:


To log in and change contact information:
- On the line of the left settings menu, click "My Contacts".
- Select the contact you want to make changes.
- After that, you have the opportunity to create any changes to the contact information.

It is also worth noting that in the case when you send an e-mail to an unknown system, the gmail.com server can automatically put the appropriate address in your contacts. By choosing the "Contacts" menu, you can easily add changes to the information about this contact.
Transfer email and contacts
Maybe in another email you have a ready-made contact list? But does the mechanical import of each individual contact take too much time? Then this setting is for you. Mail from the Google server contains a function that allows you to transfer the contact list from almost any other mailbox. In addition, it gives the opportunity to import all your correspondence.
It is convenient to transfer letters and contacts from Yandex, Mail.ru services. But it is also possible to do this from other emails. For this:
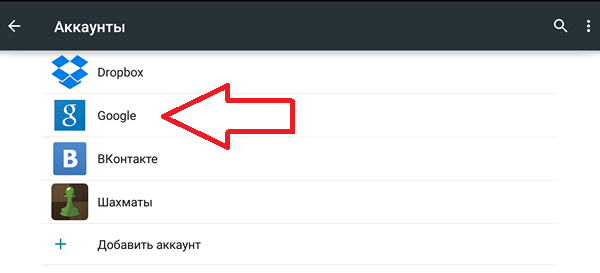
- Click the gear icon located in the upper right corner of the gmail page. You need to go in and click "Settings".
- Select the Accounts category. Check mail from other accounts (using POP3). By following the instructional information that appears on the settings screen, you can easily transfer contacts or letters.

Gmail email security
If you think that you are an ordinary person, a simple user and no one wants to enter your mail, no one encroaches, then you are very mistaken. Today there are a huge number of cybercriminals hacking mail for personal gain. Undoubtedly, if your mail is used exclusively for household correspondence with friends, then there is nothing to worry about. But in the case when the mailbox is tied to other important accounts, especially financial ones (for example, WebMoney), you must secure your own mailbox and funds so that no one can enter it. Many servers make it possible to associate important personal pages with a mobile phone number. However, most of them continue to sync with their email address.
In the event that you value outgoing information that is synchronized with your "mail", and want to prevent hacking gmail, you must properly configure the gmail.com mailbox. Enter the “Settings” (in the upper right corner after pressing the gear):
- first make sure that Use Only http is selected in the General panel. If there is no outgoing checkmark, then you need to put it. This is necessary in order for the data to come in encrypted form. In the event that the checkbox is not checked, and you are using mail in a public place with free access to the Wi-Fi network, there is a risk that attackers will intercept information in an unencrypted form and can enter your email;
- those who use email clients will be forced to change the connection type settings from simple to secure (TLS). On the connection settings panel, you need to click on the safe connection type, and also change the mail reception port (POP) from 110 to 995, the send port (SMTP) from 25 to 465. Usually, the ports change independently after clicking on the TLS connection;
- for those who do not use email programs, you should disable this feature: go to the “Forwarding and POP / IMAP” panel to check the box “Disable POP” and “Disable IMAP”;
- double authentication must be enabled. Its presence serves as the difference between mail from Google and mailboxes from other servers. After establishing double authorization, to enter the mailbox, you will need to enter the password sent in the form of an SMS message to your mobile phone number. This greatly enhances the security of your email.
How to enable 2-step email authentication?
For this:
- you need to enter the “Accounts and Import” panel, click “Change password recovery settings”.
- on the outgoing page, enter the personal mobile number. In addition, there is the opportunity to specify another email, through which you can restore a forgotten password (linking another e-mail is also not entirely safe, so I recommend not linking it);
- click on “Other Google Account Settings”;
- on the page that appears, in the "Security" branch, click "Change" two-step authentication. In the new window, select the “Proceed to setup” option;
- in the initial field, personally indicate your current mobile number. It will receive SMS messages from Google with confirmation codes. If the phone number is already synchronized with the account, skip this field, since the number will already be there;
- select the Trusted Computer option. It allows you to enter a verification code from a selected computer only once in 30 days.
Thus, you have enabled 2-step verification!
Application Passwords
Following the establishment of two-step authorization, any applications that use the username and password of your google page will stop working. An error will appear in the form of a message: "Invalid username or password." In order for them to work as before, you need to generate and change application passwords. To do this and to keep the passwords stored, do the following (after two-step authentication):
- click "Create passwords" or click on the link: https://accounts.google.com/IssuedAuthSubTokens;
- on the page enter the name you like for the password;
- click Create Password. The creation wizard will issue a password. It must be saved by you, because it can no longer be found. It is issued only once. Naturally, it can later be changed to invented in person. His name has no meaning. It will work with any application;
- then enter this password into the application, replacing it with the password name of your Google page.
Use with pleasure!