Installation instructions
Setting up the A.P.S. 5000 for arming with separate shutdown of shock sensor zones
a) To set up the A.P.S. 5000 to arm with shock sensor warning zone disabled - press and release the "Lock closed" button of a 3-button transmitter or a 4-button transmitter with 2-way communication once (the siren will give 1 confirmation signal and the direction indicators will turn on once) and then, within 5 seconds, press and release the "Lock closed" button of the transmitter 1 more time. The direction indicators will turn on again for a few seconds, confirming that the system is armed, but the shock sensor warning zone input is disabled until the next system arming.b) To set up the A.P.S. 5000 for arming with disabling both zones of the shock sensor– within 5 seconds after pressing the "Lock closed" button of the transmitter again, press it one more time. The direction indicators will turn on twice, confirming that the system is armed, but both shock sensor zones are disabled until the next system arming. The transmitter's built-in speaker with 2-way communication will beep 1 time and the "Lock closed" LED on the transmitter display will turn on 1 time.
Note: You can disable the shock sensor of the system even when the system is already armed. To do this, press and release the "Lock closed" button of the transmitter (the armed mode will restart with the appropriate confirmation signals) and then within 5 seconds press and release the "Lock closed" button of the transmitter one more (to disable the warning zone) or two (to disable both zones). sensor) times.
Note: The shock sensor can also be disabled after the system has been silently armed. To do this, press and release the "Lock closed" button of the transmitter once or twice within 5 seconds after the system has been silently armed (see the description of this function below).
3. Bypass faulty zone when arming
a) If one of the doors, hood or trunk is not closed, or if one of these circuits is faulty, then when setting up the A.P.S. 5000 to arm with a transmitter You will hear 3 siren sounds (instead of one) and the direction indicators will flash 3 times. This will bypass the open or faulty circuit and the LED will flash 2 or 4 times with a pause of 30 seconds to indicate the faulty and bypassed circuit (door or hood/trunk, respectively).
The built-in speaker of the transmitter with 2-way communication will beep 3 times, the LED indicator "Lock closed" will turn on on the transmitter display for 5 seconds and the LED indicator with the bypassed zone symbol will turn on 5 times (see table below).
b) If the shock sensor circuit is faulty, then 5 seconds after the system is armed (i.e. 5 seconds after 1 siren sound), you will hear 3 more siren sounds and the direction indicators will flash 3 times. The LED will in this case flash in series of 3 flashes after a pause of 30 seconds.
The transmitter's built-in speaker with 2-way communication will beep 3 times, the "Lock closed" LED on the transmitter display will turn on for 5 seconds, and the "Hammer" LED will turn on 5 times.
c) After the “bypassed” arming circuit is closed or repaired, the A.P.S. 5000 will also take her into custody immediately.
Yes, that's what I need instruction manual and user manual for car alarm A.P.S. 5000
User manual and installation instruction
Standard features of the A.P.S. 5000:
- 3-button/5-channel programmable key fob transmitter
- 4-button programmable keyfob transmitter with feedback and LED indicators
- Keeloq™ Dynamic Code
- Anti-theft function “Anti-Carjacking”
- Automatic and manual check for 2-way communication between the system and a 2-way transmitter
- 2-level “mic” shock sensor
- 6-tone siren with programmable/selectable tones
- Starter interlock with built-in relay
- Output for additional blocking of the engine
- Possibility of connection of the 3rd chain of blocking of the engine
- Built-in relays for door lock control
- Built-in relay for control of right/left direction indicators
- The ability to control the “polite backlight” of the car
- Pushbutton switch “Valet”
- Multifunction LED System Status Indicator (LED)
- Advanced Panic Mode
- Silent arming and disarming of the system
- Arming with separate shutdown of shock sensor zones
- "Silent" security mode
- Operational temporary disabling of automatic arming
- Disabling the alarm mode in 2 steps
- Valet Mode Enabled Warning
- 2nd channel output (for unlocking the trunk or for connecting additional accessories)
- Limited time alarm mode
- System alert
- 2-Way Transmitter Power Save Mode
- Specifying the sensor or trigger that triggered the system
- Indication of system malfunctions
- Bypass Faulty Zone or Circuit
- Positive and negative door trigger inputs
- Hood/trunk trigger input
- Saving the system state when the power is turned off
Programmable Features:
- Automatic (passive) arming
- Automatic arming with door locking
- Automatic door locking when the ignition is switched on
- Automatic unlocking of doors when the ignition is switched off
- Disabling Siren Confirmation Tones
- Automatic re-arming
- Automatic re-arming with door locking
- Automatic (passive) engine blocking
- Anti-false alarm function
- 30 second delay before arming *
- Programming the output functions of the 2nd channel of the system
- Output pulse to door locks 1 or 4 sec.
* for installing the system on cars with a delay in turning off the interior lighting
INTRODUCTION
Congratulations on your purchase of an A.P.S. 5000! This system is designed and manufactured taking into account the wishes of our Russian customers and is characterized by simplicity and reliability in operation (which is achieved by using an industrial-type Microchip microprocessor), ease of programming (system configuration reduces the need to change the system settings to a minimum) and can be installed on almost any type of car .
In the A.P.S. 5000 has all the really necessary functions: a dynamic code, a built-in starter blocking relay, the ability to connect 2 more additional engine blocking circuits, a 2-level shock sensor with the possibility of separate remote shutdown of zones, a Valet switch, built-in relays for controlling door locks and turn indicators , output of the 2nd channel, the ability to control the “polite backlight” of the car, Anti-Carjacking, the “Panic” mode, a number of programmable functions and much more.
Pay attention to the 4 main components of your security system:
- 3-button key fob transmitter
- 4-button key fob transmitter with 2-way communication
- System Status LED (LED)
- Valet Switch
1. Key fob transmitter with dynamic code
Included with the A.P.S. 5000 includes 2 KEELOQ microprocessor-based rolling code transmitters (one 3-button standard transmitter and one 4-button transmitter with 2-way communication). Each time you press the transmitter button, the code will automatically change randomly. Thus, your system is protected from attempts to "intercept" the code of your transmitter using a code grabber.
During operation, a situation may arise when the codes of the key fob transmitter and the main unit of the system are out of sync (for example, if you pressed the transmitter button more than 30 times away from the car). In this case, you only need to approach the vehicle and quickly press the transmitter button twice.
2. System Status LED (LED)
The LED informs the owner of the car about the state of the alarm system and indicates the zone or trigger that caused the system to go off.
3. Valet push button switch
This switch allows you to temporarily disable the security functions of the system (transferring the system to the Valet service mode). It is also used in conjunction with the ignition key for emergency disarming the system in the event of a lost transmitter, for disabling Anti-Carjacking mode (see the relevant sections of this manual below), for programming system functions and programming new transmitters.
| 4-button transmitter with 2-way communication | 3 button transmitter | Function | Note |
|---|---|---|---|
| Arming / locking the doors when the ignition is on or in Valet mode. | Press and release | ||
| , | , | Disabling the shock sensor warning zone of the system | Press the button within 5 seconds after arming |
| , , | , , | Disabling both zones of the shock sensor system | Press the button twice within 5 seconds after the warning zone is turned off |
| Silent system arming | |||
| + | + | Setting the system in the "silent" mode of protection | Press and release the button and the CAR button at the same time |
| Disarming / unlocking the doors with the ignition on or in Valet mode | Press and release | ||
| Silent system disarming | Press and hold the button for 2 seconds | ||
| System channel 2 output | Press and hold for 2 seconds. when the security is disarmed and the ignition is off or in the immobilizer mode. | ||
| , | , | Temporary override of passive arming | Press twice within 5 seconds with passive arming countdown enabled |
| , | , | Temporary cancellation of the immobilizer mode | Press twice within 5 seconds when the security is off, after turning off the ignition. |
| + | + | Enabling Panic Mode | Press and hold 3 seconds with the ignition off |
| + or | + or | Disabling Panic Mode | Press and release any of the indicated buttons |
| + | + | Enabling Anti-CarJacking Mode | Press and hold for 3 seconds with the ignition on |
| Button 4-button transmitter with 2-way communication | Function | Note |
|---|---|---|
| + | Enabling 2-Way Area Check Mode | Press and release the buttons and |
| + | Selection of notification modes when the system is triggered: "Vibrator" / "Melody" | Simultaneously press and hold for 3 seconds the button and the button |
| + | Switching on/off the power saving mode of the transmitter | Press simultaneously and hold for 2 seconds the button and the button |
| Turning Off System Alarm Reminders | Press and release the button |
MANUAL
1. Arming the system using a transmitter
Switch off the ignition, get out of the vehicle and make sure all doors, hood and trunk are closed. Press and release the button on a 3-button transmitter or a 4-button 2-way transmitter once. You will hear 1 confirmation siren, the turn signals will turn on 1 time and the system LED will flash slowly. The system will also automatically lock the car door, block the starter and additional circuits (if the appropriate connections are made and function # 11 is programmed accordingly).
2. Arming the system with separate shutdown of shock sensor zones
The transmitter's built-in speaker with 2-way communication will beep 1 time and the transmitter's display will turn on the LED indicator 1 time.
Note : You can disable the shock sensor of the system even when the system is already armed. To do this, press and release the transmitter button (the armed mode will restart with the appropriate confirmation signals) and then, within 5 seconds, press and release the transmitter button one more (to disable the warning zone) or two (to disable both sensor zones) times.
Note : The shock sensor can also be disabled after the system has been silently armed. To do this, press and release the transmitter button once or twice within 5 seconds of silently arming the system (see description of this feature below).
3. Bypass faulty zone when arming
- If one of the doors, hood or trunk is not closed, or if one of these circuits is faulty, then when the system is armed using the transmitter, you will hear 3 siren sounds (instead of one) and the direction indicators will flash 3 times. This will bypass the open or faulty circuit and the LED will flash 2 or 4 times with a pause of 30 seconds to indicate the faulty and bypassed circuit (door or hood/trunk, respectively).
The built-in speaker of the transmitter with 2-way communication will beep 3 times, the LED indicator on the transmitter display will turn on for 5 seconds and the LED indicator with the bypassed zone symbol will turn on 5 times (see table below).
- If the shock sensor circuit is faulty, then 5 seconds after the system is armed (i.e. 5 seconds after 1 siren signal), you will hear 3 more siren signals and the direction indicators will flash 3 times. The LED will in this case flash in series of 3 flashes after a pause of 30 seconds.
- After "bypassed" when arming, the circuit will be closed or repaired, the system will arm it immediately as well.
4. Automatic (passive) system arming
- Switch off the ignition, get out of the vehicle and make sure all doors, hood and trunk are closed. As soon as the last door has been closed, the LED will flash quickly to indicate that the system is counting down before auto-arming. 30 seconds after the last door was closed, you will hear 1 siren, the turn signals will turn on 1 time and the LED will flash slowly. At this moment, the system will also automatically lock the car door (if function # 2 is enabled), block the starter and additional circuits (if the appropriate connections are made and function # 11 is enabled).
The transmitter's built-in speaker with 2-way communication will beep 1 time and the transmitter's display will turn on the LED indicator 1 time.
If any of the doors, hood or trunk is opened during the 30 second countdown before auto-arming, the LED will stop flashing and the timing will stop. After all doors, hood and trunk are closed again, the LED will flash rapidly again and the 30 second countdown will start over.
The auto-arm feature (features #1 and #2) is programmable and you can disable it at the customer's request. The programming procedure is described in the Programmable System Functions section.
ATTENTION : In auto-arming mode, the open or faulty circuit bypass function will NOT work! Because the system does not automatically arm itself until the last door has been closed, if one of the doors, hood or trunk is left open, or if one of these circuits is faulty, auto-arming won't start . You can, however, arm the system at any time using the transmitter.
If only the shock sensor circuit is faulty - 5 seconds after auto-arming, the siren will sound 3 more chirps, the turn signals will flash 3 times and the LED will flash in series of 3 flashes after a pause for 30 seconds, indicating that this circuit has been bypassed.
The transmitter's built-in speaker with 2-way communication will beep 3 times, the transmitter's display will turn on the LED for 5 seconds, and the LED with the symbol will turn on 5 times.
5. Automatic (passive) blocking of the engine
- If for some reason you do not want to use the auto-arming feature (with or without locking the doors), you can still use the auto-engine lock feature (programmable feature #8).
If this function is enabled, after the ignition is turned off, the system LED will begin to flash rapidly, confirming the inclusion of the countdown before switching on the mode. 30 seconds after the ignition is turned off (regardless of whether the car doors were opened and closed), the system will only automatically turn on the engine block (similar to the immobilizer), but will not lock the car doors or respond to door, hood, trunk or shock sensor inputs. . The LED will start flashing slowly.
The transmitter's built-in speaker with 2-way communication will beep 1 time and the transmitter's display will turn on the LED indicator 1 time.
When the system is in automatic engine lock mode:
- When the ignition is turned on, the siren will give warning signals for 10 seconds. If during this time the ignition is not turned off or the system is not disarmed, the siren will turn on for 3 minutes (or until the ignition is turned off, if this happens earlier). After turning off the alarm mode, the system will remain in the passive engine blocking mode.
2-3 seconds after the alarm mode is activated, the built-in speaker of the transmitter with 2-way communication will give a melodic signal (melody # 4) for 10 seconds or the built-in vibrator will turn on 3 times (if this function is enabled), and the transmitter display will show for 10 seconds, the LED with the symbol will flash.
- Disconnection and subsequent reconnection of power will immediately cause 6 cycles of operation of the system. After the end of the alarm mode, the system will switch to the “full” protection mode.
- To disable the enabled automatic engine blocking mode:
In the event of a lost or malfunctioning transmitter, you can also disarm the system using the Valet switch.
Note : The passive arming function (function #1) must be turned off in order to perform the automatic passive engine lock function.
6. "Silent" security mode
You can also use the special “Silent” security mode. In this case, when the system is triggered, a signal will immediately be transmitted to the 4-button transmitter with 2-way communication. The system siren, direction indicators and interior lighting will not work in alarm mode.
To turn on the "silent" mode of protection, press and release the buttons and the transmitter at the same time.
The turn signals will turn on once and the system LED will flash slowly. The system will also automatically lock the car door, block the starter and additional circuits (if the appropriate connections are made and function # 11 is enabled).
The transmitter's built-in speaker with 2-way communication will beep 1 time and the transmitter's display will turn on the LED indicator 1 time.
“Silent” arming mode will be automatically canceled when the system is disarmed.
7. Operation of the system when the protection is on. Warning mode. System alert reminder mode.
- If the car body is slightly bumped or hit, the warning mode will turn on and the siren will give 5 quick warning signals.
The transmitter's built-in speaker with 2-way communication will give 1 melodic signal (or the built-in vibrator will turn on once) and the LED indicator with the symbol will turn on on the transmitter display 2 times.
- With a stronger impact, when opening the door, hood or trunk, or when you try to turn on the ignition, the alarm mode will immediately turn on: the siren, direction indicators and interior lighting (if this function is programmed and connected) will work continuously for 30 seconds (or until until you turn off the alarm mode from the transmitter). If all doors, hood or trunk are closed after 30 seconds, the system will automatically re-arm. If one of the circuits remains open, then the 30-second cycle of the alarm mode will be repeated. However, after 5 cycles (excluding the ignition on), the siren, direction indicators and interior lighting will turn off and the system will arm bypassing the open circuit. Once the bypassed circuit is closed, the system will also automatically arm it immediately. If the system is triggered by turning on the ignition, there will be no limit on the number of alarm cycles and the alarm mode will continue as long as the ignition remains on.
The built-in speaker of the transmitter with 2-way communication for 15 seconds (or until any transmitter button is pressed) will emit a melodic sound signal corresponding to the armed zone (see below) that triggered the system, and the LED on the transmitter display will flash for 15 seconds indicator with the trigger zone symbol. If the Vibrator mode is enabled, the built-in vibrator will turn on 3 times and the LED indicator on the transmitter display will flash for 5 seconds.
Note : If the “silent” armed mode is on, then when the system is triggered, the siren and direction indicators will not turn on, but only the alerts on the 2-way transmitter will turn on.
The transmitter's built-in speaker with 2-way communication will beep 1 time and the transmitter's display will turn on the LED indicator 1 time. In this case, if one of the circuits remains active (open), then the built-in speaker of the transmitter with 2-way communication will give an additional 3 signals, and the LED indicator on the transmitter display will turn on for 5 seconds and the LED indicator with the active / bypassed zone symbol will turn on 5 times.
If you then press and release the transmitter button, you will hear 4 siren sounds, the direction indicators will flash 4 times and the system will disarm. The LED will flash in a series of 2, 3, 4 or 5 flashes to indicate the zone that has triggered the system.
The transmitter's built-in speaker with 2-way communication will beep 4 times and the transmitter's display will flash 5 times the LED with the zone symbol of the triggered system.
Note : Disabling the alarm mode when the ignition is left on is not possible.
Table of system protection zones:
| Guard zone | System LED flashing mode | Transmitter beeps (if enabled) | Number of vibrator activations (if this function is enabled) | |
|---|---|---|---|---|
| flashing series of 2 flashes through a pause | Melody #1 | |||
| flashing series of 3 flashes through a pause | Melody #2 | 3 times (1 time long, 2 times short) | ||
| flashing series of 4 flashes through a pause | Melody #3 | 3 times (1 time long, 2 times short) | ||
| flashing series of 5 flashes through a pause | Melody #4 | 3 times (1 time long, 2 times short) |
System reminder mode:
After the system has been triggered and the alarms have been activated on the 2-way transmitter - every 70 seconds, alarms of a trigger reminder will turn on:
- the built-in speaker of the transmitter with 2-way communication will give a melodic sound signal corresponding to the trigger zone, or the built-in vibrator will turn on 3 times (if this mode is enabled);
- on the transmitter display, the LED indicator with the symbol of the zone or zones that triggered the system will turn on 4 times;
To turn off the alarm reminder signals, press and release the button: a melodic sound signal will sound corresponding to the trigger zone, and the LED indicator with the symbol of this zone will turn on. Reminder signals will be disabled until the next activation of the system.
8. Anti-false alarm function
In order to minimize false positives of the system and not disturb others, you can use the programmable anti-false alarm function (feature # 9). When this feature is enabled:
- If the shock sensor warning zone is triggered 10 times within 30 minutes, that system input will be automatically disabled for 1 hour (or until the system is disarmed, if earlier).
- If the main shock sensor zone is triggered 5 times within 60 minutes, this system input will also be automatically disabled for 1 hour (or until the system is disarmed, if earlier).
Disabling the various zones of the shock sensor occurs independently of each other.
9. Disarming the system. Automatic re-arming of the system.
The transmitter's built-in speaker with 2-way communication will beep 2 times and the transmitter's display will turn on the LED 2 times.
- If the auto-rearm feature (feature #6) is enabled, then after the system is disarmed, the LED will flash quickly and the system will re-arm after 30 seconds, if one of the doors, hood or trunk has not been opened during this time, or the ignition has not been switched on. You will hear 1 siren, the turn signals will turn on 1 time and the LED will flash slowly. At this moment, the system will also automatically lock the car door (if function # 7 is enabled), block the starter and additional circuits (if the appropriate connections are made and function # 11 is programmed).
The transmitter's built-in speaker with 2-way communication will beep 1 time and the transmitter's display will turn on the LED indicator 1 time.
If the sensor circuit is faulty, then 5 seconds after the system is automatically armed, you will hear 3 more siren sounds, the direction indicators will flash 3 more times and the sensor circuit will be bypassed.
The built-in speaker of the transmitter with 2-way communication will give an additional 3 beeps and the LED indicator with the symbol will turn on 5 times on the transmitter display.
10. Silent arming and disarming the system
You can also turn off the siren confirmation signals altogether. The programming procedure is described in the “Programmable System Functions” section, feature #5.
ATTENTION : When the system is silently armed or disarmed, the 3rd and 4th chirps (Open or Faulty Circuit Warning and System Triggered Warning) will not be silenced.
11. System warning
If, when disarming the system, you hear 4 siren signals, this means that the system was activated during your absence. The system LED will flash a certain number of times after a pause, showing which circuit triggered the system, and the display of the 2-way transmitter will show all zones that triggered the system during the last armed cycle:
| Guard zone | System LED flashing mode | Transmitter display indication | Transmitter beeps |
|---|---|---|---|
| The system was triggered by a door | flashes in series of 2 flashes after a pause | 4 signals | |
| flashes in series of 3 flashes after a pause | 4 signals | ||
| flashes in series of 4 flashes after a pause | 4 signals | ||
| flashes in series of 5 flashes after a pause | 4 signals |
Information about the operation of the system will be erased when the ignition is turned on or when the system is armed using the transmitter.
12. Automatic door locking when the ignition is turned on
If function #3 is enabled, the system will automatically lock the car door after 5 seconds. after switching on the ignition to ensure your safety while driving. At the same time, if within 5 sec. after the ignition is turned on, one of the doors was opened and closed again, this function will be canceled so that you cannot accidentally lock the keys in the car.
This function is programmable and you can disable it at the request of the client. The programming procedure is described in the Programmable System Functions section.
13. Automatic unlocking of doors when the ignition is turned off
If feature #4 is enabled, the system will automatically unlock the vehicle doors immediately after the ignition is turned off.
This function is programmable and you can disable it at the request of the client. The programming procedure is described in the Programmable System Functions section.
14. Door lock/unlock control via transmitter
When you press the transmitter button with the ignition on, the system will lock the car doors. When you press the transmitter button with the ignition on, the system will unlock the car doors.
15. 2nd channel output
The output of the 2nd channel of the system (most often it is used for remote opening of the trunk lock) is turned on by pressing the transmitter button and holding it for 3 seconds. Controlling the output of the 2nd channel is possible only when the protection is disarmed and the ignition is switched off. This will prevent accidental unlocking of the trunk while the vehicle is moving.
ATTENTION : The output of the 2nd system can also be programmed during installation to perform additional security or service functions, such as, for example:
- output for controlling the car's interior lighting
- output for additional blocking of the engine;
Please note that in this case the 2nd channel output of the system will no longer be controlled by the transmitter and will always perform only the selected security or service function. Check with your installer for the function performed by the system's 2nd channel output.
16. “Valet” mode / Emergency shutdown of the system
Valet mode is used for:
- Temporary disabling of the security functions of the system (service mode). Valet mode is retained when the system is powered off and then back on.
- Emergency shutdown of the system in the event that you have lost or forgotten your key fob transmitter or if the key fob transmitter does not function normally (for example, the battery is dead).
- Disabling Anti-Carjacking Mode (see below)
Enabling Valet Mode:
- Disarm the system and turn on the ignition.
- The LED will turn solid, indicating that the system is in Valet mode.
ATTENTION : When the system is in Valet mode, each time the ignition is turned off, the siren will sound 2 short beeps to remind you that the security functions of the system have been disabled. Don't forget to turn off Valet mode when you no longer need it so that your car is not left unprotected!
Turn off Valet mode:
- Turn on the ignition.
- Within 15 seconds, press and hold the Valet button switch for 2 seconds.
- The LED will turn off.
When the Valet mode is turned off, the transmitter's built-in speaker with 2-way communication will emit 2 short beeps and the LED indicator on the transmitter display will turn on 2 times.
When the system is in Valet mode, you can unlock and lock the car doors using the transmitter, turn on the Panic mode, Anti-CarJacking mode, and control the system's 2nd channel output.
System emergency shutdown
- Open the car door. The system will work, the siren will sound immediately, the direction indicators will flash, etc.
On the transmitter with 2-way communication, the indication of the system being triggered by opening the door will turn on: the built-in speaker of the transmitter will give the corresponding melodic sound signal (or the vibrator will turn on 3 times, if this mode is enabled) and the LED indicator with the symbol will flash on the transmitter display.
- Turn on the ignition
- Within 15 seconds, press and release the Valet push button switch.
- The alarm mode will turn off and the system will be disarmed.
17. Panic Mode
The "Panic" mode is activated by simultaneously pressing the button and the transmitter button for 3 seconds while the car's ignition is turned off. When this mode is activated, the system siren will sound continuously and the direction indicators will flash.
To turn off the panic mode, press any of the transmitter buttons:, or . The siren will turn off and the direction indicators will stop flashing. After turning off the “Panic” mode, the system will be in the state prior to turning on the mode.
The "Panic" function can also be implemented while the system is in the "Valet" mode, but only when the ignition is off. After turning off the “Panic” mode, the system will switch back to Valet mode.
18. Anti-theft function Anti-Carjacking
The Anti-Carjacking function (protection against robbery) is activated by pressing and holding for 3 seconds simultaneously the button and the transmitter button while the car's ignition is on. The system LED will flash slowly to confirm that the function is enabled. This feature will be enabled even if the system was previously in Valet mode.
30 seconds after turning on the Anti-Carjacking mode, the direction indicators will flash and the system siren will sound. If at this moment the ignition is turned off, the system will immediately block the car engine.
If the Anti-Carjacking mode has not been disabled, then after another 30 seconds the system will turn on the engine blocking circuit.
After 3 minutes, the siren and direction indicators will turn off and the system will arm - if at this moment the ignition key is in the “Off” position. If the ignition key remains in the “On” position, the siren and direction indicators will continue to work until the battery is completely discharged.
ATTENTION : Anti-Carjacking mode can only be disabled using the hidden Valet switch. To do this: turn the ignition off and on again, and within 15 seconds, press and release the Valet pushbutton switch.
19. Car driver call function
When you press the button to call the driver on the antenna module of the system with the security on or off - on the display of the transmitter with 2-way communication, all LED indicators will turn on 3 times, and the built-in speaker of the transmitter will give 5 short beeps.
20. The meaning of siren signals and direction indicators
Siren and turn signal signals inform the owner of the system about various states or functions of the system:
- 1 siren and 1 turn signal - the system is armed with a transmitter;
- 1 turning on direction indicators (no siren signal) - the system is armed silently using the transmitter or function # 5 is disabled;
- 1 short siren, 1 short and 1 long turn signal - the system is armed using a transmitter with the warning zone of the shock sensor disabled;
- 1 short siren chirp, 1 short and 2 long turn signal lights - the system is armed using a transmitter with both zones of the shock sensor disabled;
- 2 siren and 2 turn signal lights - the system is disarmed using a transmitter;
- 2 turns on turn signals (without siren signals) - the system is disarmed silently using the transmitter or function # 5 is disabled;
- 2 siren signals - the system exited the function programming mode;
- 2 siren sounds after ignition off – Valet mode is on;
- 3 siren chirps and 3 turn signal lights when arming - the system is armed with a transmitter, but one of the doors, hood or trunk is open, or one of these circuits is faulty;
- 3 siren chirps and 3 turn signal lights after arming - the system is armed using the transmitter, but the shock sensor circuit is faulty and bypassed;
- 3 siren chirps and 3 turn signal lights when auto-arming - the system is armed, but the shock sensor circuit is faulty and bypassed;
- 4 siren chirps and 4 turn signal lights when the system is disarmed - the system was triggered, Determine the zone or trigger that triggered the system by flashing the system LED and by the indication of the 2-way transmitter;
- 5 siren sounds when the system is disarmed - the system has entered or exited the transmitter programming mode.
- 5 quick siren sounds when the system is armed - the warning mode has been triggered;
- Short siren beeps for 10 seconds – the ignition is switched on if the system is in the mode of automatic blocking of the engine.
21. Meaning of LED signals
| SLOW FLASHING | ARMED |
| SLOW FLASHING WITH IGNITION ON | ANTI-CARJACKING MODE ON |
| FAST FLASHING | PASSIVE ARMING OR AUTO REARMING |
| SWITCHED OFF | ARMED DISABLED |
| CONSTANTLY ON | VALET MODE |
| FLASHES IN A SERIES OF 2 FLASHES IN PAUSE | ZONE 1 (DOOR) ACTIVATED |
| FLASHES IN A SERIES OF 3 FLASHES IN PAUSE | ZONE 2 (SENSOR) ACTIVATED |
| FLASHES IN A SERIES OF 4 FLASHES IN PAUSE | ZONE 3 (HOOD OR TRUNK) ACTIVATED |
| FLASHES IN A SERIES OF 5 FLASHES IN PAUSE | ZONE 4 ACTIVATED (IGNITION, POWER OFF) |
22. Additional functions of the 4-button key fob transmitter with 2-way communication
Automatic check for 2-way communication between the system and a 2-way transmitter
Every time 15 minutes after the system is armed using any transmitter of the system or 15 minutes after the system is automatically armed, a special mode of checking the presence of communication between the system and the transmitter with 2-way communication will automatically turn on. If the system and the 2-way transmitter are within the communication zone at this moment, the built-in speaker of the transmitter will beep 5 times and the LED indicator on the transmitter display will turn on for 5 seconds.
Manual check for 2-way communication between the system and a 2-way transmitter
Simultaneously pressing the button and the button of the 4-button transmitter with 2-way communication activates the manual mode of checking the presence of communication between the system with the transmitter with 2-way communication. If the system and the 2-way transmitter are within range, the transmitter's built-in speaker will beep 5 times and the transmitter's display will turn on the LED indicator for 5 seconds.
If there is no connection, then these alerts will not be given.
Selecting the notification mode when the system is triggered
You can choose one of the following notification modes when the system is triggered - "Vibrator" or "Melody". If the “Vibrator” mode is selected, then when the system is triggered, the built-in vibrator of the 4-button transmitter with 2-way communication will turn on 3 times; signal corresponding to the security zone that triggered the system.
To switch modes, simultaneously press the button and the button of the 4-button transmitter with 2-way communication and hold them for 3 seconds. The activation of the "Vibrator" mode is confirmed by two activations of the built-in vibrator, and the inclusion of the "Melody" mode is confirmed by a long beep signal from the transmitter's built-in speaker.
Enabling the Power Save Mode of a 2-Way Transmitter
To turn on the power saving mode, when the security mode is off, press and hold simultaneously the buttons and the 4-button transmitter with 2-way communication for 2 seconds. The transmitter's built-in speaker will beep 3 times to confirm the start of the 40 second countdown before power saving mode is activated. After 40 seconds, the built-in speaker of the transmitter will emit a descending tone, confirming the inclusion of the mode. If the 2-way 4-button transmitter receives any signal from the system within the 40-second countdown (arming confirmation signal from another system transmitter, auto-arming or auto-rearming confirmation signal, etc.) .d.), the power-saving mode will be canceled and the transmitter will beep to confirm the change in system status instead.
Once enabled, the power saving mode will be automatically disabled when the button on a 3-button transmitter or a 4-button 2-way transmitter is pressed to arm the system. The transmitter's built-in speaker with 2-way communication will beep 1 time and the transmitter's display will turn on the LED indicator 1 time.
To turn off the power saving mode, press and hold the buttons and the transmitter simultaneously for 2 seconds. The transmitter's built-in speaker with 2-way communication will emit a rising tone.
Temporarily Disabling a 2-Way Transmitter
You can temporarily disable the 2-Way Transmitter completely. To do this, press and hold the button of the 4-button transmitter with 2-way communication for 5 seconds. The transmitter's built-in speaker with 2-way communication will emit a descending tone to confirm that the transmitter is turned off.
The mode is deactivated by pressing and holding the transmitter button for 5 seconds. The transmitter's built-in speaker with 2-way communication will emit a rising tone.
23. Programmable system functions
A.P.S. system 5000 has 12 programmable functions. Functions #1-11 are programmed with the Valet switch and transmitter; feature #12 is programmed if necessary by the installer when installing the system. To program functions 1-11:
To exit the programming mode - turn off the ignition or wait 10 seconds. The siren will give 2 beeps to confirm that the system has exited programming mode.
Feature #1: “Auto arm system”
Factory setting of feature #1 is ON
Feature #2: “Locking the doors when auto-arming the system”
Factory setting function #2 - OFF
Feature #3: “Automatic door lock when ignition is switched on”
Factory setting function #3 - DISABLED
Feature #4: “Automatic unlocking of the doors when the ignition is switched off”
Factory setting feature #4 - ON
Feature #5: “Siren Confirmation Tones”
Factory setting of feature #5 is ON
Feature #6: “Automatic re-arming”
Factory setting of feature #6 is ON
Feature #7: “Locking doors during automatic re-arming”
Factory setting function #7 - OFF
Feature #8: “Auto engine lock”
Factory setting function #8 - OFF
Feature #9: “Anti-false alarm function”
Factory setting function #9 - OFF
Feature #10: “30 second delay before arming”
Factory setting function #10 - DISABLED
On many modern vehicles, interior lighting turns off some time after the doors have been closed. If the door trigger circuit is connected to the wire from the door switch to the interior light bulb, the system will "think" the car door is open. In order to avoid this situation, you can enable the 30-second delay arming function of the system and then the system will arm the car doors after turning off the interior lights.
ATTENTION : When this function is enabled and if one of the doors is open when the system is armed by the transmitter, the system CAN NOT indicate this with 3 siren signals and bypass this circuit, not arming it until all doors are closed.
Feature #11: “Programming the Blue wire function of the system (2nd channel output)”
Factory setting of function #11 - ON (Blue wire is used as the negative pulse output of the 2nd channel of the system)
This function allows you to program the Blue wire of the system to perform various functions:
Press and release the transmitter button to program the Blue wire of the system as “Negative output for courtesy car light control”. The siren will give 2 beeps.
To program the Blue wire of the system as “Negative output when armed” press and release the transmitter button again. The siren will give 3 beeps.
Feature #12: “Output pulse duration for door lock control”
ATTENTION : This feature should only be programmed by a qualified installer when installing the system.Factory setting function # 12 - 1 sec. To set the pulse duration for door lock control 4 sec. (required when installing the system on pre-1989 Mercedes-Benz or Audi vehicles) cut the black wire loop on the system main unit.
PROGRAMMING EXAMPLE
For inclusion features #3 and shutdown features #5:
24. Programming new transmitters
Up to 4 transmitters can be programmed into the system memory. When programming new or additional transmitters, the codes of all previously programmed transmitters will be erased from the system memory. This will prevent unauthorized programming of additional transmitters. To program new transmitters:
- Turn the ignition on and off (when the security is off).
- Within 5 seconds of turning off the ignition, press and release the Valet push button switch 5 times
- You will hear 5 chirps and the LED will flash slowly to confirm that the system has entered the new transmitter programming mode.
- Within 10 seconds after the confirmation signals of the siren, press any button of the 1st transmitter. The siren will sound once and the LED will flash for 1 second, confirming that the code of the first transmitter has been entered into the system's memory.
- Within 10 seconds after step 5, press any button on the next (2nd) transmitter. The siren will sound twice and the LED will flash for 1 second, confirming that the code of the second transmitter has been entered into the system's memory.
- Within 10 seconds of step 6, press any button on the next (3rd) transmitter. The siren will sound three times and the LED will flash for 1 second, confirming that the code of the third transmitter has been entered into the system's memory.
- Within 10 seconds after step 7, press any button on the next (4th) transmitter. The siren will sound four times and the LED will flash for 1 second, confirming that the code for the fourth transmitter has been entered into the system's memory.
- After entering the code of the 4th transmitter into the system memory, the system will automatically exit the programming mode, which will be confirmed by 5 siren signals.
If the ignition was switched on during programming, or if more than 10 seconds pass between steps 5-8, the system will also automatically exit the programming mode and you will hear 5 siren sounds.
INSTALLATION GUIDE
Main 18-pin connector (top row)
| The wire | Where does it connect |
|---|---|
| RED GREEN | Closing impulse, N.C. relay contact |
| YELLOW GREEN | Common lock wire |
| WHITE/GREEN | Closing impulse, N.R. relay contact |
| RED BLUE | Opening impulse, N.C. relay contact |
| YELLOW/BLUE | Common release wire |
| WHITE BLUE | Release impulse, N.R. relay contact |
| WHITE | |
| RED WHITE | |
| WHITE | To turn signal control circuit (+) |
Main 18-pin connector (bottom row)
| The wire | Function |
|---|---|
| BLACK | To negative battery terminal |
| VIOLET | To positive door trigger |
| BROWN | To the negative door trigger |
| GREEN | To negative hood and/or trunk trigger |
| BLUE | Negative output of the 2nd channel (to an additional relay for unlocking the trunk lock or to additional accessories) |
| ORANGE/BLACK | To additional N.Z. starter (or ignition) interlock relay (-) |
| YELLOW | K + 12V at the ignition switch |
| WHITE BLACK | To the siren (+) |
| RED | To battery positive terminal (+12V) |
The location of the contacts / wires in the block connector for connecting the sensor (from left to right)
Connecting additional system connectors:
APPLICATION
CONNECTING THE VEHICLE DOOR LOCKS
NEGATIVE PULSE CONTROLLED 3-WIRE CENTRAL LOCKING CIRCUIT
YELLOW/BLUE and YELLOW/GREEN wires must be connected to ground.
Connect the WHITE/GREEN wire (negative lock pulse) to the vehicle's negative lock wire.
Connect the WHITE/BLUE wire (negative unlock pulse) to the vehicle's negative unlock wire.
POSITIVE PULSE CONTROLLED 3-WIRE CENTRAL LOCKING CIRCUIT
Vehicles with these circuits do not use the RED/GREEN and RED/BLUE wires.
YELLOW/BLUE and YELLOW/GREEN wires must be connected to +12V DC through a fuse
Connect the WHITE/GREEN wire (lock positive pulse) to the vehicle's door lock positive wire.
Connect the WHITE/BLUE wire (positive unlock pulse) to the vehicle's positive unlock wire.
5-WIRE REVERSE CENTRAL LOCKING CIRCUIT
In cars with such circuits, it is necessary to find regular wires going from the main door lock switch located next to the driver, to the lock switches on the passenger doors, and then to the electric locks.
Cut the original lock wire and connect the YELLOW/GREEN wire to the part of the wire that comes from the passenger door switch or the power switch and connect the RED/GREEN wire to the other part of the wire that comes from the main switch.
Cut the original unlock wire and connect the YELLOW/BLUE wire to the part of the wire that comes from the passenger door switch or the power switch and connect the RED/BLUE wire to the other part of the cut wire that comes from the main switch.
The WHITE/BLUE and WHITE/GREEN wires must be connected to +12VDC via a fuse.
“VACUUM” CENTRAL LOCKING SYSTEM
Mercedes-Benz or Audi cars use a "vacuum" central locking system. It has electrical switches (built into the actuators) that provide +12V or ground to the air pump. These switches work when locking and unlocking the doors from inside or with the key from outside the vehicle. The polarity of the switches determines whether the pump will pressurize or vacuum. The connection can be made either under the trim (panel) on the left of the driver, or directly on the air pump, which is usually installed in the trunk or under the rear seat.
Connect the RED/GREEN and YELLOW/BLUE system wires to each other and insulate the connection.
Connect the WHITE/BLUE system wire to +12V through the fuse.
Connect the WHITE/GREEN wire of the system to ground.
Cut the wire from the electrical switch to the air pump (compressor). Connect the RED/BLUE wire from the system to the part of the cut wire that goes to the electrical switch.
Connect the YELLOW/GREEN wire from the system to the other part of the cut wire that goes to the air pump (compressor).
ATTENTION : On 1989 (or earlier) vehicles, the air pump runs for about 3 seconds. When installing the system on such vehicles, it will also be necessary to program the duration of the pulse applied to the door locks to 4 seconds (function # 12).
1-WIRE SYSTEM WITH NEGATIVE POLARITY
If the car is Nissan, Mitsubishi or Lotus and there is no switch in the door, you need to find the wire coming from the driver's door, which is shorted to ground if the car doors are open, and “open” (0V) if the doors are closed.
This type of vehicle does NOT use the WHITE/GREEN and RED/BLUE system wires.
Connect the WHITE/BLUE wire of the system to ground.
Cut the wire from the driver's door motor to the original central locking module and connect the system's RED/GREEN wire to the part of the cut wire that goes to the driver's door motor.
Connect the YELLOW/BLUE and YELLOW/GREEN wires of the system to the other part of the cut wire that goes to the original central locking module.
If the vehicle is not equipped with central locking or power door locks, you can install additional power controls and connect them to the system as follows:
Connect the RED/GREEN and RED/BLUE wires to ground.
Connect the WHITE/GREEN and WHITE/BLUE wires to +12 DC through the fuse.
Connect the YELLOW/BLUE wire to the BLUE actuator release wire.
Connect the YELLOW/GREEN wire to the GREEN wire to lock the actuator.
INSTALLATION RECOMMENDATIONS FOR A.P.S. 5000 FOR VAZ CARS
3. Recommended scheme for connecting the Green wire of the system (“negative hood/trunk trigger”) to the engine compartment lamp of VAZ 2109, 2115, 2123 families or the trunk lighting lamp of VAZ 2115 families:
A.P.S. 5000 “Installation and operating instructions”
Ratings - 25 , average score: 4.5
()
APS Instruction Manual Model 5000
Instruction Fragment
The LED will flash in a series of 2, 3, 4 or 5 flashes to indicate the zone that has triggered the system. The transmitter's built-in 2-way speaker will beep 4 times and the transmitter's display will flash the zone symbol LED 5 times. that triggered the system. Note: Disabling the alarm mode when the ignition is left on is not possible. Table of system armed zones: Armed zone System LED flashing mode Indication on the transmitter display Transmitter sound signals (if this function is enabled) Number of vibrator activations (if this function is enabled) The system was triggered by a door trigger flashes in series of 2 flashes after a pause Melody #1 3 times (1 time long, 2 times short) The system was triggered by the main zone of the shock sensor flashes in series of 3 flashes after a pause Melody # 2 3 times (1 time long, 2 times short) The system was triggered by the hood or trunk trigger flashes in series of 4 flashes after a pause Melody # 3 3 times (1 time long, 2 times short) The system was triggered by turning the ignition on or turning off / on the power flashes in a series of 5 flashes after a pause O-gt Melody # 4 3 times (1 times long, 2 times short) System triggered reminder mode: After the system is triggered and the alarms are activated on the 2-way transmitter - every 70 seconds the trigger reminder will sound: - the built-in speaker of the 2-way transmitter will sound a melodious sound signal corresponding to the trigger zone, or the built-in vibrator will turn on 3 times (if this mode is enabled); A.P.S. 5000 “Installation and Operation Manual” 10 © Saturn Marketing Ltd. - on the transmitter display, the LED indicator with the symbol of the zone or zones that triggered the system will turn on 4 times; To turn off the triggered reminder signals, press and release the ® button: a melodic sound signal will sound corresponding to the triggered zone, and the LED indicator with the symbol of this zone will turn on. Reminder signals will be disabled until the next activation of the system. 8. Anti-false alarm function In order to minimize false alarms of the system and not disturb others, you can use the programmable anti-false alarm function (feature #9). When this feature is enabled: ♦ If the shock sensor warning zone is triggered 10 times within 30 minutes, that system input will be automatically disabled for 1 hour (or until the system is disarmed, if earlier). ♦ If the main shock sensor zone is triggered 5 times within 60 minutes, that system input will also be automatically disabled for 1 hour (or until the system is disarmed, if earlier). Disabling the various zones of the shock sensor occurs independently of each other. 9. Disarming the system. Automatic re-arming of the system. 1. Press and release the ^^^1 button on the transmitter once. You will hear 2 siren sounds, the direction indicators will flash 2 times, the interior lighting will turn on for 30 seconds (if the appropriate connections are made and function # 11 is programmed), the system will unlock the car doors and disable the starter lock. The built-in speaker of the 2-way transmitter will beep 2 times and the 0-LED indicator on the transmitter display will turn on 2 times. arming (function # 6), then after disarming the system, the LED will flash quickly and the system will re-arm after 30 seconds, if during this time one of the doors, hood or trunk has not been opened, or the ignition has not been turned on . You will hear 1 siren, the turn signals will turn on 1 time and the LED will flash slowly. At this moment, the system will also automatically lock the car door (if function # 7 is enabled), block the starter and additional circuits (if the appropriate connections are made and function # 11 is programmed). The transmitter's built-in speaker with 2-way communication will beep 1 time and the 0P LED on the transmitter display will turn on 1 time. If the sensor circuit is faulty, then 5 seconds after the system is automatically armed, you will hear 3 more siren sounds, the direction indicators will flash 3 more times and the sensor circuit will be bypassed. The built-in speaker of the transmitter with 2-way communication will give an additional 3 beeps and the LED indicator with the A.P.S symbol will turn on 5 times on the transmitter display. 5000 “Installation and Operation Manual” 11 © Saturn Marketing Ltd. 10. Silent arming and disarming the system a) Press and hold the button on the transmitter for 2 seconds to arm the system without siren confirmation. At the same time, turn indicators, SI ...
The main difference of the aps 5000 car alarm, compared to other low-cost systems, is the presence of two-way communication.
The key fob alert that the owner receives in the event of an attempted theft or damage to the car often helps to prevent trouble in time and save the car from unauthorized actions.
Features of the security system from A.P.S
The car alarm aps 5000 was created by the manufacturer taking into account Russian road conditions. It is characterized by stable operation and simplicity, which is ensured by the use of a Microchip processor. Installation of such a system can be done on any car with almost no exceptions, and the technical support allows you to perform all the necessary security functions.

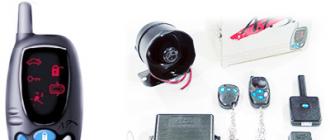
The standard alarm set includes:
- car alarm keychain aps 5000 with 4 buttons, two-way communication and LED backlight
- Dynamically changing Keeloq code
- Simple anti-theft system "Anti-Carjacking"
- shock sensor that reacts to sound
- 6-tone bell with selectable key
- Possibility of installing a third chain to block the power unit
- Control of door drives with a built-in relay
- The presence of "polite lighting" of the vehicle
- Valet switch, allowing you to remove the alarm in emergency mode and carry out programming
- LED indicator that indicates communication
- Panic Mode
- Setting the guard silently
- Automatic installation of protection and the timer of inclusion/switching off of system.
- Disabling the alarm mode in two steps
- The presence of a channel for connecting the trunk, hatch and other additional equipment
To prevent the transmitter battery from being discharged for a long time, manufacturers have provided an energy-saving mode, and an indication of a system failure will allow you to determine what exactly caused the problem.

In addition to standard functions, the alarm is equipped with several programming options. With the help of a special Valet button, it is possible to create passive door protection and engine blocking, which prevents the car from being stolen after breaking in, automatic activation of the protection when the engine is running, and other features.

Each driver himself chooses the function that is most useful and convenient for him in everyday use. How to program the system yourself describes the detailed instructions for the aps 5000 car alarm.
How much does the A.P.S 5000 alarm cost?
The cost of this security system ranges from 35-40 dollars and depends on the specific seller of this product.

The alarm set includes the following items:
- keychain transmitter providing two-way communication
- 3 button remote control
- shock sensor in the case
- LED indicator
- Valet service switch with wire
- central module with active antenna and panic button
- limit switches (buttons) of the hood and trunk
- 6 tone bell
- set of wires with plugs and relay
- instructions for car alarm aps 5000 in Russian
Advantages of the APS 5000 system and its disadvantages
The APS alarm system has many undeniable advantages that attract buyers and make this model popular. First of all, this is the availability and reliability of the design, as well as the ability to install the system yourself, since the manufacturer supplies each aps 5000 car alarm kit with a detailed connection diagram.

There are also some problems in the alarm system that car owners should pay attention to when choosing a security system for their car. The final conclusions about whether to purchase this alarm can be made by examining the following table:
| Advantages | Flaws |
| Bilateral connection. Transmits a signal to the key fob and notifies of danger, even if the siren does not work or is not heard. | Lack of remote engine start. This very handy feature is available in higher level alarms. |
| dynamic signal. The transmitter is equipped with a KEELOQ microprocessor, which prevents intruders from decrypting and guessing the code for the alarm. | Small signal reception range. You can control the car alarm only at a distance of 50 meters from the car. |
|
Manual control of the alarm. If the equipment control key fob is lost or does not work, it is possible to control it manually. |
Sensitive shock sensor. Even at the minimum level, it is triggered by loud sounds and minor contacts. |
| Ease of connection. Almost any driver can connect the system independently. A detailed diagram for the aps 5000 car alarm is set out in the instructions for the kit. | Insufficient signal between machine and remote control. Many owners note that the key fob only works when the car is in close proximity. If there are obstacles between the transmitter and receiver, the signal may be lost |
| Affordable price. At a cost of around $ 40, the APS alarm performs all the necessary measures to fully protect the car from theft. |
Faults specific to the A.P.S 5000
Like any technique, the alarm system can break down after a certain period of operation.

Consider the most common problems and existing options for their solution.
1. Keychain not working
Possible causes of malfunction
- no power to the unit or remote control
- there is no synchronization between the remote control and the central unit
Ways to solve the problem: dead batteries should be replaced with new ones. To do this, the key fob will have to be disassembled, along the way, checking the contacts inside the plastic case. In order to restore the lost synchronization, it is necessary to reset the alarm by disconnecting the battery power. If this does not help, you must use the Valet button, having previously studied the instructions for the aps 5000 car alarm.
2. The alarm does not work when the doors are opened
Possible causes of the malfunction:
door ends broken
no contact with end buttons

Ways to solve the problem: Faulty buttons should be replaced. Replace disconnected contacts. In order to do this, it is necessary to turn off the alarm so that it does not work during the repair, unscrew the buttons and remove the chips. Contacts should be cleaned with sandpaper.
3. Alarm behaves unpredictably. Turns on and off spontaneously, locks doors, etc.
Possible causes of malfunction
Weak battery charge
Outgoing contacts of the control module
Incorrect installation or configuration of the aps 5000 car alarm circuit
Ways to solve the problem: if it was not possible to correctly configure the aps 5000 car alarm according to the scheme, you must contact a service station. Outgoing contacts can be connected independently. A dead battery should be replaced or charged.
A.P.S 5000 alarm connection diagram. Is it difficult to connect with your own hands
A detailed wiring diagram for the aps 5000 car alarm must be included in each kit. It describes in stages the sequence of connecting each element, as well as the method of their installation. An experienced driver who is well versed in the electrical system of the car can cope with the installation on his own.

Since the equipment was created based on the needs of the domestic consumer, special attention in the aps 5000 car alarm scheme is given to the equipment of AvtoVAZ vehicles.
The manufacturer offers schemes for the following models:
Cars of the Lada 2108, Niva, Taiga family equipped with APS4 or APS6 immobilizers (door connection)
Lada 2110 and 2115 equipped with APS4 (door connection)
VAZ 2108, 2115, Niva (connecting the trunk and hood to 2115)
Owner reviews
|
Positive |
Negative |
|
Alexey (Kharkiv forum of motorists) I bought a car two years ago, and the time came when it was necessary to provide protection for it. It was not so easy to choose, as the range of models is quite large. After a thorough study of the topic, I eventually bought an APS-5000 alarm. And did not lose! I have been using it for the third year and at least that! It works great both during frosts and rains, despite the fact that the equipment is not at all expensive! |
Sergey (Saransk city forum) I have a VAZ 21099. Everything worked fine for 2 months (as I bought the car, the APS was already standing), well, sometimes it was not removed from the signaling the first time, I changed the battery several times. Soon the key fob completely turned off, I had to buy a new one. In addition, I do not complain about work. But the negative aftertaste still remained. |
|
Oleg (http://otzovik.com) I never set an alarm until I discovered that the lid of the tank with the lock was pulled out with meat and the wing was also crushed. I had to go, choose the signaling. I took the APS, since I don’t need fancy functions, the main thing is to scream loudly if they climb to the car. Installed myself. If the hands are not crooked, it is very simple. I connected what I needed, but I didn’t connect what I wasn’t going to use. Collected in about half a day. It works great, the key fob is easy to listen to, I didn’t even change the batteries for 3 goals. |
Alyona When I bought Logan's car, the APS 500 alarm was already on it. I don’t know who might like it, it worked extremely poorly for me. In the middle of the night, it could work for no reason or suddenly block the doors. After a year of torment and several repairs, I changed it to a new one, a little more expensive, which I am quite satisfied with. It is better to take more expensive - less headaches and damaged nerves. |
|
Leonid For some time I had to put the car in the open air near the house. So I had to buy an alarm. The choice fell on the APS-5000, as it is relatively inexpensive and, according to familiar sellers, is quite tenacious. Indeed, the system pleases with its unpretentiousness. Although the urgent need for it has disappeared, out of habit I use it every day. So far, there have been no disruptions. |
Serega (http://gtauto.ru) I fully support the negative opinion, at first the key fob stopped working, then the central unit also died (it just stupidly doesn’t perceive anything). Useful advice is to return this garbage back to the store or don’t take it at all. If 14 days have not passed, take the money back or exchange it for something else, even if it is more expensive. |
|
Artur (Saransk city forum) I needed to purchase two alarms for myself and my son at once. I bought my son a heaped up with auto start, a simple double-sided APS for myself. After 3 years of operation, I will say that there is no difference. Mine is even more convenient, since my son has to change batteries more often and had to reprogram once, since the connection with the key fob was lost. There is nothing like that in my APS. Works slowly and no problems. I recommend everyone not to waste money and purchase simple and reliable systems. And if someone wants to steal your car, he will do it with any protection, there are a lot of ways. |
Maksim A friend persuaded me to put this alarm, saying why pay more. I soon regretted my greed. Immediately did not like that the car can not be opened from the balcony of the 5th floor. It seems to be a small distance, but for some reason the receiver does not catch. Have to go down. Literally a year later, contacts began to depart. The wiring from the kit turned out to be of poor quality, and now it is wrapped in electrical tape in many places. And besides that, glitches happen from time to time. In short, I am completely dissatisfied. |
Features of A.P.S 5000 operation on different vehicles
1. Rules for using the A.P.S 5000. This section describes the standard alarm functions:
- arming and disarming
- arming except for the faulty zone
- using the Panic mode and the Valet button
- manual alarm adjustment and much more.
Also, the meanings of the light and sound signals that the system gives, and the symbols on the key fobs are deciphered here.
2. Programmable system functions. Among the special features that the manufacturer offers, the most in demand are such functions as:
- setting the guard in automatic mode
- alarm operation when the ignition is on
- blocking the engine in the "automatic" mode
- 30 second delay for chime when exiting vehicle, etc.
All these features are described in detail in the instructions, so that each driver has the opportunity to independently choose the set of functions that suits him and connect exactly what he needs.

3. Wiring diagram. The instructions contain detailed installation diagrams for all signaling elements, and separate drawings for VAZ models. Here you will find:
- Connection diagram of the main multi-pin connector (upper and lower row)
- The list of the location of the contacts and the corresponding wires in the block chip
- Connecting connectors for additional elements.
A separate appendix describes wiring diagrams for car doors and central locking.
With the help of this manual, you can easily equip the car with an alarm, the main thing is to follow the rules and sequence of installation exactly. Additional parameters make the use of the APS 5000 even more comfortable, and the protection of your car - as reliable as possible.
Detailed instructions for using the APS 5000
Video - How to turn off the alarm with YOUR HANDS