Say what you want, but recently the activity of using various buttons for adding blog posts to social networks has increased. The idea and accessibility of this method, it seems to me, is much better than various social bookmarking services, most of which in RuNet were simply “dead.” A couple of top bookmarking social networks could still somehow exist and be posted on blog pages, but the many buttons and options that different services provided were useless. Now, perhaps, this can be compared with Google Buzz - many people have started using the new service, at the moment it doesn’t seem to work (and did it work?), but the corresponding icon is still placed on many projects. But if we talk about Twitter, Facebook and VKontakte, it’s a completely different story.
In general, there are several solutions for creating a VKontakte button (as well as some others), but I recently found a couple more interesting WordPress plugins that I will share with you. But first, a little theory and “repetition of the material covered.”
1. The first option for the VKontakte button is to use pictures and code from the service. To add a simple standard code:
When changing it “for yourself”, pay attention to the link to the image vkontakte.gif, which should be located in the template folder, the images directory. The standard button that you see at the very end of the article on this blog can be changed to any other one. Also, do not forget to specify its width and height using width and height. The advantage of this option is that it’s elementary, you don’t even need to understand much about the code, you can add “as is.”

![]() 2. Option two - adding a button using . The module is quite easy to install and allows you to display the number of users who have used it. In general, a little interactivity, as well as some interesting options when setting up.
2. Option two - adding a button using . The module is quite easy to install and allows you to display the number of users who have used it. In general, a little interactivity, as well as some interesting options when setting up.
At this stage I am using this option and I like it.
3. Plugins for the regular VKontakte button and other social networks. Some time ago I published a selection where, unfortunately, there was no VKontakte, but popular foreign services were presented and their very original presentation on the blog.
Theoretically, you could get into the plugin code and, using the knowledge from the first option, replace some unnecessary bourgeois service with the VKontakte social network. But I decided to look for ready-made options. As luck would have it, there were a lot of plugins, but most of them were completely useless and dull. In the end, I chose only two worthy candidates (despite the fact that I needed one more additional condition).
Social Share Buttons for WordPress
The plugin is designed purely for RuNet, as it contains our most popular social networks - VKontakte, Odnoklassniki, Moy Mir, livejournal, Facebook and Twitter. If I'm correct, then it is somewhat similar to the VK Share Button, or, more precisely, it includes its functionality. You can choose different options for displaying buttons, as well as set some settings for each of them. It is possible to sort buttons and select some of them.
The biggest drawback of the plugin is, in fact, its limitation only to popular Runet social networks, which is not always justified. And I just needed to add LinkedIn to the site in addition to VKontakte. I admit, I looked through a lot of plugins until I found the super cool and useful Share and Follow.
is the coolest plugin with social bookmarking buttons that I have ever seen. There are a lot of possibilities and just as many settings. Installation and getting started is quite quick - download the plugin, activate it in Amdinka and indicate in the Share and Follow section which buttons you need. They will immediately appear on the blog pages.
After this, you can begin detailed settings - you can choose the size of the buttons, many different social services, as well as general features (RSS, email, print version). This same plugin adds a follow element to the side of the scroll bar and also has many other options. There are paid options, but there are enough free ones without them. I suggest watching a short video on using Share and Follow:
I may look at the Share and Follow module in more detail in the future, but you don't have to wait for me to explore it yourself. The most important thing is that it is ideal for both Runet and English-language sites - the list of social services is more than sufficient. Installation is quick and easy, in short, Share and Follow should be in the archives of any wordpress website/blog developer.
P.S. By the way, about social networks, you may find useful statuses about life for VKontakte, which you can set up for yourself very simply.
There are several basic psychological aspects in life, such as personal self-development, that allow you to achieve great success and results.
You can slightly improve your vision without glasses by wearing contact lenses to work or school, order them online.
Connected VKontakte comments on your blog or website are a good tool and a source for receiving additional traffic. A visitor will comment on your post through a widget or comment plugin from VKontakte and leave the bird untouched, his comment will appear on his wall.
This fact will not go unnoticed by his friends, who, perhaps, after visiting your site, will have an opposite opinion or a coinciding one and a dialogue will begin...
Positive factors from adding comments on VKontakte
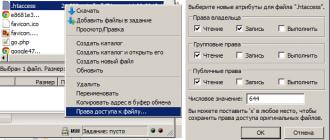
1. Significant replenishment of visitors moving from the VKontakte social network to your website. It is noticeably felt within the first months after installation of the form. And what's the reason? In this form, the default checkbox is set to “Display on your page”:

Many people don’t pay attention to it at all, it remains and the number of links to your site grows, and new visitors from VKontakte come through them, and they can even post on their wall.
2. The number of comments is growing. The process of commenting through the form developed by WordPress is complicated, such comments must go through a manual moderation procedure, it is easier to do this through the VKontakte comment entry form (there is no need to type either name or email), and the comment appears, as they say, “in one click, they become what they were before. The number of people who want you to add them as friends. The benefits of this fact do not need to be explained.
4. The ability to work through comments on the “administration” tab, where you can simply eliminate something unwanted

Negative factors from adding comments on VKontakte on WordPress
1. Additional burden due to the need to personally review and respond to comments on VKontakte, and for this you need to regularly visit specific articles on your site or do this through the administration. If you love to ride, you also love to carry sleds. Previously, replies were done from the WordPress admin panel.
2. VKontakte comments are not synchronized with the database on the site. All comments are their property.
How to add VKontakte comments in WordPressYou can add VKontakte comments to WordPress using a widget or plugin
via widget, step by step:

3rd step To set comments, click and go to the widget code from VKontakte.

4th step On the code generation page for your site, fill out a small form. Specify the site name, domain, how many comments to display, extended version of comments and block width. Next, click “Save” and enter the captcha. After saving, a code will be generated to insert comments from VKontakte onto the site.

5th step The code consists of two parts. Copy and paste one part into the file header.php before the closing tag .

6th step We copy and paste the second part of the code into the single.php file before

We save the file, go to the blog or website page and see that comments from VKontakte are connected.
Instructions for adding comments to VKontakte in WordPress via a plugin, step by step:1st step We go to the admin panel on our website in WordPress, select “Plugins” in the menu à “Add new” à type vkontakte api “Search for plugins” Find the plugin and click “Install”

2nd step After successful installation, select “Activate plugin”

3rd step Let's go to the plugin settings

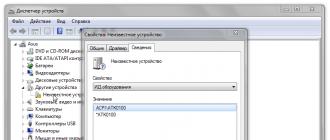
4th step Due to the lack of ID and secure key, we follow the link

5th step In the window that opens, create an application by clicking “Proceed to download”
application" by first entering its name and description

6th step In the next window that opens, enter the received code that came to your
cell phone in literally less than 30 seconds, and click “Send”

7th step In the window that opens, copy the ID and protected key and paste them into
the corresponding fields in the window opened in step 6. Return to this window and fill in
website address and base domain, click on “Save changes”

8th step In the plugin settings, check the box for “Show Vkontakte comments first”, set up buttons and other useful things and click “Save settings”

We update the cache by logging out and logging back into our site, using a useful function. So, we looked at two methods of How to add VKontakte comments in WordPress. I don’t know where to go in more detail, but maybe the video will also be useful. By the way, look at other blogs, don’t limit yourself to just VK!
If you use WordPress, then most likely you are tired of standard comments, since they are not very convenient and most likely you receive a lot of spam. Of course, there are a lot of plugins to get rid of spam, but sometimes you want to try some new comment system. In this post, I will tell you how to add VKontakte comments to WordPress, and I will also show you a plugin that will do all the work for you.
IntroductionIn this post I will look at two ways:
Detailed installation of plugins is described under the heading below, only in this case enter “AnyComment” in the search to install this plugin.
Plugin for VK commentsLet's install the VKontakte comments plugin directly through the admin panel.
Installation instructions:

This is my personal plugin and I will be grateful if you leave a good review or “5 stars” :)
Functions- Completely replace comments from WordPress to VK
- Place the VK comments widget along with regular comments. In this case, you can set the position of the widget, “above”, “below” standard comments or “below the heading”.
- View all comments left by users via VK widget in the admin center
- All the settings that the VK comment widget has are in the admin panel
- Preview of the comments widget right under settings
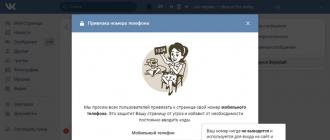
- Let's go to page with widgets and select “Comments” (or click ).
- In the “Site/Application” drop-down list, select “Connect a new site” or select the current site (if you have already added one). When adding, you need to indicate “site name”, “address”, “main domain” and select the topic..ru”, “site” and “IT (computers and software).
- Next, select “Number of comments” to display. If you select, for example, five comments, and you have already added more, then at first when the page loads it will appear as 5 comments and then you can click “Show more” to load the rest.
- We choose whether you need “Media” or not. This is for example adding graffiti, photos, audio videos and links.
- Set the width of the comment block.

We won't just paste the code because that's not correct. I'll show you how to do it in WordPress style.
Adding the VK widget codeYou should have code that looks something like this.
VK.init((apiId: XXXXXXX, onlyWidgets: true));
As you can see, it is divided into 2 parts.
First- these are the scripts (lines 1-6) that you need to load to display comments. Together with "XXXXXXX" you will have a unique number for your site.
Second- This is the part of the code that will be needed to display comments.
Create a function in functions.php- Copy the function below and open the functions.php file that is located inside your theme.
- We go down to the very bottom of the file and add the following function.
Attention! Instead of “YOUR_ID” write the ID that is written in your embed code.
Function vk_comments_api() ( if(is_single()) ( echo ""; echo " VK.init((apiId: YOUR_ID, onlyWidgets: true)); "; ) ) add_action("wp_head", "vk_comments_api");
In this code I have added two scripts to your WordPress site. But I didn't just add them. I made a condition that will add scripts only if the entry is fully open. Why do we need to load the site with unnecessary scripts? Right?
Adding comments to comments.phpBefore this line we insert the second part of our code, which looks like this:
VK.Widgets.Comments("vk_comments", (limit: 10, width: "665", attach: "*"));
And everything is ready! Comments should be installed successfully.
If you have any problems, write them in the comments below to this post, I will be glad to help.
ConclusionConnecting comments from a contact is not as complicated a process as you most likely thought. This all takes no more than five minutes.
Greetings, dear blog visitor. In this article we will talk about the comment block from the social network Vkontakte. Let's look at the step-by-step installation of comments on a WordPress website/blog. Before we get started, let's talk a little about the pros and cons of VK comments.
Pros and cons of the VKontakte comment block.+ an additional influx of VK visitors to your site, this is a huge plus of the VKontakte comment block on WordPress.
Let's take a closer look at this plus of comments, how it works: the main and most important positive point is that a visitor to your site, leaving a comment under an article on your WordPress site,
automatically duplicates this comment on your wall, thereby attracting the attention of your friends and page visitors to your site.
It looks like this:

Visitors leave comments more often. This is due to the fact that most visitors to your site are registered on the VKontakte social network, so if he liked the article or has questions, he can easily leave a comment without filling out additional data (as is usually the case for leaving standard comments).
— The only downside, I think, is that the VKontakte comment block on a blog/Wordpress site is not indexed by search engines. This means that all comments that users left through the social network are not displayed when the search engine robot visits, thus the comments do not appear in the search results.
How to add VKontakte comments to WordPress, step-by-step instructions:1.In order to install comments from VK, you need to go to the developers’ page, this can be done by clicking on the link http://vk.com/dev.
2. Then click on the “Create application” button.

3. After going to the page, fill in the Name (can be anything) and select the application type - website. Next, you need to fill in the “Site Address” and “Base Domain” fields. After you have completed all the steps, feel free to click “Connect application“.

4. At this stage of installing comments on your WordPress site, you need to confirm your actions on the VK network. To do this, click on the “Confirm via SMS” link.

Then “Get code”. Within a few minutes, a confirmation code will be sent to the phone number attached to your VK page, which must be entered in the field.

If, for some reason, the confirmation code has not been received, click “Resend code” and then select “Yes, let the robot call.”

5. After entering the confirmation code, click “Send code”. At this stage, we have added our site to the list of applications on the VKontakte network. Now let’s move on to creating and setting up a VKontakte comment block.
6. Go to the quick start page by clicking on the link http://vk.com/dev/main. On this page we go down to the “Widgets” block. Find the “Comments” link and click on it.

7. At this stage, you need to configure the future block of VK comments on the site by selecting “Site/application”, which we created in, then select the number of comments that will be visible after the article. If you do not want links, videos, etc. in the comments, uncheck the “Enable extended comments” checkbox.
At this stage, the settings for the comment block are complete; in the next steps we will install this comment block on our WordPress site.
8. Before implementing the VK comment code, you need to customize our comment block by specifying its width. In order for the VKontakte comment widget to fit into our WordPress blog, you need to know the width of the site column in which the article text is located. To do this, you need to go to the site, select part of the text of any of the articles, right-click, then select “View element code” or “Inspect element”, the choice depends on the type of browser.


9. After we have found out the width of our future VKontakte comment block, we return to the settings and set the width we need.
10. At this stage, we will insert part of the widget code into the header of our site, for this we need our site, Appearance - Editor. On the right side, find the header.php file and click on it. Then we return to the widget settings and copy the first part of the code.

Then we return to the site admin panel, to the header.php file, find the tag in the file code and paste the previously copied part of the VK widget code in front of the found tag. Then save the changes by clicking “Update file”. Correct insertion of the comment widget code into the header of the WordPress site in the screenshot below.

11. The second part of the comment block code is inserted exactly where you want to place the widget. I recommend putting it before the main wordpress comments. To do this, in the site admin panel, Appearance - Editor, find the file “comments.php” and click on it. Afterwards, copy the second part of the widget and paste the code at the very beginning of the comment file. Then we save.

Now you can go to your website, go to the article and rejoice, the VKontakte comment block has been successfully installed on your WordPress site.