Most PC users hardly need to know how to update the BIOS of the motherboard, since this process is quite risky and does not provide much advantage.
However, in some cases, an update is still required:
- If there is an unfinished microcode on the board (as a result of the manufacturer's attempt to bypass competitors by releasing the product early);
- If necessary, fix some problems with integrated devices (for example, refusal to work with a theoretically supported type of memory or processor).
Checking for an update
Having decided to reinstall the BIOS on the motherboard of your PC, first of all, you should make sure that this collection of firmware needs to be updated and whether it is possible.
You can find out on the manufacturer's website in the technical support section (CPU Support List).
As a rule, it also contains information about the compatibility of processors and BIOS versions.
True, before that, you should definitely find out the revision of your motherboard and the parameters of the BIOS already installed on the PC.
Check revision and BIOS
There are several ways to define a revision:
- look at the inscription on the motherboard;
- read the label on its packaging.
The latter option is simpler - but only if the box from the board has been preserved. In addition, sometimes a computer is purchased in an assembly, and the box goes immediately to the entire system unit.
Therefore, most often you have to remove the side cover (having previously disconnected the PC from the network) and look for inscriptions like REV 1.0 or REV 2.0 on the board. This is the revision.
Determining the version of the BIOS installed on the board takes less time.
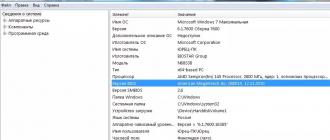
Usually, all you need to do is display the system information window by typing "msinfo32" in the command window (Windows key + R).
Among the information provided, you can find the manufacturer of the motherboard, and its model, and BIOS version.

When all the required information about the board has been received, you should visit the official page of its manufacturer and check for BIOS updates.
Sometimes the data is presented in English, however, most manufacturers have official resources and technical support in Russian.
Finding BIOS information for your board is usually fairly easy.
Advice: If the computer was purchased already assembled and has a certain model, you can try to find the appropriate BIOS versions on the website of the system unit manufacturer. In extreme cases, at least the parameters of the board will be indicated here, knowing which, you can continue searching on the resources of the company that released it.
You should also like the articles:
Update methods
Depending on the specific model of the board installed on your PC and its manufacturer, BIOS can be updated in one of three main ways:
- from the DOS mode, which is present on all, even modern computers designed to work with Windows;
- from Windows;
- using special programs (utilities) produced by manufacturers and allowing you to flash not from Windows or DOS, but directly from the BIOS itself.
Update in DOS
The first option was used 20 years ago, although at that time a boot floppy disk was required for flashing.
Now you will need a special disk or flash drive, where the Autoexec.bat (or Update.bat) file is located, which is necessary in order to start the installation.
Additional utilities and BIOS elements should also be written here.
Having prepared a bootable USB flash drive (for this you can use the help of special programs), you should install the ability to boot from media in the same BIOS and proceed with the update.
It will take a little time, but it is very important that the computer is not turned off or restarted at this time.
Updating the firmware package through Windows is much easier, although not much faster. To do this, you must first download a new BIOS version from the manufacturer's website, which will be installed on the board.
In addition, all manufacturers have their own installers.
For example, Asus has the ASUSUpdate application.
Before starting the flashing, install the utility, like a regular program, and then open it.
When a prompt appears on the screen, select the update "from a file" and indicate the path to the BIOS package already located on the computer's hard drive.
Sometimes the utility can find, download and install its latest version suitable for the board on its own

Utilities for updating
In order to be able to update the BIOS using proprietary programs from the manufacturer, you should find them on the official pages of the manufacturers.
There are such utilities, for example, on the pages of manufacturers Asus, Gigabyte, MSI and Intel.
This option is best suited for general users, as it requires the least amount of work and also avoids the error of using the wrong BIOS.
Advice: while the utility is running, close all other programs. In addition, it is not recommended to perform any actions on the PC. Moreover, it takes a little time - up to a minute on new computers, 2-3 minutes on old devices.
ASRock
ASRock, which produces boards for powerful processors and the most advanced memory modules, has its own flashing utility.
You can usually access it by pressing F6 when testing or booting the system.

The utility itself finds the necessary media with BIOS and displays only suitable firmware. After selecting the desired version, with just one click, you can upgrade in a couple of minutes.
ASUS
Most of the latest models of Asus motherboards are successfully updated using the USB BIOS Flashback utility, which is downloaded from the website of the Russian branch of the manufacturer.
For older versions, the Asus Update Utility running on Windows is used.

MSI
You can reflash MSI motherboards using the proprietary MSI Live Update program, which automatically detects the appropriate versions and downloads them from the network.
You can find the utility and instructions for it on the official website of Micro-Star International.

gigabyte
It is best to download utilities for updating the BIOS of Gigabyte boards on the official website of the manufacturer. It provides automatic detection of the required version and its download from the network.

Personal computers must be compatible with new hardware even years after they were purchased. This is necessary so that you can later upgrade.
Often, PC component manufacturers offer users to update the BIOS themselves so that the computer meets modern requirements and is compatible with new hardware. By doing this, you can easily install a processor that was not yet released when you bought the motherboard. In this case, your system will immediately recognize it and will function correctly. Due to what is this possible?
Offline system: BIOS with battery
BIOS (Basic Input/Output System - basic input-output system) is the heart of the software and an important element of any PC. It acts as an intermediary between computer components and the operating system: without the BIOS, the latter would not be able to communicate with and control the hardware. When you turn on the computer, long before the OS logo appears on the screen, the BIOS always starts first. It determines which components are installed in the PC, initializes them and provides all the information to boot the system. The BIOS itself is located on a special flash memory chip on the computer's motherboard, and the contents of the memory are preserved even in the absence of power. This is possible due to the presence of a separate battery, which is responsible for the BIOS.
We will answer the most important questions about the BIOS and possible updates. Who needs to carry out its flashing? How can I find out what motherboard is installed in the computer and what BIOS version it uses? If there is a need to update the latter, then how to carry out this procedure? And what if there are problems? It’s worth noting right away that not every PC needs an update: if the system is stable, this makes no sense. But for those who are planning a computer upgrade and a thorough replacement of equipment or want to improve system performance, flashing the BIOS is indispensable.
BIOS Setup: Additional features after the update

BIOS setup. The main BIOS menu consists of many sections. Any motherboard supports only a limited number of processor models, but by updating the BIOS, this list can be significantly expanded to include more modern chips. A prerequisite for this is the compatibility of the central processor with the motherboard connector. Problems can only occur with very old motherboards: the older they are, the less likely it is that a BIOS update makes sense.
It is also worth noting that when flashing it is far from always possible to achieve an increase in system performance. However, BIOS special features and functions, such as CPU overclocking, are often only available after an update. In the same way, only after flashing the BIOS, new processors are correctly recognized and operate at the desired clock frequency. In addition, recent BIOS versions provide useful features that enhance your system's customization options. A typical example is support for Turbo Boost technology for Intel processors. But before updating, you need to make some preparations: in addition to the motherboard ID, you need to find out the number of the installed BIOS version. The free utility CPU-Z will help you with this.
CPU-Z: getting useful information
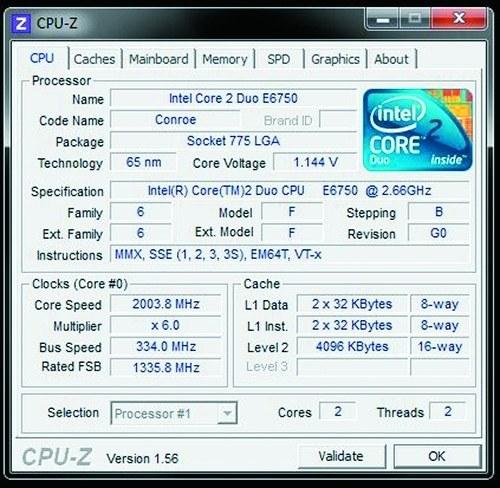
CPU-Z will provide the most detailed information about components This application provides information about the installed processor: name, manufacturer, core voltage, cache memory information, supported instruction sets and other data. CPU-Z can also determine if the processor has been overclocked or is running at factory speed. After launching the utility, on the "Motherboard" tab, you can find out all the information about the manufacturer, the name of the model and chipset, as well as the current BIOS version. Compare these data with the parameters of your motherboard, indicated on the official website of the manufacturer. If the number listed in CPU-Z is the same as the most recent BIOS version, no flashing is required. If there is a more recent version on the site, download the necessary archive. It usually contains an .exe executable file that is used to update the BIOS (for example, amiflash.exe, awdflash.exe, etc.) and a BIOS code file in BIN or ROM format. Flashing methods may vary depending on the manufacturer of the motherboard. Most developers offer their own utilities that allow you to update the BIOS directly from the Windows environment. However, for security reasons, we recommend using a more secure method.
DOS: the best BIOS update environment

DOS - the safest environment for flashing BIOS With the least risk, flashing is done using a boot floppy disk, disk, or "flash drive" in DOS mode. The first of these media can be created, for example, in Windows Explorer: just right-click on the drive shortcut and select "Format" by activating the "Create MS-DOS boot floppy" option in the context menu and specifying the path to the downloaded BIOS files.
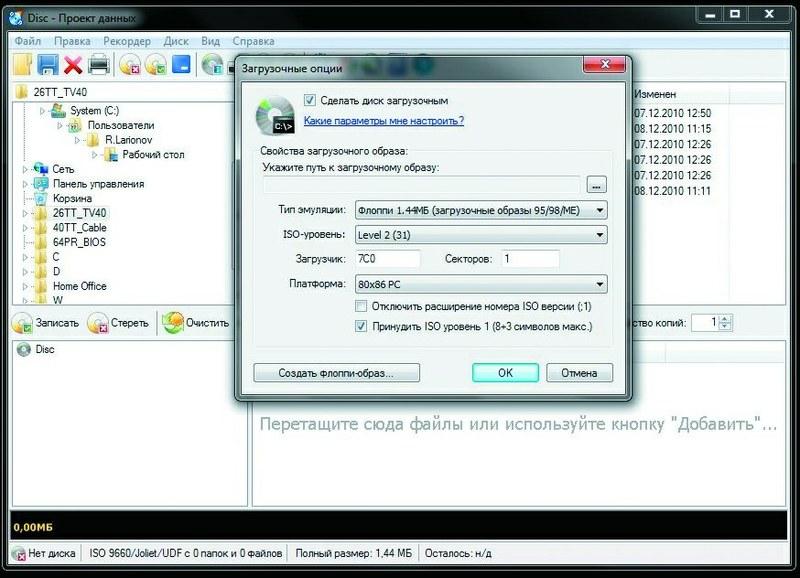
CDBurnerXP is a freeware disc burning program that emulates a bootable floppy disk for flashing the BIOS.
You will need a boot image called boot.ima which can be found on the CDBurnerXP website or our DVD. It should be opened using the Ultra ISO program, drag files with your BIOS code into the list that opens and save. After that, launch the CDBurnerXP program, select the data disc burning mode, and click OK. The main program window will open. Make the disk bootable: select Disk | Boot options", in the window that opens, check the box "Make disk bootable" and set the path to the saved boot image, specifying the emulation type "1.44 MB floppy". Burn the CD by pressing the burn button, then restart your computer and point to your drive in the startup menu. The computer will boot into DOS with a command prompt that opens the A:> directory. If you type "dir /w" you can view the contents of the floppy or disk. Flashing the BIOS can be done from the command line. Sometimes the BIOS update does not start automatically - in this case, run the dir command and run the BAT file (for example, update.bat). After a successful flashing, remove the disk and restart your computer.
BIOS variants: AMI, Phoenix and Award

As a rule, each motherboard model requires its own BIOS, since it must take into account the features of the chipset and peripheral equipment used. However, it is unprofitable for board creators to spend time and money on the full development cycle of their own BIOS, so obtaining them usually consists of two stages. The BIOS manufacturer (the most famous companies are AMI, Award and Phoenix) is developing a basic version that implements all the functions that do not depend on the features of a particular chipset. The creator of the motherboard, independently or jointly with him, improves the basic version, taking into account the features of a particular product. At the same time, for the same model, the BIOS code can change several times after the release of the board - for example, to fix bugs found or add support for new devices.
Thus, the term "BIOS version" can be used to refer to a variant of the BIOS base code released by a specialized company. For example, AwardBIOS 6.0 is the sixth version of the BIOS from Award, whose modifications are used in many motherboards. For each board model, the source code is finalized taking into account the features of the chipset and peripheral devices. Sometimes you can find BIOS versions entirely created by manufacturers of motherboards or laptops - Intel, IBM, Compaq, Toshiba, Dell and some other well-known companies. By the principle of operation and interface, they do not differ much from the BIOS produced by Award, AMI or Phoenix, so it is not very difficult to deal with them.
If an AMI BIOS is installed on the motherboard, then the “amiflash.exe BIOS.bin” command is used to update it, and the word BIOS must be replaced with the name of the file with the code. After executing the command, a window will open showing the progress of the BIOS update. During flashing, in no case should you turn off the computer or turn off the power supply, as this can lead to irreparable damage to the system. As soon as the process is completed, the program will automatically restart the PC. Remove the boot floppy or disk from the drive and boot Windows. Using the CPU-Z utility, you can check if a new BIOS version has been installed. However, flashing does not always go smoothly. But even if there are some problems and after updating the BIOS your computer no longer boots, this does not mean that it cannot be saved.
If the warranty period for your PC has not expired and you have dealt with programs and firmware from official developers, you can file a claim with the manufacturer.
However, the use of modified BIOS files from third party vendors that promise higher performance or greater system overclocking potential is not covered by the warranty. Alternatively, you can resort to paid services of firms that specialize in restoring motherboards with BIOS errors. In some situations, it helps to create a floppy disk with a firmware program and a BIOS code file on another, working computer. For BIOSes from Phoenix or Award, you need to create a file on the floppy disk called autoexec.bat. Use the standard Windows program for this - Notepad. The file must contain the following line: awdflash.exe BIOS_DATA /py /sn Replace the word BIOS_DATA with the name of the file containing the BIOS code (including the extension - usually bin or rom).
The /py and /sn keys are needed to perform a flashing without further user intervention.
Advice.
If an AMI BIOS is installed on the motherboard, it is enough to save the file with the BIOS code on a floppy disk and rename it to amiboot.rom.
Insert the floppy disk and during boot press the key combination "Ctrl + Home".
However, this solution helps only in 10-20% of all cases, since if the BIOS is damaged, it is often impossible to access the drive.
The Last Rescue: When Nothing Helps
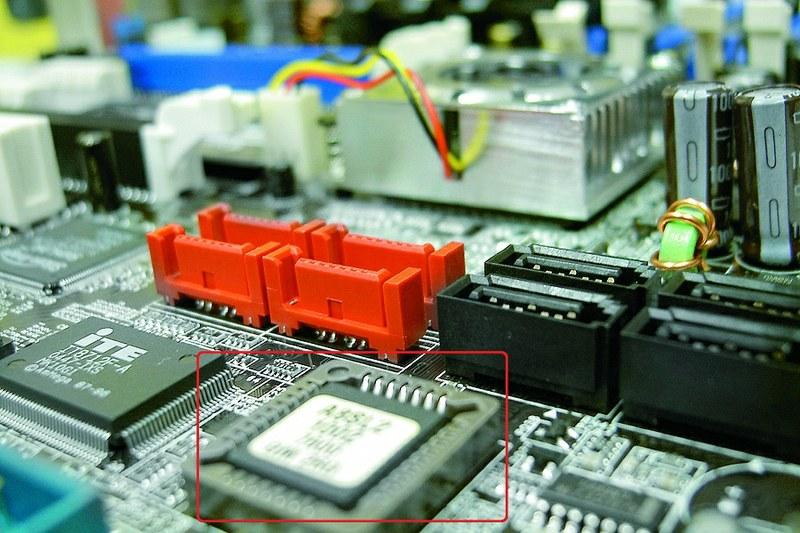
A damaged BIOS chip can be restored using another, working computer If someone you know has the same motherboard model, you can restore your BIOS using another computer. Boot a working PC in DOS mode and prepare a floppy disk with all the data necessary for flashing. While the computer is running, use tweezers to carefully remove the BIOS chip from the motherboard and insert your damaged one. This requires extreme caution, as the PC is turned on.
Now start the firmware process from the floppy disk. In this way, you will update your failed BIOS chip on a working motherboard using software tools. After that, turn off the computer and swap the components again. If everything was done correctly, a PC with a working BIOS will boot up again.
However, it should be noted that updating the BIOS and fixing errors by all the methods described are performed solely at your own peril and risk.
If the computer does not start

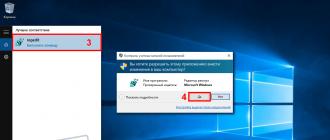
After updating the BIOS, did your PC stop turning on and you can't even enter the BIOS settings? Disconnect the computer from the network by unplugging the power plug from the outlet.
Open the case of the system unit and touch a flat metal surface on the inside with your hand to remove static electricity.
Find the battery on the motherboard. Remember how it is set (usually, "+" is on top). Remove it by pressing the metal contact to the side. Wait a minute and put the battery back in its original place. After turning on the computer, the BIOS settings will be returned to the factory settings.
If you are not sure about the newly set parameters, activate the "Load Setup Defaults" function and exit the BIOS with saving.
At the end of 2016, Intel announced the release of the processor Kaby Lake. New chip, like its predecessor skylake, uses the same 14-nanometer process technology, but it has not been without optimization. The innovations have added performance to the chip, which surpasses the power of the 6th generation processor in the Intel "family". This naturally explains the consumer hype around the 7th generation Intel processors. But what about bios? who wants to upgrade? We'll talk about this.
And the difference is what: a comparison of Skylake and Kaby Lake
If you work a lot with 4K content, then buying a Kaby Lake processor is a smart investment. New generation chips support HEVC. They entrust UHD video encoding/decoding to the video card, and do not use their own cores. Result - noticeable improvement in video quality and reduced battery consumption. Moreover, among the capabilities of processors is to direct their power to solve tasks that await, while the trend continues less energy consumption. 3D is getting better too. The picture quality surpasses the image that was previously given by the 6th generation processors. The gameplay promises to be bright and detailed.
In addition, it is worth noting the pleasant updates - increase clock frequency, improvements turbo mode, support new formats (2nd generation USB 3.1, HDCP 2.2).

BIOS firmware update to support Kaby Lake
Are you planning or have you already bought a Kaby Lake processor, but it does not work on your machine? The BIOS firmware will save the situation, of course, provided that latest bios version designed to solve this problem. Intel insists that updating the BIOS for PCs that do not need it is not desirable.
To ensure the operation of the Intel 7th generation processor, owners of motherboards with Z170, H170, B150, H110 chipsets can update BIOS. Firmware update in progress extremely simple, But more reliable contact the service. The point is that in the process difficulties often arise with which it is unrealistic for an amateur to cope.
The transition from the 6th generation is carried out in several ways, and it all depends on will the board work without an update. If not, then for firmware need skylake. If the motherboard supports the technology Q-Flash Plus, That Can you update from a flash drive? and no processor. In other cases - you need a programmer, and in addition soldering the BIOS memory chip. Agree difficult And resource-intensive.
Bios updates - required condition even for those motherboards that have received support for 7th generation chips (for example, Intel H110 / B150). And although there have been platforms on the market for some time that allow you to use updated CPUs, nobody guarantees that when you buy it, you will not get a device whose BIOS version does not support Kaby Lake. In such a situation, you will also contact for help to Skylake or go to the service center.
What does the KomPom service center offer?
The Compom service updates the BIOS firmware to support the 7th generation of Intel processors without loss of warranty. At our disposal modern equipment, which allows fast And qualitatively make the transition from the 6th generation to Kaby Lake.
Motherboard models we work with:
- Afox H110
- ASRock H110
- Asus H110
- Biostar H110
- Elite Group (ECS) H110
- Gigabyte GA-H110
- MSI H110
- ASRock H170
- Asus H170
- Gigabyte GA-H170
- MSI H170
- ASRock B150
- Gigabyte GA-B150
- MSI B150
- Asus B150
- ASRock Z170
- Asus Z170
- EVGA Z170
- Gigabyte GA-Z170
- MSI Z170
- Asus Q170 etc.
The most common reason customers request an upgrade is the use of the Intel Pentium G4560 processor in 100th motherboards. And we are happy to solve the problem of compatibility of 100-series chipsets with 7th generation processors.
The master produces the firmware not through the operating system, where there is a risk of failure of the BIOS chip. Our way - updating the BIOS firmware of the motherboard using the programmer. The firmware process takes on average 60 minutes!
We do not solder the BIOS chip!
Nice bonus for our clients - providing a guarantee for all types of services.
In this manual, I will proceed from the fact that you know why you need an update, and I will describe how to update the BIOS in steps that should be followed, regardless of which motherboard is installed on the computer.
In the event that you do not pursue any specific goal by updating the BIOS, and the system does not show any problems that could be related to its operation, I would recommend leaving everything as it is. When upgrading, there is always a risk that a failure will occur, the consequences of which are much more difficult to fix than reinstalling Windows.
Depending on who the manufacturer is and what model of the motherboard is on your computer, the BIOS update methods may differ. Here are the most common options:

For many motherboards you can use either of these methods, for example, for mine.
How exactly to update BIOS
Depending on which motherboard you have, updating the BIOS can be done in different ways. In all cases, I highly recommend reading the manufacturer's instructions, although they are often presented only in English: if you are too lazy and miss any nuances, there is a chance that failures will occur during the update that will not be easy to fix. For example, the manufacturer Gigabyte recommends disabling Hyper Threading during the procedure for some of their boards - without reading the instructions, you will not know about it.

Instructions and programs for updating BIOS manufacturers:

One item that is present in almost any manufacturer's instructions: after updating, it is recommended to reset the BIOS to the default settings (Load BIOS Defaults), then reconfigure everything as needed (if required).
The most important thing I want to draw your attention to is: be sure to look at the official instructions, I specifically do not describe the whole process for different boards, because if I miss even one moment, or you will end up with a special motherboard and everything will go wrong.