Errors when installing applications from files with the .msi extension are one of the manifestations of problems in the operation of the Windows Installer service (in the Russian version, the Windows Installer). Users of all versions of this OS, with the exception of the earliest ones, face a similar phenomenon. Until now, the problem with the installer is one of the frequent reasons why users decide to reinstall the system. Let's try to figure out how to avoid this. The reason why the Windows Installer is not working may be the following:
- virus infection, and removing the virus does not always solve the problem;
- incorrect installation of Windows updates;
- Anti-malware crashes when instead of blocking one suspicious msi file, the installation service is blocked entirely;
- changes in security policies on the computer;
- damage to system files or the registry for reasons not related to viruses (removal of installer components, unqualified editing of the registry, "crooked" software, hard drive failure, etc.).
Checking the integrity of the Windows Installer structure
The Windows Installer is represented by the following components:- file C:\Windows\System32\Msiexec.exe - directly by the installer itself;
- file C:\Windows\System32\msi.dll - Windows Installer library;
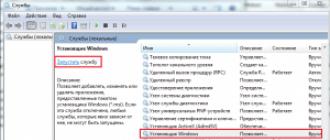
- by the Msiserver service, whose settings are stored in the registry key .
 If the files are missing, copy them from another system of the same version or from the installation disk. If the registry key is missing or damaged, also transfer it from the working system. To do this, on a working computer, run the registry editor (C:\Windows\Regedt.exe) and find the above section.
  Right-click to expand the context menu of the msiserver folder and click "Export". Save the file in .reg format and transfer it to the problem machine.
  Double-click this file and confirm your consent to add data to the registry. Restart your computer.
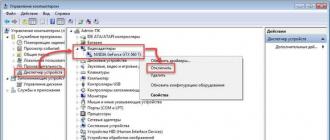
  If the Msiserver service still does not start, check if the RPC (Remote Procedure Call) service on which it depends is running.
  You can re-register the installer files and restart the service using a set of special commands on the command line. For convenience, you can create a batch file: paste the set of actions into notepad and save as with the .bat extension. To run a file, simply double-click on it. For the changes to take effect, click on the desktop and press F5.
 Checking security settings and permissions
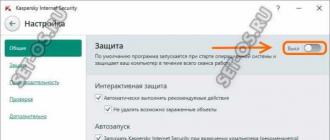
Windows Installer may not work due to the fact that it is blocked by security software or the operating system does not have the necessary rights. First, let's deal with the software. If you have an antivirus installed, disable it temporarily. Each product has its own ways to disable it, but most often it is done through the context menu of the antivirus icon in the system tray. Now let's take a look at rights. Open the context menu of Msiexec.exe and expand its properties. View the list of groups and users on the "Security" tab. Among them, there must be "System" and the "Trustedinstaller" service, and the latter must have full access to the file and be its owner. The system must have "read" and "read and execute" permissions.
  The Trustedinstaller service first appeared in Windows Vista, so in Windows XP, full control must be granted to the system. Everything written below refers to versions released after XP. To check who owns Msiexec.exe, click the "Advanced" button on the same tab.
  In the next window, expand the "Owner" tab. Set the owner to the Trustedinstaller service if something else is specified. If it doesn't appear in the "Change Owner To" list, click the "Change" button, followed by "Other Users and Groups".
  Enter Trustedinstaller in the "Enter Names..." field, click "Check Names" and OK. Return to the previous window. On the "Effective Permissions" tab, assign the necessary rights to Trustedinstaller and the system.
  The msi.dll library must have exactly the same security settings. Now let's check if there are any restrictions for the "System" user to access the following:
 - system drive (usually drive C);
- temporary folders (these are C:\Windows\Temp and C:\Users\Current_user\AppData\Temp);
- folder C:\Config.Msi;
- the folder where the msi file from which you are trying to install the program is located.
When installing Windows programs and features distributed as a .MSI installer, you may encounter the error "The Windows Installer service could not be accessed" error. The problem can be encountered in Windows 10, 8 and Windows 7.
This guide details how to fix the "Windows Installer service could not be accessed" error - there are several methods, ranging from the simpler and often more effective to the more complex.
Sometimes system tweaks and changing Windows Installer policies can lead to the error in question.
If you have Windows 10, 8, or Windows 7 Professional (or Enterprise), you can check if the Windows Installer policies have been modified as follows:

If you have Windows Home Edition installed on your computer, the path will be:
- Go to Registry Editor (Win + R - regedit).
- Navigate to HKEY_LOCAL_MACHINE\SOFTWARE\Policies\Microsoft\Windows\ and check if it has a subkey named Installer. If there is - delete it (right click on the "folder" Installer - delete).
- Check for a similar key in HKEY_CURRENT_USER\SOFTWARE\Policies\Microsoft\Windows\
If the above methods did not help, try to restore the Windows Installer service manually - 2nd method in a separate instruction
A fairly common problem among users of the Windows operating system of any version is the msi error when installing programs from a file with the .msi extension. In this article, I will describe common problems with the Windows 7/10/XP installer and how to solve them, as well as make a video on the current issue.
Files with the .msi extension are the usual installation packages (distributions) from which the program is installed. Unlike the usual "setup.exe", the system uses the Windows Installer service (msiexec.exe process) to run the msi file. In simple terms, the Windows Installer will unzip and run the files from the distribution. When the Windows Installer does not work, various errors appear.
In general, it terribly infuriates me, because. after a stupid error message, it's completely unclear what to do next. Microsoft specifically designed the Windows Installer to enhance the installation of programs (mainly for system administrators), but did not properly take care of the bug-free operation of this service, or even adequate problem reporting. And now we have to rake it 🙂
Problems may be with the operation of the service itself or may occur during the installation of programs, when everything is set up, in principle, correctly. In the first case, you need to pick the installer service, and in the second, solve the problem with a specific file. Consider both options, but first the second.
msi file errors
Very often, errors appear due to insufficient system rights to files or folders. It cannot be said that the Windows Installer does not work, in this case it is enough just to add the necessary rights and everything will work. Just yesterday, I encountered the fact that the downloaded distribution.msi did not want to be installed, while the installation wizard starts successfully, the parameters are selected, but then the system thinks for a few seconds and gives an error:

"Error reading from file "file name" verify that the file exists and that you can access it" (Error 1305). It translates "Error reading from file ... check if the file exists and if you have access to it." Well, aren't you stupid? Naturally, the "Retry" button does not help, and canceling stops the entire installation. The message also does not carry a special semantic load, because the file definitely exists and I have access to it, otherwise I would simply not be able to run it and get this message, besides for some reason in English 🙂
And the error is that I should not have access to the file, but the Windows installer, or rather the System itself. The solution is very simple:

Now the installer error will not appear! You can add access to the entire folder from which you usually install programs, for example, to the Downloads folder, as I have. Watch a video on solving problems with access rights:
In Windows XP, there will be no Security tab if Simple File Sharing is enabled. To turn it off, you need to go to "Start -> Control Panel -> Folder Options -> View" and turn off the "Use simple file sharing" option. In stripped-down versions of Windows 7/10 and XP, there is no Security tab at all. To see it, you need to log into it as an administrator.
More ways to solve the problem

The described method will help with different messages, with different numbers. For example, you may see msi file errors like this:
- Error 1723
- Internal Error 2203
- System error 2147287035
- Error "This installation package cannot be opened"
- Error 1603: A fatal error occurred during installation
In all these cases, setting the rights to the file and / or to some system folders should help. Check if "system" has access to the temporary files folder (you may get the error "The system cannot open the specified device or file"). For this:


After pressing "Enter" the path will change to "normal" and you will be moved to the real temporary folder. The rights to it also should be checked. I also recommend clearing temporary folders from everything that has accumulated there, or even better, delete them and create new ones with the same names. If you can't delete the folder, read , but it's not necessary.
If the Windows Installer service still does not want to work, then check the rights to the folder "C:\Config.Msi", here "system" must also have full access. In this case, you may have observed the "Error 1310" error. Just in case, make sure that the folder WHERE you install the software also has all the rights.
Registry settings and services
The next way to fix the error is to restore the operating parameters in the registry of the Windows Installer.
To do this, download the archive and run two reg-files from there, according to your version of Windows. Agree to import settings.
Important! Before the last action, preferably! If the method does not help or gets worse, you can recover to the previous state.
On Windows XP or Windows Server 2000, install the latest 4.5 installer.
If it doesn’t help, then re-register the components:
- Press "Win + R" and type " cmd". Then in the black window, enter the following commands in sequence:
MSIExec /unregister
MSIExec /regserver - The answer should be empty, no errors. If the problem is not solved, enter another command
regsvr32 msi.dll - close the black window
If it says that there are not enough rights, then you need to run .
If the commands were executed, but did not help, then run msi_error.bat from the archive, check the result.
The last option is to download the Kerish Doctor program, it has a feature to fix the installer service and many other common Windows problems.
Also, many programs use the .NET Framework, so it will not be superfluous to install the latest version of this package. And, finally, one more piece of advice: if there is at least one folder with a space at the beginning of the name in the path to the distribution file, then remove the space. This simple trick will solve your problem 🙂
Summarizing
Errors with the Windows installer are very unpleasant, there are a lot of them and it is not immediately clear where to dig. One thing is clear - the system has failed and needs to be restored to working condition. Sometimes nothing helps and you have to. However, do not rush to do this, try asking for help on this forum. Describe your problem exactly, tell us what you have already done, what messages you received, and maybe they will help you! After all, the world is not without good people 🙂
Purpose of msi.dll
The msi.dll file is required to install Microsoft Installer (MSI) packages. If this file is removed, the Windows Installer will not work.
In this article, we will be discussing the msi.dll error instance on a Windows computer and its solution.
Msi.dll error in Windows
When you try to install any Windows Installer program on a Windows computer, you may receive an error message similar to the one presented here:
“MSIEXEC.EXE file is associated with missing MSI.DLL:222 export.”
After pressing the button OK, another error message similar to the one mentioned below appears:
“Cannot start C:\Windows\System\MSIEXEC.EXE device connected to the system that is not working.”
Cause of error
This issue occurs if the Windows Installer files on the computer try to update the Windows File Installer.
Permission
When the problem described above occurs, the first thing you need to do is restart your computer and try to install the Windows Office program again. If the Windows Installer has promoted the files, or the files are not copied to their correct location. Instead, they are first copied to a temporary folder. Only when you restart your computer are the files copied to the appropriate folder. To resolve this error message, follow these steps.
Task 1 - Download the Windows Update Installer
- Click the link button and click the button Download located next to InstMsiA.exe.
- save file on your desktop.
Task 2 - Rename the Windows Installer files
- Go to menu Start and select Turn off computer.
- Next, click the button Restart your computer in MS-DOS mode, and then click the button OK .
- Type the following commands at the command prompt and press Enter after each command to execute them. cd system
ren msi.dll msi.old
ren msihnd.dll msihnd.old
ren msiexec.exe msiexec.old
exit - Restart Windows.
Task 3 - Start Windows in Safe Mode
- Click the button Start and select the item Turn off computer.
- Next, click the button Reload and press the button OK.
- Press and hold the button SHIFT when the window is reloaded.
Task 4 - Installing the Windows Update Installer for Windows
- Double click on the file InstMsiA.exe saved on the desktop.
- Next, follow the instructions on the screen to complete the installation process.
- Finally, restart your computer.
If the registry asks questions which cause DLL errors such as msi.dll errors?
Yes, they do this because the registry is actually messed up or corrupted, which is often the cause of a common DLL error. Entries related to DLL files are stored in the registry. You may receive recurring DLL errors if entries related to DLL files are corrupted or missing. Fixes for DLL errors such as msi.dll errors that cause registry issues. Scan the registry using an effective registry cleaner such as RegGenie. This is a powerful tool that allows you to perform a custom registry scan to fix DLL errors.
MSI.DLL - Is it a security file?
Yes, true msi.dll is a security file from Microsoft. However, several instances of malware use a file named msi.dll. To determine msi.dll on your computer is not a system threat, scan your entire Windows computer using reliable and effective security tools.
You can use the msiexec command with command line options to invoke the install or uninstall procedure. The parameters of the msiexec command are passed information that is typically specified during an interactive installation using WebSphere MQ installation panels. To do this, enter the following command at the command prompt along with the required options: msiexec [options]
When running WebSphere MQ on Windows ® Vista or Windows Server 2008 systems with User Account Control (UAC) enabled, silent installation or uninstallation must be run from an elevated command prompt. To do this, right-click to launch Command Prompt and select Run as administrator. If you try to run a non-interactive install or uninstall without elevated user privileges, you will see error AMQ4353 in the installation log.
The msiexec command supports two types of command line options:
You must first specify the command-line options in the msiexec command, and then the property=value pairs.
If a parameter is specified on both the command line and in the response file, the value on the command line takes precedence.
An example of using the msiexec command: msiexec /i "" /l*v c:\install.log /m mif-file TRANSFORMS="1033.mst" AGREETOLICENSE="yes" ADDLOCAL="Server" where: /i "path \MSI\IBM WebSphere MQ.msi" Installing the product using the specified .msi file. /l*v c:\install.log Generates an install.log log file containing information about the installation. /m mif-file Create a Microsoft® System Management Server (SMS) state file, .mif: mif-file . TRANSFORMS="1033.mst" Specifies that the installation is in English (United States). For more information about other languages, see Using transformations for the msiexec command. AGREETOLICENSE="yes" Accept the license terms. ADDLOCAL="Server" Installs the server component locally.
| Parameter | Options | Description |
|---|---|---|
| /a | Plastic bag | Administrative installation of the product over the network, i.e. installing the original application image, similar to the image on the CD. |
| /i | plastic bag|code of product | Install or configure the product using the specified .msi file. WebSphere MQ Windows installer package: IBM WebSphere MQ.msi . |
| /j | package| |
Product alert. This option ignores all property values specified on the command line. u Notify current user m Notify all users on this system g Language ID t Apply transformation to package |
| /l | log-file |
Specifies the path to the log file, as well as flags that indicate information to be logged. i Status messages w Fatal warnings e All error messages a Running actions r Action records u User prompts c Initial user interface settings m Low memory or fatal exit information o Low disk space messages p Terminal properties v Verbose output + Information added to existing file ! Each line is logged * All information except for the v option is logged. To log all information, including the v option, specify "/l*v" |
| /q | n|b|r|f | The level of user interface displayed during installation. q, qn No user interface. Non-interactive installation without user interface. qb Main user interface. Displays built-in dialog boxes with status messages qr Reduced user interface, displays a modal dialog box at the end of installation. qf Full user interface, a modal dialog box is displayed at the end of the installation. qn+ No user interface, a modal dialog box is displayed at the end of installation. qb+ Main user interface, a modal dialog box is displayed at the end of installation. The modal window is not displayed if the user canceled the installation. qb - Main user interface without modal windows. Note that the /qb+- UI level is not supported. |
| /x | plastic bag|code of product | Removing a product. |
|
||
In the tables Using an answer file with the msiexec command.
"". Continue installation and update the target system (default).
- tutorial
Good day, Habr! I want to present an interesting, in my opinion, way to create msi-installers for any software and, as a result, deploy it using GPO tools. I emphasize that the described method does not imply the creation of "casts" of the system, but uses native software installers, and only free products for commercial use are used to create msi.
Introduction, a couple of links and a disclaimer
Each normal software installer has the ability to automatically install with certain or default parameters. The essence of my method is simple and consists in packing the native installer into an msi "container" and running it with the necessary command line parameters. There is a lot of information on the network on the automatic installation of this or that application, and I will not focus on this. Our goal, I repeat, is installing software using group policies. By the way, some of you may argue that installation can be done through ZAW, but, unfortunately, this method is only applicable for installation with the rights of the current user and cannot be used for centralized automatic installation of applications.An interesting series of articles on installing software through the GPU. For beginners, I recommend reading everything so that you don’t ask later what is the difference between the “assigned” and “public” installation types.
Required software. Exe to MSI Converter freeware and the well-known orca The first is needed in order to create an msi from an exe, and the second so that the resulting msi nickname can be installed through group policies.
The method does not claim to be completely unique and in some places there may be excesses that could be avoided, but this is due to the lack of desire and the need to delve too deeply into the parameters of the msi-package tables. The initial goal was to quickly find a free way to create msi and after several hours spent reading foreign forums and endless reboots of the virtual machine, the method was found. Also, the article is not a review of the program interface, and you will not see screenshots.
Creating and preparing a package
An installation example will be produced for Mozilla Firefox, since this is a well-known product that does not have an msi installer from the developers.- Run exe to msi and specify the path to the firefox exe installer in it. According to the information previously found on the network, it becomes clear that you can quietly install the firelis with the parameters -ms -ira. We specify them in the second field exe to msi and click "Build MSI".
- It would seem that everything, the msi-package is ready. Indeed, by running the resulting result, we will get the firefox installed in the system, and the article could be put to rest. Unfortunately, not everything is so simple. The current installation package is not suitable for deployment via GPO, and when you boot your computer, you will receive completely unexplainable errors in the logs “an unrecoverable error occurred ...” And the thing is that the developers of exe to msi also want to eat and their free product generates msi "not by the rules".
- Well, let's take an orca and open our emcian in it.
- First of all, we find the table in the left list property and pay attention to two fields - product code And UpgradeCode. These two fields must be unique for each product, and our exe to msi generates always the same. Well, it doesn't matter, click on the top menu View -> Summary Information, find the field package code and click New GUID. The resulting result is copied to the clipboard and pasted into product code. Repeat for UpgradeCode and finally for myself package code. Right there in Summary Information edit the field Title on Mozilla Firefox, the rest is optional. It basically doesn't affect anything.
- Again in the table property me Product Name on Mozilla Firefox (I change a lot ARPCONTACT And manufacturer). You can also set the correct value for ProductVersion.
- It seems that the GUID and other "IDs" have changed, but as practice shows, this is not enough. Click in orca Tools –> Validate, take off the bird Show INFO Messages and press go.
- As you can see, a bunch of errors came out for the presence / absence of some tables and values. I didn’t bother and just took the first small msi that came across (7zip x64 9.20) and copied the 4 missing tables from there (via Export-Import, of course): _Validation, AdminExecuteSequence, AdminUISequence and AdvtExecuteSequence. In fact, I am sure that it is possible to create a "correct" msi installer, without unnecessary garbage, but do not forget, our goal is just to run the application's native setup in silence.
- After adding tables, go through again Tools –> Validate(by the way, the first time you can skip the check at all and immediately import the tables). If you also took msi from 7zip as a basis, then the result will be six errors that need to be eliminated. Click close, delete extra fields marked in red.
- At the end, you can check the validation again and make sure that only non-interfering warnings remain. Save msi.
- That's basically all, it remains to add msi to the GPU and assign the necessary properties.
Nuances
- When installing by the method described above, you will have, as it were, two copies of the software. The first is the actual application you need, and the second is the original msi-nickname, because we sort of installed it. In principle, this does not affect anything, except for the display in "Add or Remove Programs", and then only in Windows XP (if you have not changed anything other than what I have indicated). The downside may be the appearance of unnecessary programs during automatic software inventory, if you use it.
- You will not be able to automatically uninstall the application using the same deployment tools. More precisely it will turn out, but only the unnecessary msi-container will be deleted. Well, you can tinker with the msi properties when creating it, so that it takes the previously installed application with it, also quietly. I did not set such a task.
- When installing software updates, you need to specify in the application's GPU properties that it replaces the previous one, that is, it must first delete the old one. This ensures that you will not have those same left-handed duplicates of applications in “installing and removing programs” that have not given up to anyone.
- To install an application that has a distribution of several files, you will first have to pack it into an exe, which will unpack itself on startup and give a command for silent installation. I recommend creating sfx archives using the same 7-zip.
- Nothing prevents you from installing software through startup scripts. Moreover, this method is more flexible, and I have been using it for a long time through my scripts. That's just the use of native GPU tools is much faster, because a simple creation of msi from exe takes a couple of minutes.
- Windows 7 for some reason doesn't say "Installing a managed application..." but just says "please wait". When deploying a whole bunch of software at once for the first time, or when installing a heavy application, this can induce the user to call the admin or press the reset button.
Not infrequently, when trying to remove a program, users are faced with the fact that the program is not removed. When trying to start the uninstallation of the program through the "Control Panel", the user receives an error that interrupts the uninstallation process. After that, the program remains on the computer.
If you also don't know how to uninstall a program that won't uninstall, then this article should help you. Here we will look at three simple and effective ways to solve this problem.
Method number 1. Stop all processes that are associated with the program.
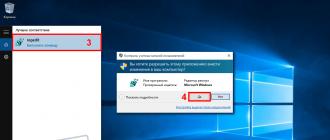
If the program is not removed, then most likely it is currently running. In order to stop the program, open " " (for example, using the key combination CTRL + SHIFT + ESC) and go to the list of processes. In the list of processes, you need to find those processes that are associated with the program and stop them.
If you have Windows 8 or Windows 10, then you need to right-click on the process you want to end and select End task from the menu that appears. In Windows 7 and older versions of Windows, the menu item you want will be called End Process.
After all processes associated with the program are stopped, you need to try again to uninstall the program. If this method did not help to remove the program, then try restarting your computer and try again. Perhaps something has hung up on you and thus blocked the removal of the program.
Method number 2. Use a special program to remove programs.
If the program is not removed even after a reboot, then you can try to remove it using a special program. The most popular program of this kind is . This program allows you to remove any other programs. At the same time, uninstallation is possible even in cases where the uninstaller does not work or the program is not displayed in the control panel.
Using Revo Uninstaller is quite simple. First you need to run this program and wait until it scans your computer and displays all installed programs. After that, you need to right-click on the program you want to remove and select "Uninstall".

After that, a window will appear in which you need to select a method for uninstalling the program. In most cases, the "Moderate" option will do.

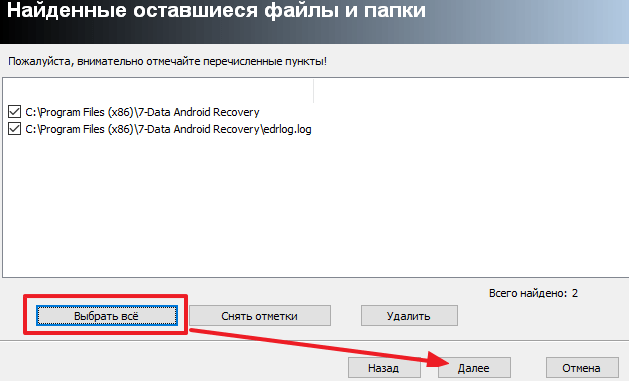
Here you can click on the "Select All" button and confirm the deletion by clicking on the "Next" button.
Method number 3. Remove the program through safe mode.
If none of the above helps to remove the program, then you need to boot the computer into and try again.
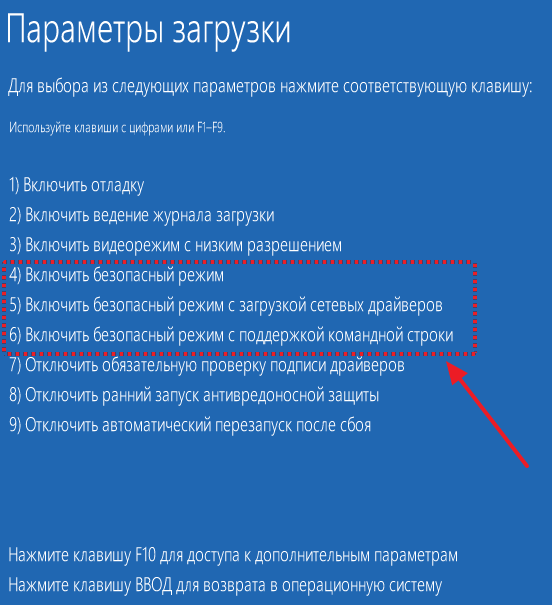
In safe mode, only the main components of the operating system are loaded; other programs that can block uninstallation are not loaded. Therefore, in safe mode, the removal should go without problems.